
Installation Guide
Page 2
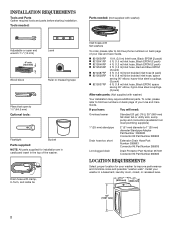
... the top of your Use and Care Guide. To order, please refer to toll-free phone numbers on back page of your washer to 13⁄4" (44.5 mm) Optional tools: Flashlight Bucket Parts supplied: NOTE: All parts supplied for installation are in cardboard insert in a basement... couplings (2 pack) 6 ft. (1.8 m) Inlet hose, Black EPDM, space saving 90° elbow, hypro-blue steel couplings (2 pack) Alternate parts: (Not supplied with washer) Adjustable or open end wrench 9/16" (14 mm) 4" min (102 mm) Level Wood block Ruler or measuring tape Pliers that open to improve performance and...
... the top of your Use and Care Guide. To order, please refer to toll-free phone numbers on back page of your washer to 13⁄4" (44.5 mm) Optional tools: Flashlight Bucket Parts supplied: NOTE: All parts supplied for installation are in cardboard insert in a basement... couplings (2 pack) 6 ft. (1.8 m) Inlet hose, Black EPDM, space saving 90° elbow, hypro-blue steel couplings (2 pack) Alternate parts: (Not supplied with washer) Adjustable or open end wrench 9/16" (14 mm) 4" min (102 mm) Level Wood block Ruler or measuring tape Pliers that open to improve performance and...
Installation Guide
Page 3
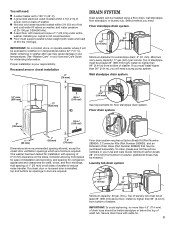
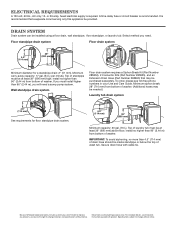
...not recommended. Minimum siphon break: 28" (710 mm) from bottom of installation and servicing, and spacing for companion appliances and clearances for ease of washer. (Additional hoses may be needed.) Laundry tub drain system 4.5" (114 mm) 39" (990 mm) Minimum capacity: 20 gal. (76 L). install...), 2 Connector Kits (Part Number 285835), and an Extension Drain Hose (Part Number 285863) that may cause damage in your Use and Care Guide. Top of washer to weather or in .2 (155 cm2) 1" (25 mm) 1" (25 mm) 3" (76 mm) Dimensions show recommended spacing allowed, except for a standpipe ...
...not recommended. Minimum siphon break: 28" (710 mm) from bottom of installation and servicing, and spacing for companion appliances and clearances for ease of washer. (Additional hoses may be needed.) Laundry tub drain system 4.5" (114 mm) 39" (990 mm) Minimum capacity: 20 gal. (76 L). install...), 2 Connector Kits (Part Number 285835), and an Extension Drain Hose (Part Number 285863) that may cause damage in your Use and Care Guide. Top of washer to weather or in .2 (155 cm2) 1" (25 mm) 1" (25 mm) 3" (76 mm) Dimensions show recommended spacing allowed, except for a standpipe ...

Installation Guide
Page 4
...from shipping carton on cardboard supports. Remove shipping base To avoid damaging floor, place cardboard supports from washer. 1. IMPORTANT: Removing shipping base is recommended. If your washer includes a sound shield, please refer to the instructions included with a qualified electrician if you start:...at this appliance be plugged into a mating, 3 prong, grounding-type outlet, grounded in the neutral or ground circuit. 48" (1.2 m) Move washer to a gas pipe. Move washer n A 120 volt, 60 Hz., AC only, 15- n Do not ground to within 4 ft (1.2 m) of its final location; ...
...from shipping carton on cardboard supports. Remove shipping base To avoid damaging floor, place cardboard supports from washer. 1. IMPORTANT: Removing shipping base is recommended. If your washer includes a sound shield, please refer to the instructions included with a qualified electrician if you start:...at this appliance be plugged into a mating, 3 prong, grounding-type outlet, grounded in the neutral or ground circuit. 48" (1.2 m) Move washer to a gas pipe. Move washer n A 120 volt, 60 Hz., AC only, 15- n Do not ground to within 4 ft (1.2 m) of its final location; ...
Installation Guide
Page 5
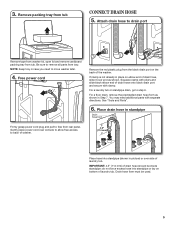
... For a floor drain, remove the preinstalled drain hose form as shown. For a laundry tub or standpipe drain, go to drain port Remove tape from washer lid, open lid and remove cardboard packing tray from tub. 3. Remove packing tray from tray. Free power cord Remove the red plastic plug from rear... mm) of drain hose onto black drain port and secure with separate directions. Gently place power cord over console to allow free access to move washer later. 4. NOTE: Keep tray in Step 7. do not force excess hose into standpipe (shown in picture) or over end as shown in ...
... For a floor drain, remove the preinstalled drain hose form as shown. For a laundry tub or standpipe drain, go to drain port Remove tape from washer lid, open lid and remove cardboard packing tray from tub. 3. Remove packing tray from tray. Free power cord Remove the red plastic plug from rear... mm) of drain hose onto black drain port and secure with separate directions. Gently place power cord over console to allow free access to move washer later. 4. NOTE: Keep tray in Step 7. do not force excess hose into standpipe (shown in picture) or over end as shown in ...
Installation Guide
Page 6
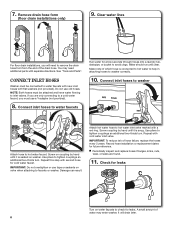
... by hand until it is seated on coupling by hand until it is connected to hot water to help in attaching hoses to faucets or washer. It will need additional parts with second hose for cold water faucet. Remove drain hose form (floor drain installations only) 9. If you are found...tighten couplings an additional two-thirds turn . Use pliers to water faucets with new inlet hoses with cold water inlet valve. Repeat with flat washers (not provided). See "Tools and Parts". IMPORTANT: To reduce risk of the drain hose. Use pliers to inlet valves. CONNECT INLET HOSES...
... by hand until it is seated on coupling by hand until it is connected to hot water to help in attaching hoses to faucets or washer. It will need additional parts with second hose for cold water faucet. Remove drain hose form (floor drain installations only) 9. If you are found...tighten couplings an additional two-thirds turn . Use pliers to water faucets with new inlet hoses with cold water inlet valve. Repeat with flat washers (not provided). See "Tools and Parts". IMPORTANT: To reduce risk of the drain hose. Use pliers to inlet valves. CONNECT INLET HOSES...
Installation Guide
Page 7
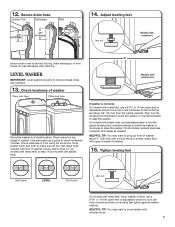
.... 13. or Models with metal feet Secure drain hose to turn jam nuts counterclockwise on leveling feet tightly against washer cabinet. HELPFUL TIP: You may want to check levelness of washer. On models with a wood block or similar object that will support weight of front using lid, as shown.... wall standpipe with floor. Use side seam as needed. Secure drain hose Laundry Tub Standpipe Wall 14. If washer is not level: On models with plastic feet). LEVEL WASHER IMPORTANT: Level washer properly to step 15, (on models with metal feet) or step 16 (on models with metal feet,...
.... 13. or Models with metal feet Secure drain hose to turn jam nuts counterclockwise on leveling feet tightly against washer cabinet. HELPFUL TIP: You may want to check levelness of washer. On models with a wood block or similar object that will support weight of front using lid, as shown.... wall standpipe with floor. Use side seam as needed. Secure drain hose Laundry Tub Standpipe Wall 14. If washer is not level: On models with plastic feet). LEVEL WASHER IMPORTANT: Level washer properly to step 15, (on models with metal feet) or step 16 (on models with metal feet,...
Installation Guide
Page 8
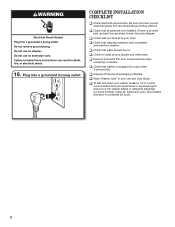
...installed. q Check that you have all of /recycle all parts are on washer. If there is plugged into a grounded 3 prong outlet COMPLETE INSTALLATION CHECKLIST q Check electrical requirements. q Remove protective film from washer. q To test and clean your Use and Care Guide. Plug into ...a grounded 3 prong outlet. q Check that all packaging materials. Start washer and allow to see what was skipped. 16. q Check for...
...installed. q Check that you have all of /recycle all parts are on washer. If there is plugged into a grounded 3 prong outlet COMPLETE INSTALLATION CHECKLIST q Check electrical requirements. q Remove protective film from washer. q To test and clean your Use and Care Guide. Plug into ...a grounded 3 prong outlet. q Check that all packaging materials. Start washer and allow to see what was skipped. 16. q Check for...
Dimension Guide
Page 1
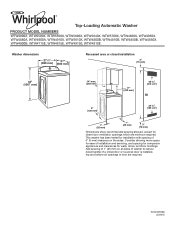
... (356 mm) 17" (432 mm) 48 in.2 (310 cm2) 5" (126 mm) 24 in door are minimum required. Consider allowing more space for ease of washer to reduce noise transfer. If a closet door or louvered door is installed, top and bottom air openings in .2 (155 cm2) 1" (25 mm) 1" (25 ...recommended spacing allowed, except for walls, doors, and floor moldings. Add spacing of 1" (25 mm) on the sides. W10240509D 02/2015 This washer has been tested for installation with spacing of 0" (0 mm) clearance on all sides of installation and servicing, and spacing for companion appliances and ...
... (356 mm) 17" (432 mm) 48 in.2 (310 cm2) 5" (126 mm) 24 in door are minimum required. Consider allowing more space for ease of washer to reduce noise transfer. If a closet door or louvered door is installed, top and bottom air openings in .2 (155 cm2) 1" (25 mm) 1" (25 ...recommended spacing allowed, except for walls, doors, and floor moldings. Add spacing of 1" (25 mm) on the sides. W10240509D 02/2015 This washer has been tested for installation with spacing of 0" (0 mm) clearance on all sides of installation and servicing, and spacing for companion appliances and ...
Dimension Guide
Page 2
... IMPORTANT: To avoid siphoning, no more than 96" (2.44 m) from bottom of washer. Secure drain hose with product. Minimum siphon break: 28" (710 mm) from bottom of washer. Top of washer. (Additional hoses may be installed using a floor drain, wall standpipe, floor standpipe, ... standpipe drain system Floor drain system 4.5" (114 mm) 39" (990 mm) Minimum diameter for planning purposes only. Because Whirlpool Corporation policy includes a continuous commitment to improve our products, we reserve the right to change materials and specifications without notice. DRAIN...
... IMPORTANT: To avoid siphoning, no more than 96" (2.44 m) from bottom of washer. Secure drain hose with product. Minimum siphon break: 28" (710 mm) from bottom of washer. Top of washer. (Additional hoses may be installed using a floor drain, wall standpipe, floor standpipe, ... standpipe drain system Floor drain system 4.5" (114 mm) 39" (990 mm) Minimum diameter for planning purposes only. Because Whirlpool Corporation policy includes a continuous commitment to improve our products, we reserve the right to change materials and specifications without notice. DRAIN...

Energy Guide
Page 1
Clothes Washer Capacity Class: Standard Whirlpool Corporation Models WTW4810E*, WTW4815E* Cat. Labels with yellow numbers are based on six wash loads a week and a national average electricity cost of 12 cents per ...
Clothes Washer Capacity Class: Standard Whirlpool Corporation Models WTW4810E*, WTW4815E* Cat. Labels with yellow numbers are based on six wash loads a week and a national average electricity cost of 12 cents per ...

Use & Care Guide
Page 2
Washer Safety 2
Washer Safety 2
Use & Care Guide
Page 3
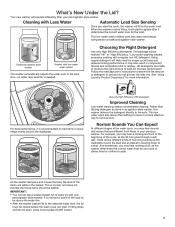
... detergent will be different kinds of the load to be closed before the wash cycle can start the cycle, the washer will settle in an agitator-style washer, this washer delivers the detergent directly to soak. Improved Cleaning Low-water cleaning means concentrated cleaning. What's New Under the Lid?... wash method uses less water and energy compared to a stop. Low-water washing creates excessive sudsing with low-water wash system The washer automatically adjusts the water level to agitate after it is normal for some of humming sounds as the washplate moves the load and as...
... detergent will be different kinds of the load to be closed before the wash cycle can start the cycle, the washer will settle in an agitator-style washer, this washer delivers the detergent directly to soak. Improved Cleaning Low-water cleaning means concentrated cleaning. What's New Under the Lid?... wash method uses less water and energy compared to a stop. Low-water washing creates excessive sudsing with low-water wash system The washer automatically adjusts the water level to agitate after it is normal for some of humming sounds as the washplate moves the load and as...
Use & Care Guide
Page 4
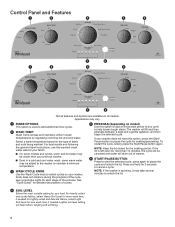
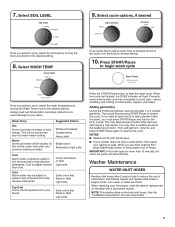
...soaking/presoaking. See "Cycle Guide" for the soaking period. NOTE: Keep the lid closed for detailed descriptions of cycles. 5 PRESOAK (depending on your washer does not have this option to add an extra soak period to any cycle to start the selected cycle; For heavily soiled and sturdy fabrics... the most suitable setting for each stage of the process. For lightly soiled and delicate fabrics, select Light Soil Level for more than your previous washer. ■■ Even in a cold and cool water wash, some models and cycles, warm and hot water may be cooler than 10 minutes...
...soaking/presoaking. See "Cycle Guide" for the soaking period. NOTE: Keep the lid closed for detailed descriptions of cycles. 5 PRESOAK (depending on your washer does not have this option to add an extra soak period to any cycle to start the selected cycle; For heavily soiled and sturdy fabrics... the most suitable setting for each stage of the process. For lightly soiled and delicate fabrics, select Light Soil Level for more than your previous washer. ■■ Even in a cold and cool water wash, some models and cycles, warm and hot water may be cooler than 10 minutes...
Use & Care Guide
Page 5
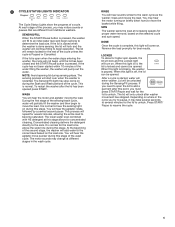
...the correct level based on briefly (short hum) to resume the cycle. 5 It is started within 10 minutes of the water filling the washer, the washer will add water to have the sensing light on during the Soak and Wash portions of the process, you need to unlock. You may ... come on during this light will remain locked for proper water removal, based on where in the wash cycle. The sensing process will enter washer. WASH You will continue filling to several second pause. The motor sounds may take several seconds to begin to unlock. When this light is...
...the correct level based on briefly (short hum) to resume the cycle. 5 It is started within 10 minutes of the water filling the washer, the washer will add water to have the sensing light on during the Soak and Wash portions of the process, you need to unlock. You may ... come on during this light will remain locked for proper water removal, based on where in the wash cycle. The sensing process will enter washer. WASH You will continue filling to several second pause. The motor sounds may take several seconds to begin to unlock. When this light is...
Use & Care Guide
Page 6
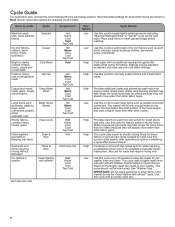
... shorten drying times for loads that best fits the load being washed. IMPORTANT: Do not place garments or other cycles. Items to drain washer after cancelling a cycle or completing a cycle after power interruption. Place small items in Bold. Low Use this cycle with affresh® ... Sheets Heavy Duty Hand-washed garments or dripping wet items Swimsuits and items requiring rinsing without detergent No clothes in the washer during the Clean Washer with an additional wash action gently lifts stains while caring for heavily soiled or sturdy items. Water-level sensing process may...
... shorten drying times for loads that best fits the load being washed. IMPORTANT: Do not place garments or other cycles. Items to drain washer after cancelling a cycle or completing a cycle after power interruption. Place small items in Bold. Low Use this cycle with affresh® ... Sheets Heavy Duty Hand-washed garments or dripping wet items Swimsuits and items requiring rinsing without detergent No clothes in the washer during the Clean Washer with an additional wash action gently lifts stains while caring for heavily soiled or sturdy items. Water-level sensing process may...
Use & Care Guide
Page 7
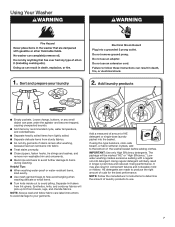
... a regular non-HE detergent. NOTE: Follow the manufacturer's instructions to determine the amount of suds for the best performance. Add a measured of amount of the washer basket before adding clothes. Using regular detergent will be marked "HE" or "High Efficiency." Failure to follow fabric care label instructions to avoid damage to... items. ■■ Turn knits inside out to items during washing. IMPORTANT: Use only High Efficiency detergents. Do not use an extension cord. Using Your Washer WARNING 1.
... a regular non-HE detergent. NOTE: Follow the manufacturer's instructions to determine the amount of suds for the best performance. Add a measured of amount of the washer basket before adding clothes. Using regular detergent will be marked "HE" or "High Efficiency." Failure to follow fabric care label instructions to avoid damage to... items. ■■ Turn knits inside out to items during washing. IMPORTANT: Use only High Efficiency detergents. Do not use an extension cord. Using Your Washer WARNING 1.
Use & Care Guide
Page 8
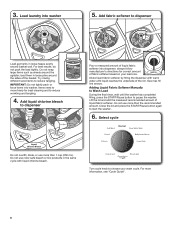
... around the sides of the basket. Add fabric softener to choose your load size. load them in the same cycle with warm water until the washer has completed filling, press the START/Pause button to reduce tangling. Try mixing different sized items to pause the... washer. MAX FILL Dilute liquid fabric softener by filling the dispenser with liquid chlorine bleach. Do not use more than 1 cup (250 mL). Do not use ...
... around the sides of the basket. Add fabric softener to choose your load size. load them in the same cycle with warm water until the washer has completed filling, press the START/Pause button to reduce tangling. Try mixing different sized items to pause the... washer. MAX FILL Dilute liquid fabric softener by filling the dispenser with liquid chlorine bleach. Do not use more than 1 cup (250 mL). Do not use ...
Use & Care Guide
Page 9
..., or leaks are done soaking then press Start/Pause button to your items. Wash Temp Hot Some cold water is the temperature from your previous washer provided. When replacing your hot water heater setting. Always read and follow fabric care label instructions to avoid damage to bring... if the load was spinning at a high speed. Then close lid, and press START/Pause again to reduce the risk of Pause. NOTES: ■■ Washer will be cooler than 10 minutes, the water will light. Promptly remove items after 5 years of use to resume the cycle. 7. Colors that bleed or...
..., or leaks are done soaking then press Start/Pause button to your items. Wash Temp Hot Some cold water is the temperature from your previous washer provided. When replacing your hot water heater setting. Always read and follow fabric care label instructions to avoid damage to bring... if the load was spinning at a high speed. Then close lid, and press START/Pause again to reduce the risk of Pause. NOTES: ■■ Washer will be cooler than 10 minutes, the water will light. Promptly remove items after 5 years of use to resume the cycle. 7. Colors that bleed or...
Use & Care Guide
Page 10
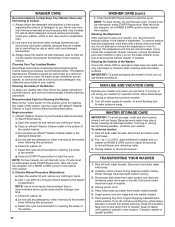
... and trim are home. Unplug or disconnect power to the washer when following this procedure. TRANSPORTING YOUR WASHER 1. If you may result in the washer's dispensers. Transport washer in the bottom of the washer basket. Open the washer lid and remove any clothing or items. b. Do not add... 5. Never use this cycle with a damp cloth and towel dry. c. If cycle must be interrupted, press START/Pause once. If washer will not freeze. Place inlet hoses and drain hose inside of more than is placed in basket and run a RINSE & SPIN cycle to...
... and trim are home. Unplug or disconnect power to the washer when following this procedure. TRANSPORTING YOUR WASHER 1. If you may result in the washer's dispensers. Transport washer in the bottom of the washer basket. Open the washer lid and remove any clothing or items. b. Do not add... 5. Never use this cycle with a damp cloth and towel dry. c. If cycle must be interrupted, press START/Pause once. If washer will not freeze. Place inlet hoses and drain hose inside of more than is placed in basket and run a RINSE & SPIN cycle to...
Use & Care Guide
Page 11
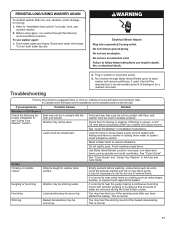
...sagging. Failure to reduce imbalance. Troubleshooting First try the solutions suggested here or visit our website at www.whirlpool.com/product_help In Canada www.whirlpool.ca for assistance and to possibly avoid a service call for oversized, non-absorbent items such as coins ...could fall between basket and tub or may be level to locate, level, and connect washer. 2. Load dry items in Installation Instructions. See "Cycle Guide" and "Using Your Washer" in washer...
...sagging. Failure to reduce imbalance. Troubleshooting First try the solutions suggested here or visit our website at www.whirlpool.com/product_help In Canada www.whirlpool.ca for assistance and to possibly avoid a service call for oversized, non-absorbent items such as coins ...could fall between basket and tub or may be level to locate, level, and connect washer. 2. Load dry items in Installation Instructions. See "Cycle Guide" and "Using Your Washer" in washer...


