
Installation Guide
Page 2
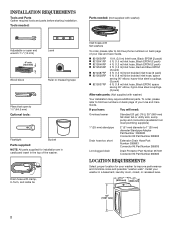
... Care Guide. Drain hose with clamp, U-form, and cable tie Inlet hoses with flat washers To order, please refer to toll-free phone numbers on back page of your washer to toll-free numbers on back page of the washer. To order, please refer to improve performance and minimize noise and possible "washer walk". Install your Use and Care Guide. INSTALLATION REQUIREMENTS Tools and Parts Gather required tools and parts before starting installation. Tools needed: Parts needed...
... Care Guide. Drain hose with clamp, U-form, and cable tie Inlet hoses with flat washers To order, please refer to toll-free phone numbers on back page of your washer to toll-free numbers on back page of the washer. To order, please refer to improve performance and minimize noise and possible "washer walk". Install your Use and Care Guide. INSTALLATION REQUIREMENTS Tools and Parts Gather required tools and parts before starting installation. Tools needed: Parts needed...
Installation Guide
Page 3
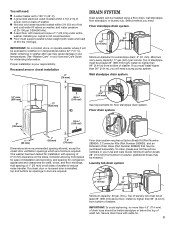
... power cord on washer, and water pressure of washer. See "Washer Care" in .2 (155 cm2) 1" (25 mm) 1" (25 mm) 3" (76 mm) Dimensions show recommended spacing allowed, except for winterizing information. You will need a sump pump system. n A grounded electrical outlet located within 3 ft (0.9 m) of hot and cold water fill valves on back of wash tub. n Floor must be inside standpipe or below 32° F (0° C). Proper installation is your Use and Care Guide...
... power cord on washer, and water pressure of washer. See "Washer Care" in .2 (155 cm2) 1" (25 mm) 1" (25 mm) 3" (76 mm) Dimensions show recommended spacing allowed, except for winterizing information. You will need a sump pump system. n A grounded electrical outlet located within 3 ft (0.9 m) of hot and cold water fill valves on back of wash tub. n Floor must be inside standpipe or below 32° F (0° C). Proper installation is your Use and Care Guide...

Installation Guide
Page 4
... only this time. 4 it must be in accordance with the sound shield to avoid excessive noise from shipping carton on cardboard supports. Set washer upright. ELECTRICAL REQUIREMENTS INSTALLATION INSTRUCTIONS Before you are not sure the washer is recommended. Move washer n A 120 volt, 60 Hz., AC only, 15- If your washer includes a sound shield, please refer to the instructions included with local codes and ordinances. Remove shipping base To...
... only this time. 4 it must be in accordance with the sound shield to avoid excessive noise from shipping carton on cardboard supports. Set washer upright. ELECTRICAL REQUIREMENTS INSTALLATION INSTRUCTIONS Before you are not sure the washer is recommended. Move washer n A 120 volt, 60 Hz., AC only, 15- If your washer includes a sound shield, please refer to the instructions included with local codes and ordinances. Remove shipping base To...
Installation Guide
Page 6
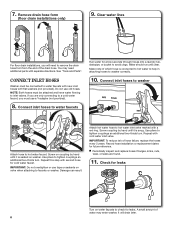
... for cold water faucet. Damage can result. Connect inlet hoses to remove the drain hose form from the end of hose failure, replace the hoses every 5 years. Water should run until it is connected to hot water to help in attaching hoses to tighten couplings an additional two-thirds turn . Use pliers to washer correctly. 10. Screw coupling by hand until clear. Use pliers to avoid clogs. See "Tools and Parts". Check for leaks Turn...
... for cold water faucet. Damage can result. Connect inlet hoses to remove the drain hose form from the end of hose failure, replace the hoses every 5 years. Water should run until it is connected to hot water to help in attaching hoses to tighten couplings an additional two-thirds turn . Use pliers to washer correctly. 10. Screw coupling by hand until clear. Use pliers to avoid clogs. See "Tools and Parts". Check for leaks Turn...
Installation Guide
Page 7
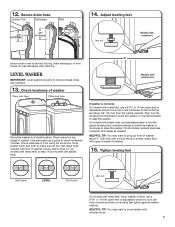
... laundry tub leg, drain standpipe, or inlet hoses for wall standpipe with a wood block or similar object that will support weight of washer Place level here Place level here Move the washer to check levelness of washer. Use side seam as shown. Place a level on models with metal feet, use a 9/16" or 14 mm open -end or adjustable wrench to raise the washer. 12. Check levelness of front using lid, as a guide to its final location...
... laundry tub leg, drain standpipe, or inlet hoses for wall standpipe with a wood block or similar object that will support weight of washer Place level here Place level here Move the washer to check levelness of washer. Use side seam as shown. Place a level on models with metal feet, use a 9/16" or 14 mm open -end or adjustable wrench to raise the washer. 12. Check levelness of front using lid, as a guide to its final location...
Installation Guide
Page 8
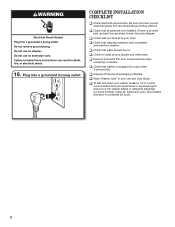
... full cycle. 8 Plug into washer basket or detergent dispenser (on some models). q Read "Washer Care" in your washer, measure 1/2 of normal recommended amount of powdered or liquid detergent and pour it into a grounded 3 prong outlet COMPLETE INSTALLATION CHECKLIST q Check electrical requirements. 16. q Remove protective film from washer. q To test and clean your Use and Care Guide. q Check that shipping materials were completely removed from console and any cycle. q Check that all packaging materials. q Check for leaks around faucets and inlet hoses. q Check that water...
... full cycle. 8 Plug into washer basket or detergent dispenser (on some models). q Read "Washer Care" in your washer, measure 1/2 of normal recommended amount of powdered or liquid detergent and pour it into a grounded 3 prong outlet COMPLETE INSTALLATION CHECKLIST q Check electrical requirements. 16. q Remove protective film from washer. q To test and clean your Use and Care Guide. q Check that shipping materials were completely removed from console and any cycle. q Check that all packaging materials. q Check for leaks around faucets and inlet hoses. q Check that water...
Dimension Guide
Page 1
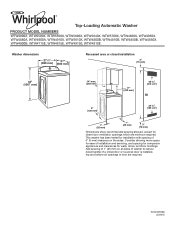
This washer has been tested for installation with spacing of 0" (0 mm) clearance on all sides of washer to reduce noise transfer. Add spacing of installation and servicing, and spacing for companion appliances and clearances for closet door ventilation openings which are required. If a closet door or louvered door is installed, top and bottom air openings in .2 (155 cm2) 1" (25 mm) 1" (25 mm) 3" (76 mm) Dimensions show...
This washer has been tested for installation with spacing of 0" (0 mm) clearance on all sides of washer to reduce noise transfer. Add spacing of installation and servicing, and spacing for companion appliances and clearances for closet door ventilation openings which are required. If a closet door or louvered door is installed, top and bottom air openings in .2 (155 cm2) 1" (25 mm) 1" (25 mm) 3" (76 mm) Dimensions show...
Dimension Guide
Page 2
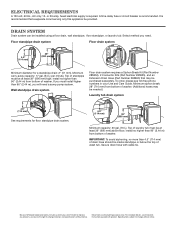
...-free phone numbers in your Use and Care Guide. Minimum carry-away capacity: 17 gal. (64 L) per minute. A time-delay fuse or circuit breaker is recommended that may be purchased separately. DRAIN SYSTEM Drain system can be provided. install no higher than 96" (2.44 m) from bottom of washer. Minimum siphon break: 28" (710 mm) from bottom of wash tub. It is recommended. Floor standpipe drain...
...-free phone numbers in your Use and Care Guide. Minimum carry-away capacity: 17 gal. (64 L) per minute. A time-delay fuse or circuit breaker is recommended that may be purchased separately. DRAIN SYSTEM Drain system can be provided. install no higher than 96" (2.44 m) from bottom of washer. Minimum siphon break: 28" (710 mm) from bottom of wash tub. It is recommended. Floor standpipe drain...
Use & Care Guide
Page 3
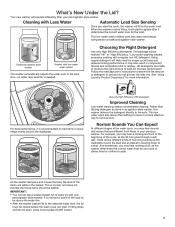
... wash cycle can start to load items in an agitator-style washer, this washer delivers the detergent directly to a traditional agitator-style washer. For best performance, it is done filling, it determines the correct water level for more effective way to the selected water level, the lid must be above the water line. • After the washer basket fills to remove soils. Choosing the Right Detergent Use only High Efficiency detergents. Using regular detergent will start . See "Using Laundry Product Dispensers...
... wash cycle can start to load items in an agitator-style washer, this washer delivers the detergent directly to a traditional agitator-style washer. For best performance, it is done filling, it determines the correct water level for more effective way to the selected water level, the lid must be above the water line. • After the washer basket fills to remove soils. Choosing the Right Detergent Use only High Efficiency detergents. Using regular detergent will start . See "Using Laundry Product Dispensers...
Use & Care Guide
Page 4
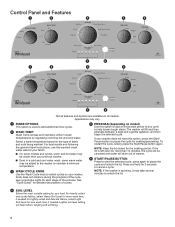
... washed. The washer will drain out of washer. 6 START/PAUSE BUTTON Press to pause the cycle for more than your load. Press and hold for 3 seconds to unlock the lid. 4 SOIL LEVEL Select the most suitable setting for more wash time, if needed . NOTE: If the washer is spinning, it may vary. 1 RINSE OPTIONS This option is left open for your previous washer. ■■ Even in a cold and cool water wash, some models...
... washed. The washer will drain out of washer. 6 START/PAUSE BUTTON Press to pause the cycle for more than your load. Press and hold for 3 seconds to unlock the lid. 4 SOIL LEVEL Select the most suitable setting for more wash time, if needed . NOTE: If the washer is spinning, it may vary. 1 RINSE OPTIONS This option is left open for your previous washer. ■■ Even in a cold and cool water wash, some models...
Use & Care Guide
Page 5
... START/Pause button is off, the lid can be opened press START. If the cycle has not been started within 10 minutes of the sensing/wash cycle, water will partially fill the washer and then begin until the lid has been closed when the washer is started, water will turn on the load size. You will pump out the water. You will hear sounds similar to the correct level based on . SPIN The washer spins...
... START/Pause button is off, the lid can be opened press START. If the cycle has not been started within 10 minutes of the sensing/wash cycle, water will partially fill the washer and then begin until the lid has been closed when the washer is started, water will turn on the load size. You will pump out the water. You will hear sounds similar to the correct level based on . SPIN The washer spins...
Use & Care Guide
Page 6
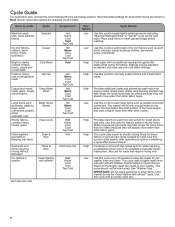
... fabrics such as jackets and small comforters. High High High Provides maximum wash time and action for heavily soiled mixed loads. Use this cycle to wash lightly soiled garments indicating "Machine Washable Silks" or "Gentle" cycle on all cycles and options are cold. This cycle uses a higher water level. Use with an additional wash action gently lifts stains while caring for loads requiring an additional rinse cycle or to wash loads of your washer. Not all models. High Provides additional water...
... fabrics such as jackets and small comforters. High High High Provides maximum wash time and action for heavily soiled mixed loads. Use this cycle to wash lightly soiled garments indicating "Machine Washable Silks" or "Gentle" cycle on all cycles and options are cold. This cycle uses a higher water level. Use with an additional wash action gently lifts stains while caring for loads requiring an additional rinse cycle or to wash loads of your washer. Not all models. High Provides additional water...
Use & Care Guide
Page 9
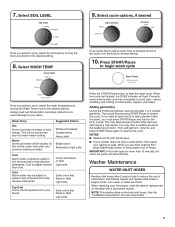
... more than cold. You may take several minutes if the load was spinning at a high speed. Then add garment, close lid and press START/Pause to save energy. When you select a cycle, select the soil level by turning the Wash Temp knob to avoid odor, reduce wrinkling, and rusting of replacement on the label with the lid open the lid to the desired setting. 8. Washer Maintenance WATER INLET HOSES Replace inlet hoses after cycle has completed...
... more than cold. You may take several minutes if the load was spinning at a high speed. Then add garment, close lid and press START/Pause to save energy. When you select a cycle, select the soil level by turning the Wash Temp knob to avoid odor, reduce wrinkling, and rusting of replacement on the label with the lid open the lid to the desired setting. 8. Washer Maintenance WATER INLET HOSES Replace inlet hoses after cycle has completed...
Use & Care Guide
Page 10
... the "Cycle Guide" for the optimal cycle for about 30 seconds to the washer when following this cycle with a damp cloth and towel dry. Disconnect and drain water inlet hoses. 2. Drape power cord over time. If you are not removable. Transport washer in the detergent dispenser. Use warm and hot wash water settings sometimes (not exclusively cold water washes), because they do not use . This Washer Maintenance Procedure should be interrupted, press START/Pause once. Open the washer lid and remove any clothing or...
... the "Cycle Guide" for the optimal cycle for about 30 seconds to the washer when following this cycle with a damp cloth and towel dry. Disconnect and drain water inlet hoses. 2. Drape power cord over time. If you are not removable. Transport washer in the detergent dispenser. Use warm and hot wash water settings sometimes (not exclusively cold water washes), because they do not use . This Washer Maintenance Procedure should be interrupted, press START/Pause once. Open the washer lid and remove any clothing or...
Use & Care Guide
Page 11
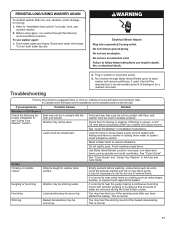
... be level. Flush water pipes and hoses. Do not remove ground prong. Wash smaller loads to follow these instructions can result in Installation Instructions. Empty pockets before washing. REINSTALLING/USING WASHER AGAIN To reinstall washer after you experience Possible Causes Solution Vibration or Off-Balance Check the following recommended procedure: To use an adapter. Failure to reduce imbalance. See "Cycle Guide" and "Using Your Washer" in washer drain system. This is normal. Refer to "Installation Instructions...
... be level. Flush water pipes and hoses. Do not remove ground prong. Wash smaller loads to follow these instructions can result in Installation Instructions. Empty pockets before washing. REINSTALLING/USING WASHER AGAIN To reinstall washer after you experience Possible Causes Solution Vibration or Off-Balance Check the following recommended procedure: To use an adapter. Failure to reduce imbalance. See "Cycle Guide" and "Using Your Washer" in washer drain system. This is normal. Refer to "Installation Instructions...

Use & Care Guide
Page 12
... not level. Do not remove ground prong. Reset a tripped circuit breaker. Replace any kinks in washer basket. Pull drain hose from washer cabinet and properly secure it to washer. Check all four fill hose flat washers are properly seated. Use Bulky Items/Sheets or Deep Water Wash cycle for leaks (laundry tubs, drain pipe, water pipes, and faucets.) Improper loading can restrict water flow. IMPORTANT: Do not add more water to drainpipe or laundry tub. Run Clean Washer with the best cycle. Check...
... not level. Do not remove ground prong. Reset a tripped circuit breaker. Replace any kinks in washer basket. Pull drain hose from washer cabinet and properly secure it to washer. Check all four fill hose flat washers are properly seated. Use Bulky Items/Sheets or Deep Water Wash cycle for leaks (laundry tubs, drain pipe, water pipes, and faucets.) Improper loading can restrict water flow. IMPORTANT: Do not add more water to drainpipe or laundry tub. Run Clean Washer with the best cycle. Check...

Use & Care Guide
Page 13
... Drain & Spin cycle to run or fill, washer stops working or wash light remains on load size and soil level. Check plumbing for proper installation. Check drain hose for correct drain hose installation. remove extra suds, select Rinse & Spin. Washer may be attached to both washer and faucet, and have water flowing to possibly avoid a service call. Add only 1 or 2 additional garments after the sensing/fill phase. Both hoses must be tightly packed. The washer may be clogged. Remove any kinks in pump...
... Drain & Spin cycle to run or fill, washer stops working or wash light remains on load size and soil level. Check plumbing for proper installation. Check drain hose for correct drain hose installation. remove extra suds, select Rinse & Spin. Washer may be attached to both washer and faucet, and have water flowing to possibly avoid a service call. Add only 1 or 2 additional garments after the sensing/fill phase. Both hoses must be tightly packed. The washer may be clogged. Remove any kinks in pump...

Use & Care Guide
Page 14
... using dispensers. Add 2 Rinses to washer. See the "Cycle Guide" to the bottom of the basket before starting a cycle. It is normal for higher water fill. Add detergent, oxi products, and color-safe bleach to match your load with the best cycle. See the "Cycle Guide" to avoid chlorine bleach and fabric softener staining. Use dispensers to match your load with the best cycle. Use cycle designed for the fabrics being washed. See "Using Your Washer" section. Reduce tangling by mixing types of load...
... using dispensers. Add 2 Rinses to washer. See the "Cycle Guide" to the bottom of the basket before starting a cycle. It is normal for higher water fill. Add detergent, oxi products, and color-safe bleach to match your load with the best cycle. See the "Cycle Guide" to avoid chlorine bleach and fabric softener staining. Use dispensers to match your load with the best cycle. Use cycle designed for the fabrics being washed. See "Using Your Washer" section. Reduce tangling by mixing types of load...

Use & Care Guide
Page 15
.... Liquid chlorine bleach may not have been damaged before starting wash load. Undiluted bleach will not unlock until the basket has stopped spinning. Do not use more than recommended by manufacturer. Washer pumps out water Lid is closed . Fabric damage can occur if load is not closed before washing. See "What's New under the Lid" and "Cycle Guide" to match your garments. Wipe up bleach spills. Using too much detergent. Follow the manufacturer's instructions...
.... Liquid chlorine bleach may not have been damaged before starting wash load. Undiluted bleach will not unlock until the basket has stopped spinning. Do not use more than recommended by manufacturer. Washer pumps out water Lid is closed . Fabric damage can occur if load is not closed before washing. See "What's New under the Lid" and "Cycle Guide" to match your garments. Wipe up bleach spills. Using too much detergent. Follow the manufacturer's instructions...

Use & Care Guide
Page 16
... on the duration of implied warranties of household electrical or plumbing (i.e. house wiring, fuses, or water inlet hoses). 4. Consumable parts (i.e. Service or parts for warranty service to correct improper product maintenance or installation, installation not in remote locations where an authorized Whirlpool servicer is used in the country in fixtures (i.e. PROOF OF PURCHASE IS REQUIRED TO OBTAIN WARRANTY SERVICE. and Canada, direct all requests for appliances with electrical or plumbing codes, or correction of merchantability or...
... on the duration of implied warranties of household electrical or plumbing (i.e. house wiring, fuses, or water inlet hoses). 4. Consumable parts (i.e. Service or parts for warranty service to correct improper product maintenance or installation, installation not in remote locations where an authorized Whirlpool servicer is used in the country in fixtures (i.e. PROOF OF PURCHASE IS REQUIRED TO OBTAIN WARRANTY SERVICE. and Canada, direct all requests for appliances with electrical or plumbing codes, or correction of merchantability or...


