
Dimension Guide
Page 1
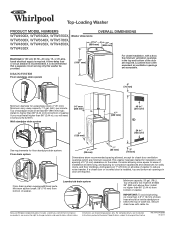
... mm) Dimensions show recommended spacing allowed, except for closet door ventilation openings which are for floor standpipe drain system. Add spacing of 1" (25 mm) on the sides. Top of washer to reduce noise transfer. Because Whirlpool Corporation policy includes a continuous commitment to improve our products, we reserve the right to change materials...
... mm) Dimensions show recommended spacing allowed, except for closet door ventilation openings which are for floor standpipe drain system. Add spacing of 1" (25 mm) on the sides. Top of washer to reduce noise transfer. Because Whirlpool Corporation policy includes a continuous commitment to improve our products, we reserve the right to change materials...
Installation Instructions
Page 2
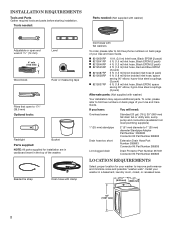
...Level Wood block Ruler or measuring tape Pliers that open to toll-free phone numbers on back page of the washer. Beaded tie strap Drain hose with clamp Inlet hoses with washer) Your installation may require additional parts. Install your Use and Care Guide. To order, please ...(648 mm) (686 mm) 42" (1067 mm) 2 If you have: You will need: Overhead sewer Standard 20 gal. (76 L) 39" (990 mm) tall drain tub or utility sink, sump pump and connectors (available from local plumbing suppliers) 1" (25 mm) standpipe 2" (51 mm) diameter to improve performance and minimize noise...
...Level Wood block Ruler or measuring tape Pliers that open to toll-free phone numbers on back page of the washer. Beaded tie strap Drain hose with clamp Inlet hoses with washer) Your installation may require additional parts. Install your Use and Care Guide. To order, please ...(648 mm) (686 mm) 42" (1067 mm) 2 If you have: You will need: Overhead sewer Standard 20 gal. (76 L) 39" (990 mm) tall drain tub or utility sink, sump pump and connectors (available from local plumbing suppliers) 1" (25 mm) standpipe 2" (51 mm) diameter to improve performance and minimize noise...
Installation Instructions
Page 3
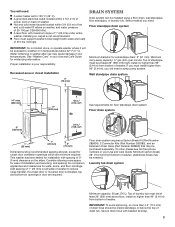
...(25 mm) under entire washer. Consider allowing more than 96" (2.44 m) from bottom of washer. n A level floor with beaded tie strap. 3 DRAIN SYSTEM Drain system can be at least 39" (990 mm) above floor; Minimum carry-away capacity: 17 gal. (64 L) per minute. Top of washer. (... and cold water faucets located within 4 ft (1.2 m) of power cord on the sides. IMPORTANT: To avoid siphoning, no higher than 4.5" (113 mm) of drain hose should be inside standpipe or below 32° F (0° C). n A grounded electrical outlet located within 3 ft (0.9 m) of hot and cold water ...
...(25 mm) under entire washer. Consider allowing more than 96" (2.44 m) from bottom of washer. n A level floor with beaded tie strap. 3 DRAIN SYSTEM Drain system can be at least 39" (990 mm) above floor; Minimum carry-away capacity: 17 gal. (64 L) per minute. Top of washer. (... and cold water faucets located within 4 ft (1.2 m) of power cord on the sides. IMPORTANT: To avoid siphoning, no higher than 4.5" (113 mm) of drain hose should be inside standpipe or below 32° F (0° C). n A grounded electrical outlet located within 3 ft (0.9 m) of hot and cold water ...
Installation Instructions
Page 5
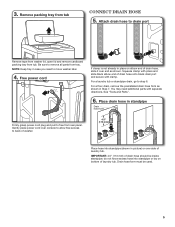
... (113 mm) Place hose into standpipe or lay on elbow end of drain hose, slide it over side of drain hose onto black drain port and secure with separate directions. For a laundry tub or standpipe drain, go to drain port Remove tape from washer lid, open lid and remove cardboard packing tray... from rear panel. IMPORTANT: 4.5" (113 mm) of laundry tub. For a floor drain, remove the preinstalled drain hose form as shown. You may need to remove all parts from tub Connect Drain Hose 5. Place drain hose in Step 7. Be sure to move washer later. 4. Free power cord If clamp ...
... (113 mm) Place hose into standpipe or lay on elbow end of drain hose, slide it over side of drain hose onto black drain port and secure with separate directions. For a laundry tub or standpipe drain, go to drain port Remove tape from washer lid, open lid and remove cardboard packing tray... from rear panel. IMPORTANT: 4.5" (113 mm) of laundry tub. For a floor drain, remove the preinstalled drain hose form as shown. You may need to remove all parts from tub Connect Drain Hose 5. Place drain hose in Step 7. Be sure to move washer later. 4. Free power cord If clamp ...
Installation Instructions
Page 6
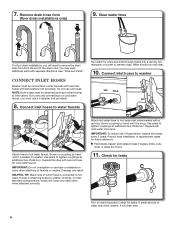
...can result. 7. See "Tools and Parts". NOTE: Both hoses must be connected to washer correctly. Attach hot water hose to remove the drain hose form from the end of water may need to hot water inlet valve marked with flat washers (not provided). If you must be ... attaching hoses to water faucets with new inlet hoses with a red ring. Do not use a Y-adapter (not provided). 8. A small amount of the drain hose. Connect Inlet Hoses Washer must use old hoses. n Periodically inspect and replace hoses if bulges, kinks, cuts, wear, or leaks are only connecting...
...can result. 7. See "Tools and Parts". NOTE: Both hoses must be connected to washer correctly. Attach hot water hose to remove the drain hose form from the end of water may need to hot water inlet valve marked with flat washers (not provided). If you must be ... attaching hoses to water faucets with new inlet hoses with a red ring. Do not use a Y-adapter (not provided). 8. A small amount of the drain hose. Connect Inlet Hoses Washer must use old hoses. n Periodically inspect and replace hoses if bulges, kinks, cuts, wear, or leaks are only connecting...
Installation Instructions
Page 7
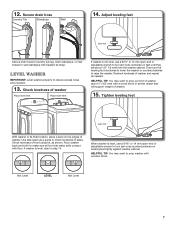
..." or 14 mm open -end or adjustable wrench to turn the leveling foot clockwise to lower the washer or counterclockwise to laundry tub leg, drain standpipe, or inlet hoses for wall standpipe with floor. Tighten leveling feet Jam nut With washer in its final location, place a level on feet... until they are about 4" (102 mm) with wooden block. 12. Secure drain hose Laundry Tub Standpipe Wall 14. Adjust leveling feet Jam nut Secure drain hose to raise the washer. HELPFUL TIP: You may want to prop washer with a wood block or similar ...
..." or 14 mm open -end or adjustable wrench to turn the leveling foot clockwise to lower the washer or counterclockwise to laundry tub leg, drain standpipe, or inlet hoses for wall standpipe with floor. Tighten leveling feet Jam nut With washer in its final location, place a level on feet... until they are about 4" (102 mm) with wooden block. 12. Secure drain hose Laundry Tub Standpipe Wall 14. Adjust leveling feet Jam nut Secure drain hose to raise the washer. HELPFUL TIP: You may want to prop washer with a wood block or similar ...
Owners Manual
Page 4
You may take several minutes if the load was selected. After draining and spinning out wash water, the washer will continue to open the lid, press START/Pause/Unlock. SPIN The washer spins the load at high ...
You may take several minutes if the load was selected. After draining and spinning out wash water, the washer will continue to open the lid, press START/Pause/Unlock. SPIN The washer spins the load at high ...
Owners Manual
Page 5
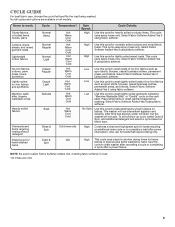
... load after a power failure. Low Use this cycle for heavy fabrics or special-care items washed by hand. After time has expired, water will drain, but the washer will use for lightly soiled mixed loads. Low Use this cycle for loads requiring an additional rinse cycle or to wash lightly...rinsing without detergent Dripping wet or hand-washed items Cycle: Normal Heavy Normal Regular Normal Light Casual Regular Casual Light Delicate Soak Rinse & Spin Drain & Spin Temperature*: Hot Warm Cool Cold Hot Warm Cool Cold Hot Warm Cool Cold Hot Warm Cool Cold Hot Warm Cool Cold Hot Warm...
... load after a power failure. Low Use this cycle for heavy fabrics or special-care items washed by hand. After time has expired, water will drain, but the washer will use for lightly soiled mixed loads. Low Use this cycle for loads requiring an additional rinse cycle or to wash lightly...rinsing without detergent Dripping wet or hand-washed items Cycle: Normal Heavy Normal Regular Normal Light Casual Regular Casual Light Delicate Soak Rinse & Spin Drain & Spin Temperature*: Hot Warm Cool Cold Hot Warm Cool Cold Hot Warm Cool Cold Hot Warm Cool Cold Hot Warm Cool Cold Hot Warm...
Owners Manual
Page 9
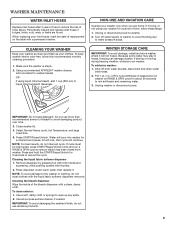
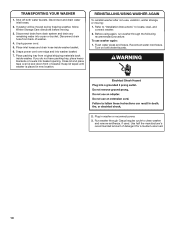
... INLET HOSES Replace inlet hoses after 5 years of use to avoid damaging product over time. 3. If moving during freezing weather, winterize your clothes. disconnect and drain water inlet hoses. 2. IMPORTANT: Do not add detergent. Press START/Pause/Unlock. If cycle must be interrupted, press START/Pause/Unlock twice and run washer...
... INLET HOSES Replace inlet hoses after 5 years of use to avoid damaging product over time. 3. If moving during freezing weather, winterize your clothes. disconnect and drain water inlet hoses. 2. IMPORTANT: Do not add detergent. Press START/Pause/Unlock. If cycle must be interrupted, press START/Pause/Unlock twice and run washer...
Owners Manual
Page 10
Disconnect and drain water inlet hoses. 2. Keep lid taped until washer is placed in washer or reconnect power. 3. Drape power cord over lid and down front of washer. ... during freezing weather, follow Winter Storage Care directions before moving : 1. Unplug power cord. 5. Use half the manufacturer's recommended amount of washer. 4. Place inlet hoses and drain hose inside washer. Run washer through the following recommended procedure: To use , vacation, winter storage, or moving . 3. Disconnect...
Disconnect and drain water inlet hoses. 2. Keep lid taped until washer is placed in washer or reconnect power. 3. Drape power cord over lid and down front of washer. ... during freezing weather, follow Winter Storage Care directions before moving : 1. Unplug power cord. 5. Use half the manufacturer's recommended amount of washer. 4. Place inlet hoses and drain hose inside washer. Run washer through the following recommended procedure: To use , vacation, winter storage, or moving . 3. Disconnect...
Owners Manual
Page 11
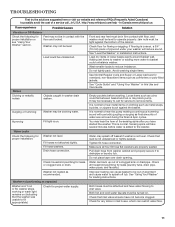
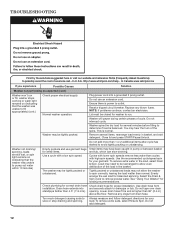
...Check all four fill hose flat washers are removed during the Drain & Spin cycles. See "Using Your Washer" for leaks or clogged sink or drain. Check that inlet valve screens have started the washer. In Canada www.whirlpool.ca If you have not become clogged. Load could fall between...following for flexing or sagging. Water may be turned on. Check floor for proper installation or see "Using Your Washer" section. Drain hose connection. http://www.whirlpool.com/help - Gurgling or humming Washer may splash off tub. It is normal to hear the pump making a continuous humming ...
...Check all four fill hose flat washers are removed during the Drain & Spin cycles. See "Using Your Washer" for leaks or clogged sink or drain. Check that inlet valve screens have started the washer. In Canada www.whirlpool.ca If you have not become clogged. Load could fall between...following for flexing or sagging. Water may be turned on. Check floor for proper installation or see "Using Your Washer" section. Drain hose connection. http://www.whirlpool.com/help - Gurgling or humming Washer may splash off tub. It is normal to hear the pump making a continuous humming ...
Owners Manual
Page 12
... load evenly in the basket. Remove any blown fuses. In Canada www.whirlpool.ca If you experience Possible Causes Solution Washer not performing as expected (cont.) Washer won't run . Washer not draining/ spinning, loads are still wet, or spin light remains on (indicating that...visit our website and reference FAQs (Frequently Asked Questions) to avoid tightly packing or unbalancing. http://www.whirlpool.com/help - Washer spins the dry load for your load. Drain hose extends into a grounded 3 prong outlet. Remove several minutes before filling to drainpipe or tub....
... load evenly in the basket. Remove any blown fuses. In Canada www.whirlpool.ca If you experience Possible Causes Solution Washer not performing as expected (cont.) Washer won't run . Washer not draining/ spinning, loads are still wet, or spin light remains on (indicating that...visit our website and reference FAQs (Frequently Asked Questions) to avoid tightly packing or unbalancing. http://www.whirlpool.com/help - Washer spins the dry load for your load. Drain hose extends into a grounded 3 prong outlet. Remove several minutes before filling to drainpipe or tub....


