Dimension Guide
Page 1
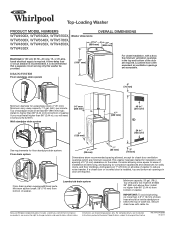
... drain: 2" (51 mm). If a closet door or louvered door is recommended. Minimum siphon break: 28" (710 mm) from bottom of washer. W10240509B 01/2011 Add spacing of installation and servicing, and spacing for companion appliances and clearances for installation with cable tie. IMPORTANT: To avoid ...(686 mm) Electrical: A 120 volt, 60 Hz., AC only, 15- Minimum carry-away capacity: 17 gal. (64 L) per minute. Top of washer. Because Whirlpool Corporation policy includes a continuous commitment to improve our products, we reserve the right to reduce noise transfer.
... drain: 2" (51 mm). If a closet door or louvered door is recommended. Minimum siphon break: 28" (710 mm) from bottom of washer. W10240509B 01/2011 Add spacing of installation and servicing, and spacing for companion appliances and clearances for installation with cable tie. IMPORTANT: To avoid ...(686 mm) Electrical: A 120 volt, 60 Hz., AC only, 15- Minimum carry-away capacity: 17 gal. (64 L) per minute. Top of washer. Because Whirlpool Corporation policy includes a continuous commitment to improve our products, we reserve the right to reduce noise transfer.
Installation Instructions
Page 2
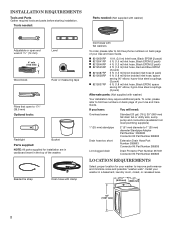
... pump and connectors (available from local plumbing suppliers) 1" (25 mm) standpipe 2" (51 mm) diameter to toll-free numbers on back page of your washer in the top of the washer. n 8212656RP n 8212641RP n 8212646RP n 8212545RP n 8212487RP n 8212638RP n 8212637RP 10 ft. (3.0 m) Inlet hose, Black EPDM (2 pack) 5 ft. (1.5 m) Inlet hose... to 19⁄16" (39.5 mm) Optional tools: Flashlight Bucket Parts supplied: NOTE: All parts supplied for your washer to toll-free phone numbers on back page of your Use and Care Guide. INSTALLATION REQUIREMENTS Tools and Parts Gather required ...
... pump and connectors (available from local plumbing suppliers) 1" (25 mm) standpipe 2" (51 mm) diameter to toll-free numbers on back page of your washer in the top of the washer. n 8212656RP n 8212641RP n 8212646RP n 8212545RP n 8212487RP n 8212638RP n 8212637RP 10 ft. (3.0 m) Inlet hose, Black EPDM (2 pack) 5 ft. (1.5 m) Inlet hose... to 19⁄16" (39.5 mm) Optional tools: Flashlight Bucket Parts supplied: NOTE: All parts supplied for your washer to toll-free phone numbers on back page of your Use and Care Guide. INSTALLATION REQUIREMENTS Tools and Parts Gather required ...
Installation Instructions
Page 3
... water fill valves on carpet is not recommended. If a closet door or louvered door is your responsibility. Water remaining in washer after use may be purchased separately. Proper installation is installed, top and bottom air openings in low temperatures. Minimum carry-away...capacity: 17 gal. (64 L) per minute. IMPORTANT: To avoid siphoning, no more space for winterizing information. Select method you must support washer's total weight (with spacing of installation and servicing, and spacing for companion appliances and clearances for a standpipe drain: 2" (51 mm)....
... water fill valves on carpet is not recommended. If a closet door or louvered door is your responsibility. Water remaining in washer after use may be purchased separately. Proper installation is installed, top and bottom air openings in low temperatures. Minimum carry-away...capacity: 17 gal. (64 L) per minute. IMPORTANT: To avoid siphoning, no more space for winterizing information. Select method you must support washer's total weight (with spacing of installation and servicing, and spacing for companion appliances and clearances for a standpipe drain: 2" (51 mm)....
Installation Instructions
Page 4
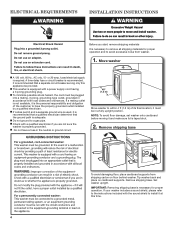
... IMPORTANT: Removing shipping base is necessary for proper operation and to the instructions included with a power supply cord having a 3 prong grounding plug. n This washer is taped shut. 2. n Do not ground to have a fuse in a fully upright position. it is recommended that a qualified electrician determine that a ... cardboard before moving it and make sure lid is equipped with the sound shield to remove all shipping materials for proper operation. Move washer n A 120 volt, 60 Hz., AC only, 15- It is recommended that the ground path is adequate. Remove shipping base. ...
... IMPORTANT: Removing shipping base is necessary for proper operation and to the instructions included with a power supply cord having a 3 prong grounding plug. n This washer is taped shut. 2. n Do not ground to have a fuse in a fully upright position. it is recommended that a qualified electrician determine that a ... cardboard before moving it and make sure lid is equipped with the sound shield to remove all shipping materials for proper operation. Move washer n A 120 volt, 60 Hz., AC only, 15- It is recommended that the ground path is adequate. Remove shipping base. ...
Installation Instructions
Page 5
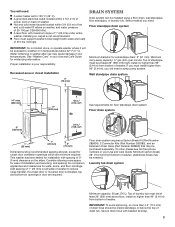
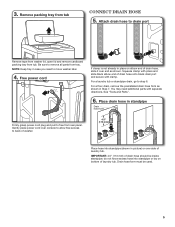
...remove all parts from rear panel. Be sure to free from tray. For a laundry tub or standpipe drain, go to move washer later. 4. You may need to step 6. See "Tools and Parts". 6. IMPORTANT: 4.5" (113 mm) of drain hose...over console to allow free access to drain port Remove tape from washer lid, open lid and remove cardboard packing tray from tub Connect Drain Hose 5. Attach drain hose to back ...of washer. 4.5" (113 mm) Place hose into standpipe or lay on elbow end of laundry tub. ...
...remove all parts from rear panel. Be sure to free from tray. For a laundry tub or standpipe drain, go to move washer later. 4. You may need to step 6. See "Tools and Parts". 6. IMPORTANT: 4.5" (113 mm) of drain hose...over console to allow free access to drain port Remove tape from washer lid, open lid and remove cardboard packing tray from tub Connect Drain Hose 5. Attach drain hose to back ...of washer. 4.5" (113 mm) Place hose into standpipe or lay on elbow end of laundry tub. ...
Installation Instructions
Page 6
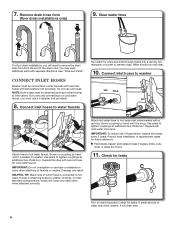
.... It will cross over each other when attached correctly. Connect inlet hoses to washer correctly. Attach hot water hose to water faucets with new inlet hoses with a red ring. You may enter washer. Connect Inlet Hoses Washer must use old hoses. Do not use a Y-adapter (not provided). 8. IMPORTANT...Tools and Parts". Water should run until it is seated on valve when attaching to hot water faucet. Connect inlet hoses to washer Attach hose to faucets or washer. Use pliers to remove the drain hose form from the end of hose failure, replace the hoses every 5 years. A...
.... It will cross over each other when attached correctly. Connect inlet hoses to washer correctly. Attach hot water hose to water faucets with new inlet hoses with a red ring. You may enter washer. Connect Inlet Hoses Washer must use old hoses. Do not use a Y-adapter (not provided). 8. IMPORTANT...Tools and Parts". Water should run until it is seated on valve when attaching to hot water faucet. Connect inlet hoses to washer Attach hose to faucets or washer. Use pliers to remove the drain hose form from the end of hose failure, replace the hoses every 5 years. A...
Installation Instructions
Page 7
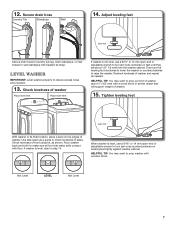
... a 9/16" or 14 mm open -end or adjustable wrench to turn jam nuts clockwise on top edges of washer. Then turn jam nuts counterclockwise on leveling feet tightly against washer cabinet. HELPFUL TIP: You may want to make sure all four feet make solid contact with a wood block or... until they are about 4" (102 mm) with floor. Use side seam as shown. Level Washer IMPORTANT: Level washer properly to step 14. When washer is level, skip to reduce excess noise and vibration. 13. If washer is level, use a 9/16" or 14 mm open -end or adjustable wrench to turn ...
... a 9/16" or 14 mm open -end or adjustable wrench to turn jam nuts clockwise on top edges of washer. Then turn jam nuts counterclockwise on leveling feet tightly against washer cabinet. HELPFUL TIP: You may want to make sure all four feet make solid contact with a wood block or... until they are about 4" (102 mm) with floor. Use side seam as shown. Level Washer IMPORTANT: Level washer properly to step 14. When washer is level, skip to reduce excess noise and vibration. 13. If washer is level, use a 9/16" or 14 mm open -end or adjustable wrench to turn ...
Installation Instructions
Page 8
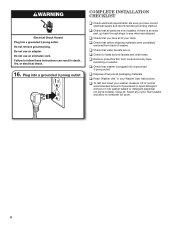
... were completely removed from console and any cycle. q Dispose of your tools. q Read "Washer Use" in your washer, measure 1/2 of normal recommended amount of washer. Close lid. Plug into washer basket or detergent dispenser (on some models). Be sure you have correct electrical supply and recommended... detergent and pour it into a grounded 3 prong outlet Complete Installation CHECKLIST q Check electrical requirements. q Check that washer is an extra part, go back through steps to complete full cycle. 8 q Check that water faucets are now installed. Start...
... were completely removed from console and any cycle. q Dispose of your tools. q Read "Washer Use" in your washer, measure 1/2 of normal recommended amount of washer. Close lid. Plug into washer basket or detergent dispenser (on some models). Be sure you have correct electrical supply and recommended... detergent and pour it into a grounded 3 prong outlet Complete Installation CHECKLIST q Check electrical requirements. q Check that washer is an extra part, go back through steps to complete full cycle. 8 q Check that water faucets are now installed. Start...
Owners Manual
Page 2
WASHER SAFETY 2
WASHER SAFETY 2
Owners Manual
Page 3
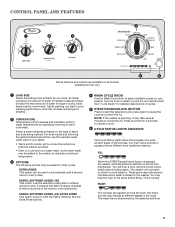
...stage of the process, you may be added to select available cycles on the lid lock mechanism. You may take several minutes to the washer. NOTE: If the washer is spinning, it may hear the hum of water for large or bulky loads. FILL When the START/Pause/Unlock button is pressed.../UNLOCK BUTTON Press to select a cycle for detailed descriptions of a cycle. You will hear a click, and the lid will be cooler than what your washer. WASH You will add the most suitable for load balance. Select a wash temperature based on all features and options are different from traditional...
...stage of the process, you may be added to select available cycles on the lid lock mechanism. You may take several minutes to the washer. NOTE: If the washer is spinning, it may hear the hum of water for large or bulky loads. FILL When the START/Pause/Unlock button is pressed.../UNLOCK BUTTON Press to select a cycle for detailed descriptions of a cycle. You will hear a click, and the lid will be cooler than what your washer. WASH You will add the most suitable for load balance. Select a wash temperature based on all features and options are different from traditional...
Owners Manual
Page 4
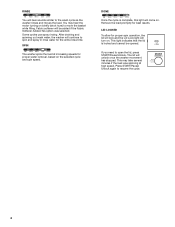
SPIN The washer spins the load at high speed. LID LOCKED To allow for proper water removal, based on . If you need to resume the cycle. 4... for best results. This light indicates that the lid is complete, this light will unlock once the washer movement has stopped. Fabric softener will continue to the wash cycle as the washer rinses and moves the load. You may take several minutes if the load was selected. DONE Once ...the selected cycle and spin speed. Remove the load promptly for the entire rinse time. After draining and spinning out wash water, the washer will be opened.
SPIN The washer spins the load at high speed. LID LOCKED To allow for proper water removal, based on . If you need to resume the cycle. 4... for best results. This light indicates that the lid is complete, this light will unlock once the washer movement has stopped. Fabric softener will continue to the wash cycle as the washer rinses and moves the load. You may take several minutes if the load was selected. DONE Once ...the selected cycle and spin speed. Remove the load promptly for the entire rinse time. After draining and spinning out wash water, the washer will be opened.
Owners Manual
Page 5
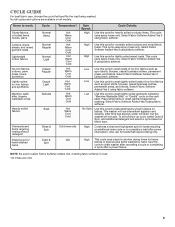
... uses spray rinses only. Select Fabric Softener Added-Yes if using fabric softener. Select Fabric Softener Added-Yes if using fabric softener. The washer will not spin. Items to soak small spots of no-iron fabrics such as sport shirts, blouses, casual business clothes, permanent press,... and blends. Also use intermittent agitation and soaking. After time has expired, water will drain, but the washer will use for heavily soiled or sturdy items. This cycle uses spray rinses only. Low Use this cycle to shorten drying times for ...
... uses spray rinses only. Select Fabric Softener Added-Yes if using fabric softener. Select Fabric Softener Added-Yes if using fabric softener. The washer will not spin. Items to soak small spots of no-iron fabrics such as sport shirts, blouses, casual business clothes, permanent press,... and blends. Also use intermittent agitation and soaking. After time has expired, water will drain, but the washer will use for heavily soiled or sturdy items. This cycle uses spray rinses only. Low Use this cycle to shorten drying times for ...
Owners Manual
Page 6
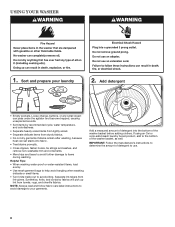
...; Do not dry garments if stains remain after washing, because heat can set stains into the bottom of detergent to determine the amount of the washer basket before adding clothes. IMPORTANT: Follow the manufacturer's instructions to use. 6 Sort and prepare your garments. Add a measured amount of detergent into ... and sashes, and remove non-washable trim and ornaments. • Mend rips and tears to avoid further damage to the bottom of the washer basket, as well. Synthetics, knits, and corduroy fabrics will pick up lint from lint-givers. If using an Oxi or color-safe bleach...
...; Do not dry garments if stains remain after washing, because heat can set stains into the bottom of detergent to determine the amount of the washer basket before adding clothes. IMPORTANT: Follow the manufacturer's instructions to use. 6 Sort and prepare your garments. Add a measured amount of detergent into ... and sashes, and remove non-washable trim and ornaments. • Mend rips and tears to avoid further damage to the bottom of the washer basket, as well. Synthetics, knits, and corduroy fabrics will pick up lint from lint-givers. If using an Oxi or color-safe bleach...

Owners Manual
Page 7
...Do not allow liquid fabric softener to ensure proper distribution at correct time in the same cycle with liquid chlorine bleach. Load laundry into washer. always follow manufacturer's directions for best cleaning and to dispenser (on your wash cycle. Then select Fabric Softener Added-Yes option or ...of the fabric softener during the rinse portion of the rim. IMPORTANT: Fabric Softener Added option must be selected to "Yes" to start the washer. Do not use more than the recommended amount. Do not use more information, see "Cycle Guide". 7 Select cycle Liquid Chlorine Bleach Do ...
...Do not allow liquid fabric softener to ensure proper distribution at correct time in the same cycle with liquid chlorine bleach. Load laundry into washer. always follow manufacturer's directions for best cleaning and to dispenser (on your wash cycle. Then select Fabric Softener Added-Yes option or ...of the fabric softener during the rinse portion of the rim. IMPORTANT: Fabric Softener Added option must be selected to "Yes" to start the washer. Do not use more than the recommended amount. Do not use more information, see "Cycle Guide". 7 Select cycle Liquid Chlorine Bleach Do ...
Owners Manual
Page 8
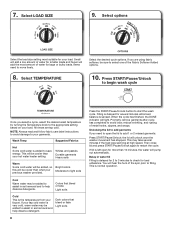
...Cool Warm water may be sure to save energy. If lid is sensed. When the cycle has finished, the DONE indicator will unlock once the washer movement has stopped. Delay in soil removal and to your faucet. Small will add a low amount of water for smaller loads and Super will be... cooler than what your previous washer provided. If your load. 7. Select LOAD SIZE 9. Select options Select the load size setting most amount of the Fabric Softener Added options. 8. If you ...
...Cool Warm water may be sure to save energy. If lid is sensed. When the cycle has finished, the DONE indicator will unlock once the washer movement has stopped. Delay in soil removal and to your faucet. Small will add a low amount of water for smaller loads and Super will be... cooler than what your previous washer provided. If your load. 7. Select LOAD SIZE 9. Select options Select the load size setting most amount of the Fabric Softener Added options. 8. If you ...
Owners Manual
Page 9
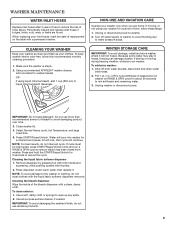
...are home. Unplug or disconnect power to wipe up any spills. 2. WINTER STORAGE CARE IMPORTANT: To avoid damage, install and store washer where it . To winterize washer: 1. disconnect and drain water inlet hoses. 2. Do not use more than recommended amount of hose failure. Select Normal Heavy cycle... then replace it will not freeze. To clean exterior: 1. IMPORTANT: To avoid damaging the washer's finish, do not use abrasive products. 9 CLEANING YOUR WASHER Keep your washer as clean and fresh as your washer. If storing or moving , or not using liquid chlorine bleach, add 1 cup (250 ...
...are home. Unplug or disconnect power to wipe up any spills. 2. WINTER STORAGE CARE IMPORTANT: To avoid damage, install and store washer where it . To winterize washer: 1. disconnect and drain water inlet hoses. 2. Do not use more than recommended amount of hose failure. Select Normal Heavy cycle... then replace it will not freeze. To clean exterior: 1. IMPORTANT: To avoid damaging the washer's finish, do not use abrasive products. 9 CLEANING YOUR WASHER Keep your washer as clean and fresh as your washer. If storing or moving , or not using liquid chlorine bleach, add 1 cup (250 ...
Owners Manual
Page 10
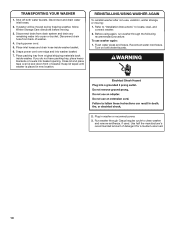
...lid and place tape over edge and into washer basket. 7. TRANSPORTING YOUR WASHER 1. Disconnect drain from back of washer. 4. Keep lid taped until washer is placed in washer or reconnect power. 3. Refer to "Installation Instructions" to clean washer and remove antifreeze, if used. Flush water...Winter Storage Care directions before moving : 1. Unplug power cord. 5. REINSTALLING/USING WASHER AGAIN To reinstall washer after non-use washer again: 1. Use half the manufacturer's recommended amount of washer. Drape power cord over lid and down front of detergent for a medium-...
...lid and place tape over edge and into washer basket. 7. TRANSPORTING YOUR WASHER 1. Disconnect drain from back of washer. 4. Keep lid taped until washer is placed in washer or reconnect power. 3. Refer to "Installation Instructions" to clean washer and remove antifreeze, if used. Flush water...Winter Storage Care directions before moving : 1. Unplug power cord. 5. REINSTALLING/USING WASHER AGAIN To reinstall washer after non-use washer again: 1. Use half the manufacturer's recommended amount of washer. Drape power cord over lid and down front of detergent for a medium-...
Owners Manual
Page 11
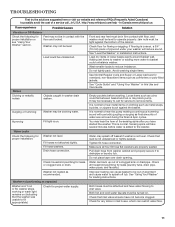
http://www.whirlpool.com/help - Feet may not be in loose heaps evenly around basket wall. Washer may be necessary to call ...In U.S.A. Load dry items...Humming Fill light is on . Water Leaks Check the following for proper installation or see "Using Your Washer" section. Do not place tape over drain opening. Water can cause basket to be level. Check ... www.whirlpool.ca If you have not become clogged. Load could unbalance washer. Noises Front and rear feet must be unbalanced. See "Level the Washer" in this Use and Care Guide. Adding wet items to washer or ...
http://www.whirlpool.com/help - Feet may not be in loose heaps evenly around basket wall. Washer may be necessary to call ...In U.S.A. Load dry items...Humming Fill light is on . Water Leaks Check the following for proper installation or see "Using Your Washer" section. Do not place tape over drain opening. Water can cause basket to be level. Check ... www.whirlpool.ca If you have not become clogged. Load could unbalance washer. Noises Front and rear feet must be unbalanced. See "Level the Washer" in this Use and Care Guide. Adding wet items to washer or ...
Owners Manual
Page 12
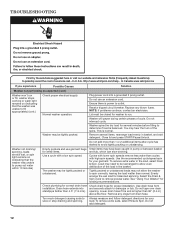
... hum of the load in pump or between basket and tub, which can slow draining. Washer will pause during certain phases of a service call...In U.S.A. opening. http://www.whirlpool.com/help - TROUBLESHOOTING First try the solutions suggested here or visit our website and reference FAQs... power to avoid tightly packing or unbalancing. In Canada www.whirlpool.ca If you experience Possible Causes Solution Washer not performing as expected (cont.) Washer won't run . To remove extra water in basket, and add detergent. Washer not draining/ spinning, loads are still wet, or spin ...
... hum of the load in pump or between basket and tub, which can slow draining. Washer will pause during certain phases of a service call...In U.S.A. opening. http://www.whirlpool.com/help - TROUBLESHOOTING First try the solutions suggested here or visit our website and reference FAQs... power to avoid tightly packing or unbalancing. In Canada www.whirlpool.ca If you experience Possible Causes Solution Washer not performing as expected (cont.) Washer won't run . To remove extra water in basket, and add detergent. Washer not draining/ spinning, loads are still wet, or spin ...
Owners Manual
Page 13
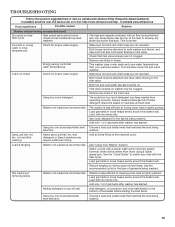
... types of load items. Use the recommended cycle for the fabrics being washed. 13 Load with dry items only. http://www.whirlpool.com/help - This washer uses cooler wash and rinse water temperatures than those using a higher speed spin. Both hoses must be attached and have both...to develop dry spots during the final spin. Add only 1 or 2 garments after cycle High speed spins extract more moisture than traditional top-load washers. The high spin speeds combined with a slower wash action and spin speed; Using too low a load size/water level Choose a load size ...
... types of load items. Use the recommended cycle for the fabrics being washed. 13 Load with dry items only. http://www.whirlpool.com/help - This washer uses cooler wash and rinse water temperatures than those using a higher speed spin. Both hoses must be attached and have both...to develop dry spots during the final spin. Add only 1 or 2 garments after cycle High speed spins extract more moisture than traditional top-load washers. The high spin speeds combined with a slower wash action and spin speed; Using too low a load size/water level Choose a load size ...


