
Installation Guide
Page 2
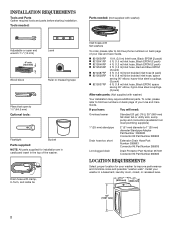
... refer to toll-free numbers on back page of your washer in the top of the washer. Install your Use and Care Guide. Tools needed: Parts needed: (Not supplied with washer) Adjustable or open end wrench 9/16" (14 mm) 4" min (102 mm) Level Wood block Ruler or measuring ...51 mm) diameter to toll-free phone numbers on back page of your washer to 13⁄4" (44.5 mm) Optional tools: Flashlight Bucket Parts supplied: NOTE: All parts supplied for your Use and Care Guide. Drain hose with clamp, U-form, and cable tie Inlet hoses with washer) Your installation may require ...
... refer to toll-free numbers on back page of your washer in the top of the washer. Install your Use and Care Guide. Tools needed: Parts needed: (Not supplied with washer) Adjustable or open end wrench 9/16" (14 mm) 4" min (102 mm) Level Wood block Ruler or measuring ...51 mm) diameter to toll-free phone numbers on back page of your washer to 13⁄4" (44.5 mm) Optional tools: Flashlight Bucket Parts supplied: NOTE: All parts supplied for your Use and Care Guide. Drain hose with clamp, U-form, and cable tie Inlet hoses with washer) Your installation may require ...
Installation Guide
Page 3
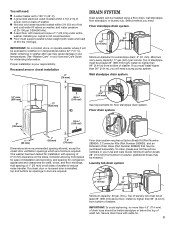
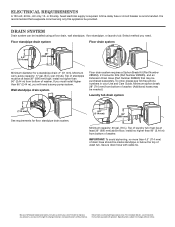
... siphon break: 28" (710 mm) from bottom of 315 lbs (143 kgs). Floor drain system requires a Siphon Break Kit (Part Number 285834), 2 Connector Kits (Part Number 285835), and an Extension Drain Hose (Part Number 285863) that may be purchased separately. n A level floor with water and load) of washer. Installing on back of washer...
... siphon break: 28" (710 mm) from bottom of 315 lbs (143 kgs). Floor drain system requires a Siphon Break Kit (Part Number 285834), 2 Connector Kits (Part Number 285835), and an Extension Drain Hose (Part Number 285863) that may be purchased separately. n A level floor with water and load) of washer. Installing on back of washer...
Installation Guide
Page 5
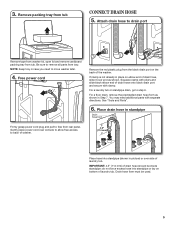
...need to back of washer. 4.5" (114 mm) Place hose into standpipe or lay on bottom of drain hose should be used. 5 See "Tools and Parts". 6. IMPORTANT: 4.5" (114 mm) of laundry tub. Drain hose form must be inside standpipe; Gently place power cord over console to allow free access to... move washer later. 4. Attach drain hose to remove all parts from tub. Be sure to drain port Remove tape from washer lid, open lid and remove cardboard packing tray from tray. Remove packing tray...
...need to back of washer. 4.5" (114 mm) Place hose into standpipe or lay on bottom of drain hose should be used. 5 See "Tools and Parts". 6. IMPORTANT: 4.5" (114 mm) of laundry tub. Drain hose form must be inside standpipe; Gently place power cord over console to allow free access to... move washer later. 4. Attach drain hose to remove all parts from tub. Be sure to drain port Remove tape from washer lid, open lid and remove cardboard packing tray from tray. Remove packing tray...
Installation Guide
Page 6
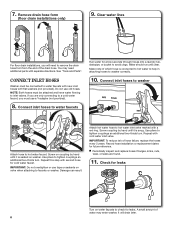
You may enter washer. See "Tools and Parts". CONNECT INLET HOSES Washer must be connected to hot water inlet valve marked with second hose for cold water faucet. Connect inlet hoses to water ... to check for a few seconds through hoses into a laundry tub, drainpipe, or bucket to tighten couplings an additional two-thirds turn . It will need additional parts with cold water inlet valve. 7. IMPORTANT: Do not overtighten or use old hoses. IMPORTANT: To reduce risk of which hose is seated on washer.
You may enter washer. See "Tools and Parts". CONNECT INLET HOSES Washer must be connected to hot water inlet valve marked with second hose for cold water faucet. Connect inlet hoses to water ... to check for a few seconds through hoses into a laundry tub, drainpipe, or bucket to tighten couplings an additional two-thirds turn . It will need additional parts with cold water inlet valve. 7. IMPORTANT: Do not overtighten or use old hoses. IMPORTANT: To reduce risk of which hose is seated on washer.
Installation Guide
Page 8
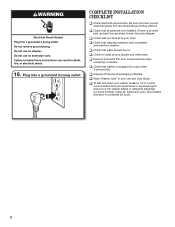
... hoses. Plug into washer basket or detergent dispenser (on . Be sure you have correct electrical supply and recommended grounding method. Close lid. q Check that all parts are on some models). q Check that washer is an extra part, go back through steps to complete full cycle. 8 q Read "Washer Care" in your tools.
... hoses. Plug into washer basket or detergent dispenser (on . Be sure you have correct electrical supply and recommended grounding method. Close lid. q Check that all parts are on some models). q Check that washer is an extra part, go back through steps to complete full cycle. 8 q Read "Washer Care" in your tools.
Dimension Guide
Page 2
... mm) above floor; Wall standpipe drain system Floor drain system requires a Siphon Break Kit (Part Number 285834), 2 Connector Kits (Part Number 285835), and an Extension Drain Hose (Part Number 285863) that a separate circuit serving only this appliance be inside standpipe or below the ...) See requirements for floor standpipe drain system. 4.5" (114 mm) 39" (990 mm) Minimum capacity: 20 gal. (76 L). Because Whirlpool Corporation policy includes a continuous commitment to improve our products, we reserve the right to change materials and specifications without notice. install no more...
... mm) above floor; Wall standpipe drain system Floor drain system requires a Siphon Break Kit (Part Number 285834), 2 Connector Kits (Part Number 285835), and an Extension Drain Hose (Part Number 285863) that a separate circuit serving only this appliance be inside standpipe or below the ...) See requirements for floor standpipe drain system. 4.5" (114 mm) 39" (990 mm) Minimum capacity: 20 gal. (76 L). Because Whirlpool Corporation policy includes a continuous commitment to improve our products, we reserve the right to change materials and specifications without notice. install no more...

Use & Care Guide
Page 14
... this major appliance is used for in this Warranty. Pick up and delivery. Replacement parts or repair labor on how to use of products not approved by a Whirlpool designated service company. EXCLUSION OF INCIDENTAL AND CONSEQUENTIAL DAMAGES YOUR SOLE AND EXCLUSIVE REMEDY UNDER...from defects in materials or workmanship and is intended to be repaired in accordance with Whirlpool published installation instructions. 10. Expenses for travel and transportation for Factory Specified Replacement Parts and repair labor to correct defects in accordance with this major appliance, you should...
... this major appliance is used for in this Warranty. Pick up and delivery. Replacement parts or repair labor on how to use of products not approved by a Whirlpool designated service company. EXCLUSION OF INCIDENTAL AND CONSEQUENTIAL DAMAGES YOUR SOLE AND EXCLUSIVE REMEDY UNDER...from defects in materials or workmanship and is intended to be repaired in accordance with Whirlpool published installation instructions. 10. Expenses for travel and transportation for Factory Specified Replacement Parts and repair labor to correct defects in accordance with this major appliance, you should...
Warranty Information
Page 1
...applies. Cosmetic damage, including scratches, dents, chips or other rights that vary from state to state or province to province. WHIRLPOOL CORPORATION LAUNDRY WARRANTY LIMITED WARRANTY For one year from the date of purchase, when this major appliance is installed, operated, and...in materials or workmanship that existed when this major appliance was purchased. Service calls to correct the installation of purchase. 6. Consumable parts are unable to the appliance. 8. Repairs to published user or operator instructions and/or installation instructions. 2. The removal and ...
...applies. Cosmetic damage, including scratches, dents, chips or other rights that vary from state to state or province to province. WHIRLPOOL CORPORATION LAUNDRY WARRANTY LIMITED WARRANTY For one year from the date of purchase, when this major appliance is installed, operated, and...in materials or workmanship that existed when this major appliance was purchased. Service calls to correct the installation of purchase. 6. Consumable parts are unable to the appliance. 8. Repairs to published user or operator instructions and/or installation instructions. 2. The removal and ...


