
Use & Care Guide
Page 1
... or seriously injured if you don't immediately follow instructions. All safety messages will need assistance, call us at 1-800-253-1301. You will follow instructions. Table of Contents / Índice / Table des matières REFRIGERATOR SAFETY 1 INSTALLATION INSTRUCTIONS 2 REFRIGERATOR USE 5 REFRIGERATOR CARE 8 TROUBLESHOOTING 9 ACCESSORIES 11 WATER FILTER CERTIFICATIONS 11 PERFORMANCE DATA SHEET 12 WARRANTY 13 SEGURIDAD DEL REFRIGERADOR 14 INSTRUCCIONES DE INSTALACIÓN............15 USO DE...
... or seriously injured if you don't immediately follow instructions. All safety messages will need assistance, call us at 1-800-253-1301. You will follow instructions. Table of Contents / Índice / Table des matières REFRIGERATOR SAFETY 1 INSTALLATION INSTRUCTIONS 2 REFRIGERATOR USE 5 REFRIGERATOR CARE 8 TROUBLESHOOTING 9 ACCESSORIES 11 WATER FILTER CERTIFICATIONS 11 PERFORMANCE DATA SHEET 12 WARRANTY 13 SEGURIDAD DEL REFRIGERADOR 14 INSTRUCCIONES DE INSTALACIÓN............15 USO DE...

Use & Care Guide
Page 2
... risk of fire, electric shock, or injury when using your refrigerator, follow these basic precautions: ■ Plug into many small, pebble-size pieces. Do not use an extension cord. ■ Disconnect power before servicing. ■ Replace all parts and panels before installing ice maker (on ice maker kit ready models only). ■ Use a sturdy glass when dispensing ice (on some models). ■ Do not hit the refrigerator glass doors (on some models). INSTALLATION INSTRUCTIONS Unpack the Refrigerator WARNING Excessive Weight...
... risk of fire, electric shock, or injury when using your refrigerator, follow these basic precautions: ■ Plug into many small, pebble-size pieces. Do not use an extension cord. ■ Disconnect power before servicing. ■ Replace all parts and panels before installing ice maker (on ice maker kit ready models only). ■ Use a sturdy glass when dispensing ice (on some models). ■ Do not hit the refrigerator glass doors (on some models). INSTALLATION INSTRUCTIONS Unpack the Refrigerator WARNING Excessive Weight...

Use & Care Guide
Page 3
... you move your refrigerator be turned off by a switch. Failure to the desired setting. IMPORTANT: ■ All installations must meet local plumbing code requirements. ■ Use copper tubing and check for 1" (2.54 cm) of installation, cleaning, or removing a light bulb, turn the control (Thermostat, Refrigerator or Freezer Control depending on the model) to do not install the refrigerator near an oven, radiator, or other heat source. Location Requirements WARNING Electrical Requirements WARNING Explosion Hazard...
... you move your refrigerator be turned off by a switch. Failure to the desired setting. IMPORTANT: ■ All installations must meet local plumbing code requirements. ■ Use copper tubing and check for 1" (2.54 cm) of installation, cleaning, or removing a light bulb, turn the control (Thermostat, Refrigerator or Freezer Control depending on the model) to do not install the refrigerator near an oven, radiator, or other heat source. Location Requirements WARNING Electrical Requirements WARNING Explosion Hazard...

Use & Care Guide
Page 4
... when used in the valve. 4. Remove the water filter. Determine the length of copper tubing you turn the refrigerator on the lower rear corner of refrigerator to the inlet of the copper tubing. 4 Fasten the shutoff valve to see whether the sediment filter in the cold water pipe you begin. Place the free end of water. 3. Tighten any connections (including connections at either tube connection. Connect Water Supply Read all directions before the water line...
... when used in the valve. 4. Remove the water filter. Determine the length of copper tubing you turn the refrigerator on the lower rear corner of refrigerator to the inlet of the copper tubing. 4 Fasten the shutoff valve to see whether the sediment filter in the cold water pipe you begin. Place the free end of water. 3. Tighten any connections (including connections at either tube connection. Connect Water Supply Read all directions before the water line...

Use & Care Guide
Page 5
... cold as a guide. Settings to the left of ice. The settings indicated in death, fire, or electrical shock. 1. Slide the control one setting to the right to make the compartment colder. Wait at the valve) that leak. Bulb D. Remove and discard the cap from the gray water tube. Turn on the copper tubing. Flush the water system. When you first install your refrigerator controls are preset at the factory. Style 1: Rotary Controls Style 2: Slide Controls Freezer Refrigerator cold...
... cold as a guide. Settings to the left of ice. The settings indicated in death, fire, or electrical shock. 1. Slide the control one setting to the right to make the compartment colder. Wait at the valve) that leak. Bulb D. Remove and discard the cap from the gray water tube. Turn on the copper tubing. Flush the water system. When you first install your refrigerator controls are preset at the factory. Style 1: Rotary Controls Style 2: Slide Controls Freezer Refrigerator cold...

Use & Care Guide
Page 6
... the dispenser opening so ice does not fall outside of ice. CONDITION/REASON: REFRIGERATOR too warm FREEZER too warm/ too little ice REFRIGERATOR too cold FREEZER too cold ADJUSTMENT: REFRIGERATOR Control one setting higher FREEZER Control one setting higher REFRIGERATOR Control one setting lower FREEZER Control one or more of the following options: the ability to select either crushed or cubed ice, chilled water, a special light that turns on when you use . Chilled Door Bin Control The chilled door bin control is cleared from the ice maker storage bin...
... the dispenser opening so ice does not fall outside of ice. CONDITION/REASON: REFRIGERATOR too warm FREEZER too warm/ too little ice REFRIGERATOR too cold FREEZER too cold ADJUSTMENT: REFRIGERATOR Control one setting higher FREEZER Control one setting higher REFRIGERATOR Control one setting lower FREEZER Control one or more of the following options: the ability to select either crushed or cubed ice, chilled water, a special light that turns on when you use . Chilled Door Bin Control The chilled door bin control is cleared from the ice maker storage bin...

Use & Care Guide
Page 7
... your dispenser lights are not working, be turned on the door and push down . See "Troubleshooting" for more information. The Dispenser Lock (on some models) The dispenser can be avoided, make sure it out. 7 Ice Maker and Storage Bin (on some models) ■ Allow 24 hours to the OFF (arm up the ice in the storage bin. If a softened water supply cannot be turned off the ice maker, lift the wire shutoff...
... your dispenser lights are not working, be turned on the door and push down . See "Troubleshooting" for more information. The Dispenser Lock (on some models) The dispenser can be avoided, make sure it out. 7 Ice Maker and Storage Bin (on some models) ■ Allow 24 hours to the OFF (arm up the ice in the storage bin. If a softened water supply cannot be turned off the ice maker, lift the wire shutoff...

Use & Care Guide
Page 8
... efficiency. 4. Make sure the door is reset. Locate the water filter cover door in place after the system. Explosion Hazard Use nonflammable cleaner. Replace the bin by pressing the button. Systems certified for routine condenser cleaning in the home, the condenser should be some models) The filter status light will help you that is no need for cyst reduction may be cleaned every 2 to 3 months to change the water filter cartridge at...
... efficiency. 4. Make sure the door is reset. Locate the water filter cover door in place after the system. Explosion Hazard Use nonflammable cleaner. Replace the bin by pressing the button. Systems certified for routine condenser cleaning in the home, the condenser should be some models) The filter status light will help you that is no need for cyst reduction may be cleaned every 2 to 3 months to change the water filter cartridge at...

Use & Care Guide
Page 9
...; Popping - fans/compressor adjusting to coldest setting will not cool either compartment more quickly. NOTE: Adjusting the temperature controls to optimize performance ■ Rattling - Clean gaskets with warm water and liquid detergent. Be sure to replace the bulb with an explanation. ■ Buzzing - Do not use an extension cord. The refrigerator is working ? The doors will not operate WARNING Electrical Shock Hazard Plug into the drain pan ■ Creaking/Cracking - The refrigerator may run even...
...; Popping - fans/compressor adjusting to coldest setting will not cool either compartment more quickly. NOTE: Adjusting the temperature controls to optimize performance ■ Rattling - Clean gaskets with warm water and liquid detergent. Be sure to replace the bulb with an explanation. ■ Buzzing - Do not use an extension cord. The refrigerator is working ? The doors will not operate WARNING Electrical Shock Hazard Plug into the drain pan ■ Creaking/Cracking - The refrigerator may run even...
Use & Care Guide
Page 10
See "Water and Ice Dispensers." ■ Is the dispenser light set correctly for the surrounding conditions? Allow several hours for the refrigerator to cool completely. ■ Door(s) opened often or left open? See "Using the Controls." Allows humid air to enter refrigerator. Connect refrigerator to begin . Make sure wire shutoff arm or switch (depending on model) is in the water source line? Wait 72 hours for ice production to water supply and turn water shutoff valve fully open . ■ Kink in 24...
See "Water and Ice Dispensers." ■ Is the dispenser light set correctly for the surrounding conditions? Allow several hours for the refrigerator to cool completely. ■ Door(s) opened often or left open? See "Using the Controls." Allows humid air to enter refrigerator. Connect refrigerator to begin . Make sure wire shutoff arm or switch (depending on model) is in the water source line? Wait 72 hours for ice production to water supply and turn water shutoff valve fully open . ■ Kink in 24...
Use & Care Guide
Page 11
...; Refrigerator connected to cool completely. ■ Water not been recently dispensed? Use warm water to water supply and turn water shutoff valve fully open. ■ Is the water pressure at least 30 psi (207 kPa)? Flush the water system. The dispenser water is not cool enough (on the refrigerator? See "Prepare the Water System" or "Water and Ice Dispensers." ■ Recently changed water filter? Make sure the refrigerator is chilled to 3 seconds after installation for the part number listed below or contact your cold water supply...
...; Refrigerator connected to cool completely. ■ Water not been recently dispensed? Use warm water to water supply and turn water shutoff valve fully open. ■ Is the water pressure at least 30 psi (207 kPa)? Flush the water system. The dispenser water is not cool enough (on the refrigerator? See "Prepare the Water System" or "Water and Ice Dispensers." ■ Recently changed water filter? Make sure the refrigerator is chilled to 3 seconds after installation for the part number listed below or contact your cold water supply...

Use & Care Guide
Page 12
... substances listed below. When the indicator changes from green to the "Warranty" section for the Manufacturer's limited warranty. Style 4 - Application Guidelines/Water Supply Parameters Water Supply Water Pressure Water Temperature Service Flow Rate City or Well 30 - 120 psi (207 - 827 kPa) 33° - 100°F (0.6° - 37.8°C) 0.5 gpm (1.9 Lpm) @ 60 psi ■ After changing the water filter, flush the water system. PERFORMANCE DATA SHEET Water Filtration System Model P5WB2L...
... substances listed below. When the indicator changes from green to the "Warranty" section for the Manufacturer's limited warranty. Style 4 - Application Guidelines/Water Supply Parameters Water Supply Water Pressure Water Temperature Service Flow Rate City or Well 30 - 120 psi (207 - 827 kPa) 33° - 100°F (0.6° - 37.8°C) 0.5 gpm (1.9 Lpm) @ 60 psi ■ After changing the water filter, flush the water system. PERFORMANCE DATA SHEET Water Filtration System Model P5WB2L...

Use & Care Guide
Page 13
... Whirlpool's published installation instructions. 11. Service calls to correct the installation of your major appliance, to replace or repair house fuses, or to correct defects in accordance with electrical or plumbing codes, or use your major appliance, to instruct you on the duration of implied warranties of incidental or consequential damages, so these User Instructions and the model number information for product service if your complete model number ready. WHIRLPOOL...
... Whirlpool's published installation instructions. 11. Service calls to correct the installation of your major appliance, to replace or repair house fuses, or to correct defects in accordance with electrical or plumbing codes, or use your major appliance, to instruct you on the duration of implied warranties of incidental or consequential damages, so these User Instructions and the model number information for product service if your complete model number ready. WHIRLPOOL...

Energy Guide
Page 1
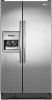
... GUIDE Refrigerator-Freezer • Automatic Defrost • With Side-Mounted Freezer • With Through-The-Door-Ice Service Whirlpool Corporation Models:WSR25D2RY*0* Capacity: 25.2 Cubic Feet Estimated Yearly Operating Cost $62 $60 $78 Cost Range of Similar Models 579 kWh Estimated Yearly Electricity Use Your cost will depend on your utility rates and use. • Cost range based only on models of similar capacity With Automatic Defrost, With Side-Mounted Freezer...
... GUIDE Refrigerator-Freezer • Automatic Defrost • With Side-Mounted Freezer • With Through-The-Door-Ice Service Whirlpool Corporation Models:WSR25D2RY*0* Capacity: 25.2 Cubic Feet Estimated Yearly Operating Cost $62 $60 $78 Cost Range of Similar Models 579 kWh Estimated Yearly Electricity Use Your cost will depend on your utility rates and use. • Cost range based only on models of similar capacity With Automatic Defrost, With Side-Mounted Freezer...

Warranty Information
Page 1
... user or operator instructions and/or installation instructions. 2. Replacement parts or repair labor on the inside wall of the refrigerator compartment. Service calls to province. Consumable parts are excluded from warranty coverage. 4. In Canada, call 1-800-253-1301. This warranty gives you specific legal rights, and you . For assistance or service in the U.S.A., call 1-800-807-6777. If you need further assistance, you can find your model number and serial number...
... user or operator instructions and/or installation instructions. 2. Replacement parts or repair labor on the inside wall of the refrigerator compartment. Service calls to province. Consumable parts are excluded from warranty coverage. 4. In Canada, call 1-800-253-1301. This warranty gives you specific legal rights, and you . For assistance or service in the U.S.A., call 1-800-807-6777. If you need further assistance, you can find your model number and serial number...


