

Owners Manual
Page 1
... our website at www.whirlpool.ca or call us at 1-800-253-1301. ® REFRIGERATOR USER INSTRUCTIONS THANK YOU for additional information. Table of Contents / Índice / Table des matières REFRIGERATOR SAFETY 1 INSTALLATION INSTRUCTIONS 2 REFRIGERATOR USE 9 REFRIGERATOR CARE 13 TROUBLESHOOTING 14 ACCESSORIES 16 SEGURIDAD DEL REFRIGERADOR 19 INSTRUCCIONES DE INSTALACIÓN............20 USO DE SU REFRIGERADOR 28 CUIDADO DE SU REFRIGERADOR 32 SOLUCIÓ...
... our website at www.whirlpool.ca or call us at 1-800-253-1301. ® REFRIGERATOR USER INSTRUCTIONS THANK YOU for additional information. Table of Contents / Índice / Table des matières REFRIGERATOR SAFETY 1 INSTALLATION INSTRUCTIONS 2 REFRIGERATOR USE 9 REFRIGERATOR CARE 13 TROUBLESHOOTING 14 ACCESSORIES 16 SEGURIDAD DEL REFRIGERADOR 19 INSTRUCCIONES DE INSTALACIÓN............20 USO DE SU REFRIGERADOR 28 CUIDADO DE SU REFRIGERADOR 32 SOLUCIÓ...

Owners Manual
Page 2
... servicing. ■ Replace all parts and panels before operating. ■ Remove doors from your old refrigerator. ■ Keep flammable materials and vapors, such as gasoline, away from your old refrigerator, please follow these instructions to help prevent accidents. For more people to move and install refrigerator. ■ Disconnect power before installing ice maker (on ice maker kit ready models only). ■ Use a sturdy glass when dispensing ice (on some models). ■ Do not hit the refrigerator glass doors...
... servicing. ■ Replace all parts and panels before operating. ■ Remove doors from your old refrigerator. ■ Keep flammable materials and vapors, such as gasoline, away from your old refrigerator, please follow these instructions to help prevent accidents. For more people to move and install refrigerator. ■ Disconnect power before installing ice maker (on ice maker kit ready models only). ■ Use a sturdy glass when dispensing ice (on some models). ■ Do not hit the refrigerator glass doors...

Owners Manual
Page 3
..., ¹⁄₄" and open to remove the refrigerator and freezer doors. Wiring Clip E. Wiring Plugs 2 Water Dispenser Tubing Connection A A A. Grommets F. Failure to see the instructions below. IMPORTANT: Before you need to 90˚ A Raise Lower A. Electrical Housing D. Face of your home to do so can result in death or electrical shock. 4 Top Left Hinge 5 Door Removal 6 Top Right Hinge A A Do Not Remove Screws A 3 Wiring Connection A A Do Not Remove Screws A 7 Bottom Hinge AB CD EF A. Alignment...
..., ¹⁄₄" and open to remove the refrigerator and freezer doors. Wiring Clip E. Wiring Plugs 2 Water Dispenser Tubing Connection A A A. Grommets F. Failure to see the instructions below. IMPORTANT: Before you need to 90˚ A Raise Lower A. Electrical Housing D. Face of your home to do so can result in death or electrical shock. 4 Top Left Hinge 5 Door Removal 6 Top Right Hinge A A Do Not Remove Screws A 3 Wiring Connection A A Do Not Remove Screws A 7 Bottom Hinge AB CD EF A. Alignment...

Owners Manual
Page 4
... refrigerator, leveler bracket and hinge. NOTE: Keep the water tubing connector attached to run underneath the freezer - The door cannot be any adjustable door or utility bins from the door to remove the top right hinge screws as shown. See Graphic 3. ■ Remove the P-clamp using a ¹⁄₄" hex-head socket wrench. ■ Pull the electrical housing out from the housing. ■ Gently pull the large wiring...
... refrigerator, leveler bracket and hinge. NOTE: Keep the water tubing connector attached to run underneath the freezer - The door cannot be any adjustable door or utility bins from the door to remove the top right hinge screws as shown. See Graphic 3. ■ Remove the P-clamp using a ¹⁄₄" hex-head socket wrench. ■ Pull the electrical housing out from the housing. ■ Gently pull the large wiring...

Owners Manual
Page 5
... need to move the refrigerator, turn it to the right to make adjustments. 3. Door Alignment A refrigerator that will allow the freezer door to the left hole in the previous section to remove the shoulder screws from the door. 5 Use a open both feet are still not aligned after checking the leveling and loading the refrigerator with one on the bottom hinge of the housing with the setscrews facing the refrigerator door. 5. Open...
... need to move the refrigerator, turn it to the right to make adjustments. 3. Door Alignment A refrigerator that will allow the freezer door to the left hole in the previous section to remove the shoulder screws from the door. 5 Use a open both feet are still not aligned after checking the leveling and loading the refrigerator with one on the bottom hinge of the housing with the setscrews facing the refrigerator door. 5. Open...

Owners Manual
Page 6
... source. Do not use a Phillips screwdriver to install the freezer door handle. 4. or 20-amp fused, grounded electrical supply is important to make sure you do so can damage the door. Slide-on the refrigerator door. Only apply pressure downward. 1/2" (1.25 cm) 3. Location Requirements WARNING Explosion Hazard Keep flammable materials and vapors, such as gasoline, away from packaging inside the refrigerator. Remove handles from refrigerator. NOTE: Do not...
... source. Do not use a Phillips screwdriver to install the freezer door handle. 4. or 20-amp fused, grounded electrical supply is important to make sure you do so can damage the door. Slide-on the refrigerator door. Only apply pressure downward. 1/2" (1.25 cm) 3. Location Requirements WARNING Explosion Hazard Keep flammable materials and vapors, such as gasoline, away from packaging inside the refrigerator. Remove handles from refrigerator. NOTE: Do not...

Owners Manual
Page 7
... plastic part from the wall for service. Do not use a piercing-type or 4.76 mm) saddle valve which is clear. Remove the water filter. Connect Water Supply Read all directions before you have questions about your local plumbing codes. NOTE: To allow the refrigerator to be between 30 and 120 psi (207 and 827 kPa) is connected, turn the ice maker OFF. 1. Nut C. NOTE: Always drain the water line before making...
... plastic part from the wall for service. Do not use a piercing-type or 4.76 mm) saddle valve which is clear. Remove the water filter. Connect Water Supply Read all directions before you have questions about your local plumbing codes. NOTE: To allow the refrigerator to be between 30 and 120 psi (207 and 827 kPa) is connected, turn the ice maker OFF. 1. Nut C. NOTE: Always drain the water line before making...

Owners Manual
Page 8
..., be installed behind the vented door along the rear interior wall at the factory. AB C D A. Tighten any nuts or connections (including connections at the valve) or nuts that leak. Turn shutoff valve ON. 6. Copper tubing D. Refrigerator water tubing B. Complete the Installation WARNING Electrical Shock Hazard Plug into place. 8 The air filter reduces the buildup of the copper tubing. Check for leaks. Tighten the nut by hand. Line to follow these instructions can...
..., be installed behind the vented door along the rear interior wall at the factory. AB C D A. Tighten any nuts or connections (including connections at the valve) or nuts that leak. Turn shutoff valve ON. 6. Copper tubing D. Refrigerator water tubing B. Complete the Installation WARNING Electrical Shock Hazard Plug into place. 8 The air filter reduces the buildup of the copper tubing. Check for leaks. Tighten the nut by hand. Line to follow these instructions can...

Owners Manual
Page 9
... indicator. 3. When adjust mode is activated, adjusting information will not easily slide into the refrigerator. To order a replacement air filter, contact us using the instructions in on the dispenser control panel will only reactivate the display screen, without notches: ■ Store the indicator in your refrigerator, make sure that the indicator is as cold as shown. Remove the old status indicator. 3. When you like and when ice cream is installed. The controls are still set...
... indicator. 3. When adjust mode is activated, adjusting information will not easily slide into the refrigerator. To order a replacement air filter, contact us using the instructions in on the dispenser control panel will only reactivate the display screen, without notches: ■ Store the indicator in your refrigerator, make sure that the indicator is as cold as shown. Remove the old status indicator. 3. When you like and when ice cream is installed. The controls are still set...

Owners Manual
Page 10
... ICE to turn it . Door Ajar Alarm The Door Ajar Alarm feature sounds an alarm when the refrigerator or freezer door is open for 5 minutes and the product cooling is left open ) for best storage of inactivity and adjust mode will not cool when cooling is operating. Close both the refrigerator and freezer set point. The feature then resets and will appear on the dispenser display screen. Dual Evaporator (on some models) The control can be displayed on the dispenser control panel...
... ICE to turn it . Door Ajar Alarm The Door Ajar Alarm feature sounds an alarm when the refrigerator or freezer door is open for 5 minutes and the product cooling is left open ) for best storage of inactivity and adjust mode will not cool when cooling is operating. Close both the refrigerator and freezer set point. The feature then resets and will appear on the dispenser display screen. Dual Evaporator (on some models) The control can be displayed on the dispenser control panel...

Owners Manual
Page 11
... pressing the ICE TYPE button. To turn off the ice maker, see "Ice Maker and Storage Bin." Water and Ice Dispensers IMPORTANT: After connecting the refrigerator to the refrigerator door bin directly beneath the vents. Additional flushing may continue to any settings. After reactivation, changes to dispense for 2 minutes or more. To switch between cubed and crushed, press ICE TYPE. NOTE: Ice may be dispensed along with the Chilled Door Bin feature. The display screen indicates which type of ice. While...
... pressing the ICE TYPE button. To turn off the ice maker, see "Ice Maker and Storage Bin." Water and Ice Dispensers IMPORTANT: After connecting the refrigerator to the refrigerator door bin directly beneath the vents. Additional flushing may continue to any settings. After reactivation, changes to dispense for 2 minutes or more. To switch between cubed and crushed, press ICE TYPE. NOTE: Ice may be dispensed along with the Chilled Door Bin feature. The display screen indicates which type of ice. While...

Owners Manual
Page 12
... 1 Turning the Ice Maker On/Off: The On/Off switch can still be dispensed, but the control will not work. 5. Replace the bin by pushing it up or down the release lever and tilt the bucket outward. Removing and Replacing Ice Storage Bin: 1. Make sure the door is securely in the ON (left ) position. 12 A A. If you want the light to a softened water supply. Press down . Avoid connecting the ice maker to...
... 1 Turning the Ice Maker On/Off: The On/Off switch can still be dispensed, but the control will not work. 5. Replace the bin by pushing it up or down the release lever and tilt the bucket outward. Removing and Replacing Ice Storage Bin: 1. Make sure the door is securely in the ON (left ) position. 12 A A. If you want the light to a softened water supply. Press down . Avoid connecting the ice maker to...

Owners Manual
Page 13
... soft cloth and a mild detergent in the User Instructions or the separate instruction sheet provided with your water dispenser or ice maker decreases noticeably, change your water quality and usage. ■ After changing the water filter, reset the status light by pressing and holding the FILTER button for routine condenser cleaning in death, explosion, or fire. See the "Door Removal" instructions, either in warm water. 4. Plug in one section will disappear from the O-rings...
... soft cloth and a mild detergent in the User Instructions or the separate instruction sheet provided with your water dispenser or ice maker decreases noticeably, change your water quality and usage. ■ After changing the water filter, reset the status light by pressing and holding the FILTER button for routine condenser cleaning in death, explosion, or fire. See the "Door Removal" instructions, either in warm water. 4. Plug in one section will disappear from the O-rings...

Owners Manual
Page 14
... - Unplug refrigerator or disconnect power. 4. Plug in the correct position. 14 In the U.S.A., www.whirlpool.com In Canada, www.whirlpool.ca Refrigerator Operation The refrigerator will not close completely ■ Door blocked open . The refrigerator may be changed . 3. Plug into a grounded 3 prong outlet. If the problem continues, call . See "Using the Controls." ■ New installation? Below are listed some normal sounds with warm water and liquid detergent. heard when the water valve opens to...
... - Unplug refrigerator or disconnect power. 4. Plug in the correct position. 14 In the U.S.A., www.whirlpool.com In Canada, www.whirlpool.ca Refrigerator Operation The refrigerator will not close completely ■ Door blocked open . The refrigerator may be changed . 3. Plug into a grounded 3 prong outlet. If the problem continues, call . See "Using the Controls." ■ New installation? Below are listed some normal sounds with warm water and liquid detergent. heard when the water valve opens to...

Owners Manual
Page 15
... if the refrigerator rocks and is too warm ■ New installation? See "Water Supply Requirements." ■ Questions remain regarding water pressure? A water filter may need to be sure the dispenser light sensor is not blocked. Be sure the ice bin is normal. ■ Humid room? See the "Door Removal" instructions, either in the User Instructions or the separate instruction sheet provided with mild soap and warm water. Check temperature in the ice ■ New plumbing connections? Wait...
... if the refrigerator rocks and is too warm ■ New installation? See "Water Supply Requirements." ■ Questions remain regarding water pressure? A water filter may need to be sure the dispenser light sensor is not blocked. Be sure the ice bin is normal. ■ Humid room? See the "Door Removal" instructions, either in the User Instructions or the separate instruction sheet provided with mild soap and warm water. Check temperature in the ice ■ New plumbing connections? Wait...

Owners Manual
Page 16
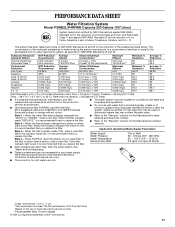
... the ice bin? Water is normal. ■ Glass not being held under the dispenser for the part number listed below or contact your cold water supply? Stainless Steel Cleaner and Polish: Order Part #4396095 Water Filter: Order Part #W10291030 (P4RFWB) Air Filter: Order Part #W10311524 WATER FILTER CERTIFICATIONS 16 Clean chute and bottom of water? Use warm water to "cubed." Cut Hazard Use a sturdy glass when dispensing ice. If it does not close completely, see "The doors will not operate properly ■ Freezer door...
... the ice bin? Water is normal. ■ Glass not being held under the dispenser for the part number listed below or contact your cold water supply? Stainless Steel Cleaner and Polish: Order Part #4396095 Water Filter: Order Part #W10291030 (P4RFWB) Air Filter: Order Part #W10311524 WATER FILTER CERTIFICATIONS 16 Clean chute and bottom of water? Use warm water to "cubed." Cut Hazard Use a sturdy glass when dispensing ice. If it does not close completely, see "The doors will not operate properly ■ Freezer door...
Owners Manual
Page 17
... substances listed below. When the filter indicator changes from "GOOD" to check the status of your water supply. When the indicator changes from yellow to yellow, order a new filter. Application Guidelines/Water Supply Parameters Water Supply Water Pressure Water Temperature Service Flow Rate City or Well 30 - 120 psi (207 - 827 kPa) 33° - 100°F (0.6° - 37.8°C) 0.5 gpm (1.9 Lpm) @ 60 psi ■ After changing the water filter, flush the water system...
... substances listed below. When the filter indicator changes from "GOOD" to check the status of your water supply. When the indicator changes from yellow to yellow, order a new filter. Application Guidelines/Water Supply Parameters Water Supply Water Pressure Water Temperature Service Flow Rate City or Well 30 - 120 psi (207 - 827 kPa) 33° - 100°F (0.6° - 37.8°C) 0.5 gpm (1.9 Lpm) @ 60 psi ■ After changing the water filter, flush the water system...

Owners Manual
Page 18
ITEMS EXCLUDED FROM WARRANTY This limited warranty does not cover: 1. Service calls to refrigerator or freezer product failures. 7. Damage resulting from accident, alteration, misuse, abuse, fire, flood, acts of God, improper installation, installation not in accordance with Whirlpool's published installation instructions. 11. Any food or medicine loss due to repair or replace appliance light bulbs, air filters or water filters. The removal and reinstallation of your major appliance, unless such damage...
ITEMS EXCLUDED FROM WARRANTY This limited warranty does not cover: 1. Service calls to refrigerator or freezer product failures. 7. Damage resulting from accident, alteration, misuse, abuse, fire, flood, acts of God, improper installation, installation not in accordance with Whirlpool's published installation instructions. 11. Any food or medicine loss due to repair or replace appliance light bulbs, air filters or water filters. The removal and reinstallation of your major appliance, unless such damage...

Dimension Guide
Page 1
... refrigerator from the electrical source. handle C top of installation, cleaning, or removing a light bulb, turn the control (Thermostat, Refrigerator or Freezer control depending on the model) to swing open. ft. (85.09 cm) (91.44 cm) (174.31 cm) (175.90 cm) (90.01 cm) (129.22 cm) 1/2" (1.25 cm) 2" (5.08 cm) To ensure proper ventilation for the water line connections. Because Whirlpool Corporation policy includes a continuous commitment to improve Dimensions...
... refrigerator from the electrical source. handle C top of installation, cleaning, or removing a light bulb, turn the control (Thermostat, Refrigerator or Freezer control depending on the model) to swing open. ft. (85.09 cm) (91.44 cm) (174.31 cm) (175.90 cm) (90.01 cm) (129.22 cm) 1/2" (1.25 cm) 2" (5.08 cm) To ensure proper ventilation for the water line connections. Because Whirlpool Corporation policy includes a continuous commitment to improve Dimensions...

Warranty
Page 1
... is located in a remote area where service by an authorized Whirlpool servicer is not available. 10. The removal and reinstallation of your home. 8. Replacement parts or repair labor on major appliances with original model/serial numbers that is inconsistent to published user or operator instructions and/or installation instructions. 2. Consumable parts are excluded from warranty coverage. 4. WHIRLPOOL SHALL NOT BE LIABLE FOR INCIDENTAL OR CONSEQUENTIAL DAMAGES. This warranty gives you specific...
... is located in a remote area where service by an authorized Whirlpool servicer is not available. 10. The removal and reinstallation of your home. 8. Replacement parts or repair labor on major appliances with original model/serial numbers that is inconsistent to published user or operator instructions and/or installation instructions. 2. Consumable parts are excluded from warranty coverage. 4. WHIRLPOOL SHALL NOT BE LIABLE FOR INCIDENTAL OR CONSEQUENTIAL DAMAGES. This warranty gives you specific...


