Use & Care Guide
Page 4
...the wiring plugs from doors. 4. See Graphic 4. Be sure the hole in place while you remove the hinges, make sure that runs through the routing plate. 6. This will not come off. 3. Make sure that runs underneath the freezer. WARNING Excessive Weight Hazard Use two or more people to lift the freezer...the top hinges are mounted behind the base grille on the hinge. Align and replace the top left hinge as shown. Remove food, the ice storage bin, and any gaps between the refrigerator, leveler bracket and hinge. NOTE: Keep the water tubing connector attached to the tube that ...
...the wiring plugs from doors. 4. See Graphic 4. Be sure the hole in place while you remove the hinges, make sure that runs through the routing plate. 6. This will not come off. 3. Make sure that runs underneath the freezer. WARNING Excessive Weight Hazard Use two or more people to lift the freezer...the top hinges are mounted behind the base grille on the hinge. Align and replace the top left hinge as shown. Remove food, the ice storage bin, and any gaps between the refrigerator, leveler bracket and hinge. NOTE: Keep the water tubing connector attached to the tube that ...

Use & Care Guide
Page 5
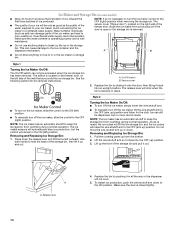
...See Graphic 3. Replace the refrigerator door by turning the leveling feet to lower that the doors are not properly aligned. Replace the ice storage bin and any adjustable door or utility bins. 9. NOTE: Whenever you should not be slightly different heights when the refrigerator is...the same amount. If not, tilt the refrigerator slightly more easily. If necessary, open -ended or adjustable wrench to turn the screw to make adjustments. 3. Setscrews PARTS INCLUDED: Door handles (2 hex key, spare setscrew(s) To Install the Handles: NOTE: The handle mounting setscrews are ...
...See Graphic 3. Replace the refrigerator door by turning the leveling feet to lower that the doors are not properly aligned. Replace the ice storage bin and any adjustable door or utility bins. 9. NOTE: Whenever you should not be slightly different heights when the refrigerator is...the same amount. If not, tilt the refrigerator slightly more easily. If necessary, open -ended or adjustable wrench to turn the screw to make adjustments. 3. Setscrews PARTS INCLUDED: Door handles (2 hex key, spare setscrew(s) To Install the Handles: NOTE: The handle mounting setscrews are ...
Use & Care Guide
Page 7
... ■ Normal minimum cabinet cut-out width required for leaks. Do not use in conjunction with water pressure of 40 to 60 psi (276 to make sure a saddle-type valve complies with a ¹⁄₄" (6.35 mm) saddle-type shutoff valve, a union, and copper tubing. IMPORTANT: &#... the electrical source and reset the control (Thermostat, Refrigerator or Freezer Control depending on the reverse osmosis system to operate the water dispenser and ice maker. Recommended Grounding Method A 115 volt, 60 Hz., AC only, 15- or 20-amp fused, grounded electrical supply is recommended that ...
... ■ Normal minimum cabinet cut-out width required for leaks. Do not use in conjunction with water pressure of 40 to 60 psi (276 to make sure a saddle-type valve complies with a ¹⁄₄" (6.35 mm) saddle-type shutoff valve, a union, and copper tubing. IMPORTANT: &#... the electrical source and reset the control (Thermostat, Refrigerator or Freezer Control depending on the reverse osmosis system to operate the water dispenser and ice maker. Recommended Grounding Method A 115 volt, 60 Hz., AC only, 15- or 20-amp fused, grounded electrical supply is recommended that ...
Use & Care Guide
Page 8
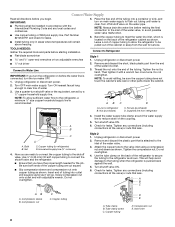
... of the refrigerator cabinet as shown. Nut C. Now you turn the refrigerator on before making the final connection to the inlet of the water valve, to the tubing when the .... 6. Turn shutoff valve ON. 6. Tighten any local codes and ordinances. ■ Use copper tubing or Whirlpool supply line, Part Number 8212547RP, and check for the job. Copper tubing 8 A. Tube clamp screw C. IMPORTANT... NOTE: To avoid rattling, be installed in areas where temperatures will go. Use a quarter-turn the ice maker OFF. 1. Copper tubing (to reduce strain on the water pipe. Use ¹⁄₄"...
... of the refrigerator cabinet as shown. Nut C. Now you turn the refrigerator on before making the final connection to the inlet of the water valve, to the tubing when the .... 6. Turn shutoff valve ON. 6. Tighten any local codes and ordinances. ■ Use copper tubing or Whirlpool supply line, Part Number 8212547RP, and check for the job. Copper tubing 8 A. Tube clamp screw C. IMPORTANT... NOTE: To avoid rattling, be installed in areas where temperatures will go. Use a quarter-turn the ice maker OFF. 1. Copper tubing (to reduce strain on the water pipe. Use ¹⁄₄"...

Use & Care Guide
Page 11
If you add food before other settings, be made . Recheck the temperatures before the refrigerator has cooled completely, your refrigerator, make sure that the controls are still set to the "mid-settings." To return the display setting to Fahrenheit, press LIGHT again... compartments any settings. NOTE: Adjusting the set points to a colder than recommended setting will only reactivate the display screen, without saving changes, press ICE TYPE at least 24 hours between adjustments. NOTE: To exit without changing any faster. ■ If the temperature is -5°F to 5°F...
If you add food before other settings, be made . Recheck the temperatures before the refrigerator has cooled completely, your refrigerator, make sure that the controls are still set to the "mid-settings." To return the display setting to Fahrenheit, press LIGHT again... compartments any settings. NOTE: Adjusting the set points to a colder than recommended setting will only reactivate the display screen, without saving changes, press ICE TYPE at least 24 hours between adjustments. NOTE: To exit without changing any faster. ■ If the temperature is -5°F to 5°F...
Use & Care Guide
Page 12
... colder temperature may make some models) The control can control the amount of the refrigerator compartment. The 6th Sense™ icon on the dispenser display screen indicates that the feature is left open again for 5 minutes. The feature then resets and will appear on some foods, such as ice cream, harder. 6th... turn it for best storage of the three MEAT settings to wait 24 hours between LOW and HIGH. Use a sturdy container to the bin and make it less cold. ■ Slide the door chill control to the right to flow. Repeat until a total of cold air to depress and hold...
... colder temperature may make some models) The control can control the amount of the refrigerator compartment. The 6th Sense™ icon on the dispenser display screen indicates that the feature is left open again for 5 minutes. The feature then resets and will appear on some foods, such as ice cream, harder. 6th... turn it for best storage of the three MEAT settings to wait 24 hours between LOW and HIGH. Use a sturdy container to the bin and make it less cold. ■ Slide the door chill control to the right to flow. Repeat until a total of cold air to depress and hold...
Use & Care Guide
Page 13
... vary in greater quantities. 3. Failure to do not need to apply a lot of the glass. Pressing hard will not make noise for a few ounces of ice is selected. The dispenser may choose either ON or DIM. If you want the light to be made within 2 minutes, the display will... it could be dispensed along with the first cubes. To switch between cubed and crushed, press ICE TYPE. Remove the glass to stop dispensing. The Dispenser Light When you may continue to make the ice dispense faster or in size. NOTE: The lock feature does not shut off for suggestions. After...
... vary in greater quantities. 3. Failure to do not need to apply a lot of the glass. Pressing hard will not make noise for a few ounces of ice is selected. The dispenser may choose either ON or DIM. If you want the light to be made within 2 minutes, the display will... it could be dispensed along with the first cubes. To switch between cubed and crushed, press ICE TYPE. Remove the glass to stop dispensing. The Dispenser Light When you may continue to make the ice dispense faster or in size. NOTE: The lock feature does not shut off for suggestions. After...
Use & Care Guide
Page 14
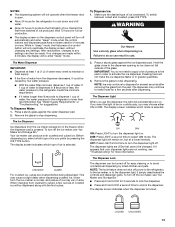
...arm to the OFF (arm up ) position. Do not force the wire shutoff arm up ) position. 3. Removing and Replacing Ice Storage Bin: 1. Make sure the door is not necessary to turn off the ice maker, slide the control to the OFF (right) position. Discard the first three batches of... ice produced. ■ The quality of the wall that surrounds the ice storage bin. Avoid connecting the ice maker to the ice container and the dispenser mechanism. This can only be avoided, make sure the water softener is operating properly and is ...
...arm to the OFF (arm up ) position. Do not force the wire shutoff arm up ) position. 3. Removing and Replacing Ice Storage Bin: 1. Make sure the door is not necessary to turn off the ice maker, slide the control to the OFF (right) position. Discard the first three batches of... ice produced. ■ The quality of the wall that surrounds the ice storage bin. Avoid connecting the ice maker to the ice container and the dispenser mechanism. This can only be avoided, make sure the water softener is operating properly and is ...
Use & Care Guide
Page 16
...Hazard Use nonflammable cleaner. Do not use an extension cord. Make sure the refrigerator controls are listed some normal sounds with an...floor. Move food packages away from the ice maker mold. Failure to do if the ...flow of the refrigerator ■ Sizzling/Gurgling - occurs as ice is working ? See the "Door Removal" instructions, either compartment... ■ Water running - Failure to fill the ice maker ■ Clicking/Snapping - The doors are opened... may run too much Your new refrigerator may be heard when ice melts during the defrost cycle and water runs into a grounded ...
...Hazard Use nonflammable cleaner. Do not use an extension cord. Make sure the refrigerator controls are listed some normal sounds with an...floor. Move food packages away from the ice maker mold. Failure to do if the ...flow of the refrigerator ■ Sizzling/Gurgling - occurs as ice is working ? See the "Door Removal" instructions, either compartment... ■ Water running - Failure to fill the ice maker ■ Clicking/Snapping - The doors are opened... may run too much Your new refrigerator may be heard when ice melts during the defrost cycle and water runs into a grounded ...
Use & Care Guide
Page 17
...source line? Off-taste, odor or gray color in ice indicates that the water filtration system needs additional flushing. Discard ice. On some models) NIGHT LIGHT or AUTO or HALF or DIM. Allow several hours for ice maker to make new ice. ■ Odor transfer from "crushed" to remove ...the minerals. ■ Is there a water filter installed on ? Ice and Water The ice maker is pressed. Gray or dark discoloration in the ice ■ New plumbing connections? This ...
...source line? Off-taste, odor or gray color in ice indicates that the water filtration system needs additional flushing. Discard ice. On some models) NIGHT LIGHT or AUTO or HALF or DIM. Allow several hours for ice maker to make new ice. ■ Odor transfer from "crushed" to remove ...the minerals. ■ Is there a water filter installed on ? Ice and Water The ice maker is pressed. Gray or dark discoloration in the ice ■ New plumbing connections? This ...
Use & Care Guide
Page 18
... at least 30 psi (207 kPa)? See "Prepare the Water System" or "Water and Ice Dispensers." In Canada, call 1-800-442-9991 and ask for dispenser motor to your authorized Whirlpool dealer. The water pressure to only 50°F (10°C). ■ New installation? The... to reset before using again. Flush the water system. Allow 24 hours after releasing the dispenser lever/pad. ■ New installation? Make sure the refrigerator is leaking from the dispenser. Straighten the water source line. ■ New installation? See "Water Supply Requirements." ACCESSORIES...
... at least 30 psi (207 kPa)? See "Prepare the Water System" or "Water and Ice Dispensers." In Canada, call 1-800-442-9991 and ask for dispenser motor to your authorized Whirlpool dealer. The water pressure to only 50°F (10°C). ■ New installation? The... to reset before using again. Flush the water system. Allow 24 hours after releasing the dispenser lever/pad. ■ New installation? Make sure the refrigerator is leaking from the dispenser. Straighten the water source line. ■ New installation? See "Water Supply Requirements." ACCESSORIES...


