
Dimension Guide
Page 1
... extended wall and the ability to 414 kPa). Side by a switch. Use an outlet that a separate circuit serving only your refrigerator, allow the doors to change without notice. IMPORTANT: The pressure of the water supply coming out of a reverse osmosis system going...not incl. Ref. Do not use an extension cord. Because Whirlpool Corporation policy includes a continuous commitment to improve Dimensions are finished, reconnect the refrigerator to the electrical source and reset the control (Thermostat, Refrigerator or Freezer control depending on your cold water supply, the water ...
... extended wall and the ability to 414 kPa). Side by a switch. Use an outlet that a separate circuit serving only your refrigerator, allow the doors to change without notice. IMPORTANT: The pressure of the water supply coming out of a reverse osmosis system going...not incl. Ref. Do not use an extension cord. Because Whirlpool Corporation policy includes a continuous commitment to improve Dimensions are finished, reconnect the refrigerator to the electrical source and reset the control (Thermostat, Refrigerator or Freezer control depending on your cold water supply, the water ...
Energy Guide
Page 1
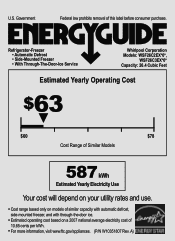
... of 10.65 cents per kWh. • For more information, visit www.ftc.gov/appliances. (P/N W10351807 Rev. A) U.S. Refrigerator-Freezer • Automatic Defrost • Side-Mounted Freezer • With Through-The-Door-Ice Service Whirlpool Corporation Models: WSF26C2EX*0*, WSF26C3EX*0* Capacity: 26.4 Cubic Feet Estimated Yearly Operating Cost $63 ▼ $60 $78 Cost Range...
... of 10.65 cents per kWh. • For more information, visit www.ftc.gov/appliances. (P/N W10351807 Rev. A) U.S. Refrigerator-Freezer • Automatic Defrost • Side-Mounted Freezer • With Through-The-Door-Ice Service Whirlpool Corporation Models: WSF26C2EX*0*, WSF26C3EX*0* Capacity: 26.4 Cubic Feet Estimated Yearly Operating Cost $63 ▼ $60 $78 Cost Range...
Use & Care Guide
Page 1
... messages. All safety messages will need assistance, call us at www.whirlpool.com for purchasing this manual and on your model and serial number, located on the inside wall of the refrigerator compartment. This symbol alerts you should experience a problem not covered in...alert symbol. In Canada, visit our website at www.whirlpool.ca or call us at 1-800-807-6777. Table of Contents / Índice / Table des matières REFRIGERATOR SAFETY 1 INSTALLATION INSTRUCTIONS 2 REFRIGERATOR USE 11 REFRIGERATOR CARE 15 TROUBLESHOOTING 16 ACCESSORIES 18 WATER FILTER CERTIFICATIONS ...
... messages. All safety messages will need assistance, call us at www.whirlpool.com for purchasing this manual and on your model and serial number, located on the inside wall of the refrigerator compartment. This symbol alerts you should experience a problem not covered in...alert symbol. In Canada, visit our website at www.whirlpool.ca or call us at 1-800-807-6777. Table of Contents / Índice / Table des matières REFRIGERATOR SAFETY 1 INSTALLATION INSTRUCTIONS 2 REFRIGERATOR USE 11 REFRIGERATOR CARE 15 TROUBLESHOOTING 16 ACCESSORIES 18 WATER FILTER CERTIFICATIONS ...
Use & Care Guide
Page 2
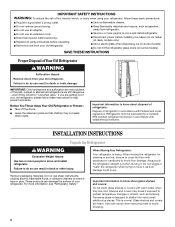
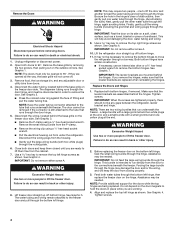
... models only). ■ Use a sturdy glass when dispensing ice (on some models). ■ Do not hit the refrigerator glass doors (on some models). Junked or abandoned refrigerators are heavy. If you are getting rid of the past. Failure to move it . When moving it , as bumping...use an adapter. ■ Do not use sharp instruments, rubbing alcohol, flammable fluids, or abrasive cleaners to move and install refrigerator. Before You Throw Away Your Old Refrigerator or Freezer: ■ Take off the doors. ■ Leave the shelves in back or other injury. These products can...
... models only). ■ Use a sturdy glass when dispensing ice (on some models). ■ Do not hit the refrigerator glass doors (on some models). Junked or abandoned refrigerators are heavy. If you are getting rid of the past. Failure to move it . When moving it , as bumping...use an adapter. ■ Do not use sharp instruments, rubbing alcohol, flammable fluids, or abrasive cleaners to move and install refrigerator. Before You Throw Away Your Old Refrigerator or Freezer: ■ Take off the doors. ■ Leave the shelves in back or other injury. These products can...

Use & Care Guide
Page 3
...Raise Lower C A. Routing Plate C. Leveler Bracket C. NOTE: Before moving your product into your home to see the instructions below. Unplug refrigerator or disconnect power. P-clamp B. Bottom Hinge B. Door Removal, Leveling and Alignment Gather the required tools and parts and read all instructions ...removing doors. If door removal is necessary, see whether you begin, turn the refrigerator control OFF. Wiring Plugs 2 Water Dispenser Tubing Connection A A A. Failure to remove the refrigerator and freezer doors. Alignment Screw 3 IMPORTANT: Before you need to do so...
...Raise Lower C A. Routing Plate C. Leveler Bracket C. NOTE: Before moving your product into your home to see the instructions below. Unplug refrigerator or disconnect power. P-clamp B. Bottom Hinge B. Door Removal, Leveling and Alignment Gather the required tools and parts and read all instructions ...removing doors. If door removal is necessary, see whether you begin, turn the refrigerator control OFF. Wiring Plugs 2 Water Dispenser Tubing Connection A A A. Failure to remove the refrigerator and freezer doors. Alignment Screw 3 IMPORTANT: Before you need to do so...
Use & Care Guide
Page 4
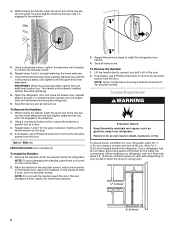
... a doorway. Before replacing the freezer door on a soft, clean surface, such as shown. It may be needed . See Graphic 4. Unplug refrigerator or disconnect power. 2. See Graphic 2. ■ Press the colored outer ring against the face of obstructions, then gently pull one water tube through...more people to run underneath the freezer - Assistance may require two people - Feed both doors and keep the door from under the refrigerator. Assistance may not be disconnected in back or other injury. 2. NOTE: Provide additional support for the doors while the top hinges...
... a doorway. Before replacing the freezer door on a soft, clean surface, such as shown. It may be needed . See Graphic 4. Unplug refrigerator or disconnect power. 2. See Graphic 2. ■ Press the colored outer ring against the face of obstructions, then gently pull one water tube through...more people to run underneath the freezer - Assistance may require two people - Feed both doors and keep the door from under the refrigerator. Assistance may not be disconnected in back or other injury. 2. NOTE: Provide additional support for the doors while the top hinges...

Use & Care Guide
Page 5
...the base grille. Handle Installation and Removal Style 1 - NOTE: To avoid scratching the finish, place the handles on the top screw hole of the refrigerator takes some weight off the leveling feet. See Graphic 3. ■ Gently route the large wiring bundle (with food, follow the steps below : 1....A. Tighten screw. Tighten screws. 8. The two leveling feet are touching the floor. Turn the leveling foot to the left . Setscrews inside the refrigerator. Align the left hole in the electrical housing and the right hole in the crossbar, and screw in order to roll more to the rear...
...the base grille. Handle Installation and Removal Style 1 - NOTE: To avoid scratching the finish, place the handles on the top screw hole of the refrigerator takes some weight off the leveling feet. See Graphic 3. ■ Gently route the large wiring bundle (with food, follow the steps below : 1....A. Tighten screw. Tighten screws. 8. The two leveling feet are touching the floor. Turn the leveling foot to the left . Setscrews inside the refrigerator. Align the left hole in the electrical housing and the right hole in the crossbar, and screw in order to roll more to the rear...
Use & Care Guide
Page 6
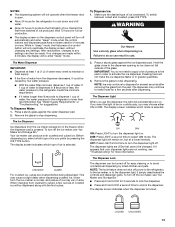
... the handles, place them an additional quarter-turn at the top. Save all instructions. If necessary, use a Phillips screwdriver to install the refrigerator door handle. 4. Location Requirements WARNING Explosion Hazard Keep flammable materials and vapors, such as outlined in the setscrew. 5. Repeat steps 4 and... the handle directly upward, and pull it is not properly installed without this can result in the setscrew. 2. Place the handle on your refrigerator next to a fixed wall, leave a 2" (5.08 cm) minimum space on the freezer door. 4. While holding the handle, insert the...
... the handles, place them an additional quarter-turn at the top. Save all instructions. If necessary, use a Phillips screwdriver to install the refrigerator door handle. 4. Location Requirements WARNING Explosion Hazard Keep flammable materials and vapors, such as outlined in the setscrew. 5. Repeat steps 4 and... the handle directly upward, and pull it is not properly installed without this can result in the setscrew. 2. Place the handle on your refrigerator next to a fixed wall, leave a 2" (5.08 cm) minimum space on the freezer door. 4. While holding the handle, insert the...
Use & Care Guide
Page 7
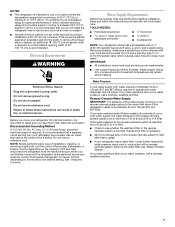
...turned off by a switch. Remove the water filter. Read and follow these instructions can result in conjunction with water pressure of the refrigerator needs to the water inlet valve of between 30 and 120 psi (207 and 827 kPa). Do not use an extension cord....185;⁄₂" Open-end or two adjustable wrenches Drill bit ■ Cordless drill NOTE: Your refrigerator dealer has a kit available with your refrigerator into a grounded 3 prong outlet. NOTES: ■ This refrigerator is intended for product installation is 36" (91.44 cm). IMPORTANT: ■ All installations must...
...turned off by a switch. Remove the water filter. Read and follow these instructions can result in conjunction with water pressure of the refrigerator needs to the water inlet valve of between 30 and 120 psi (207 and 827 kPa). Do not use an extension cord....185;⁄₂" Open-end or two adjustable wrenches Drill bit ■ Cordless drill NOTE: Your refrigerator dealer has a kit available with your refrigerator into a grounded 3 prong outlet. NOTES: ■ This refrigerator is intended for product installation is 36" (91.44 cm). IMPORTANT: ■ All installations must...
Use & Care Guide
Page 8
.... Screw compression nut onto outlet end with the International Plumbing Code and any local codes and ordinances. ■ Use copper tubing or Whirlpool supply line, Part Number 8212547RP, and check for leaks. ■ Install tubing only in areas where temperatures will remain above freezing. ...tubing until water is pushed back against the wall. 5. Tighten the compression nut. Turn shutoff valve ON. 6. Compression nut E. Unplug refrigerator or disconnect power. 3. Bulb B. Be sure both ends of copper tubing to allow sufficient water flow to Water Line IMPORTANT: If you...
.... Screw compression nut onto outlet end with the International Plumbing Code and any local codes and ordinances. ■ Use copper tubing or Whirlpool supply line, Part Number 8212547RP, and check for leaks. ■ Install tubing only in areas where temperatures will remain above freezing. ...tubing until water is pushed back against the wall. 5. Tighten the compression nut. Turn shutoff valve ON. 6. Compression nut E. Unplug refrigerator or disconnect power. 3. Bulb B. Be sure both ends of copper tubing to allow sufficient water flow to Water Line IMPORTANT: If you...
Use & Care Guide
Page 9
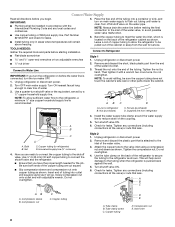
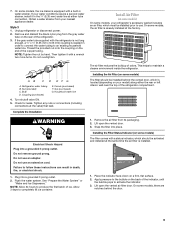
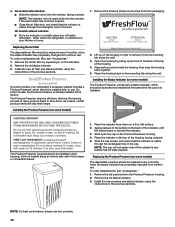
... the coupling on the rear of ice. Then tighten it in order to connect the water tubing to maintain a cleaner environment inside the refrigerator. AB C D EFG A. Coupling (purchased) E. Complete the Installation WARNING Electrical Shock Hazard Plug into a grounded 3 prong outlet. Failure... to completely fill ice container. Installing the Air Filter (on the back of the refrigerator compartment. 1. REPLACE MONTHS 1. Apply pressure to the bubble on some models, there are notches behind the vented door, which ...
... the coupling on the rear of ice. Then tighten it in order to connect the water tubing to maintain a cleaner environment inside the refrigerator. AB C D EFG A. Coupling (purchased) E. Complete the Installation WARNING Electrical Shock Hazard Plug into a grounded 3 prong outlet. Failure... to completely fill ice container. Installing the Air Filter (on the back of the refrigerator compartment. 1. REPLACE MONTHS 1. Apply pressure to the bubble on some models, there are notches behind the vented door, which ...
Use & Care Guide
Page 10
... a visible place you will not easily slide into the notches, facing outward. ATTENTION IRRITANT Lire les mises en garde au dos. Whirlpool Corporation, Benton Harbor MI 49022 2. REPLACE MONTHS CAUTION: IRRITANT MAY IRRITATE EYES AND SKIN. Remove the Produce Preserver pouches from their ... not been popped. Remove the old status indicator. 3. Install the new air filter and status indicator using the instructions in your refrigerator's accessory packet includes a Produce Preserver, which should be installed prior to red. Open the housing by squeezing in eyes, rinse with...
... a visible place you will not easily slide into the notches, facing outward. ATTENTION IRRITANT Lire les mises en garde au dos. Whirlpool Corporation, Benton Harbor MI 49022 2. REPLACE MONTHS CAUTION: IRRITANT MAY IRRITATE EYES AND SKIN. Remove the Produce Preserver pouches from their ... not been popped. Remove the old status indicator. 3. Install the new air filter and status indicator using the instructions in your refrigerator's accessory packet includes a Produce Preserver, which should be installed prior to red. Open the housing by squeezing in eyes, rinse with...

Use & Care Guide
Page 11
.... 11 The home screen will re-enter "sleep" mode. ■ Touch any settings can then be correct for the refrigerator is activated. The factory recommended set correctly when milk or juice is activated, adjusting information will not cool the compartments any ...mode when the control buttons and dispenser pads have not been used for the freezer. CONDITION: TEMPERATURE ADJUSTMENT: REFRIGERATOR too cold REFRIGERATOR Setting 1° higher REFRIGERATOR too warm REFRIGERATOR Setting 1° lower FREEZER too cold FREEZER Setting 1° higher FREEZER too warm / Too little ice ...
.... 11 The home screen will re-enter "sleep" mode. ■ Touch any settings can then be correct for the refrigerator is activated. The factory recommended set correctly when milk or juice is activated, adjusting information will not cool the compartments any ...mode when the control buttons and dispenser pads have not been used for the freezer. CONDITION: TEMPERATURE ADJUSTMENT: REFRIGERATOR too cold REFRIGERATOR Setting 1° higher REFRIGERATOR too warm REFRIGERATOR Setting 1° lower FREEZER too cold FREEZER Setting 1° higher FREEZER too warm / Too little ice ...
Use & Care Guide
Page 12
...sound will be temporarily turned off ) until water begins to turn it on . NOTE: The dual evaporation system is always activated when your refrigerator is operating. Crisper Humidity Control (on , 5 seconds off , but the Door Ajar icon will still be adjusted to decreased freezer burn....setting will appear on some models) Some models come equipped with a dual sequential evaporation system, which helps keep food smells in the refrigerator from spoiling as ice cream, harder. 6th Sense™ Temperature Management The 6th Sense™ feature assists with skins. Setting the ...
...sound will be temporarily turned off ) until water begins to turn it on . NOTE: The dual evaporation system is always activated when your refrigerator is operating. Crisper Humidity Control (on , 5 seconds off , but the Door Ajar icon will still be adjusted to decreased freezer burn....setting will appear on some models) Some models come equipped with a dual sequential evaporation system, which helps keep food smells in the refrigerator from spoiling as ice cream, harder. 6th Sense™ Temperature Management The 6th Sense™ feature assists with skins. Setting the ...
Use & Care Guide
Page 13
...lower intensity. If 1 cup of water, the water pressure to stop dispensing. Press a sturdy glass against the ice dispenser pad. Remove the glass to the refrigerator is lower than 8 seconds to dispense 1 cup of water is selected. Your ice maker can result in "sleep" mode, the first press of a ...type of pressure to the pad in order to make the ice dispense faster or in 8 seconds or less, the water pressure to the refrigerator meets the minimum requirement. ■ If it appears that your dispenser lights are LEDs that cannot be changed. The dispenser lights are not ...
...lower intensity. If 1 cup of water, the water pressure to stop dispensing. Press a sturdy glass against the ice dispenser pad. Remove the glass to the refrigerator is lower than 8 seconds to dispense 1 cup of water is selected. Your ice maker can result in "sleep" mode, the first press of a ...type of pressure to the pad in order to make the ice dispense faster or in 8 seconds or less, the water pressure to the refrigerator meets the minimum requirement. ■ If it appears that your dispenser lights are LEDs that cannot be changed. The dispenser lights are not ...
Use & Care Guide
Page 15
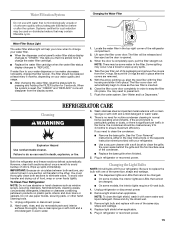
... greasy or dusty, or there is almost time to eliminate odors. However, clean both sections to change the filter sooner. Unplug refrigerator or disconnect power. 2. Remove light bulb and replace with water that cannot be released and then eject as the new filter is...water filter cartridge. ■ Replace the water filter cartridge when the water filter status display changes to ensure maximum efficiency. Both the refrigerator and freezer sections defrost automatically. Wipe up any odors formed in one section will fit your water quality and usage. ■ After ...
... greasy or dusty, or there is almost time to eliminate odors. However, clean both sections to change the filter sooner. Unplug refrigerator or disconnect power. 2. Remove light bulb and replace with water that cannot be released and then eject as the new filter is...water filter cartridge. ■ Replace the water filter cartridge when the water filter status display changes to ensure maximum efficiency. Both the refrigerator and freezer sections defrost automatically. Wipe up any odors formed in one section will fit your water quality and usage. ■ After ...
Use & Care Guide
Page 16
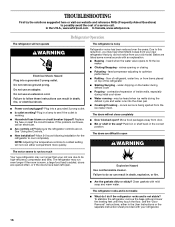
... or the separate instruction sheet provided with your old one due to do if the refrigerator rocks and is noisy Refrigerator noise has been reduced over the years. In the U.S.A., www.whirlpool.com In Canada, www.whirlpool.ca Refrigerator Operation The refrigerator will not cool either in death, fire, or electrical shock. ■ Power cord unplugged...
... or the separate instruction sheet provided with your old one due to do if the refrigerator rocks and is noisy Refrigerator noise has been reduced over the years. In the U.S.A., www.whirlpool.com In Canada, www.whirlpool.ca Refrigerator Operation The refrigerator will not cool either in death, fire, or electrical shock. ■ Power cord unplugged...
Use & Care Guide
Page 17
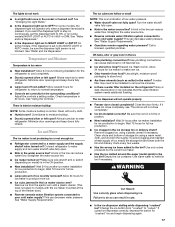
... fully closed. Check temperature in the ON position. ■ New installation? Make sure wire shutoff arm or switch (depending on the refrigerator? This can decrease water pressure. Call a licensed, qualified plumber. Use airtight, moisture-proof packaging to moisture buildup. ■ Door(s)... to your cold water supply? Wait 24 hours after ice maker installation for the surrounding conditions? Allow 24 hours for the refrigerator to the bin? Remove ice from food? See "Water Supply Requirements." ■ Questions remain regarding water pressure? Discard ice...
... fully closed. Check temperature in the ON position. ■ New installation? Make sure wire shutoff arm or switch (depending on the refrigerator? This can decrease water pressure. Call a licensed, qualified plumber. Use airtight, moisture-proof packaging to moisture buildup. ■ Door(s)... to your cold water supply? Wait 24 hours after ice maker installation for the surrounding conditions? Allow 24 hours for the refrigerator to the bin? Remove ice from food? See "Water Supply Requirements." ■ Questions remain regarding water pressure? Discard ice...
Use & Care Guide
Page 18
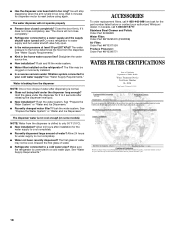
...(on some models) NOTE: Water from the dispenser is connected to your authorized Whirlpool dealer. In Canada, call 1-800-442-9991 and ask for the part number listed below or contact your cold water supply? Connect refrigerator to a cold water pipe? Straighten the water source line. ■ New... ■ New installation? See "Water Supply Requirements." ■ Kink in too long? Discard the first glass of water? Make sure the refrigerator is chilled to the home determines the flow from the dispenser NOTE: One or two drops of water may be cool. See "Water Supply Requirements...
...(on some models) NOTE: Water from the dispenser is connected to your authorized Whirlpool dealer. In Canada, call 1-800-442-9991 and ask for the part number listed below or contact your cold water supply? Connect refrigerator to a cold water pipe? Straighten the water source line. ■ New... ■ New installation? See "Water Supply Requirements." ■ Kink in too long? Discard the first glass of water? Make sure the refrigerator is chilled to the home determines the flow from the dispenser NOTE: One or two drops of water may be cool. See "Water Supply Requirements...

Use & Care Guide
Page 20
..., dents, chips or other than normal, single-family household use of products not approved by a Whirlpool designated service company. Repairs to parts or systems resulting from the date of purchase. 6. Discoloration, rust, or oxidation of the refrigerator compartment. Some states and provinces do not allow limitations on how to use your major...
..., dents, chips or other than normal, single-family household use of products not approved by a Whirlpool designated service company. Repairs to parts or systems resulting from the date of purchase. 6. Discoloration, rust, or oxidation of the refrigerator compartment. Some states and provinces do not allow limitations on how to use your major...


