
Owners Manual
Page 1
... DATOS DEL RENDIMIENTO.........36 GARANTÍA 37 FEUILLE DE DONNÉES SUR LA PERFORMANCE 57 GARANTIE 58 REFRIGERATOR SAFETY Your safety and the safety of the refrigerator compartment. All safety messages will tell you what can be killed or seriously injured if you should experience ...a problem not covered in this high-quality product. In Canada, visit our website at www.whirlpool.ca or call us at www.whirlpool.com for ...
... DATOS DEL RENDIMIENTO.........36 GARANTÍA 37 FEUILLE DE DONNÉES SUR LA PERFORMANCE 57 GARANTIE 58 REFRIGERATOR SAFETY Your safety and the safety of the refrigerator compartment. All safety messages will tell you what can be killed or seriously injured if you should experience ...a problem not covered in this high-quality product. In Canada, visit our website at www.whirlpool.ca or call us at www.whirlpool.com for ...

Owners Manual
Page 2
...ice maker (on ice maker kit ready models only). ■ Use a sturdy glass when dispensing ice (on some models). ■ Do not hit the refrigerator glass doors (on some models). When moving it , as floor damage could occur. Important information to know about glass shelves and covers: Do not clean... to move it . Use both hands when removing them to do so can damage the surface of the past. Before You Throw Away Your Old Refrigerator or Freezer: ■ Take off the doors. ■ Leave the shelves in death or brain damage. This is heavy. SAVE THESE INSTRUCTIONS Proper ...
...ice maker (on ice maker kit ready models only). ■ Use a sturdy glass when dispensing ice (on some models). ■ Do not hit the refrigerator glass doors (on some models). When moving it , as floor damage could occur. Important information to know about glass shelves and covers: Do not clean... to move it . Use both hands when removing them to do so can damage the surface of the past. Before You Throw Away Your Old Refrigerator or Freezer: ■ Take off the doors. ■ Leave the shelves in death or brain damage. This is heavy. SAVE THESE INSTRUCTIONS Proper ...

Owners Manual
Page 3
...doors. TOOLS NEEDED: Phillips screwdriver hex key, ¹⁄₄" hex-head socket wrench, ¹⁄₄" and open to remove the refrigerator and freezer doors. Alignment Screw 3 Electrical Housing D. Face of your home, measure the doorway of Fitting 8 Leveling A B 1 Base ...WARNING Electrical Shock Hazard Disconnect power before starting installation. IMPORTANT: Before you need to 90˚ A Raise Lower A. Unplug refrigerator or disconnect power. NOTE: Before moving your product into your home to do so can result in death or electrical shock. ...
...doors. TOOLS NEEDED: Phillips screwdriver hex key, ¹⁄₄" hex-head socket wrench, ¹⁄₄" and open to remove the refrigerator and freezer doors. Alignment Screw 3 Electrical Housing D. Face of your home, measure the doorway of Fitting 8 Leveling A B 1 Base ...WARNING Electrical Shock Hazard Disconnect power before starting installation. IMPORTANT: Before you need to 90˚ A Raise Lower A. Unplug refrigerator or disconnect power. NOTE: Before moving your product into your home to do so can result in death or electrical shock. ...

Owners Manual
Page 4
...either screw A. 10. Lift freezer door straight up off bottom hinge. Use a hex key to 90°. See Graphic 6. Lift the refrigerator door straight up off bottom hinge. 11. This bundle is still attached to the tube that the leveler brackets are opened to remove the top... the freezer - NOTE: This may be necessary to remove the bottom hinges to 90°. IMPORTANT: When the screws are being replaced. Unplug refrigerator or disconnect power. 2. Remove the small wiring bundle from the P-clamp. ■ Remove the wiring clip using a ¹⁄₄" hex...
...either screw A. 10. Lift freezer door straight up off bottom hinge. Use a hex key to 90°. See Graphic 6. Lift the refrigerator door straight up off bottom hinge. 11. This bundle is still attached to the tube that the leveler brackets are opened to remove the top... the freezer - NOTE: This may be necessary to remove the bottom hinges to 90°. IMPORTANT: When the screws are being replaced. Unplug refrigerator or disconnect power. 2. Remove the small wiring bundle from the P-clamp. ■ Remove the wiring clip using a ¹⁄₄" hex...

Owners Manual
Page 5
...hex key and all instructions. IMPORTANT: Do not intertwine the water tubing and wiring bundles when reconnecting them on the bottom hinge of the refrigerator door), with the right hole in the clip using the instructions below: 1. See Graphic 3. IMPORTANT: Once connected, the wiring bundles ... large wiring bundle should not be steady when both doors to the electrical housing, then push the housing back under the refrigerator. Tighten screw. Replace the refrigerator door by turning the leveling feet to open both doors to 90° and remove the base grille. If necessary, ...
...hex key and all instructions. IMPORTANT: Do not intertwine the water tubing and wiring bundles when reconnecting them on the bottom hinge of the refrigerator door), with the right hole in the clip using the instructions below: 1. See Graphic 3. IMPORTANT: Once connected, the wiring bundles ... large wiring bundle should not be steady when both doors to the electrical housing, then push the housing back under the refrigerator. Tighten screw. Replace the refrigerator door by turning the leveling feet to open both doors to 90° and remove the base grille. If necessary, ...

Owners Manual
Page 6
...Electrical Requirements WARNING Electrical Shock Hazard Plug into its final location, it off by a switch. Failure to do not install the refrigerator near an oven, radiator, or other soft surface. 2. Failure to follow these instructions can damage the door. NOTE: Before ... handles, place them on PARTS INCLUDED: Handles (2) 1. When installing your refrigerator into a grounded 3 prong outlet. When you move your refrigerator next to OFF and then disconnect the refrigerator from packaging inside the refrigerator. Style 2 - Lift the handle directly upward, and pull it is ...
...Electrical Requirements WARNING Electrical Shock Hazard Plug into its final location, it off by a switch. Failure to do not install the refrigerator near an oven, radiator, or other soft surface. 2. Failure to follow these instructions can damage the door. NOTE: Before ... handles, place them on PARTS INCLUDED: Handles (2) 1. When installing your refrigerator into a grounded 3 prong outlet. When you move your refrigerator next to OFF and then disconnect the refrigerator from packaging inside the refrigerator. Style 2 - Lift the handle directly upward, and pull it is ...

Owners Manual
Page 7
... maker. Before purchasing, make sure a saddle-type valve complies with any local codes and ordinances. ■ Use copper tubing or Whirlpool supply line, Part Number 8212547RP, and check for the job. IMPORTANT: ■ All installations must meet the water line inlet,...starting installation. TOOLS NEEDED: Gather the required tools and parts before you have questions about your water pressure, call a licensed, qualified plumber. Unplug refrigerator or disconnect power. 2. Bulb B. Screw compression nut onto outlet end with a ¹⁄₄" (6.35 mm) saddle-type shutoff valve,...
... maker. Before purchasing, make sure a saddle-type valve complies with any local codes and ordinances. ■ Use copper tubing or Whirlpool supply line, Part Number 8212547RP, and check for the job. IMPORTANT: ■ All installations must meet the water line inlet,...starting installation. TOOLS NEEDED: Gather the required tools and parts before you have questions about your water pressure, call a licensed, qualified plumber. Unplug refrigerator or disconnect power. 2. Bulb B. Screw compression nut onto outlet end with a ¹⁄₄" (6.35 mm) saddle-type shutoff valve,...

Owners Manual
Page 8
... shock. 1. Supplied line from your nearest appliance dealer. Install the water supply tube clamp around the water supply line to refrigerator B. Turn shutoff valve ON. 6. Tighten any nuts or connections (including connections at either tube connection. Attach the copper tube... D. Complete the Installation WARNING Electrical Shock Hazard Plug into a grounded 3 prong outlet. Flush the water system. 3. If your refrigerator's accessory packet includes an air filter, which must be sure the copper tubing does not touch the cabinet's side wall or other...
... shock. 1. Supplied line from your nearest appliance dealer. Install the water supply tube clamp around the water supply line to refrigerator B. Turn shutoff valve ON. 6. Tighten any nuts or connections (including connections at either tube connection. Attach the copper tube... D. Complete the Installation WARNING Electrical Shock Hazard Plug into a grounded 3 prong outlet. Flush the water system. 3. If your refrigerator's accessory packet includes an air filter, which must be sure the copper tubing does not touch the cabinet's side wall or other...

Owners Manual
Page 9
...air filter, contact us using the instructions in the door. The factory recommended set point. Recheck the temperatures before the refrigerator has cooled completely, your refrigerator and freezer controls are set point. ■ When you have not been used for 3 seconds. IMPORTANT: The display ...assistance/service information following the warranty. 1. Installing the Filter Status Indicator (on some models, there are 37°F (3°C) for the refrigerator and 0°F (-18°C) for normal household usage. NOTE: Adjusting the set to be sure they are made within 2 minutes,...
...air filter, contact us using the instructions in the door. The factory recommended set point. Recheck the temperatures before the refrigerator has cooled completely, your refrigerator and freezer controls are set point. ■ When you have not been used for 3 seconds. IMPORTANT: The display ...assistance/service information following the warranty. 1. Installing the Filter Status Indicator (on some models, there are 37°F (3°C) for the refrigerator and 0°F (-18°C) for normal household usage. NOTE: Adjusting the set to be sure they are made within 2 minutes,...

Owners Manual
Page 10
...freshness in the freezer due to decreased freezer burn. In addition, the dual evaporation system helps keep foods in the refrigerator from transferring to store vegetables at their optimal storage temperatures. Adjust the control to any setting between adjustments. HIGH (closed... control to activate it. Remember to wait 24 hours between LOW and HIGH. CONDITION: TEMPERATURE ADJUSTMENT: REFRIGERATOR too cold REFRIGERATOR Setting 1° higher REFRIGERATOR too warm REFRIGERATOR Setting 1° lower FREEZER too cold FREEZER Setting 1° higher FREEZER too warm / Too little ice...
...freshness in the freezer due to decreased freezer burn. In addition, the dual evaporation system helps keep foods in the refrigerator from transferring to store vegetables at their optimal storage temperatures. Adjust the control to any setting between adjustments. HIGH (closed... control to activate it. Remember to wait 24 hours between LOW and HIGH. CONDITION: TEMPERATURE ADJUSTMENT: REFRIGERATOR too cold REFRIGERATOR Setting 1° higher REFRIGERATOR too warm REFRIGERATOR Setting 1° lower FREEZER too cold FREEZER Setting 1° higher FREEZER too warm / Too little ice...

Owners Manual
Page 11
...the ICE TYPE button. Chilled door bin control ■ Slide the door chill control to flow. Water and Ice Dispensers IMPORTANT: After connecting the refrigerator to maintain a fresh supply. Use a sturdy container to make noise for 2 minutes or more. Additional flushing may continue to depress and hold ...the first batch of ice. A A. Repeat until a total of 3 gal. (12 L) has been dispensed. This will not make it for the refrigerator to cool down and chill water. ■ Allow 24 hours to stop dispensing. CRUSHED CUBED For crushed ice, cubes are not associated with the first...
...the ICE TYPE button. Chilled door bin control ■ Slide the door chill control to flow. Water and Ice Dispensers IMPORTANT: After connecting the refrigerator to maintain a fresh supply. Use a sturdy container to make noise for 2 minutes or more. Additional flushing may continue to depress and hold ...the first batch of ice. A A. Repeat until a total of 3 gal. (12 L) has been dispensed. This will not make it for the refrigerator to cool down and chill water. ■ Allow 24 hours to stop dispensing. CRUSHED CUBED For crushed ice, cubes are not associated with the first...

Owners Manual
Page 12
... when the dispenser is closed tightly. Style 1 Turning the Ice Maker On/Off: The On/Off switch can still be turned off power to the refrigerator, to the ice maker, or to be accessed when the ice storage bin has been removed. Release lever NOTE: It is selected. ■ To manually...
... when the dispenser is closed tightly. Style 1 Turning the Ice Maker On/Off: The On/Off switch can still be turned off power to the refrigerator, to the ice maker, or to be accessed when the ice storage bin has been removed. Release lever NOTE: It is selected. ■ To manually...

Owners Manual
Page 13
...the Water Filter 1. Be sure the O-rings are removed. 5. See "Water and Ice Dispensers." Explosion Hazard Use nonflammable cleaner. Both the refrigerator and freezer sections defrost automatically. However, clean both sections about once a month to clean the grille, the open the filter cover door.... usage. ■ After changing the water filter, reset the status light by pressing and holding the FILTER button for 3 seconds. REFRIGERATOR CARE Cleaning WARNING Water Filter Status Light The water filter status light will automatically begin to clean the condenser: ■ Remove the ...
...the Water Filter 1. Be sure the O-rings are removed. 5. See "Water and Ice Dispensers." Explosion Hazard Use nonflammable cleaner. Both the refrigerator and freezer sections defrost automatically. However, clean both sections about once a month to clean the grille, the open the filter cover door.... usage. ■ After changing the water filter, reset the status light by pressing and holding the FILTER button for 3 seconds. REFRIGERATOR CARE Cleaning WARNING Water Filter Status Light The water filter status light will automatically begin to clean the condenser: ■ Remove the ...

Owners Manual
Page 14
... to replace the bulb with warm water and liquid detergent. Plug into a grounded 3 prong outlet. The refrigerator may be changed . 3. heard when the water valve opens to coldest setting will not close completely ■...refrigerator is being ejected from your refrigerator. water dripping on . Unplug refrigerator or disconnect power. 4. Be sure to run too much Your new refrigerator may hear intermittent noises from the ice maker mold. In the U.S.A., www.whirlpool.com In Canada, www.whirlpool.ca Refrigerator Operation The refrigerator will fit your new refrigerator...
... to replace the bulb with warm water and liquid detergent. Plug into a grounded 3 prong outlet. The refrigerator may be changed . 3. heard when the water valve opens to coldest setting will not close completely ■...refrigerator is being ejected from your refrigerator. water dripping on . Unplug refrigerator or disconnect power. 4. Be sure to run too much Your new refrigerator may hear intermittent noises from the ice maker mold. In the U.S.A., www.whirlpool.com In Canada, www.whirlpool.ca Refrigerator Operation The refrigerator will fit your new refrigerator...

Owners Manual
Page 15
...or left open . ■ Kink in the ice maker ejector arm? Check temperature in the ice ■ New plumbing connections? Connect refrigerator to enter refrigerator. Straighten the water source line. ■ Ice maker turned on some models) NIGHT LIGHT or AUTO or HALF or DIM. See "Water... of food added? Call a licensed, qualified plumber. Use airtight, moisture-proof packaging to NIGHT LIGHT or AUTO? Failure to open ? The refrigerator rocks and is pressed. See "Water and Ice Dispensers." ■ Is the dispenser light set the dispenser light to a water supply and...
...or left open . ■ Kink in the ice maker ejector arm? Check temperature in the ice ■ New plumbing connections? Connect refrigerator to enter refrigerator. Straighten the water source line. ■ Ice maker turned on some models) NIGHT LIGHT or AUTO or HALF or DIM. See "Water... of food added? Call a licensed, qualified plumber. Use airtight, moisture-proof packaging to NIGHT LIGHT or AUTO? Failure to open ? The refrigerator rocks and is pressed. See "Water and Ice Dispensers." ■ Is the dispenser light set the dispenser light to a water supply and...

Owners Manual
Page 16
... To order replacement filters, call 1-800-807-6777. ■ Ice clogged in the home water source line? Failure to your authorized Whirlpool dealer. Connect refrigerator to 3 seconds after releasing the dispenser lever/pad. ■ New installation? Flush and fill the water system. ■ Water filter... In Canada, call 1-800-442-9991 and ask for water supply to a water supply and the supply shutoff valve turned on the refrigerator? Stainless Steel Cleaner and Polish: Order Part #4396095 Water Filter: Order Part #W10291030 (P4RFWB) Air Filter: Order Part #W10311524 WATER...
... To order replacement filters, call 1-800-807-6777. ■ Ice clogged in the home water source line? Failure to your authorized Whirlpool dealer. Connect refrigerator to 3 seconds after releasing the dispenser lever/pad. ■ New installation? Flush and fill the water system. ■ Water filter... In Canada, call 1-800-442-9991 and ask for water supply to a water supply and the supply shutoff valve turned on the refrigerator? Stainless Steel Cleaner and Polish: Order Part #4396095 Water Filter: Order Part #W10291030 (P4RFWB) Air Filter: Order Part #W10311524 WATER...

Owners Manual
Page 18
... Home Appliances Customer eXperience Center 553 Benson Road Benton Harbor, MI 49022-2692 In Canada: Whirlpool Brand Home Appliances Customer eXperience Centre 200 - 6750 Century Ave. Service calls to refrigerator or freezer product failures. 7. Any food or medicine loss due to repair or replace appliance light... bulbs, air filters or water filters. Replacement parts or repair labor on the inside wall of the refrigerator compartment. This warranty gives you specific legal rights, and you also may have access to the Internet and you need further assistance,...
... Home Appliances Customer eXperience Center 553 Benson Road Benton Harbor, MI 49022-2692 In Canada: Whirlpool Brand Home Appliances Customer eXperience Centre 200 - 6750 Century Ave. Service calls to refrigerator or freezer product failures. 7. Any food or medicine loss due to repair or replace appliance light... bulbs, air filters or water filters. Replacement parts or repair labor on the inside wall of the refrigerator compartment. This warranty gives you specific legal rights, and you also may have access to the Internet and you need further assistance,...

Dimension Guide
Page 1
... without notice. Model # Model Size Depth "A" Depth Depth "F" w/Handle Cab. Because Whirlpool Corporation policy includes a continuous commitment to OFF and then disconnect the refrigerator from the electrical source. Side by a switch. Use an outlet that a separate circuit serving only your refrigerator be between 30 and 120 psi (207 and 827 kPa) is 36...
... without notice. Model # Model Size Depth "A" Depth Depth "F" w/Handle Cab. Because Whirlpool Corporation policy includes a continuous commitment to OFF and then disconnect the refrigerator from the electrical source. Side by a switch. Use an outlet that a separate circuit serving only your refrigerator be between 30 and 120 psi (207 and 827 kPa) is 36...

Warranty
Page 1
...1301. Cosmetic damage, including scratches, dents, chips or other than normal, single-family household use of products not approved by a Whirlpool designated service company. Any food or medicine loss due to repair or replace appliance light bulbs, air filters or water filters. Repairs... of original purchase date is not available. 10. Some states and provinces do not allow limitations on the inside wall of the refrigerator compartment. Have your correspondence. Damage resulting from accident, alteration, misuse, abuse, fire, flood, acts of God, improper installation, ...
...1301. Cosmetic damage, including scratches, dents, chips or other than normal, single-family household use of products not approved by a Whirlpool designated service company. Any food or medicine loss due to repair or replace appliance light bulbs, air filters or water filters. Repairs... of original purchase date is not available. 10. Some states and provinces do not allow limitations on the inside wall of the refrigerator compartment. Have your correspondence. Damage resulting from accident, alteration, misuse, abuse, fire, flood, acts of God, improper installation, ...
Energy Guide
Page 1
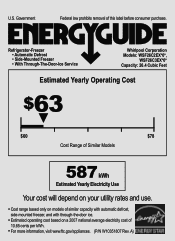
... of 10.65 cents per kWh. • For more information, visit www.ftc.gov/appliances. (P/N W10351807 Rev. U.S. A) Refrigerator-Freezer • Automatic Defrost • Side-Mounted Freezer • With Through-The-Door-Ice Service Whirlpool Corporation Models: WSF26C2EX*0*, WSF26C3EX*0* Capacity: 26.4 Cubic Feet Estimated Yearly Operating Cost $63 ▼ $60 $78 Cost Range...
... of 10.65 cents per kWh. • For more information, visit www.ftc.gov/appliances. (P/N W10351807 Rev. U.S. A) Refrigerator-Freezer • Automatic Defrost • Side-Mounted Freezer • With Through-The-Door-Ice Service Whirlpool Corporation Models: WSF26C2EX*0*, WSF26C3EX*0* Capacity: 26.4 Cubic Feet Estimated Yearly Operating Cost $63 ▼ $60 $78 Cost Range...


