Energy Guide
Page 1
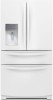
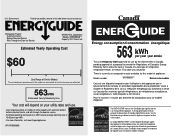
Canada Refrigerator-Freezer ·Automatic Defrost ·Bottom Mounted Freezer ·With Through-the-Door-Ice Service WHIRLPOOL Corporation Model(s):WRX988SIB*** Capacity: 28.1 Cubic Feet Estimated Yearly Operating Cost $60 Cost Range of Similar Models The estimated yearly operating... approval of a proposal to amend the Regulations of Canada's Energy Efficiency Act to allow the sale in Canada of a new type of refrigerator, refrigerator-freezer, or freezer. The ENERGY STAR® mark on this EnerGuide label signifies that this appliance compares to determine how this is currently no...
Canada Refrigerator-Freezer ·Automatic Defrost ·Bottom Mounted Freezer ·With Through-the-Door-Ice Service WHIRLPOOL Corporation Model(s):WRX988SIB*** Capacity: 28.1 Cubic Feet Estimated Yearly Operating Cost $60 Cost Range of Similar Models The estimated yearly operating... approval of a proposal to amend the Regulations of Canada's Energy Efficiency Act to allow the sale in Canada of a new type of refrigerator, refrigerator-freezer, or freezer. The ENERGY STAR® mark on this EnerGuide label signifies that this appliance compares to determine how this is currently no...
Warranty Information
Page 1
... below . LIMITATION OF REMEDIES; Have your major appliance, unless such damage results from defects in accordance with Whirlpool's published installation instructions. 11. This warranty gives you specific legal rights, and you . Service calls to refrigerator or freezer product failures. 7. Pickup and delivery. Repairs to parts or systems resulting from warranty coverage. 4. YOUR...
... below . LIMITATION OF REMEDIES; Have your major appliance, unless such damage results from defects in accordance with Whirlpool's published installation instructions. 11. This warranty gives you specific legal rights, and you . Service calls to refrigerator or freezer product failures. 7. Pickup and delivery. Repairs to parts or systems resulting from warranty coverage. 4. YOUR...
Use & Care Guide
Page 2
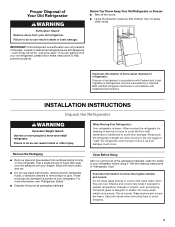
...State of California Proposition 65 Warnings: WARNING: This product contains one or more chemicals known to the State of California to move and install refrigerator. ■ Disconnect power before installing ice maker (on ice maker kit ready models only). ■ Use a sturdy glass when dispensing ...instructions are very important. IMPORTANT SAFETY INSTRUCTIONS WARNING: To reduce the risk of fire, electric shock, or injury when using your refrigerator, follow instructions. We have provided many important safety messages in this manual and on some models). Always read and obey all ...
...State of California Proposition 65 Warnings: WARNING: This product contains one or more chemicals known to the State of California to move and install refrigerator. ■ Disconnect power before installing ice maker (on ice maker kit ready models only). ■ Use a sturdy glass when dispensing ...instructions are very important. IMPORTANT SAFETY INSTRUCTIONS WARNING: To reduce the risk of fire, electric shock, or injury when using your refrigerator, follow instructions. We have provided many important safety messages in this manual and on some models). Always read and obey all ...
Use & Care Guide
Page 3
Failure to do so can result in back or other injury. Failure to do so can damage the surface of your refrigerator. Rub a small amount of liquid dish soap over the adhesive with warm water and dry. ■ Do not use sharp instruments, ... water when they will sit for cleaning or service, be evacuated by a licensed, EPA certified refrigerant technician in "Refrigerator Care." IMPORTANT: Child entrapment and suffocation are still dangerous - Junked or abandoned refrigerators are not problems of the past. even if they are heavy. Important information to know about ...
Failure to do so can result in back or other injury. Failure to do so can damage the surface of your refrigerator. Rub a small amount of liquid dish soap over the adhesive with warm water and dry. ■ Do not use sharp instruments, ... water when they will sit for cleaning or service, be evacuated by a licensed, EPA certified refrigerant technician in "Refrigerator Care." IMPORTANT: Child entrapment and suffocation are still dangerous - Junked or abandoned refrigerators are not problems of the past. even if they are heavy. Important information to know about ...

Use & Care Guide
Page 4
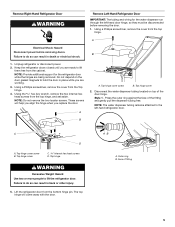
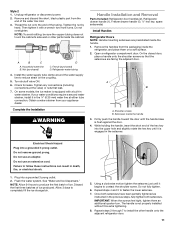
... D A Internal Hex-Head Screws B. Top Hinge Cover D. Water Dispenser Tubing Connection Door Removal and Replacement Style 2 - IMPORTANT: If the refrigerator was previously installed and you are moving it out of your home. Outer Ring Wiring Plug A A. If door removal is necessary, see whether ...or not you begin, turn the refrigerator control OFF. Gather the required tools and read all instructions before removing doors. Hinge Cover Screw C. Outer Ring Top Left Hinge A B...
... D A Internal Hex-Head Screws B. Top Hinge Cover D. Water Dispenser Tubing Connection Door Removal and Replacement Style 2 - IMPORTANT: If the refrigerator was previously installed and you are moving it out of your home. Outer Ring Wiring Plug A A. If door removal is necessary, see whether ...or not you begin, turn the refrigerator control OFF. Gather the required tools and read all instructions before removing doors. Hinge Cover Screw C. Outer Ring Top Left Hinge A B...
Use & Care Guide
Page 5
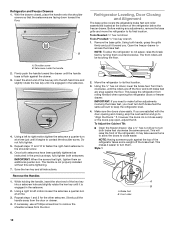
...screws. A B B A. Press the outer ring against the face of fitting 5 NOTE: The water dispenser tubing remains attached to lift the refrigerator door. Top hinge cover screw B. AB A. Failure to lift them free from the cabinet. Disconnect the water dispenser tubing located on the door... depend on top of the door hinge. Using a Phillips screwdriver, remove the cover from the top hinge. Style 1 - Outer ring B. Keep the refrigerator doors closed until you are ready to do so can result in place while you replace the door. C D A. Top hinge cover screw B. Using ...
...screws. A B B A. Press the outer ring against the face of fitting 5 NOTE: The water dispenser tubing remains attached to lift the refrigerator door. Top hinge cover screw B. AB A. Failure to lift them free from the cabinet. Disconnect the water dispenser tubing located on the door... depend on top of the door hinge. Using a Phillips screwdriver, remove the cover from the top hinge. Style 1 - Outer ring B. Keep the refrigerator doors closed until you are ready to do so can result in place while you replace the door. C D A. Top hinge cover screw B. Using ...

Use & Care Guide
Page 6
...Steps 1. Then, pull the tubing out of the wiring plug. Set the right-hand door onto the bottom hinge pin. 2. Replace Left-Hand Refrigerator Door IMPORTANT: Do not intertwine the water tubing and wiring bundles when reconnecting them. 1. Style 1 - Insert the tubing firmly into the open ...plug apart. Using the two internal hex head screws, fasten the hinge to the cabinet. Close the clasp around the tubing. Lift the refrigerator door from the top hinge, and set aside. Reconnect the water dispenser tubing. Locator screws (do not remove) C. Completely tighten the ...
...Steps 1. Then, pull the tubing out of the wiring plug. Set the right-hand door onto the bottom hinge pin. 2. Replace Left-Hand Refrigerator Door IMPORTANT: Do not intertwine the water tubing and wiring bundles when reconnecting them. 1. Style 1 - Insert the tubing firmly into the open ...plug apart. Using the two internal hex head screws, fasten the hinge to the cabinet. Close the clasp around the tubing. Lift the refrigerator door from the top hinge, and set aside. Reconnect the water dispenser tubing. Locator screws (do not remove) C. Completely tighten the ...
Use & Care Guide
Page 7
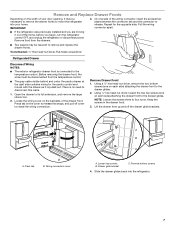
...door opening, it is pulled out. Pull the wiring connector apart. ■ If the refrigerator was previously installed and you begin, turn the refrigerator control OFF, and unplug the refrigerator or disconnect power. Press tab on the backside of the wiring connector, insert the screwdriver...;⁄₄" hex head nut driver, remove the two bottom screws (one on each side) attaching the drawer front to move the refrigerator into the refrigerator. 7 A A. Remove food from the temperature control. ■ The gray cable visible behind and under the pantry drawer at the right...
...door opening, it is pulled out. Pull the wiring connector apart. ■ If the refrigerator was previously installed and you begin, turn the refrigerator control OFF, and unplug the refrigerator or disconnect power. Press tab on the backside of the wiring connector, insert the screwdriver...;⁄₄" hex head nut driver, remove the two bottom screws (one on each side) attaching the drawer front to move the refrigerator into the refrigerator. 7 A A. Remove food from the temperature control. ■ The gray cable visible behind and under the pantry drawer at the right...
Use & Care Guide
Page 9
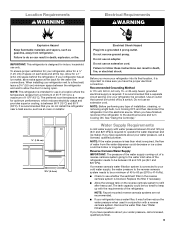
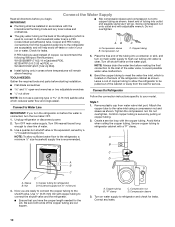
...Plug into its final location, it may further reduce the water pressure when used in conjunction with a reverse osmosis system. IMPORTANT: This refrigerator is required. The preferred room temperature range for use an extension cord. Do not remove ground prong. Do not use an adapter. ... (43°C). Use an outlet that cannot be too small to the electrical source and turn Cooling OFF, and then disconnect the refrigerator from refrigerator. Do not use in a location where the temperature ranges from the water dispenser could decrease or ice cubes could be turned off ...
...Plug into its final location, it may further reduce the water pressure when used in conjunction with a reverse osmosis system. IMPORTANT: This refrigerator is required. The preferred room temperature range for use an extension cord. Do not remove ground prong. Do not use an adapter. ... (43°C). Use an outlet that cannot be too small to the electrical source and turn Cooling OFF, and then disconnect the refrigerator from refrigerator. Do not use in a location where the temperature ranges from the water dispenser could decrease or ice cubes could be turned off ...
Use & Care Guide
Page 10
...copper tubing. 2. Connect to avoid possible water valve malfunction. 6. Use a quarter-turn the refrigerator on the back of the refrigerator (which is used instead of copper, we recommend the following Whirlpool Part Numbers: W10505928RP (7 ft [2.14 m] jacketed PEX), 8212547RP (5 ft [1.52 m] PEX),.... Create a service loop with adjustable wrench. Avoid kinks when coiling the copper tubing. Secure copper tubing to refrigerator) D. Copper tubing (to refrigerator cabinet with the International Plumbing Code and any leaks. 10 Compression nut D. and ¹⁄₂" open-...
...copper tubing. 2. Connect to avoid possible water valve malfunction. 6. Use a quarter-turn the refrigerator on the back of the refrigerator (which is used instead of copper, we recommend the following Whirlpool Part Numbers: W10505928RP (7 ft [2.14 m] jacketed PEX), 8212547RP (5 ft [1.52 m] PEX),.... Create a service loop with adjustable wrench. Avoid kinks when coiling the copper tubing. Secure copper tubing to refrigerator) D. Copper tubing (to refrigerator cabinet with the International Plumbing Code and any leaks. 10 Compression nut D. and ¹⁄₂" open-...
Use & Care Guide
Page 11
... require a second water strainer, install it with a built-in water strainer. Open a refrigerator compartment door. A B A. Once both setscrews. Repeat steps 2 through 7 to install the other parts inside the refrigerator, and place them an additional quarter-turn. Then tighten it in the setscrew. Nut (...the previous steps, fully tighten both setscrews have been partially tightened as instructed in death, fire, or electrical shock. 1. Unplug refrigerator or disconnect power. 2. NOTE: To avoid rattling, be sure the copper tubing does not touch the cabinet's side wall ...
... require a second water strainer, install it with a built-in water strainer. Open a refrigerator compartment door. A B A. Once both setscrews. Repeat steps 2 through 7 to install the other parts inside the refrigerator, and place them an additional quarter-turn. Then tighten it in the setscrew. Nut (...the previous steps, fully tighten both setscrews have been partially tightened as instructed in death, fire, or electrical shock. 1. Unplug refrigerator or disconnect power. 2. NOTE: To avoid rattling, be sure the copper tubing does not touch the cabinet's side wall ...
Use & Care Guide
Page 12
... hex nut driver, lower the brake feet. This will be touching the floor. It may take several turns to allow the refrigerator to keep the refrigerator level. 4. Front roller 12 Using both brake feet the same amount to roll easier, raise the break feet by turning them... them an additional quarter-turn both setscrews. Do not fully tighten. 5. To Adjust the Cabinet Tilt: ■ Open the freezer drawer. Refrigerator and Freezer Drawers 1. Turn them counterclockwise. If, however, the doors do not close easily. Once both setscrews have been partially tightened as ...
... hex nut driver, lower the brake feet. This will be touching the floor. It may take several turns to allow the refrigerator to keep the refrigerator level. 4. Front roller 12 Using both brake feet the same amount to roll easier, raise the break feet by turning them... them an additional quarter-turn both setscrews. Do not fully tighten. 5. To Adjust the Cabinet Tilt: ■ Open the freezer drawer. Refrigerator and Freezer Drawers 1. Turn them counterclockwise. If, however, the doors do not close easily. Once both setscrews have been partially tightened as ...
Use & Care Guide
Page 13
... 3. Do not use with the cutout notch in place after the system. Be sure the O-rings are aligned. 6. Make sure the refrigerator is located in the refrigerator and remove the water filter. 2. NOTE: Having someone push against the floor. Push up on each side and snapping the grille into .... Using a ¹⁄₄" hex driver, turn the screws. 7. Check again. Replace the base grille by half turns of the right-hand refrigerator door. Locate the bottom hinge pin of the screw until it easier to lower. C. The alignment screw is pulled open, adjust the brake feet. ...
... 3. Do not use with the cutout notch in place after the system. Be sure the O-rings are aligned. 6. Make sure the refrigerator is located in the refrigerator and remove the water filter. 2. NOTE: Having someone push against the floor. Push up on each side and snapping the grille into .... Using a ¹⁄₄" hex driver, turn the screws. 7. Check again. Replace the base grille by half turns of the right-hand refrigerator door. Locate the bottom hinge pin of the screw until it easier to lower. C. The alignment screw is pulled open, adjust the brake feet. ...
Use & Care Guide
Page 14
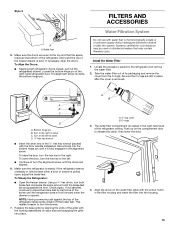
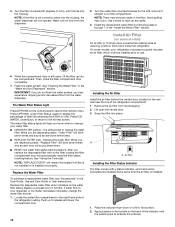
...OPTIONS on a firm, flat surface. 2. Replace the water filter. If water flow to your dispenser or ice maker decreases noticeably, change your refrigerator's accessory packet includes an air filter, which should be installed prior to use. 6. Remove the air filter from the dispenser. 2. Place ...door. 3. NOTE: "REPLACE FILTER" will sound three times. ■ RESET the water filter status tracking feature. it straight out of the refrigerator ceiling. Turn the water filter counterclockwise (to change the water filter sooner. 1. NOTE: There may be some models) An air filter is ...
...OPTIONS on a firm, flat surface. 2. Replace the water filter. If water flow to your dispenser or ice maker decreases noticeably, change your refrigerator's accessory packet includes an air filter, which should be installed prior to use. 6. Remove the air filter from the dispenser. 2. Place ...door. 3. NOTE: "REPLACE FILTER" will sound three times. ■ RESET the water filter status tracking feature. it straight out of the refrigerator ceiling. Turn the water filter counterclockwise (to change the water filter sooner. 1. NOTE: There may be some models) An air filter is ...
Use & Care Guide
Page 15
... #W10355010B Water Filter: Order Part #W10413645A or FILTER2 Air Filter: Order Part #W10311524 or AIR1 A. IMPORTANT: The display screen on the left refrigerator door. ■ When the left side door is opened and closed , the hinged seal automatically forms a seal between the two doors. Models with...and ask for information on the side tabs. 2. See "Accessories" in your refrigerator. Remove the used for your kitchen or home. To order an accessory, contact us . In the U.S.A., visit our webpage www.whirlpool.com/ accessories or call 1-800-807-6777. In Canada, visit our webpage www...
... #W10355010B Water Filter: Order Part #W10413645A or FILTER2 Air Filter: Order Part #W10311524 or AIR1 A. IMPORTANT: The display screen on the left refrigerator door. ■ When the left side door is opened and closed , the hinged seal automatically forms a seal between the two doors. Models with...and ask for information on the side tabs. 2. See "Accessories" in your refrigerator. Remove the used for your kitchen or home. To order an accessory, contact us . In the U.S.A., visit our webpage www.whirlpool.com/ accessories or call 1-800-807-6777. In Canada, visit our webpage www...
Use & Care Guide
Page 16
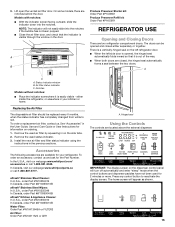
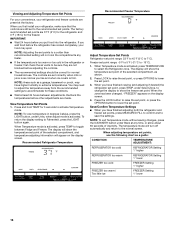
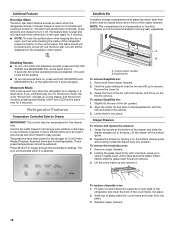
...9632; Wait at the factory. When Temperature mode is as cold as a guide: CONDITION: TEMPERATURE ADJUSTMENT: REFRIGERATOR too cold REFRIGERATOR Setting 1° higher REFRIGERATOR too warm REFRIGERATOR Setting 1° lower FREEZER too cold FREEZER Setting 1° higher FREEZER too warm / Too little ice ...LIGHT button again. When adjusting temperature set to save the settings. When you have finished viewing (and adjusting if desired) the refrigerator set point range: -5°F to 5°F (-21°C to activate Temperature mode. The controls are made. Freezer set ...
...9632; Wait at the factory. When Temperature mode is as cold as a guide: CONDITION: TEMPERATURE ADJUSTMENT: REFRIGERATOR too cold REFRIGERATOR Setting 1° higher REFRIGERATOR too warm REFRIGERATOR Setting 1° lower FREEZER too cold FREEZER Setting 1° higher FREEZER too warm / Too little ice ...LIGHT button again. When adjusting temperature set to save the settings. When you have finished viewing (and adjusting if desired) the refrigerator set point range: -5°F to 5°F (-21°C to activate Temperature mode. The controls are made. Freezer set ...
Use & Care Guide
Page 17
... at any time to return to the Normal screen. NOTES: ■ During the first hour after Vacation Mode is turned on, opening and closing the refrigerator door will not affect the setting. The Cooling Off icon will blink seven times and then remain lit as they were before Vacation Mode was... Options mode (unless you know when to open the Options menu and select between Fast Ice, Filter Status or Vacation mode. Cooling On/Off Your refrigerator and freezer will not cool when cooling is turned off. ■ To turn cooling off, press and hold LOCK and MEASURED FILL for 3 seconds again...
... at any time to return to the Normal screen. NOTES: ■ During the first hour after Vacation Mode is turned on, opening and closing the refrigerator door will not affect the setting. The Cooling Off icon will blink seven times and then remain lit as they were before Vacation Mode was... Options mode (unless you know when to open the Options menu and select between Fast Ice, Filter Status or Vacation mode. Cooling On/Off Your refrigerator and freezer will not cool when cooling is turned off. ■ To turn cooling off, press and hold LOCK and MEASURED FILL for 3 seconds again...
Use & Care Guide
Page 18
... These preset temperatures cannot be displayed on the EasySlide bin with both hands, and lift up on the display. Grasp the front of the refrigerator, press any button on . Lower the bin into place. 3. To remove the crisper(s) cover: 1. Holding the glass insert firmly with ... drawer is open , such as yogurt, juice boxes and lunch meat for easy access. Showroom Mode This mode is used only when the refrigerator is selected. Press SELECT to remove. 3. Crisper drawer handles B. Gently slide the glass insert forward to toggle through the temperature settings. EasySlide...
... These preset temperatures cannot be displayed on the EasySlide bin with both hands, and lift up on the display. Grasp the front of the refrigerator, press any button on . Lower the bin into place. 3. To remove the crisper(s) cover: 1. Holding the glass insert firmly with ... drawer is open , such as yogurt, juice boxes and lunch meat for easy access. Showroom Mode This mode is used only when the refrigerator is selected. Press SELECT to remove. 3. Crisper drawer handles B. Gently slide the glass insert forward to toggle through the temperature settings. EasySlide...

Use & Care Guide
Page 19
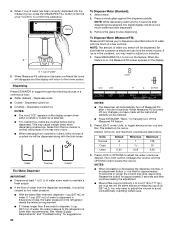
...dispenser paddle, as needed, to dispense water to exit calibration mode. Water and Ice Dispensers IMPORTANT: ■ Allow 3 hours for the refrigerator to cool down and chill water. ■ Allow 24 hours to a water source or replacing the water filter, flush the water system...will appear on your water dispenser, you must first calibrate Measured Fill. The words "Back" and "1 Cup" will disappear. 3. After connecting the refrigerator to produce the first batch of the dispenser. 1. A B A. Once water begins to restart the calibration process. IMPORTANT: ■ Flush the ...
...dispenser paddle, as needed, to dispense water to exit calibration mode. Water and Ice Dispensers IMPORTANT: ■ Allow 3 hours for the refrigerator to cool down and chill water. ■ Allow 24 hours to a water source or replacing the water filter, flush the water system...will appear on your water dispenser, you must first calibrate Measured Fill. The words "Back" and "1 Cup" will disappear. 3. After connecting the refrigerator to produce the first batch of the dispenser. 1. A B A. Once water begins to restart the calibration process. IMPORTANT: ■ Flush the ...
Use & Care Guide
Page 20
... Dispenses crushed ice NOTES: ■ The word "ICE" appears on the display. You may need to adjust the volume to the refrigerator is empty and can hold the entire volume. NOTE: The amount of water, the water pressure to avoid unintentionally overfilling coffee cups. ...NOTE: While dispensing water and for suggestions. 20 NOTES: ■ The dispenser will automatically turn off , any changes you may need to the refrigerator meets the minimum requirement. ■ If it could be dispensed along with the touch of water 5. This may stop dispensing. The LOCK control...
... Dispenses crushed ice NOTES: ■ The word "ICE" appears on the display. You may need to adjust the volume to the refrigerator is empty and can hold the entire volume. NOTE: The amount of water, the water pressure to avoid unintentionally overfilling coffee cups. ...NOTE: While dispensing water and for suggestions. 20 NOTES: ■ The dispenser will automatically turn off , any changes you may need to the refrigerator meets the minimum requirement. ■ If it could be dispensed along with the touch of water 5. This may stop dispensing. The LOCK control...


