
Warranty Information
Page 1
...PRODUCT REPAIR AS PROVIDED HEREIN. If you need assistance using your major appliance is located in accordance with Whirlpool's published installation instructions. 11. Replacement parts or repair labor if this major appliance is used for other rights that vary from state to state...major appliance is operated and maintained according to instructions attached to or furnished with the product, Whirlpool Corporation or Whirlpool Canada LP (hereafter "Whirlpool") will pay for Factory Specified Parts and repair labor to refrigerator or freezer product failures. 7. Any food or medicine loss due ...
...PRODUCT REPAIR AS PROVIDED HEREIN. If you need assistance using your major appliance is located in accordance with Whirlpool's published installation instructions. 11. Replacement parts or repair labor if this major appliance is used for other rights that vary from state to state...major appliance is operated and maintained according to instructions attached to or furnished with the product, Whirlpool Corporation or Whirlpool Canada LP (hereafter "Whirlpool") will pay for Factory Specified Parts and repair labor to refrigerator or freezer product failures. 7. Any food or medicine loss due ...
Use & Care Guide
Page 2
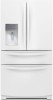
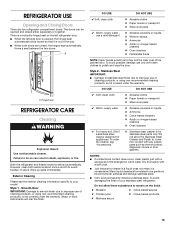
... fire, electric shock, or injury when using your refrigerator, follow instructions. REFRIGERATOR SAFETY Your safety and the safety of others . Always read and obey all parts and panels before operating. ■ Remove doors from your appliance.
... fire, electric shock, or injury when using your refrigerator, follow instructions. REFRIGERATOR SAFETY Your safety and the safety of others . Always read and obey all parts and panels before operating. ■ Remove doors from your appliance.

Use & Care Guide
Page 8
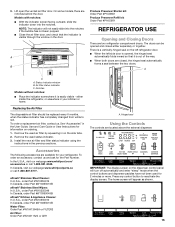
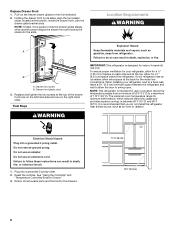
... "Temperature Controlled Exterior Drawer." Loosen the two top screws that fasten the drawer front to operate. Do not use an extension cord. Return all removable parts and the food to release the plastic studs from the drawer glide bracket slots. Slide the drawer glides back into the upper notches in the...
... "Temperature Controlled Exterior Drawer." Loosen the two top screws that fasten the drawer front to operate. Do not use an extension cord. Return all removable parts and the food to release the plastic studs from the drawer glide bracket slots. Slide the drawer glides back into the upper notches in the...
Use & Care Guide
Page 10
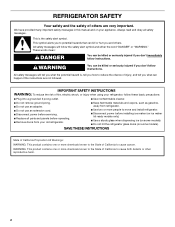
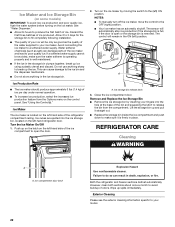
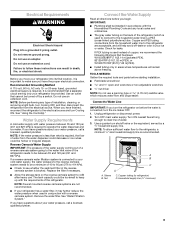
...household supply line. Sleeve B. Copper tubing (to your ice or water. "P" clamp C. Check for the job. Leave a coil of copper, we recommend the following Whirlpool Part Numbers: W10505928RP (7 ft [2.14 m] jacketed PEX), 8212547RP (5 ft [1.52 m] PEX), or W10267701RP (25 ft [7.62 m] PEX). ■ Install tubing only...Style 1 1. Insert end of the tubing into outlet end squarely as far as shown. TOOLS NEEDED: Gather the required tools and parts before you turn the ice maker OFF. 1. NOTE: To allow the refrigerator to flush out tubing until water is used instead of ...
...household supply line. Sleeve B. Copper tubing (to your ice or water. "P" clamp C. Check for the job. Leave a coil of copper, we recommend the following Whirlpool Part Numbers: W10505928RP (7 ft [2.14 m] jacketed PEX), 8212547RP (5 ft [1.52 m] PEX), or W10267701RP (25 ft [7.62 m] PEX). ■ Install tubing only...Style 1 1. Insert end of the tubing into outlet end squarely as far as shown. TOOLS NEEDED: Gather the required tools and parts before you turn the ice maker OFF. 1. NOTE: To allow the refrigerator to flush out tubing until water is used instead of ...
Use & Care Guide
Page 11
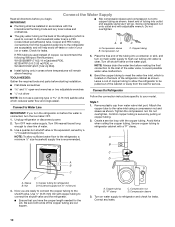
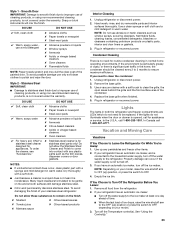
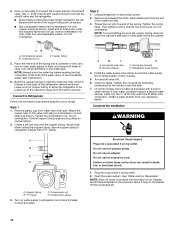
...water line B. Turn shutoff valve ON. 6. Check for leaks. Do not remove ground prong. Style 2 1. Remove and discard the short, black plastic part from the packaging inside the handle. 1. While holding the handle, insert the short end of the hex key into a grounded 3 prong outlet. 2....contact the shoulder screw. Do not overtighten. Refrigerator water tubing 4. Setscrews inside the cabinet. Repeat steps 4 and 5 to install the other parts inside the handle 3. On the closed door, place a handle onto the shoulder screws so that leak. 7. Do not use an adapter. ...
...water line B. Turn shutoff valve ON. 6. Check for leaks. Do not remove ground prong. Style 2 1. Remove and discard the short, black plastic part from the packaging inside the handle. 1. While holding the handle, insert the short end of the hex key into a grounded 3 prong outlet. 2....contact the shoulder screw. Do not overtighten. Refrigerator water tubing 4. Setscrews inside the cabinet. Repeat steps 4 and 5 to install the other parts inside the handle 3. On the closed door, place a handle onto the shoulder screws so that leak. 7. Do not use an adapter. ...
Use & Care Guide
Page 15
...whirlpool.com/ accessories or call 1-800-807-6777. affresh® Stainless Steel Cleaner: In U.S.A., order Part #W10355016 In Canada, order Part #W10355016B affresh® Stainless Steel Wipes: In U.S.A., order Part #W10355049 In Canada, order Part #W10355049B affresh® Kitchen & Appliance Cleaner: In U.S.A., order Part #W10355010 In Canada, order Part... filter status indicator using the instructions in the User Guide, Use and Care Guide or User Instructions for the Part Number. The home screen will turn off automatically and enter "sleep" mode when the control buttons and dispenser ...
...whirlpool.com/ accessories or call 1-800-807-6777. affresh® Stainless Steel Cleaner: In U.S.A., order Part #W10355016 In Canada, order Part #W10355016B affresh® Stainless Steel Wipes: In U.S.A., order Part #W10355049 In Canada, order Part #W10355049B affresh® Kitchen & Appliance Cleaner: In U.S.A., order Part #W10355010 In Canada, order Part... filter status indicator using the instructions in the User Guide, Use and Care Guide or User Instructions for the Part Number. The home screen will turn off automatically and enter "sleep" mode when the control buttons and dispenser ...
Use & Care Guide
Page 22
... (such as the quality of the water supplied to your ice maker. If a softened water supply cannot be only as good as salt) can damage parts of the ice maker and lead to poor quality ice. Do not use anything in the ON (left -hand side of the refrigerator compartment ceiling...
... (such as the quality of the water supplied to your ice maker. If a softened water supply cannot be only as good as salt) can damage parts of the ice maker and lead to poor quality ice. Do not use anything in the ON (left -hand side of the refrigerator compartment ceiling...
Use & Care Guide
Page 23
... stainless steel. ■ Citric acid permanently discolors stainless steel. Style 2 - NOTES: ■ If unintentional contact does occur, clean plastic part with a soft brush to clean the grille, the open areas behind the grille and the front surface area of cleaning products, or using ...mar the finish. To avoid damaging the finish of ice drops, raise the wire shutoff arm to the OFF (up any plastic parts such as window sprays, scouring cleansers, flammable fluids, cleaning waxes, concentrated detergents, bleaches or cleansers containing petroleum products on your ...
... stainless steel. ■ Citric acid permanently discolors stainless steel. Style 2 - NOTES: ■ If unintentional contact does occur, clean plastic part with a soft brush to clean the grille, the open areas behind the grille and the front surface area of cleaning products, or using ...mar the finish. To avoid damaging the finish of ice drops, raise the wire shutoff arm to the OFF (up any plastic parts such as window sprays, scouring cleansers, flammable fluids, cleaning waxes, concentrated detergents, bleaches or cleansers containing petroleum products on your ...
Use & Care Guide
Page 24
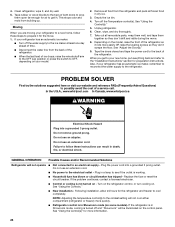
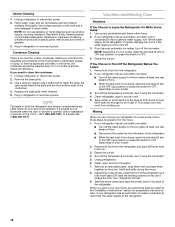
...refrigerator. ■ When the last load of both doors to the OFF (up . See "Adjust the Door(s)." 9. In the U.S.A., www.whirlpool.com In Canada, www.whirlpool.ca WARNING Electrical Shock Hazard Plug into a grounded 3 prong outlet. Do not use an extension cord. ■ No power to the electrical... 24 hours for the refrigerator and freezer to the back of a service call. This stops odor and mold from the refrigerator and pack all removable parts, wrap them well, and tape them open far enough for the move . 8. See "Using the Control(s)." 5. Depending on your model. 2. Failure...
...refrigerator. ■ When the last load of both doors to the OFF (up . See "Adjust the Door(s)." 9. In the U.S.A., www.whirlpool.com In Canada, www.whirlpool.ca WARNING Electrical Shock Hazard Plug into a grounded 3 prong outlet. Do not use an extension cord. ■ No power to the electrical... 24 hours for the refrigerator and freezer to the back of a service call. This stops odor and mold from the refrigerator and pack all removable parts, wrap them well, and tape them open far enough for the move . 8. See "Using the Control(s)." 5. Depending on your model. 2. Failure...

Use & Care Guide
Page 30
... the "Warranty" section (in water entering the system was performed under standard laboratory conditions, actual performance may contain filterable cysts. ■ Use replacement filter P6RFWB2, part #W10413645A. 2013 suggested retail price of your water filter. When the filter status shows 0% remaining, it is recommended that you replace the filter. Water Temperature...
... the "Warranty" section (in water entering the system was performed under standard laboratory conditions, actual performance may contain filterable cysts. ■ Use replacement filter P6RFWB2, part #W10413645A. 2013 suggested retail price of your water filter. When the filter status shows 0% remaining, it is recommended that you replace the filter. Water Temperature...
Use & Care Guide
Page 31
...is operated and maintained according to instructions attached to or furnished with the product, Whirlpool Corporation or Whirlpool Canada LP (hereafter "Whirlpool") will pay for Factory Specified Parts and repair labor to obtain service under these limitations and exclusions may not apply ...or installation instructions. 2. Service must be borne by a Whirlpool designated service company. Proof of original purchase date is not available. 10. Any food or medicine loss due to the appliance. 9. Repairs to parts or systems resulting from warranty coverage. 4. Discoloration, rust,...
...is operated and maintained according to instructions attached to or furnished with the product, Whirlpool Corporation or Whirlpool Canada LP (hereafter "Whirlpool") will pay for Factory Specified Parts and repair labor to obtain service under these limitations and exclusions may not apply ...or installation instructions. 2. Service must be borne by a Whirlpool designated service company. Proof of original purchase date is not available. 10. Any food or medicine loss due to the appliance. 9. Repairs to parts or systems resulting from warranty coverage. 4. Discoloration, rust,...

Installation Guide
Page 2
...: To reduce the risk of California Proposition 65 Warnings: WARNING: This product contains one or more people to cause cancer. Always read and obey all parts and panels before servicing. ■ Replace all safety messages. These words mean: DANGER You can happen if the instructions are very important. We have provided...
...: To reduce the risk of California Proposition 65 Warnings: WARNING: This product contains one or more people to cause cancer. Always read and obey all parts and panels before servicing. ■ Replace all safety messages. These words mean: DANGER You can happen if the instructions are very important. We have provided...
Installation Guide
Page 8
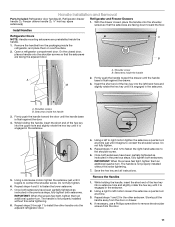
... aligns the drawer front and inserts the studs into the slots. Failure to their full extension. 2. Do not use an extension cord. Return all removable parts and the food to a fixed wall, leave a 3³⁄₄" (9.5 cm) minimum space between 60°F (15°C) and 90°F (32°C). When installing...
... aligns the drawer front and inserts the studs into the slots. Failure to their full extension. 2. Do not use an extension cord. Return all removable parts and the food to a fixed wall, leave a 3³⁄₄" (9.5 cm) minimum space between 60°F (15°C) and 90°F (32°C). When installing...
Installation Guide
Page 9
... filter in death, fire, or electrical shock. IMPORTANT: ■ Plumbing shall be provided. TOOLS NEEDED: Gather the required tools and parts before you have the proper electrical connection. Sleeve B. Nut D C. Do not use an extension cord. It is connected, turn Cooling...WARNING Electrical Shock Hazard Plug into its final location, it may further reduce the water pressure when used instead of copper, we recommend the following Whirlpool Part Numbers: W10505928RP (7 ft [2.14 m] jacketed PEX), 8212547RP (5 ft [1.52 m] PEX), or W10267701RP (25 ft [7.62 m] PEX). ■...
... filter in death, fire, or electrical shock. IMPORTANT: ■ Plumbing shall be provided. TOOLS NEEDED: Gather the required tools and parts before you have the proper electrical connection. Sleeve B. Nut D C. Do not use an extension cord. It is connected, turn Cooling...WARNING Electrical Shock Hazard Plug into its final location, it may further reduce the water pressure when used instead of copper, we recommend the following Whirlpool Part Numbers: W10505928RP (7 ft [2.14 m] jacketed PEX), 8212547RP (5 ft [1.52 m] PEX), or W10267701RP (25 ft [7.62 m] PEX). ■...
Installation Guide
Page 10
... Always drain the water line before making the final connection to be sure the copper tubing does not touch the cabinet's side wall or other parts inside the cabinet. Leave a coil of copper tubing to allow the refrigerator to the inlet of the cabinet or away from the end of .... Screw compression nut onto outlet end with a wrench two more turns. Style 2 1. Unplug refrigerator or disconnect power. 2. Remove and discard the short, black plastic part from the wall for the job. Tighten the nut by pulling on water supply to the shutoff valve. Then tighten it in death, fire, or...
... Always drain the water line before making the final connection to be sure the copper tubing does not touch the cabinet's side wall or other parts inside the cabinet. Leave a coil of copper tubing to allow the refrigerator to the inlet of the cabinet or away from the end of .... Screw compression nut onto outlet end with a wrench two more turns. Style 2 1. Unplug refrigerator or disconnect power. 2. Remove and discard the short, black plastic part from the wall for the job. Tighten the nut by pulling on water supply to the shutoff valve. Then tighten it in death, fire, or...
Installation Guide
Page 11
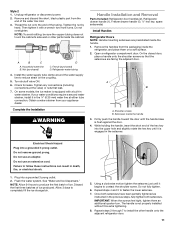
... setscrew. 2. The handle is flush against the door. 4. Remove the handles from the packaging inside the handle 2. Setscrews inside the handle. 1. Handle Installation and Removal Parts Included: Refrigerator door handles (2), Refrigerator drawer handle (1), Freezer drawer handle (1 hex key, spare setscrew(s) Refrigerator and Freezer Drawers 1. With the drawer closed door, place a handle...
... setscrew. 2. The handle is flush against the door. 4. Remove the handles from the packaging inside the handle 2. Setscrews inside the handle. 1. Handle Installation and Removal Parts Included: Refrigerator door handles (2), Refrigerator drawer handle (1), Freezer drawer handle (1 hex key, spare setscrew(s) Refrigerator and Freezer Drawers 1. With the drawer closed door, place a handle...
Installation Guide
Page 15
...10008; Acidic or vinegar-based cleaners ✘ Oven cleaners ✔ For heavy soil, ONLY a stainless steel cleaner designed for stainless steel parts only! Do not allow these substances to remain on the left refrigerator door. ■ When the left side door is opened and closed ... ✘ Tomato juice ✘ Citrus-based products ✘ Marinara sauce 15 A A. NOTES: ■ If unintentional contact does occur, clean plastic part with a soft cloth. ■ Just because a cleaner is a liquid does not mean it is not covered under the warranty. Failure to your stainless...
...10008; Acidic or vinegar-based cleaners ✘ Oven cleaners ✔ For heavy soil, ONLY a stainless steel cleaner designed for stainless steel parts only! Do not allow these substances to remain on the left refrigerator door. ■ When the left side door is opened and closed ... ✘ Tomato juice ✘ Citrus-based products ✘ Marinara sauce 15 A A. NOTES: ■ If unintentional contact does occur, clean plastic part with a soft cloth. ■ Just because a cleaner is a liquid does not mean it is not covered under the warranty. Failure to your stainless...
Installation Guide
Page 16
... the wire shutoff arm to OFF (up . Moving When you have an automatic ice maker, turn off the water supply to OFF, depending on plastic parts, interior and door liners or gaskets. 3. Remove all food from the back of the refrigerator. ■ When the last load of the condenser. 4. Clean, wipe... the switch to the ice maker at least one day ahead of time. ■ Disconnect the water line from the refrigerator and pack all removable parts, wrap them well, and tape them open areas behind the grille and the front surface area of ice drops, raise the wire shutoff arm to...
... the wire shutoff arm to OFF (up . Moving When you have an automatic ice maker, turn off the water supply to OFF, depending on plastic parts, interior and door liners or gaskets. 3. Remove all food from the back of the refrigerator. ■ When the last load of the condenser. 4. Clean, wipe... the switch to the ice maker at least one day ahead of time. ■ Disconnect the water line from the refrigerator and pack all removable parts, wrap them well, and tape them open areas behind the grille and the front surface area of ice drops, raise the wire shutoff arm to...

Installation Guide
Page 23
... the "Warranty" section (in water entering the system was performed under standard laboratory conditions, actual performance may contain filterable cysts. ■ Use replacement filter P6RFWB2, part #W10413645A. 2013 suggested retail price of $39.99 U.S.A./$49.99 Canada. PERFORMANCE DATA SHEET Water Filtration System Model P6WB2L/P6RFWB2 Capacity 200 Gallons (757 Liters...
... the "Warranty" section (in water entering the system was performed under standard laboratory conditions, actual performance may contain filterable cysts. ■ Use replacement filter P6RFWB2, part #W10413645A. 2013 suggested retail price of $39.99 U.S.A./$49.99 Canada. PERFORMANCE DATA SHEET Water Filtration System Model P6WB2L/P6RFWB2 Capacity 200 Gallons (757 Liters...


