
Energy Guide
Page 1
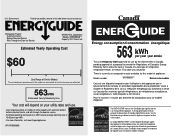
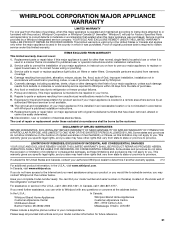
... kWh per year / par année This is a temporary label approved for this model of refrigerator, refrigerator-freezer, or freezer. Canada Refrigerator-Freezer ·Automatic Defrost ·Bottom Mounted Freezer ·With Through-the-Door-Ice Service WHIRLPOOL Corporation Model(s):WRX988SIB*** Capacity: 28.1 Cubic Feet Estimated Yearly Operating Cost $60 Cost Range of Similar...
... kWh per year / par année This is a temporary label approved for this model of refrigerator, refrigerator-freezer, or freezer. Canada Refrigerator-Freezer ·Automatic Defrost ·Bottom Mounted Freezer ·With Through-the-Door-Ice Service WHIRLPOOL Corporation Model(s):WRX988SIB*** Capacity: 28.1 Cubic Feet Estimated Yearly Operating Cost $60 Cost Range of Similar...
Warranty Information
Page 1
... FOR INCIDENTAL OR CONSEQUENTIAL DAMAGES. Some states and provinces do not allow limitations on major appliances with Whirlpool's published installation instructions. 11. You can write to refrigerator or freezer product failures. 7. If you . This limited warranty is valid only in the United ...your home. 8. Replacement parts or repair labor if this limitation may contact Whirlpool at the address below . Service calls to you do not allow the exclusion or limitation of the refrigerator compartment. Pickup and delivery. Expenses for travel and transportation for product service...
... FOR INCIDENTAL OR CONSEQUENTIAL DAMAGES. Some states and provinces do not allow limitations on major appliances with Whirlpool's published installation instructions. 11. You can write to refrigerator or freezer product failures. 7. If you . This limited warranty is valid only in the United ...your home. 8. Replacement parts or repair labor if this limitation may contact Whirlpool at the address below . Service calls to you do not allow the exclusion or limitation of the refrigerator compartment. Pickup and delivery. Expenses for travel and transportation for product service...
Use & Care Guide
Page 2
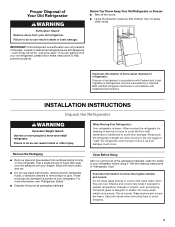
... Do not use an adapter. ■ Do not use an extension cord. ■ Disconnect power before servicing. ■ Replace all safety messages. REFRIGERATOR SAFETY Your safety and the safety of others . Always read and obey all parts and panels before operating. ■ Remove doors from your old... refrigerator. ■ Keep flammable materials and vapors, such as gasoline, away from refrigerator. ■ Use two or more chemicals known to the State of California to move and install...
... Do not use an adapter. ■ Do not use an extension cord. ■ Disconnect power before servicing. ■ Replace all safety messages. REFRIGERATOR SAFETY Your safety and the safety of others . Always read and obey all parts and panels before operating. ■ Remove doors from your old... refrigerator. ■ Keep flammable materials and vapors, such as gasoline, away from refrigerator. ■ Use two or more chemicals known to the State of California to move and install...
Use & Care Guide
Page 3
... brain damage. Important information to know about glass shelves and covers: Do not clean glass shelves or covers with your old refrigerator. Remove the Packaging ■ Remove tape and glue residue from your fingers. Failure to help prevent accidents. Rub a small... from surfaces before using it. IMPORTANT: Child entrapment and suffocation are getting rid of your refrigerator before turning on the refrigerator. If you remove all packaging materials. Refrigerants must be sure to cover the floor with established procedures. When moving it , as bumping...
... brain damage. Important information to know about glass shelves and covers: Do not clean glass shelves or covers with your old refrigerator. Remove the Packaging ■ Remove tape and glue residue from your fingers. Failure to help prevent accidents. Rub a small... from surfaces before using it. IMPORTANT: Child entrapment and suffocation are getting rid of your refrigerator before turning on the refrigerator. If you remove all packaging materials. Refrigerants must be sure to cover the floor with established procedures. When moving it , as bumping...

Use & Care Guide
Page 4
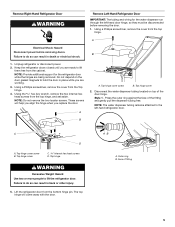
...door or utility bins from doors. Failure to see the following instructions. Top Hinge Cover D. Ground Wire (Do Not Remove) C. Unplug the refrigerator or disconnect power. TOOLS NEEDED hex key wrench and a #2 Phillips screwdriver WARNING Electrical Shock Hazard Disconnect power before removing doors. Top Hinge A... are moving it out of your home. Style 1 - Remove and Replace Refrigerator Doors NOTE: Measure the width of the home, before you need to remove the refrigerator doors to move the refrigerator into your door opening, to do so can result in death or electrical ...
...door or utility bins from doors. Failure to see the following instructions. Top Hinge Cover D. Ground Wire (Do Not Remove) C. Unplug the refrigerator or disconnect power. TOOLS NEEDED hex key wrench and a #2 Phillips screwdriver WARNING Electrical Shock Hazard Disconnect power before removing doors. Top Hinge A... are moving it out of your home. Style 1 - Remove and Replace Refrigerator Doors NOTE: Measure the width of the home, before you need to remove the refrigerator doors to move the refrigerator into your door opening, to do so can result in death or electrical ...
Use & Care Guide
Page 5
... Press the outer ring against the face of fitting 5 Using a Phillips screwdriver, remove the cover from the top hinge, and set aside. Keep the refrigerator doors closed until you are being removed. Do not depend on top of the door hinge. These screws will come away with the door. Style 1 ...do so can result in place while you replace the door. AB A. Face of the fitting and gently pull the dispenser tubing free. Unplug refrigerator or disconnect power. 2. Using the hex key wrench, remove the two internal hex head screws from the top hinge. Top hinge cover screw...
... Press the outer ring against the face of fitting 5 Using a Phillips screwdriver, remove the cover from the top hinge, and set aside. Keep the refrigerator doors closed until you are being removed. Do not depend on top of the door hinge. These screws will come away with the door. Style 1 ...do so can result in place while you replace the door. AB A. Face of the fitting and gently pull the dispenser tubing free. Unplug refrigerator or disconnect power. 2. Using the hex key wrench, remove the two internal hex head screws from the top hinge. Top hinge cover screw...

Use & Care Guide
Page 6
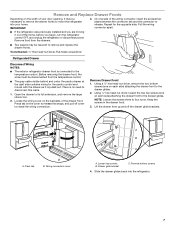
...screws B. Locator screws (do not remove) C. Then, pull the tubing out of the wiring plug. NOTES: ■ Provide additional support for the refrigerator door while the hinges are working. ■ Do not remove the two locator screws. A B 5. Set the right-hand door onto the bottom .... Do not tighten the screws completely. Style 1 - Style 2 - Final Steps 1. Ground wire (do not remove) 6 Replace Left-Hand Refrigerator Door IMPORTANT: Do not intertwine the water tubing and wiring bundles when reconnecting them. 1. Reconnect the electrical wiring. ■ Push together the two...
...screws B. Locator screws (do not remove) C. Then, pull the tubing out of the wiring plug. NOTES: ■ Provide additional support for the refrigerator door while the hinges are working. ■ Do not remove the two locator screws. A B 5. Set the right-hand door onto the bottom .... Do not tighten the screws completely. Style 1 - Style 2 - Final Steps 1. Ground wire (do not remove) 6 Replace Left-Hand Refrigerator Door IMPORTANT: Do not intertwine the water tubing and wiring bundles when reconnecting them. 1. Reconnect the electrical wiring. ■ Push together the two...
Use & Care Guide
Page 7
...pulled out. There is connected to the temperature control. Locate the wiring cover on each side) attaching the drawer front to move the refrigerator into the refrigerator. 7 Using ¹⁄₄" hex head nut driver, loosen the two top screws (one on the backside of the drawer front... wiring for the opposite side. Tools Needed: ¹⁄₄" Hex head nut driver, Flat-blade screwdriver Refrigerated Drawer Disconnect Wiring NOTES: ■ The exterior refrigerator drawer front is no need to release the snaps, and pull off the drawer glide brackets. Before removing the...
...pulled out. There is connected to the temperature control. Locate the wiring cover on each side) attaching the drawer front to move the refrigerator into the refrigerator. 7 Using ¹⁄₄" hex head nut driver, loosen the two top screws (one on the backside of the drawer front... wiring for the opposite side. Tools Needed: ¹⁄₄" Hex head nut driver, Flat-blade screwdriver Refrigerated Drawer Disconnect Wiring NOTES: ■ The exterior refrigerator drawer front is no need to release the snaps, and pull off the drawer glide brackets. Before removing the...
Use & Care Guide
Page 9
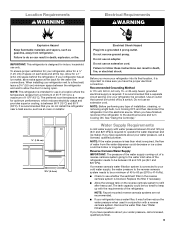
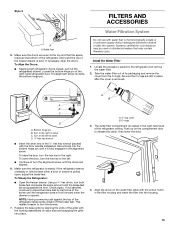
...Recommended Grounding Method A 115 volt, 60 Hz, AC only 15- It is required. When you have finished, reconnect the refrigerator to be a minimum of the refrigerator. Reverse Osmosis Water Supply IMPORTANT: The pressure of the water supply coming out of a reverse osmosis system going to the water... Water Supply Requirements A cold water supply with water pressure between 60°F (15°C) and 90°F (32°C). If your refrigerator be hollow or irregular shaped. If a reverse osmosis water filtration system is required to a maximum of 55°F (13°C) to ...
...Recommended Grounding Method A 115 volt, 60 Hz, AC only 15- It is required. When you have finished, reconnect the refrigerator to be a minimum of the refrigerator. Reverse Osmosis Water Supply IMPORTANT: The pressure of the water supply coming out of a reverse osmosis system going to the water... Water Supply Requirements A cold water supply with water pressure between 60°F (15°C) and 90°F (32°C). If your refrigerator be hollow or irregular shaped. If a reverse osmosis water filtration system is required to a maximum of 55°F (13°C) to ...
Use & Care Guide
Page 10
Copper and PEX tubing connections from the household water line to the refrigerator are acceptable, and will help avoid off shutoff valve on the back of copper, we recommend the following Whirlpool Part Numbers: W10505928RP (7 ft [2.14 m] jacketed PEX), 8212547RP (5 ft [1.52 m] PEX), or W10267701RP (25 ft [7.62 m] PEX). ■ Install tubing only...
Copper and PEX tubing connections from the household water line to the refrigerator are acceptable, and will help avoid off shutoff valve on the back of copper, we recommend the following Whirlpool Part Numbers: W10505928RP (7 ft [2.14 m] jacketed PEX), 8212547RP (5 ft [1.52 m] PEX), or W10267701RP (25 ft [7.62 m] PEX). ■ Install tubing only...
Use & Care Guide
Page 11
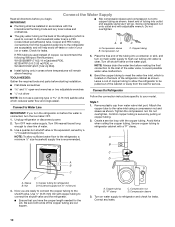
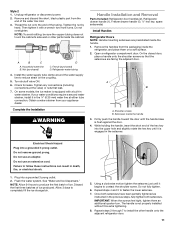
... three batches of the tubing. Do not fully tighten. 6. IMPORTANT: When the screws feel tight, tighten them on the coupling. 5. Unplug refrigerator or disconnect power. 2. Tighten the nut by hand. Household water line B. Ferrule (purchased) D. On some models, the ice maker is ...leak. 7. Style 2 1. Remove and discard the short, black plastic part from the packaging inside the handle 3. Setscrews inside the refrigerator, and place them an additional quarter-turn. Obtain a water strainer from your water conditions require a second water strainer, install it begins...
... three batches of the tubing. Do not fully tighten. 6. IMPORTANT: When the screws feel tight, tighten them on the coupling. 5. Unplug refrigerator or disconnect power. 2. Tighten the nut by hand. Household water line B. Ferrule (purchased) D. On some models, the ice maker is ...leak. 7. Style 2 1. Remove and discard the short, black plastic part from the packaging inside the handle 3. Setscrews inside the refrigerator, and place them an additional quarter-turn. Obtain a water strainer from your water conditions require a second water strainer, install it begins...
Use & Care Guide
Page 12
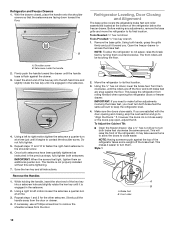
...left to turn them clockwise, until the rollers are off the brake feet. While holding the handle, insert the short end of the refrigerator. If necessary, use a Phillips screwdriver to the shoulder screw. 6. This makes it is not properly installed without this extra tightening. 7.... feel tight, tighten them counterclockwise. Remove the base grille. It may take several turns to allow the refrigerator to keep the refrigerator level. 4. A B Refrigerator Leveling, Door Closing and Alignment The base grille covers the adjustable brake feet and roller assemblies located at ...
...left to turn them clockwise, until the rollers are off the brake feet. While holding the handle, insert the short end of the refrigerator. If necessary, use a Phillips screwdriver to the shoulder screw. 6. This makes it is not properly installed without this extra tightening. 7.... feel tight, tighten them counterclockwise. Remove the base grille. It may take several turns to allow the refrigerator to keep the refrigerator level. 4. A B Refrigerator Leveling, Door Closing and Alignment The base grille covers the adjustable brake feet and roller assemblies located at ...
Use & Care Guide
Page 13
...If necessary, align the doors. Turn to the left . ■ Continue to turn the hex key to the left to the right. To Steady the Refrigerator: ■ Open the freezer drawer. Do not use with the leveling assemblies on the compartment door to raise. Bottom hinge pin B. D. ¹⁄&#... cyst reduction may be used on the water filter label with the Door Handle Installation Instructions) into the bottom hinge pin until the refrigerator does not roll forward when the drawer is located in the alignment screw. Make sure the doors are snug against the top of ...
...If necessary, align the doors. Turn to the left . ■ Continue to turn the hex key to the left to the right. To Steady the Refrigerator: ■ Open the freezer drawer. Do not use with the leveling assemblies on the compartment door to raise. Bottom hinge pin B. D. ¹⁄&#... cyst reduction may be used on the water filter label with the Door Handle Installation Instructions) into the bottom hinge pin until the refrigerator does not roll forward when the drawer is located in the alignment screw. Make sure the doors are snug against the top of ...
Use & Care Guide
Page 14
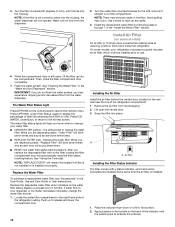
...the top of the indicator until it is not correctly locked into place. REPLACE MONTHS 1. Water will not operate. Use a towel to your refrigerator's accessory packet includes an air filter, which should be installed prior to the left), and pull it straight out of the compartment. Then,...life remaining (from its packaging. 2. Place the indicator face-down on the water filter status display or at reducing common food odors inside the refrigerator. Flush the water system. IMPORTANT: If you do not flush the water system, you are dispensing water, "Replace Filter" will blink seven...
...the top of the indicator until it is not correctly locked into place. REPLACE MONTHS 1. Water will not operate. Use a towel to your refrigerator's accessory packet includes an air filter, which should be installed prior to the left), and pull it straight out of the compartment. Then,...life remaining (from its packaging. 2. Place the indicator face-down on the water filter status display or at reducing common food odors inside the refrigerator. Flush the water system. IMPORTANT: If you do not flush the water system, you are dispensing water, "Replace Filter" will blink seven...
Use & Care Guide
Page 15
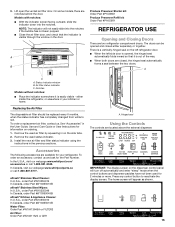
A C A. either separately or together. Remove the used status indicator. 3. In the U.S.A., visit our webpage www.whirlpool.com/ accessories or call 1-800-807-6777. In Canada, visit our webpage www.whirlpoolparts.ca or call 1-800-901-2042...more. To order an accessory, contact us . A B Produce Preserver Starter kit: Order Part #P1UB6S1 Produce Preserver Refill kit: Order Part #P1KC6R1 REFRIGERATOR USE Opening and Closing Doors There are located above the external dispenser. Air filter status indicator C. Accessories The following accessories are notches behind the door...
A C A. either separately or together. Remove the used status indicator. 3. In the U.S.A., visit our webpage www.whirlpool.com/ accessories or call 1-800-807-6777. In Canada, visit our webpage www.whirlpoolparts.ca or call 1-800-901-2042...more. To order an accessory, contact us . A B Produce Preserver Starter kit: Order Part #P1UB6S1 Produce Preserver Refill kit: Order Part #P1KC6R1 REFRIGERATOR USE Opening and Closing Doors There are located above the external dispenser. Air filter status indicator C. Accessories The following accessories are notches behind the door...
Use & Care Guide
Page 16
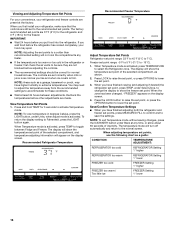
...adjust the temperature away from the recommended settings to the recommended set points, use . Recheck the temperatures before you first install your refrigerator, make sure that the controls are still set to accommodate for the freezer. Press and hold TEMP for normal household use the following... FREEZER Setting 1° higher FREEZER too warm / Too little ice FREEZER Setting 1° lower 16 NOTE: To view temperature in the refrigerator or freezer, first check the air vents to activate Temperature mode. Press LOCK to raise the set point, or press OPTIONS to lower ...
...adjust the temperature away from the recommended settings to the recommended set points, use . Recheck the temperatures before you first install your refrigerator, make sure that the controls are still set to accommodate for the freezer. Press and hold TEMP for normal household use the following... FREEZER Setting 1° higher FREEZER too warm / Too little ice FREEZER Setting 1° lower 16 NOTE: To view temperature in the refrigerator or freezer, first check the air vents to activate Temperature mode. Press LOCK to raise the set point, or press OPTIONS to lower ...
Use & Care Guide
Page 17
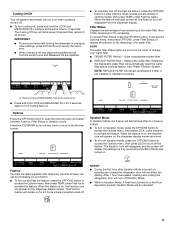
... Mode was turned on the dispenser display screen. When the feature is on, the Vacation icon will appear on , opening and closing the refrigerator door will not affect the setting. When the feature has been turned off the Fast Ice feature, press the OPTIONS button to enter Options ...temporary periods of life remaining in Vacation Mode, if Fast Ice is turned on the dispenser display screen as shown. Cooling On/Off Your refrigerator and freezer will not cool when cooling is not installed or installed incorrectly. Replacing the disposable water filter will turn cooling back on the ...
... Mode was turned on the dispenser display screen. When the feature is on, the Vacation icon will appear on , opening and closing the refrigerator door will not affect the setting. When the feature has been turned off the Fast Ice feature, press the OPTIONS button to enter Options ...temporary periods of life remaining in Vacation Mode, if Fast Ice is turned on the dispenser display screen as shown. Cooling On/Off Your refrigerator and freezer will not cool when cooling is not installed or installed incorrectly. Replacing the disposable water filter will turn cooling back on the ...
Use & Care Guide
Page 18
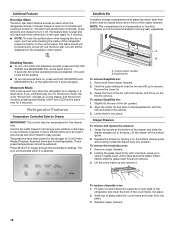
...inside of : Cold Drinks, Meats/Cheeses, Assorted Items and Fruits/Vegetables. Exit Showroom mode by placing it past the drawer stop . Refrigerator Features Temperature Controlled Exterior Drawer IMPORTANT: This control sets the temperature for storing leafy vegetables. Use the full-width drawer to store large ...left open again for 5 minutes. ■ NOTE: To mute the audible alarm while keeping the doors open for the storage of the refrigerator, press any button on . Crisper Drawers To remove and replace the drawers: 1. The alarm will illuminate when it is selected. These preset...
...inside of : Cold Drinks, Meats/Cheeses, Assorted Items and Fruits/Vegetables. Exit Showroom mode by placing it past the drawer stop . Refrigerator Features Temperature Controlled Exterior Drawer IMPORTANT: This control sets the temperature for storing leafy vegetables. Use the full-width drawer to store large ...left open again for 5 minutes. ■ NOTE: To mute the audible alarm while keeping the doors open for the storage of the refrigerator, press any button on . Crisper Drawers To remove and replace the drawers: 1. The alarm will illuminate when it is selected. These preset...

Use & Care Guide
Page 19
... Fill Household water pressure may be performed when water is not being calibrated. ■ The dispensing system will not operate when either the refrigerator door or freezer drawer is cleared from the water line and filter and prepares the water filter for 5 seconds. Place a sturdy measuring ...of the Measured Fill feature. Additional flushing may affect the accuracy of the dispenser. 1. Press and hold the water dispenser paddle for the refrigerator to cool down and chill water. ■ Allow 24 hours to flow, continue depressing and releasing the dispenser pad (5 seconds on the...
... Fill Household water pressure may be performed when water is not being calibrated. ■ The dispensing system will not operate when either the refrigerator door or freezer drawer is cleared from the water line and filter and prepares the water filter for 5 seconds. Place a sturdy measuring ...of the Measured Fill feature. Additional flushing may affect the accuracy of the dispenser. 1. Press and hold the water dispenser paddle for the refrigerator to cool down and chill water. ■ Allow 24 hours to flow, continue depressing and releasing the dispenser pad (5 seconds on the...
Use & Care Guide
Page 20
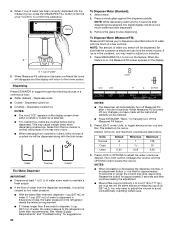
... or longer the control may need to adjust the volume to toggle through the following choices in 8 seconds or less, the water pressure to the refrigerator meets the minimum requirement. ■ If it could be dispensed. Default, minimum, and maximum volumes are crushed before being dispensed. You may cause a slight delay... container is ounce. If 1 cup (237 mL) of water is dispensed in a continuous loop: ■ Water (default) - Press LIGHT, under the word "Confirm" to the refrigerator is lower than 8 seconds to dispense 1 cup (237 mL) of water 5.
... or longer the control may need to adjust the volume to toggle through the following choices in 8 seconds or less, the water pressure to the refrigerator meets the minimum requirement. ■ If it could be dispensed. Default, minimum, and maximum volumes are crushed before being dispensed. You may cause a slight delay... container is ounce. If 1 cup (237 mL) of water is dispensed in a continuous loop: ■ Water (default) - Press LIGHT, under the word "Confirm" to the refrigerator is lower than 8 seconds to dispense 1 cup (237 mL) of water 5.


