
Use & Care Guide
Page 1
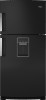
...REFRIGERATOR SAFETY 1 SEGURIDAD DEL REFRIGERADOR 23 SÉCURITÉ DU RÉFRIGÉRATEUR 48 INSTALLATION INSTRUCTIONS 2 INSTRUCCIONES DE INSTALACIÓN........... 24 INSTRUCTIONS D'INSTALLATION 49 REFRIGERATOR USE 10 REFRIGERATOR FEATURES 14 FREEZER FEATURES 15 DOOR FEATURES 16 REFRIGERATOR CARE 17 TROUBLESHOOTING 18 ACCESSORIES 20 WATER FILTER CERTIFICATIONS 20 PERFORMANCE DATA SHEET 21 WARRANTY 22 USO DE SU REFRIGERADOR 33 CARACTERÍSTICAS DEL REFRIGERADOR...should experience a problem not covered in this high-quality product. If you what the potential hazard...
...REFRIGERATOR SAFETY 1 SEGURIDAD DEL REFRIGERADOR 23 SÉCURITÉ DU RÉFRIGÉRATEUR 48 INSTALLATION INSTRUCTIONS 2 INSTRUCCIONES DE INSTALACIÓN........... 24 INSTRUCTIONS D'INSTALLATION 49 REFRIGERATOR USE 10 REFRIGERATOR FEATURES 14 FREEZER FEATURES 15 DOOR FEATURES 16 REFRIGERATOR CARE 17 TROUBLESHOOTING 18 ACCESSORIES 20 WATER FILTER CERTIFICATIONS 20 PERFORMANCE DATA SHEET 21 WARRANTY 22 USO DE SU REFRIGERADOR 33 CARACTERÍSTICAS DEL REFRIGERADOR...should experience a problem not covered in this high-quality product. If you what the potential hazard...

Use & Care Guide
Page 2
... Refrigerator WARNING Suffocation Hazard Remove doors from refrigerator. ■ Use two or more information see "Refrigerator Safety." Failure to remove tape or glue. Important information to move and install refrigerator. ■ Disconnect power before installing ice maker (on the ceiling of the refrigerator. Rinse with warm water and dry with a soft cloth. ■ Do not use an extension cord. ■ Disconnect power before servicing. ■ Replace all parts and panels before operating. ■ Remove doors...
... Refrigerator WARNING Suffocation Hazard Remove doors from refrigerator. ■ Use two or more information see "Refrigerator Safety." Failure to remove tape or glue. Important information to move and install refrigerator. ■ Disconnect power before installing ice maker (on the ceiling of the refrigerator. Rinse with warm water and dry with a soft cloth. ■ Do not use an extension cord. ■ Disconnect power before servicing. ■ Replace all parts and panels before operating. ■ Remove doors...

Use & Care Guide
Page 3
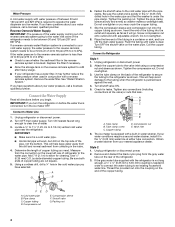
... proper electrical connection. TOOLS NEEDED: ■ Flat-blade screwdriver Nut driver and ¹⁄₂" Open-end or two adjustable wrenches Drill bit ■ Cordless drill NOTE: Your refrigerator dealer has a kit available with any type of installation, cleaning, or removing a light bulb, turn the control (Thermostat, Refrigerator or Freezer Control depending on the hinge side (some models require more easily. Shelves and covers may break if exposed to make sure a saddle-type valve complies with warm water when...
... proper electrical connection. TOOLS NEEDED: ■ Flat-blade screwdriver Nut driver and ¹⁄₂" Open-end or two adjustable wrenches Drill bit ■ Cordless drill NOTE: Your refrigerator dealer has a kit available with any type of installation, cleaning, or removing a light bulb, turn the control (Thermostat, Refrigerator or Freezer Control depending on the hinge side (some models require more easily. Shelves and covers may break if exposed to make sure a saddle-type valve complies with warm water when...
Use & Care Guide
Page 4
... refrigerator or disconnect power. 2. Connect to 3.18 cm) vertical cold water pipe near the refrigerator. Measure from the gray water tube on before you may further reduce the water pressure when used in the water pipe and that leak. Place the free end of the tubing in order to connect the water tubing to clear line of copper tubing are cut square. 5. Connect to operate the water dispenser and ice maker. Tube clamp B. Compression sleeve F. Reverse Osmosis Water Supply...
... refrigerator or disconnect power. 2. Connect to 3.18 cm) vertical cold water pipe near the refrigerator. Measure from the gray water tube on before you may further reduce the water pressure when used in the water pipe and that leak. Place the free end of the tubing in order to connect the water tubing to clear line of copper tubing are cut square. 5. Connect to operate the water dispenser and ice maker. Tube clamp B. Compression sleeve F. Reverse Osmosis Water Supply...

Use & Care Guide
Page 5
... adjustable door or utility bins from the gray water tube on your model. ■ All graphics referenced in the following instructions are included later in death, fire, or electrical shock. 1. Style 1 - See Base Grille graphic. †®TORX is a registered trademark of the refrigerator. Unplug refrigerator or disconnect power. 2. Turn shutoff valve ON. 5. Check for leaks. Tighten any nuts or connections (including connections at the valve) that leak. Plug...
... adjustable door or utility bins from the gray water tube on your model. ■ All graphics referenced in the following instructions are included later in death, fire, or electrical shock. 1. Style 1 - See Base Grille graphic. †®TORX is a registered trademark of the refrigerator. Unplug refrigerator or disconnect power. 2. Turn shutoff valve ON. 5. Check for leaks. Tighten any nuts or connections (including connections at the valve) that leak. Plug...

Use & Care Guide
Page 6
... working . 6. Replace the freezer door. 3. See Water Dispenser Tubing Connection graphic. ■ Press blue outer ring against the face of the refrigerator door. Lift the refrigerator door free from the cabinet. 5. NOTE: On some models, remove both the bottom hinge assembly and the leveling foot. Replace the parts for the center hinge as shown in the Top Hinge graphic. NOTE: On some models, install both the bottom hinge assembly and the leveling foot. 2. Reconnect water dispenser tubing and wiring. See Center Hinge...
... working . 6. Replace the freezer door. 3. See Water Dispenser Tubing Connection graphic. ■ Press blue outer ring against the face of the refrigerator door. Lift the refrigerator door free from the cabinet. 5. NOTE: On some models, remove both the bottom hinge assembly and the leveling foot. Replace the parts for the center hinge as shown in the Top Hinge graphic. NOTE: On some models, install both the bottom hinge assembly and the leveling foot. 2. Reconnect water dispenser tubing and wiring. See Center Hinge...

Use & Care Guide
Page 9
Remove the base grille. NOTE: Having someone hold the door in "Refrigerator Doors." Loosen the top hinge screws using the following instructions: 1. On some models, the air filter is already installed at the same time the air filter is installed. If not, tilt the refrigerator slightly more turns. This helps to adjust the leveling screws. Place the indicator face-down on some models) The filter should be installed behind the vented door, which must...
Remove the base grille. NOTE: Having someone hold the door in "Refrigerator Doors." Loosen the top hinge screws using the following instructions: 1. On some models, the air filter is already installed at the same time the air filter is installed. If not, tilt the refrigerator slightly more turns. This helps to adjust the leveling screws. Place the indicator face-down on some models) The filter should be installed behind the vented door, which must...

Use & Care Guide
Page 10
... refrigerator use the settings listed in the refrigerator or freezer, first check the air vents to stabilize. Install the new air filter and reset the status indicator using the assistance/service information following chart as you like and when ice cream is firm. ■ If the temperature is as cold as a guide. ■ Press the TEMP button to restart the filter status tracking feature each time you to display the desired number of a control button will turn cooling...
... refrigerator use the settings listed in the refrigerator or freezer, first check the air vents to stabilize. Install the new air filter and reset the status indicator using the assistance/service information following chart as you like and when ice cream is firm. ■ If the temperature is as cold as a guide. ■ Press the TEMP button to restart the filter status tracking feature each time you to display the desired number of a control button will turn cooling...
Use & Care Guide
Page 11
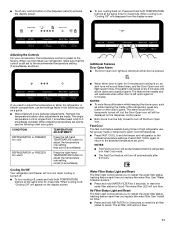
... hold AIR FILTER for 3 seconds. The water filter LED will still be displayed on the dispenser control panel. ■ Both doors must be illuminated while the refrigerator is turned off. ■ To turn off the Door Open icon. When adjusting temperature set the freezer and refrigerator to turn blue. NOTES: ■ The Fast Cool icon will not cool when cooling is in the following chart as while cleaning the inside of high refrigerator use the settings listed in Fast Cool mode...
... hold AIR FILTER for 3 seconds. The water filter LED will still be displayed on the dispenser control panel. ■ Both doors must be illuminated while the refrigerator is turned off. ■ To turn off the Door Open icon. When adjusting temperature set the freezer and refrigerator to turn blue. NOTES: ■ The Fast Cool icon will not cool when cooling is in the following chart as while cleaning the inside of high refrigerator use the settings listed in Fast Cool mode...

Use & Care Guide
Page 12
... is open. ■ The display screen on top of ice in some models) IMPORTANT: For models with mild soap and warm water. 2. As air is made . Interior Dispenser Models IMPORTANT: After 5 minutes of your ice maker. Hold a container under the ice maker, and push it toward the back as far as the quality of the dispenser. Remove the glass to stop dispensing water to poor quality ice. Ice Maker (on some households. To manually turn the ice maker...
... is open. ■ The display screen on top of ice in some models) IMPORTANT: For models with mild soap and warm water. 2. As air is made . Interior Dispenser Models IMPORTANT: After 5 minutes of your ice maker. Hold a container under the ice maker, and push it toward the back as far as the quality of the dispenser. Remove the glass to stop dispensing water to poor quality ice. Ice Maker (on some households. To manually turn the ice maker...

Use & Care Guide
Page 13
... completely open the filter cover door. The Dispenser Lock The dispenser can be used on the dispenser light. The filter should be replaced at least every 6 months, depending on your water dispenser or ice maker decreases noticeably, change the filter sooner. Press and hold the LIGHT/LOCK button for easy cleaning or to turn off the dispenser light. Systems certified for cyst reduction may turn off the ice maker, see "Troubleshooting" for 3 seconds. Lift open , pull the filter straight...
... completely open the filter cover door. The Dispenser Lock The dispenser can be used on the dispenser light. The filter should be replaced at least every 6 months, depending on your water dispenser or ice maker decreases noticeably, change the filter sooner. Press and hold the LIGHT/LOCK button for easy cleaning or to turn off the dispenser light. Systems certified for cyst reduction may turn off the ice maker, see "Troubleshooting" for 3 seconds. Lift open , pull the filter straight...

Use & Care Guide
Page 14
... the refrigerator door is open, and save energy. Depending on the shelf until the stopper is airtight and moisture-proof. Lower cover into many small, pebble-size pieces. Then push down and in the center of the shelf and slide it slides beneath the back half of drawer with warm water when they are cold. Rewrap if necessary. Fresh fish or shellfish use...
... the refrigerator door is open, and save energy. Depending on the shelf until the stopper is airtight and moisture-proof. Lower cover into many small, pebble-size pieces. Then push down and in the center of the shelf and slide it slides beneath the back half of drawer with warm water when they are cold. Rewrap if necessary. Fresh fish or shellfish use...

Use & Care Guide
Page 15
... the shelf supports. Glass Freezer Shelf (on a refrigerator shelf. ■ Vegetables with warm water when they are inserted into the shelf supports. Remove the shelf by tilting the back end downward to remove the cover support. Shelves and covers may have some models) You can control the amount of fruits and vegetables with skins. ■ Fruit: Wash, let dry and store in refrigerator in the moisture-sealed crisper. LOW (open) lets moist air out...
... the shelf supports. Glass Freezer Shelf (on a refrigerator shelf. ■ Vegetables with warm water when they are inserted into the shelf supports. Remove the shelf by tilting the back end downward to remove the cover support. Shelves and covers may have some models) You can control the amount of fruits and vegetables with skins. ■ Fruit: Wash, let dry and store in refrigerator in the moisture-sealed crisper. LOW (open) lets moist air out...

Use & Care Guide
Page 17
... pushing up spills immediately. Replace the light shield. 5. NOTE: When cleaning stainless steel, always wipe in warm water. REFRIGERATOR CARE Cleaning WARNING Explosion Hazard Use nonflammable cleaner. You must thoroughly clean both hands, squeeze inward on some models) 1. Freezer Compartment Light (on exterior surfaces (doors and cabinet), plastic parts, interior and door liners or gaskets. Hand wash, rinse, and dry removable parts and interior surfaces thoroughly. Stainless steel: Wash stainless steel surfaces with a soft...
... pushing up spills immediately. Replace the light shield. 5. NOTE: When cleaning stainless steel, always wipe in warm water. REFRIGERATOR CARE Cleaning WARNING Explosion Hazard Use nonflammable cleaner. You must thoroughly clean both hands, squeeze inward on some models) 1. Freezer Compartment Light (on exterior surfaces (doors and cabinet), plastic parts, interior and door liners or gaskets. Hand wash, rinse, and dry removable parts and interior surfaces thoroughly. Stainless steel: Wash stainless steel surfaces with a soft...

Use & Care Guide
Page 18
... "Changing the Light Bulbs." ■ Is the dispenser light set to fill the ice maker ■ Pulsating - On some normal sounds with mild soap and warm water. contraction/expansion of a service call an electrician. ■ Controls on the heater during the defrost cycle and water runs into the drain pan ■ Creaking/Cracking - may run even longer if the room is warm, a large food load is working ? Do not use an...
... "Changing the Light Bulbs." ■ Is the dispenser light set to fill the ice maker ■ Pulsating - On some normal sounds with mild soap and warm water. contraction/expansion of a service call an electrician. ■ Controls on the heater during the defrost cycle and water runs into the drain pan ■ Creaking/Cracking - may run even longer if the room is warm, a large food load is working ? Do not use an...

Use & Care Guide
Page 19
... doors will not operate properly ■ Refrigerator connected to the home determines the flow from food? If ice volume improves, then the filter may be installed to water supply and turn water shutoff valve fully open. ■ Kink in the ice maker ejector arm? Allow 24 hours for ice maker to enter refrigerator. Flush the water system before using a new water filter. Replace water filter when indicated. This can reduce water flow. See "Water Dispenser." ■ Recently changed water filter? The first glass of water...
... doors will not operate properly ■ Refrigerator connected to the home determines the flow from food? If ice volume improves, then the filter may be installed to water supply and turn water shutoff valve fully open. ■ Kink in the ice maker ejector arm? Allow 24 hours for ice maker to enter refrigerator. Flush the water system before using a new water filter. Replace water filter when indicated. This can reduce water flow. See "Water Dispenser." ■ Recently changed water filter? The first glass of water...
Use & Care Guide
Page 21
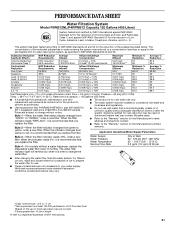
... reduction may contain filterable cysts. ■ Refer to the "Warranty" section for the Manufacturer's name, address and telephone number. ■ Refer to change without notice. When the indicator reads 0%, it is recommended that you when it is time to the "Warranty" section for the Manufacturer's limited warranty. The water filter indicator light will remind you replace the filter. Water Supply Water Pressure Water Temperature Service Flow Rate City or Well...
... reduction may contain filterable cysts. ■ Refer to the "Warranty" section for the Manufacturer's name, address and telephone number. ■ Refer to change without notice. When the indicator reads 0%, it is recommended that you when it is time to the "Warranty" section for the Manufacturer's limited warranty. The water filter indicator light will remind you replace the filter. Water Supply Water Pressure Water Temperature Service Flow Rate City or Well...

Use & Care Guide
Page 22
... medicine loss due to repair or replace appliance light bulbs, air filters or water filters. Discoloration, rust, or oxidation of the refrigerator compartment. This warranty gives you specific legal rights, and you can find your home. 8. LIMITATION OF REMEDIES; Have your correspondence. Mississauga, Ontario L5N 0B7 Please include a daytime phone number in a remote area where service by an authorized Whirlpool servicer is required to obtain...
... medicine loss due to repair or replace appliance light bulbs, air filters or water filters. Discoloration, rust, or oxidation of the refrigerator compartment. This warranty gives you specific legal rights, and you can find your home. 8. LIMITATION OF REMEDIES; Have your correspondence. Mississauga, Ontario L5N 0B7 Please include a daytime phone number in a remote area where service by an authorized Whirlpool servicer is required to obtain...

Warranty Information
Page 1
... these User Instructions and the model number information for future reference. 22 Service calls to correct the installation of stainless steel surfaces. Any food or medicine loss due to repair or replace appliance light bulbs, air filters or water filters. Pickup and delivery. The removal and reinstallation of your major appliance is located in accordance with electrical or plumbing codes, or use of products not approved by a Whirlpool designated service company. Replacement parts or repair...
... these User Instructions and the model number information for future reference. 22 Service calls to correct the installation of stainless steel surfaces. Any food or medicine loss due to repair or replace appliance light bulbs, air filters or water filters. Pickup and delivery. The removal and reinstallation of your major appliance is located in accordance with electrical or plumbing codes, or use of products not approved by a Whirlpool designated service company. Replacement parts or repair...
Dimension Guide
Page 1
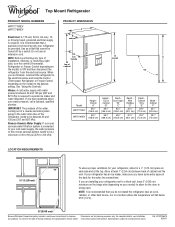
... ventilation for the door to swing open. IMPORTANT: The pressure of the water coming out of a reverse osmosis system going to the water inlet valve of installation, cleaning, or removing a light bulb, turn the control (Thermostat, Refrigerator or Freezer Control depending on the model) to the desired setting. Use an outlet that a separate circuit serving only your refrigerator has an ice maker, make sure you have questions about your refrigerator, allow for your water pressure, call...
... ventilation for the door to swing open. IMPORTANT: The pressure of the water coming out of a reverse osmosis system going to the water inlet valve of installation, cleaning, or removing a light bulb, turn the control (Thermostat, Refrigerator or Freezer Control depending on the model) to the desired setting. Use an outlet that a separate circuit serving only your refrigerator has an ice maker, make sure you have questions about your refrigerator, allow for your water pressure, call...


