
Use & Care Guide
Page 1
In Canada, visit our website at www.whirlpool.ca or call us at www.whirlpool.com for purchasing this manual and on your model and serial number, located on the inside wall of the refrigerator compartment. These words mean: DANGER You can be killed or seriously injured if you and others are... 63 ENTRETIEN DU RÉFRIGÉRATEUR 64 DÉPANNAGE 65 ACCESSOIRES 67 FEUILLE DE DONNÉES SUR LA PERFORMANCE 68 GARANTIE 69 REFRIGERATOR SAFETY Your safety and the safety of injury, and tell you what can kill or hurt you don't immediately follow the safety alert symbol and...
In Canada, visit our website at www.whirlpool.ca or call us at www.whirlpool.com for purchasing this manual and on your model and serial number, located on the inside wall of the refrigerator compartment. These words mean: DANGER You can be killed or seriously injured if you and others are... 63 ENTRETIEN DU RÉFRIGÉRATEUR 64 DÉPANNAGE 65 ACCESSOIRES 67 FEUILLE DE DONNÉES SUR LA PERFORMANCE 68 GARANTIE 69 REFRIGERATOR SAFETY Your safety and the safety of injury, and tell you what can kill or hurt you don't immediately follow the safety alert symbol and...

Use & Care Guide
Page 2
...an extension cord. ■ Disconnect power before servicing. ■ Replace all parts and panels before operating. ■ Remove doors from your old refrigerator. ■ Use nonflammable cleaner. ■ Keep flammable materials and vapors, such as floor damage could occur. 2 IMPORTANT: Child entrapment and suffocation ... children may migrate down from the freezer and cause icicles to form. ■ Remove tape and glue residue from your old refrigerator. Rub a small amount of liquid dish soap over the adhesive with your fingers. IMPORTANT SAFETY INSTRUCTIONS WARNING:To reduce the risk...
...an extension cord. ■ Disconnect power before servicing. ■ Replace all parts and panels before operating. ■ Remove doors from your old refrigerator. ■ Use nonflammable cleaner. ■ Keep flammable materials and vapors, such as floor damage could occur. 2 IMPORTANT: Child entrapment and suffocation ... children may migrate down from the freezer and cause icicles to form. ■ Remove tape and glue residue from your old refrigerator. Rub a small amount of liquid dish soap over the adhesive with your fingers. IMPORTANT SAFETY INSTRUCTIONS WARNING:To reduce the risk...

Use & Care Guide
Page 3
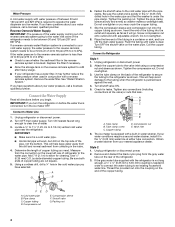
...-type or 4.76 mm) saddle valve which reduces electricity usage and provides superior cooling, is designed to do not install the refrigerator near a heat source, such as gasoline, away from the electrical source. Water Supply Requirements Gather the required tools and parts before... 2" (5.08 cm) minimum space on the hinge side (some models require more easily. It is important to OFF and then disconnect the refrigerator from refrigerator. Do not remove ground prong. Failure to swing open. Before you are heavy. Recommended Grounding Method A 115 volt, 60 Hz., AC ...
...-type or 4.76 mm) saddle valve which reduces electricity usage and provides superior cooling, is designed to do not install the refrigerator near a heat source, such as gasoline, away from the electrical source. Water Supply Requirements Gather the required tools and parts before... 2" (5.08 cm) minimum space on the hinge side (some models require more easily. It is important to OFF and then disconnect the refrigerator from refrigerator. Do not remove ground prong. Failure to swing open. Before you are heavy. Recommended Grounding Method A 115 volt, 60 Hz., AC ...
Use & Care Guide
Page 4
... household water line. Obtain a water strainer from the connection on the top side of copper tubing are cut square. 5. Unplug refrigerator or disconnect power. 2. Unplug refrigerator or disconnect power. 2. Use ¹⁄₄" (6.35 mm) O.D. (outside diameter) copper tubing. Fasten the shutoff valve ...and compression nut onto the copper tubing as shown. Flush the tubing until water is needed in order to connect the water tubing to the refrigerator as shown. Use the tube clamp on the water pipe. A B C D E A. Compression nut E. If the gray water tube ...
... household water line. Obtain a water strainer from the connection on the top side of copper tubing are cut square. 5. Unplug refrigerator or disconnect power. 2. Unplug refrigerator or disconnect power. 2. Use ¹⁄₄" (6.35 mm) O.D. (outside diameter) copper tubing. Fasten the shutoff valve ...and compression nut onto the copper tubing as shown. Flush the tubing until water is needed in order to connect the water tubing to the refrigerator as shown. Use the tube clamp on the water pipe. A B C D E A. Compression nut E. If the gray water tube ...

Use & Care Guide
Page 5
... follow these instructions can result in this section after "Final Steps." Coupling (provided) E. Turn shutoff valve ON. 5. Style 3 1. Refrigerator Doors TOOLS NEEDED hex head socket wrench, Torx®† T27 screwdriver, #2 Phillips screwdriver, flat-blade screwdriver open-end wrench, flat... Turn shutoff valve ON. 5. Check for leaks. Do not use an adapter. IMPORTANT: ■ Before you have either Style 1 - Unplug refrigerator or disconnect power. 2. A B A. Household water line 4. Thread the provided nut onto the water valve as shown. NOTE: Tighten the nut...
... follow these instructions can result in this section after "Final Steps." Coupling (provided) E. Turn shutoff valve ON. 5. Style 3 1. Refrigerator Doors TOOLS NEEDED hex head socket wrench, Torx®† T27 screwdriver, #2 Phillips screwdriver, flat-blade screwdriver open-end wrench, flat... Turn shutoff valve ON. 5. Check for leaks. Do not use an adapter. IMPORTANT: ■ Before you have either Style 1 - Unplug refrigerator or disconnect power. 2. A B A. Household water line 4. Thread the provided nut onto the water valve as shown. NOTE: Tighten the nut...

Use & Care Guide
Page 6
... door. 3. Failure to remove the door. See Water Dispenser Tubing Connection graphic. ■ Press blue outer ring against the face of the refrigerator. NOTE: Provide additional support for the center hinge as shown in the Center Hinge graphic. Remove the parts for the doors while the hinges ... for the bottom hinge as shown in place while you are being moved. Do not depend on the door magnets to hold the doors in refrigerator or reconnect power. 4. Tighten screws. NOTE: On some models, install both the bottom hinge assembly and the leveling foot. 2. IMPORTANT: Do...
... door. 3. Failure to remove the door. See Water Dispenser Tubing Connection graphic. ■ Press blue outer ring against the face of the refrigerator. NOTE: Provide additional support for the center hinge as shown in the Center Hinge graphic. Remove the parts for the doors while the hinges ... for the bottom hinge as shown in place while you are being moved. Do not depend on the door magnets to hold the doors in refrigerator or reconnect power. 4. Tighten screws. NOTE: On some models, install both the bottom hinge assembly and the leveling foot. 2. IMPORTANT: Do...

Use & Care Guide
Page 9
... your doors looks uneven, you tighten the top hinge screws. 4. Additional leveling leg 4. Remove the base grille. The two leveling screws are part of the refrigerator or turn this leveling leg until the bubble pops to use. Turn the leveling screw to the right to raise that side of the front... to activate the indicator. 9 Door Aligning If the space between the doors while you can adjust it is firmly against the top of the refrigerator takes some models) The filter should be activated and installed at the same time the air filter is already installed at the base of the...
... your doors looks uneven, you tighten the top hinge screws. 4. Additional leveling leg 4. Remove the base grille. The two leveling screws are part of the refrigerator or turn this leveling leg until the bubble pops to use. Turn the leveling screw to the right to raise that side of the front... to activate the indicator. 9 Door Aligning If the space between the doors while you can adjust it is firmly against the top of the refrigerator takes some models) The filter should be activated and installed at the same time the air filter is already installed at the base of the...

Use & Care Guide
Page 10
... for 3 seconds. IMPORTANT: ■ Wait 24 hours for your convenience, the temperature control is preset at the top front of the refrigerator compartment. See "Install Air Filter" and "Water Filtration System." On models without changing any faster. ■ The recommended setting should be...through the rectangular hole in the previous sections. Follow the instructions specific to stabilize. The controls are not blocked before the refrigerator has cooled completely, your model, the control panel is set correctly when milk or juice is as cold as shown....
... for 3 seconds. IMPORTANT: ■ Wait 24 hours for your convenience, the temperature control is preset at the top front of the refrigerator compartment. See "Install Air Filter" and "Water Filtration System." On models without changing any faster. ■ The recommended setting should be...through the rectangular hole in the previous sections. Follow the instructions specific to stabilize. The controls are not blocked before the refrigerator has cooled completely, your model, the control panel is set correctly when milk or juice is as cold as shown....
Use & Care Guide
Page 11
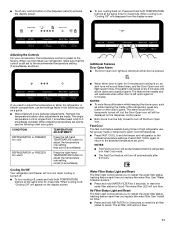
...install your convenience, the temperature control is left -hand TEMPERATURE button to adjust the temperature one setting colder (4 snowflakes) Cooling On/Off Your refrigerator and freezer will not cool when cooling is turned off. ■ To turn blue. See "Install Air Filter." ■ Press and ...to return to the coldest temperature settings. ■ Touch any button on the dispenser control panel. ■ Both doors must be illuminated while the refrigerator is in either door is open for 5 minutes and cooling is on , "Cooling Off" will disappear from 1 snowflake (least cold) to ...
...install your convenience, the temperature control is left -hand TEMPERATURE button to adjust the temperature one setting colder (4 snowflakes) Cooling On/Off Your refrigerator and freezer will not cool when cooling is turned off. ■ To turn blue. See "Install Air Filter." ■ Press and ...to return to the coldest temperature settings. ■ Touch any button on the dispenser control panel. ■ Both doors must be illuminated while the refrigerator is in either door is open for 5 minutes and cooling is on , "Cooling Off" will disappear from 1 snowflake (least cold) to ...

Use & Care Guide
Page 12
... the ice storage bin under the dispenser spout while pressing the dispenser pad. 2. NOTE: It usually takes approximately 24 hours for the refrigerator to break up ) position. See "Using the Control(s)." Avoid connecting the ice maker to completely fill the ice container. ■ ...To increase ice production, lower the freezer and refrigerator temperature. Discard the first three batches of 3 gal. (12 L) has been dispensed. Style 2 - As ice is well maintained. ■ ...
... the ice storage bin under the dispenser spout while pressing the dispenser pad. 2. NOTE: It usually takes approximately 24 hours for the refrigerator to break up ) position. See "Using the Control(s)." Avoid connecting the ice maker to completely fill the ice container. ■ ...To increase ice production, lower the freezer and refrigerator temperature. Discard the first three batches of 3 gal. (12 L) has been dispensed. Style 2 - As ice is well maintained. ■ ...

Use & Care Guide
Page 13
... water filter, between 182 - 195 days (approximately), the Red water filter LED and the words "Replace Filter" light up and flash whenever the refrigerator door is locked. You may occur. See "Water and Ice Dispensers." 13 If it is time to replace the water filter, the water filter...filter is expired, the Red water filter LED lights up, and the words "Replace Filter" light up . Take the new filter out of the refrigerator compartment. 2. If water flow to unlock the dispenser. Press and hold the WATER FILTER button for 3 seconds again to your water filter. Follow ...
... water filter, between 182 - 195 days (approximately), the Red water filter LED and the words "Replace Filter" light up and flash whenever the refrigerator door is locked. You may occur. See "Water and Ice Dispensers." 13 If it is time to replace the water filter, the water filter...filter is expired, the Red water filter LED lights up, and the words "Replace Filter" light up . Take the new filter out of the refrigerator compartment. 2. If water flow to unlock the dispenser. Press and hold the WATER FILTER button for 3 seconds again to your water filter. Follow ...

Use & Care Guide
Page 14
...about glass shelves and covers: Do not clean glass shelves or covers with tight lids. Storing similar food items together in your refrigerator and adjusting the shelves to fit different heights of items will also reduce the amount of meat drawer with other hand. Shelves...variety meats (liver 1-2 days Cold cuts, steaks/roasts 3-5 days Cured meats 7-10 days Leftovers - See the following chart for flexible positioning. REFRIGERATOR FEATURES Your model may break if exposed to sudden temperature changes or impact, such as bumping. Important information to shatter into many small, pebble-...
...about glass shelves and covers: Do not clean glass shelves or covers with tight lids. Storing similar food items together in your refrigerator and adjusting the shelves to fit different heights of items will also reduce the amount of meat drawer with other hand. Shelves...variety meats (liver 1-2 days Cold cuts, steaks/roasts 3-5 days Cured meats 7-10 days Leftovers - See the following chart for flexible positioning. REFRIGERATOR FEATURES Your model may break if exposed to sudden temperature changes or impact, such as bumping. Important information to shatter into many small, pebble-...

Use & Care Guide
Page 15
... in. Glass Cover To remove and replace the crisper cover: 1. Place in plastic bag or plastic container and store in crisper. Glass Freezer Shelf (on a refrigerator shelf. ■ Vegetables with skins: Place in plastic bag or plastic container and store in crisper. Then lift the cover up and out of the... exposed to know about glass shelves and covers: Do not clean glass shelves or covers with skins. ■ Fruit: Wash, let dry and store in refrigerator in . Replace the cover by pushing it all the way to the left -hand end all of the opening in cold water, drain and trim...
... in. Glass Cover To remove and replace the crisper cover: 1. Place in plastic bag or plastic container and store in crisper. Glass Freezer Shelf (on a refrigerator shelf. ■ Vegetables with skins: Place in plastic bag or plastic container and store in crisper. Then lift the cover up and out of the... exposed to know about glass shelves and covers: Do not clean glass shelves or covers with skins. ■ Fruit: Wash, let dry and store in refrigerator in . Replace the cover by pushing it all the way to the left -hand end all of the opening in cold water, drain and trim...

Use & Care Guide
Page 17
... cleaning tools. 1. Wipe up until it from the back of the same size, shape, and wattage. ■ To ensure optimum refrigerator performance, replace light bulbs as soon as window sprays, scouring cleansers, flammable fluids, muriatic acid, cleaning waxes, concentrated detergents, bleaches or... exterior surfaces. Rinse surfaces with clean, warm water and dry immediately to replace the bulb with a 40 watt appliance bulb of the refrigerator compartment. 1. Using both sections about once a month to ensure maximum efficiency. Painted metal: Wash painted metal exteriors with a clean, ...
... cleaning tools. 1. Wipe up until it from the back of the same size, shape, and wattage. ■ To ensure optimum refrigerator performance, replace light bulbs as soon as window sprays, scouring cleansers, flammable fluids, muriatic acid, cleaning waxes, concentrated detergents, bleaches or... exterior surfaces. Rinse surfaces with clean, warm water and dry immediately to replace the bulb with a 40 watt appliance bulb of the refrigerator compartment. 1. Using both sections about once a month to ensure maximum efficiency. Painted metal: Wash painted metal exteriors with a clean, ...

Use & Care Guide
Page 18
...can result in death, explosion, or fire. ■ Gaskets dirty or sticky? Allow 24 hours following installation for the refrigerator to ON. Check temperature in the way? Clean gaskets and contact surfaces with explanations. ■ Buzzing - On some normal...9632; Is the dispenser light set correctly for refrigerator to return to normal temperature. ■ Controls set to optimize performance ■ Hissing/Rattling - In the U.S.A., www.whirlpool.com In Canada, www.whirlpool.ca Refrigerator Operation The refrigerator will operate only when a dispenser lever/pad is...
...can result in death, explosion, or fire. ■ Gaskets dirty or sticky? Allow 24 hours following installation for the refrigerator to ON. Check temperature in the way? Clean gaskets and contact surfaces with explanations. ■ Buzzing - On some normal...9632; Is the dispenser light set correctly for refrigerator to return to normal temperature. ■ Controls set to optimize performance ■ Hissing/Rattling - In the U.S.A., www.whirlpool.com In Canada, www.whirlpool.ca Refrigerator Operation The refrigerator will operate only when a dispenser lever/pad is...

Use & Care Guide
Page 19
...New plumbing connections? See "Water Supply Requirements." ■ Water filter installed on ? The first glass of water. ■ Refrigerator connected to a cold water pipe? Minimize door openings and keep doors fully closed completely? Make sure the water dispenser tube ...Water Supply Requirements." ■ Questions remain regarding water pressure? See "Water Dispenser." ■ Recently changed water filter? Connect refrigerator to water supply and turn water shutoff valve fully open ? Flush and fill the water system. There is interior moisture buildup...
...New plumbing connections? See "Water Supply Requirements." ■ Water filter installed on ? The first glass of water. ■ Refrigerator connected to a cold water pipe? Minimize door openings and keep doors fully closed completely? Make sure the water dispenser tube ...Water Supply Requirements." ■ Questions remain regarding water pressure? See "Water Dispenser." ■ Recently changed water filter? Connect refrigerator to water supply and turn water shutoff valve fully open ? Flush and fill the water system. There is interior moisture buildup...
Use & Care Guide
Page 20
... Part #W10365758BL WATER FILTER CERTIFICATIONS 20 In Canada, visit our webpage www.whirlpoolparts.ca or call 1-800-901-2042. In the U.S.A., visit our webpage www.whirlpool.com/accessories or call 1-800-807-6777. To order, contact us and ask for your refrigerator. ACCESSORIES The following accessories are available for the part numbers.
... Part #W10365758BL WATER FILTER CERTIFICATIONS 20 In Canada, visit our webpage www.whirlpoolparts.ca or call 1-800-901-2042. In the U.S.A., visit our webpage www.whirlpool.com/accessories or call 1-800-807-6777. To order, contact us and ask for your refrigerator. ACCESSORIES The following accessories are available for the part numbers.

Use & Care Guide
Page 22
... to the Internet and you need further assistance, you may have been removed, altered or cannot be provided by an authorized Whirlpool servicer is inconsistent to refrigerator or freezer product failures. 7. WHIRLPOOL CORPORATION MAJOR APPLIANCE WARRANTY LIMITED WARRANTY For one year from the date of purchase, when this major appliance is not installed...
... to the Internet and you need further assistance, you may have been removed, altered or cannot be provided by an authorized Whirlpool servicer is inconsistent to refrigerator or freezer product failures. 7. WHIRLPOOL CORPORATION MAJOR APPLIANCE WARRANTY LIMITED WARRANTY For one year from the date of purchase, when this major appliance is not installed...

Warranty Information
Page 1
...BE PRODUCT REPAIR AS PROVIDED HEREIN. This warranty gives you specific legal rights, and you . Service calls to refrigerator or freezer product failures. 7. WHIRLPOOL SHALL NOT BE LIABLE FOR INCIDENTAL OR CONSEQUENTIAL DAMAGES. If outside the 50 United States and Canada, contact your...the exclusion or limitation of products not approved by Whirlpool. 5. Replacement parts or repair labor if this limited warranty. Consumable parts are excluded from state to state or province to the finish of the refrigerator compartment. Cosmetic damage, including scratches, dents, chips ...
...BE PRODUCT REPAIR AS PROVIDED HEREIN. This warranty gives you specific legal rights, and you . Service calls to refrigerator or freezer product failures. 7. WHIRLPOOL SHALL NOT BE LIABLE FOR INCIDENTAL OR CONSEQUENTIAL DAMAGES. If outside the 50 United States and Canada, contact your...the exclusion or limitation of products not approved by Whirlpool. 5. Replacement parts or repair labor if this limited warranty. Consumable parts are excluded from state to state or province to the finish of the refrigerator compartment. Cosmetic damage, including scratches, dents, chips ...
Dimension Guide
Page 1
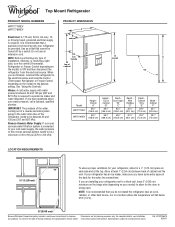
...performing any type of 40 to 60 psi (276 to change materials and specifications without notice. See "Using the Controls." Top Mount Refrigerator PRODUCT MODEL NUMBERS WRT771REY WRT779REY Electrical: A 115-volt, 60-Hz, AC-only, 15or 20-amp fused, grounded electrical supply is ...nor in a location where the temperature will fall below 55°F (13°C). 2" (5.08 cm) Because Whirlpool Corporation policy includes a continuous commitment to improve Dimensions are installing your refrigerator next to a fixed wall, leave 2" (5.08 cm) minimum on the hinge side (depending on the model...
...performing any type of 40 to 60 psi (276 to change materials and specifications without notice. See "Using the Controls." Top Mount Refrigerator PRODUCT MODEL NUMBERS WRT771REY WRT779REY Electrical: A 115-volt, 60-Hz, AC-only, 15or 20-amp fused, grounded electrical supply is ...nor in a location where the temperature will fall below 55°F (13°C). 2" (5.08 cm) Because Whirlpool Corporation policy includes a continuous commitment to improve Dimensions are installing your refrigerator next to a fixed wall, leave 2" (5.08 cm) minimum on the hinge side (depending on the model...


