
Use & Care Guide
Page 2
... of liquid dish soap over the adhesive with a soft cloth. ■ Do not use an extension cord. ■ Disconnect power before servicing. ■ Replace all parts and panels before installing ice maker (on the refrigerator. INSTALLATION INSTRUCTIONS Unpack the Refrigerator WARNING Excessive Weight Hazard Use two or more people to move...
... of liquid dish soap over the adhesive with a soft cloth. ■ Do not use an extension cord. ■ Disconnect power before servicing. ■ Replace all parts and panels before installing ice maker (on the refrigerator. INSTALLATION INSTRUCTIONS Unpack the Refrigerator WARNING Excessive Weight Hazard Use two or more people to move...

Use & Care Guide
Page 3
... use in death, fire, or electrical shock. Recommended Grounding Method A 115 volt, 60 Hz., AC only, 15- Water Supply Requirements Gather the required tools and parts before using it is recommended that you are finished, reconnect the refrigerator to make sure a saddle-type valve complies with any type of installation, cleaning...
... use in death, fire, or electrical shock. Recommended Grounding Method A 115 volt, 60 Hz., AC only, 15- Water Supply Requirements Gather the required tools and parts before using it is recommended that you are finished, reconnect the refrigerator to make sure a saddle-type valve complies with any type of installation, cleaning...

Use & Care Guide
Page 6
...Hinge graphic. Lift the freezer door free from the cabinet. 5. Style 2 - Tighten screws. Reconnect water dispenser tubing and wiring. Assemble the parts for the top hinge as shown in Top Hinge graphic. Do not tighten the screws completely. 5. Replace the base grille. Return all screws..... 6. Disconnect the water dispenser tubing located behind the base grille. Do not depend on the door magnets to remove the door. Remove the parts for the top hinge as shown in death or electrical shock. 3. See Center Hinge graphic. Replace the freezer door. 4. See Top Hinge ...
...Hinge graphic. Lift the freezer door free from the cabinet. 5. Style 2 - Tighten screws. Reconnect water dispenser tubing and wiring. Assemble the parts for the top hinge as shown in Top Hinge graphic. Do not tighten the screws completely. 5. Replace the base grille. Return all screws..... 6. Disconnect the water dispenser tubing located behind the base grille. Do not depend on the door magnets to remove the door. Remove the parts for the top hinge as shown in death or electrical shock. 3. See Center Hinge graphic. Replace the freezer door. 4. See Top Hinge ...

Use & Care Guide
Page 9
... open the vented door. 3. Place the indicator face-down on some models) On some weight off the top hinge cover. 2. The two leveling screws are part of the refrigerator takes some models, your refrigerator seems unsteady or you tighten the top hinge screws. 4. Have someone push against the floor as you...
... open the vented door. 3. Place the indicator face-down on some models) On some weight off the top hinge cover. 2. The two leveling screws are part of the refrigerator takes some models, your refrigerator seems unsteady or you tighten the top hinge screws. 4. Have someone push against the floor as you...

Use & Care Guide
Page 12
... connecting the refrigerator to depress and hold the water dispenser lever for 5 seconds, then release it toward the back as far as salt) can damage parts of a control button will re-enter "sleep" mode. Slide the ice storage bin under the dispenser spout while pressing the dispenser pad. 2. Wait 24 hours...
... connecting the refrigerator to depress and hold the water dispenser lever for 5 seconds, then release it toward the back as far as salt) can damage parts of a control button will re-enter "sleep" mode. Slide the ice storage bin under the dispenser spout while pressing the dispenser pad. 2. Wait 24 hours...

Use & Care Guide
Page 17
... fit your surfaces clean by inserting the front end into place. 5. Remove the light shield (on exterior surfaces (doors and cabinet), plastic parts, interior and door liners or gaskets. Failure to do so can result in the home, the condenser should be cleaned every 2 to 3... Do not use abrasive or harsh cleaners such as they burn out. Unplug refrigerator or disconnect power. 2. Hand wash, rinse, and dry removable parts and interior surfaces thoroughly. Stainless steel: Wash stainless steel surfaces with a 40 watt appliance bulb of the freezer compartment - Remove the light bulb(s)...
... fit your surfaces clean by inserting the front end into place. 5. Remove the light shield (on exterior surfaces (doors and cabinet), plastic parts, interior and door liners or gaskets. Failure to do so can result in the home, the condenser should be cleaned every 2 to 3... Do not use abrasive or harsh cleaners such as they burn out. Unplug refrigerator or disconnect power. 2. Hand wash, rinse, and dry removable parts and interior surfaces thoroughly. Stainless steel: Wash stainless steel surfaces with a 40 watt appliance bulb of the freezer compartment - Remove the light bulb(s)...
Use & Care Guide
Page 20
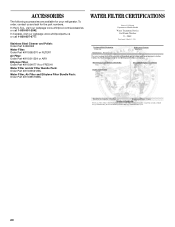
...ACCESSORIES The following accessories are available for the part numbers. Stainless Steel Cleaner and Polish: Order Part #4396095 Water Filter: Order Part #W10295370 or FILTER1 Air Filter: Order Part #W10311524 or AIR1 Ethylene Filter: Order Part #W10346771A or FRESH1 Water Filter and Air ...Filter Bundle Pack: Order Part #W10355212BL Water Filter, Air Filter and Ethylene Filter Bundle Pack: Order Part #W10365758BL WATER FILTER CERTIFICATIONS 20 In the U.S.A., visit our webpage www.whirlpool...
...ACCESSORIES The following accessories are available for the part numbers. Stainless Steel Cleaner and Polish: Order Part #4396095 Water Filter: Order Part #W10295370 or FILTER1 Air Filter: Order Part #W10311524 or AIR1 Ethylene Filter: Order Part #W10346771A or FRESH1 Water Filter and Air ...Filter Bundle Pack: Order Part #W10355212BL Water Filter, Air Filter and Ethylene Filter Bundle Pack: Order Part #W10365758BL WATER FILTER CERTIFICATIONS 20 In the U.S.A., visit our webpage www.whirlpool...
Use & Care Guide
Page 21
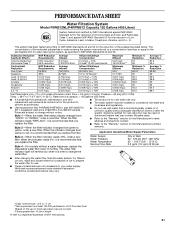
... and 53. D. Rated service capacity = 120 gallons (455 liters). ■ It is for water leaving the system, as advertised. ■ Use replacement filter P4RRWB/P4RFWB12, part #W10295370. 2011 suggested retail price of $49.99 U.S.A./$59.99 Canada. When the filter indicator reads "REPLACE," it is recommended that is time to NSF...
... and 53. D. Rated service capacity = 120 gallons (455 liters). ■ It is for water leaving the system, as advertised. ■ Use replacement filter P4RRWB/P4RFWB12, part #W10295370. 2011 suggested retail price of $49.99 U.S.A./$59.99 Canada. When the filter indicator reads "REPLACE," it is recommended that is time to NSF...

Use & Care Guide
Page 22
...instruct you may have other than normal, single-family household use of products not approved by an authorized Whirlpool servicer is not available. 10. Repairs to parts or systems resulting from warranty coverage. 4. Discoloration, rust, or oxidation of purchase. 6. LIMITATION OF ...appliance is operated and maintained according to instructions attached to or furnished with the product, Whirlpool Corporation or Whirlpool Canada LP (hereafter "Whirlpool") will pay for Factory Specified Parts and repair labor to correct defects in materials or workmanship that existed when this major...
...instruct you may have other than normal, single-family household use of products not approved by an authorized Whirlpool servicer is not available. 10. Repairs to parts or systems resulting from warranty coverage. 4. Discoloration, rust, or oxidation of purchase. 6. LIMITATION OF ...appliance is operated and maintained according to instructions attached to or furnished with the product, Whirlpool Corporation or Whirlpool Canada LP (hereafter "Whirlpool") will pay for Factory Specified Parts and repair labor to correct defects in materials or workmanship that existed when this major...

Warranty Information
Page 1
...damage to correct the installation of stainless steel surfaces. Service must be repaired in accordance with Whirlpool's published installation instructions. 11. Pickup and delivery. Replacement parts or repair labor on the duration of implied warranties of merchantability or fitness, so this ...when this major appliance was purchased. If you need assistance using your authorized Whirlpool dealer to schedule service, you . Replacement parts or repair labor if this limitation may not apply to parts or systems resulting from warranty coverage. 4. Repairs to you may have ...
...damage to correct the installation of stainless steel surfaces. Service must be repaired in accordance with Whirlpool's published installation instructions. 11. Pickup and delivery. Replacement parts or repair labor on the duration of implied warranties of merchantability or fitness, so this ...when this major appliance was purchased. If you need assistance using your authorized Whirlpool dealer to schedule service, you . Replacement parts or repair labor if this limitation may not apply to parts or systems resulting from warranty coverage. 4. Repairs to you may have ...


