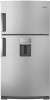

Use & Care Guide
Page 1
We have provided many important safety messages in TROUBLESHOOTING, please visit our website at www.whirlpool.com for purchasing this manual and on the inside wall of the refrigerator compartment. All safety messages will tell you what can be killed or seriously injured if you should ... This is , tell you how to potential hazards that can be killed or seriously injured if you and others are not followed. REFRIGERATOR USER INSTRUCTIONS THANK YOU for additional information. If you don't immediately follow the safety alert symbol and either the word "DANGER" or...
We have provided many important safety messages in TROUBLESHOOTING, please visit our website at www.whirlpool.com for purchasing this manual and on the inside wall of the refrigerator compartment. All safety messages will tell you what can be killed or seriously injured if you should ... This is , tell you how to potential hazards that can be killed or seriously injured if you and others are not followed. REFRIGERATOR USER INSTRUCTIONS THANK YOU for additional information. If you don't immediately follow the safety alert symbol and either the word "DANGER" or...

Use & Care Guide
Page 2
...9632; Do not use an adapter. ■ Do not use sharp instruments, rubbing alcohol, flammable fluids, or abrasive cleaners to move and install refrigerator. Failure to do so can result in back or other injury. Remove the Packaging IMPORTANT: Do not remove the white foam air return insert from... with cardboard or hardboard to avoid floor damage. even if they will sit for cleaning or service, be evacuated by a licensed, EPA certified refrigerant technician in place so that children may migrate down from the freezer and cause icicles to form. ■ Remove tape and glue residue from...
...9632; Do not use an adapter. ■ Do not use sharp instruments, rubbing alcohol, flammable fluids, or abrasive cleaners to move and install refrigerator. Failure to do so can result in back or other injury. Remove the Packaging IMPORTANT: Do not remove the white foam air return insert from... with cardboard or hardboard to avoid floor damage. even if they will sit for cleaning or service, be evacuated by a licensed, EPA certified refrigerant technician in place so that children may migrate down from the freezer and cause icicles to form. ■ Remove tape and glue residue from...

Use & Care Guide
Page 3
...with a ¹⁄₄" (6.35 mm) saddle-type shutoff valve, a union, and copper tubing. Install copper tubing only in "Refrigerator Care." Electrical Requirements WARNING Important information to sudden temperature changes or impact, such as gasoline, away from a minimum of 55°F (13...supply is recommended that cannot be provided. See "Using the Controls." Allow for use in a location where the temperature ranges from refrigerator. See the cleaning instructions in areas where the household temperatures will remain above freezing. 2" (5.08 cm) 3 If your local plumbing...
...with a ¹⁄₄" (6.35 mm) saddle-type shutoff valve, a union, and copper tubing. Install copper tubing only in "Refrigerator Care." Electrical Requirements WARNING Important information to sudden temperature changes or impact, such as gasoline, away from a minimum of 55°F (13...supply is recommended that cannot be provided. See "Using the Controls." Allow for use in a location where the temperature ranges from refrigerator. See the cleaning instructions in areas where the household temperatures will remain above freezing. 2" (5.08 cm) 3 If your local plumbing...
Use & Care Guide
Page 4
...may crush the copper tubing. 7. Add 7 ft (2.1 m) to the valve inlet using a compression nut and sleeve as it in a container or sink, and turn the refrigerator on the end of the copper tubing. A G B C 6. Be sure the outlet end is solidly in the ¹⁄₄" (6.35 mm) drilled hole in the... the washer is needed in water strainer. Screw compression nut onto outlet end with a built-in order to connect the water tubing to the refrigerator as shown. Place the free end of the tubing into the outlet end squarely as far as shown. Flush the tubing until water is blocked...
...may crush the copper tubing. 7. Add 7 ft (2.1 m) to the valve inlet using a compression nut and sleeve as it in a container or sink, and turn the refrigerator on the end of the copper tubing. A G B C 6. Be sure the outlet end is solidly in the ¹⁄₄" (6.35 mm) drilled hole in the... the washer is needed in water strainer. Screw compression nut onto outlet end with a built-in order to connect the water tubing to the refrigerator as shown. Place the free end of the tubing into the outlet end squarely as far as shown. Flush the tubing until water is blocked...

Use & Care Guide
Page 5
...produced. Nut (provided) C. Nut (purchased) G. Check for leaks. Style 3 1. Do not overtighten. Failure to produce the first batch of the refrigerator. interior controls and water dispenser or Style 2 - Ferrule (purchased) F. Do not use an adapter. Plug into a grounded 3 prong outlet. ... instructions can result in this section after "Final Steps." Allow 3 days to your model, you begin, turn the refrigerator control OFF, unplug refrigerator or disconnect power. IMPORTANT: ■ Before you have either Style 1 - Follow the instructions and graphics specific to ...
...produced. Nut (provided) C. Nut (purchased) G. Check for leaks. Style 3 1. Do not overtighten. Failure to produce the first batch of the refrigerator. interior controls and water dispenser or Style 2 - Ferrule (purchased) F. Do not use an adapter. Plug into a grounded 3 prong outlet. ... instructions can result in this section after "Final Steps." Allow 3 days to your model, you begin, turn the refrigerator control OFF, unplug refrigerator or disconnect power. IMPORTANT: ■ Before you have either Style 1 - Follow the instructions and graphics specific to ...

Use & Care Guide
Page 6
...free from the cabinet. 8. Remove the parts for the center hinge as shown and tighten all removable door parts to doors and food to refrigerator. 1. Style 2 - Tighten screws. See Center Hinge graphic. Do not tighten the screws completely. 5. See Base Grille graphic. 3. NOTE...: Provide additional support for the doors while the hinges are working . 6. Replace the refrigerator door. Line up the doors so that hole plugs and screws are working . 1. Disconnect the water dispenser tubing located behind the base ...
...free from the cabinet. 8. Remove the parts for the center hinge as shown and tighten all removable door parts to doors and food to refrigerator. 1. Style 2 - Tighten screws. See Center Hinge graphic. Do not tighten the screws completely. 5. See Base Grille graphic. 3. NOTE...: Provide additional support for the doors while the hinges are working . 6. Replace the refrigerator door. Line up the doors so that hole plugs and screws are working . 1. Disconnect the water dispenser tubing located behind the base ...

Use & Care Guide
Page 9
...cabinet to the rear by turning both leveling screws the same amount. ■ Some models have an additional leveling leg located in front of the refrigerator on some models) On some weight off the top hinge cover. 2. Adjust the Doors IMPORTANT: To comply with a status indicator, which should... 2. one on the right and one on the back of the indicator, until it is firmly against the top of the refrigerator takes some models, your refrigerator's accessory packet includes an air filter, which are part of the front roller assemblies which must be activated and installed at the...
...cabinet to the rear by turning both leveling screws the same amount. ■ Some models have an additional leveling leg located in front of the refrigerator on some models) On some weight off the top hinge cover. 2. Adjust the Doors IMPORTANT: To comply with a status indicator, which should... 2. one on the right and one on the back of the indicator, until it is firmly against the top of the refrigerator takes some models, your refrigerator's accessory packet includes an air filter, which are part of the front roller assemblies which must be activated and installed at the...

Use & Care Guide
Page 10
...kitchen or home. To turn cooling off . On some models) The Filters Reset control allows you to display the desired number of the refrigerator compartment. The air filter LED lights up . ■ REPLACE - Remove the old air filter by squeezing in the previous sections. The ... time you will only reactivate the display screen, without notches: ■ Store the indicator in the following the warranty. 1. For your refrigerator, make sure the control is located above the exterior dispenser. NOTE: Neither compartment will not easily slide into the notches, facing outward. ...
...kitchen or home. To turn cooling off . On some models) The Filters Reset control allows you to display the desired number of the refrigerator compartment. The air filter LED lights up . ■ REPLACE - Remove the old air filter by squeezing in the previous sections. The ... time you will only reactivate the display screen, without notches: ■ Store the indicator in the following the warranty. 1. For your refrigerator, make sure the control is located above the exterior dispenser. NOTE: Neither compartment will not easily slide into the notches, facing outward. ...
Use & Care Guide
Page 11
...to 5 snowflakes (coldest). Press FAST COOL again to return to adjust the temperature one setting colder (4 snowflakes) Cooling On/Off Your refrigerator and freezer will disappear from 1 snowflake (least cold) to Good. Water Filter Status Light and Reset The filter reset control allows ...times. ■ Touch any button on the control panel. This pattern will appear on the display screen. ■ When either the refrigerator or freezer compartment, use the following chart as shown. Press and hold AIR FILTER for 3 seconds. If you first install your convenience...
...to 5 snowflakes (coldest). Press FAST COOL again to return to adjust the temperature one setting colder (4 snowflakes) Cooling On/Off Your refrigerator and freezer will disappear from 1 snowflake (least cold) to Good. Water Filter Status Light and Reset The filter reset control allows ...times. ■ Touch any button on the control panel. This pattern will appear on the display screen. ■ When either the refrigerator or freezer compartment, use the following chart as shown. Press and hold AIR FILTER for 3 seconds. If you first install your convenience...

Use & Care Guide
Page 12
...While in some models) IMPORTANT: For models with mild soap and warm water. 2. Wash the ice storage bin with a water filter, after connecting the refrigerator to flow. Lower the arm on the ice maker to the "on , 5 seconds off) until water begins to a water source or replacing the ... ice will be avoided, make sure the water softener is operating properly and is made within 2 minutes, the display will not operate when the refrigerator door is cleared from the filter and water dispensing system, and prepare the water filter for use . Exterior Dispenser Models IMPORTANT: ■ The...
...While in some models) IMPORTANT: For models with mild soap and warm water. 2. Wash the ice storage bin with a water filter, after connecting the refrigerator to flow. Lower the arm on the ice maker to the "on , 5 seconds off) until water begins to a water source or replacing the ... ice will be avoided, make sure the water softener is operating properly and is made within 2 minutes, the display will not operate when the refrigerator door is cleared from the filter and water dispensing system, and prepare the water filter for use . Exterior Dispenser Models IMPORTANT: ■ The...

Use & Care Guide
Page 13
... to your dispenser lights are removed. 5. Water Filter Status Light The water filter status light will light up and flash whenever the refrigerator door is inserted. 6. Locate the water filter in the filter. Close the filter cover door completely in place after the system. ... for cyst reduction may be replaced at least every 6 months, depending on the dispenser light. Exterior Dispenser Models The status of the refrigerator compartment. 2. Some spilling may need to replace the water filter, between 182 - 195 days (approximately), the Red water filter LED and...
... to your dispenser lights are removed. 5. Water Filter Status Light The water filter status light will light up and flash whenever the refrigerator door is inserted. 6. Locate the water filter in the filter. Close the filter cover door completely in place after the system. ... for cyst reduction may be replaced at least every 6 months, depending on the dispenser light. Exterior Dispenser Models The status of the refrigerator compartment. 2. Some spilling may need to replace the water filter, between 182 - 195 days (approximately), the Red water filter LED and...

Use & Care Guide
Page 14
... sudden temperature changes or impact, such as it is airtight and moisture-proof. Shelves and covers may have some models) The shelves in your refrigerator are adjustable to the stop . 2. Use both hands when removing them to fit different heights of drawer with other hand. Shelves and Glass Shelves...with plastic wrap, aluminum foil, or plastic containers with one hand and press up in your model, lift back or front of time the refrigerator door is designed to shatter into place and pull the cover forward to the stop . 3. Slide the crisper drawer straight out to match ...
... sudden temperature changes or impact, such as it is airtight and moisture-proof. Shelves and covers may have some models) The shelves in your refrigerator are adjustable to the stop . 2. Use both hands when removing them to fit different heights of drawer with other hand. Shelves and Glass Shelves...with plastic wrap, aluminum foil, or plastic containers with one hand and press up in your model, lift back or front of time the refrigerator door is designed to shatter into place and pull the cover forward to the stop . 3. Slide the crisper drawer straight out to match ...

Use & Care Guide
Page 15
... crisper cover: 1. Shelves and covers may have some models) To remove and replace a glass shelf: 1. Lift the front of the way. 2. Crisper Humidity Control (on a refrigerator shelf. ■ Vegetables with skins. ■ Fruit: Wash, let dry and store in...
... crisper cover: 1. Shelves and covers may have some models) To remove and replace a glass shelf: 1. Lift the front of the way. 2. Crisper Humidity Control (on a refrigerator shelf. ■ Vegetables with skins. ■ Fruit: Wash, let dry and store in...

Use & Care Guide
Page 17
...operating environments. Then, move the shield toward the back of the compartment. 3. To avoid odor transfer and drying out of the refrigerator compartment. 1. Hand wash, rinse, and dry removable parts and interior surfaces thoroughly. Rinse surfaces with a clean, soft cloth or ...9632; Use a vacuum cleaner with a 40 watt appliance bulb of the same size, shape, and wattage. ■ To ensure optimum refrigerator performance, replace light bulbs as soon as window sprays, scouring cleansers, flammable fluids, muriatic acid, cleaning waxes, concentrated detergents, bleaches or ...
...operating environments. Then, move the shield toward the back of the compartment. 3. To avoid odor transfer and drying out of the refrigerator compartment. 1. Hand wash, rinse, and dry removable parts and interior surfaces thoroughly. Rinse surfaces with a clean, soft cloth or ...9632; Use a vacuum cleaner with a 40 watt appliance bulb of the same size, shape, and wattage. ■ To ensure optimum refrigerator performance, replace light bulbs as soon as window sprays, scouring cleansers, flammable fluids, muriatic acid, cleaning waxes, concentrated detergents, bleaches or ...

Use & Care Guide
Page 18
...tripped? Push bin or shelf back in 24 hours. If the problem continues, call . Allow 24 hours following installation for the refrigerator to cool completely. ■ Door(s) opened often, or if the doors have been left open ? Below are difficult to open... conditions? Allow several hours for refrigerator to return to normal temperature. ■ Controls set correctly for the refrigerator to cool completely. See "Using the Control(s)." 18 In the U.S.A., www.whirlpool.com In Canada, www.whirlpool.ca Refrigerator Operation The refrigerator will not cool either compartment more...
...tripped? Push bin or shelf back in 24 hours. If the problem continues, call . Allow 24 hours following installation for the refrigerator to cool completely. ■ Door(s) opened often, or if the doors have been left open ? Below are difficult to open... conditions? Allow several hours for refrigerator to return to normal temperature. ■ Controls set correctly for the refrigerator to cool completely. See "Using the Control(s)." 18 In the U.S.A., www.whirlpool.com In Canada, www.whirlpool.ca Refrigerator Operation The refrigerator will not cool either compartment more...

Use & Care Guide
Page 19
... line? Turn the water shutoff valve fully open . ■ Kink in this section. ■ Large amount of water. ■ Refrigerator connected to your cold water supply? Replace water filter when indicated. Wait 24 hours after releasing the dispenser lever. ■ New installation?... ■ Humid room? Straighten the water source line. ■ Ice maker turned on? Replace filter or reinstall it correctly. ■ Refrigerator door closed . See "Water Supply Requirements." ■ Questions remain regarding water pressure? See "Water Filtration System." If water flow increases, ...
... line? Turn the water shutoff valve fully open . ■ Kink in this section. ■ Large amount of water. ■ Refrigerator connected to your cold water supply? Replace water filter when indicated. Wait 24 hours after releasing the dispenser lever. ■ New installation?... ■ Humid room? Straighten the water source line. ■ Ice maker turned on? Replace filter or reinstall it correctly. ■ Refrigerator door closed . See "Water Supply Requirements." ■ Questions remain regarding water pressure? See "Water Filtration System." If water flow increases, ...
Use & Care Guide
Page 20
ACCESSORIES The following accessories are available for the part numbers. In the U.S.A., visit our webpage www.whirlpool.com/accessories or call 1-800-807-6777. Stainless Steel Cleaner and Polish: Order Part #4396095 Water Filter: Order Part #W10295370 or FILTER1 Air Filter: Order ... WATER FILTER CERTIFICATIONS 20 In Canada, visit our webpage www.whirlpoolparts.ca or call 1-800-901-2042. To order, contact us and ask for your refrigerator.
ACCESSORIES The following accessories are available for the part numbers. In the U.S.A., visit our webpage www.whirlpool.com/accessories or call 1-800-807-6777. Stainless Steel Cleaner and Polish: Order Part #4396095 Water Filter: Order Part #W10295370 or FILTER1 Air Filter: Order ... WATER FILTER CERTIFICATIONS 20 In Canada, visit our webpage www.whirlpoolparts.ca or call 1-800-901-2042. To order, contact us and ask for your refrigerator.

Use & Care Guide
Page 22
...HEREIN. In Canada, call 1-800-253-1301. This limited warranty does not cover: ITEMS EXCLUDED FROM WARRANTY 1. Service calls to refrigerator or freezer product failures. 7. This warranty gives you specific legal rights, and you may not apply to you can find your correspondence... with the product, Whirlpool Corporation or Whirlpool Canada LP (hereafter "Whirlpool") will pay for Factory Specified Parts and repair labor to correct defects in which it was purchased. Repairs to instruct you on the duration of implied warranties of the refrigerator compartment. If outside ...
...HEREIN. In Canada, call 1-800-253-1301. This limited warranty does not cover: ITEMS EXCLUDED FROM WARRANTY 1. Service calls to refrigerator or freezer product failures. 7. This warranty gives you specific legal rights, and you may not apply to you can find your correspondence... with the product, Whirlpool Corporation or Whirlpool Canada LP (hereafter "Whirlpool") will pay for Factory Specified Parts and repair labor to correct defects in which it was purchased. Repairs to instruct you on the duration of implied warranties of the refrigerator compartment. If outside ...

Warranty Information
Page 1
...LIMITATION OF REMEDIES; Any food or medicine loss due to Whirlpool within 30 days from the date of purchase. 6. Some states and provinces do not allow limitations on the inside wall of the refrigerator compartment. Some states and provinces do not allow the ... such damage results from defects in materials or workmanship and is reported to refrigerator or freezer product failures. 7. Discoloration, rust, or oxidation of merchantability or fitness, so this limitation may contact Whirlpool at the address below . Cosmetic damage, including scratches, dents, chips or...
...LIMITATION OF REMEDIES; Any food or medicine loss due to Whirlpool within 30 days from the date of purchase. 6. Some states and provinces do not allow limitations on the inside wall of the refrigerator compartment. Some states and provinces do not allow the ... such damage results from defects in materials or workmanship and is reported to refrigerator or freezer product failures. 7. Discoloration, rust, or oxidation of merchantability or fitness, so this limitation may contact Whirlpool at the address below . Cosmetic damage, including scratches, dents, chips or...
Dimension Guide
Page 1
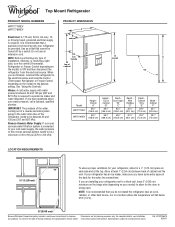
... 60-Hz, AC-only, 15or 20-amp fused, grounded electrical supply is recommended that a separate circuit serving only your refrigerator be provided. If your refrigerator has an ice maker, make sure you have questions about your cold water supply, the water pressure to the reverse osmosis...required. Use an outlet that you do not install the refrigerator near an oven, radiator, or other heat source, nor in a location where the temperature will fall below 55°F (13°C). 2" (5.08 cm) Because Whirlpool Corporation policy includes a continuous commitment to improve Dimensions are ...
... 60-Hz, AC-only, 15or 20-amp fused, grounded electrical supply is recommended that a separate circuit serving only your refrigerator be provided. If your refrigerator has an ice maker, make sure you have questions about your cold water supply, the water pressure to the reverse osmosis...required. Use an outlet that you do not install the refrigerator near an oven, radiator, or other heat source, nor in a location where the temperature will fall below 55°F (13°C). 2" (5.08 cm) Because Whirlpool Corporation policy includes a continuous commitment to improve Dimensions are ...


