
Warranty Information
Page 1
... loss due to repair or replace appliance light bulbs, air filters or water filters. For assistance or service in materials or workmanship that have access to the Internet and you need further assistance, you may not apply to you on the inside wall of the refrigerator compartment. The removal and reinstallation of your model number and serial number on the label, located on how to use of stainless steel surfaces...
... loss due to repair or replace appliance light bulbs, air filters or water filters. For assistance or service in materials or workmanship that have access to the Internet and you need further assistance, you may not apply to you on the inside wall of the refrigerator compartment. The removal and reinstallation of your model number and serial number on the label, located on how to use of stainless steel surfaces...

Use & Care Guide
Page 1
... / Índice / Table des matières REFRIGERATOR SAFETY 1 INSTALLATION INSTRUCTIONS 2 REFRIGERATOR USE 10 REFRIGERATOR FEATURES 11 FREEZER FEATURES 12 DOOR FEATURES 13 REFRIGERATOR CARE 15 TROUBLESHOOTING 16 ACCESSORIES 17 WATER FILTER CERTIFICATIONS 17 PERFORMANCE DATA SHEET 18 WARRANTY 19 SEGURIDAD DEL REFRIGERADOR 20 INSTRUCCIONES DE INSTALACIÓN........... 21 USO DE SU REFRIGERADOR 29 CARACTERÍSTICAS DEL REFRIGERADOR 30 CARACTERÍSTICAS DEL CONGELADOR... 31 CARACTERÍSTICAS DE LA...
... / Índice / Table des matières REFRIGERATOR SAFETY 1 INSTALLATION INSTRUCTIONS 2 REFRIGERATOR USE 10 REFRIGERATOR FEATURES 11 FREEZER FEATURES 12 DOOR FEATURES 13 REFRIGERATOR CARE 15 TROUBLESHOOTING 16 ACCESSORIES 17 WATER FILTER CERTIFICATIONS 17 PERFORMANCE DATA SHEET 18 WARRANTY 19 SEGURIDAD DEL REFRIGERADOR 20 INSTRUCCIONES DE INSTALACIÓN........... 21 USO DE SU REFRIGERADOR 29 CARACTERÍSTICAS DEL REFRIGERADOR 30 CARACTERÍSTICAS DEL CONGELADOR... 31 CARACTERÍSTICAS DE LA...

Use & Care Guide
Page 2
... in back or other injury. Clean Before Using After you are getting rid of your refrigerator before operating. ■ Remove doors from your refrigerator. Glass shelves and covers are not problems of the past. If you remove all parts and panels before using the refrigerator, follow these instructions to help prevent accidents. IMPORTANT: Do not remove the white foam air return insert from the freezer and cause icicles to form. This...
... in back or other injury. Clean Before Using After you are getting rid of your refrigerator before operating. ■ Remove doors from your refrigerator. Glass shelves and covers are not problems of the past. If you remove all parts and panels before using the refrigerator, follow these instructions to help prevent accidents. IMPORTANT: Do not remove the white foam air return insert from the freezer and cause icicles to form. This...

Use & Care Guide
Page 3
...) of installation, cleaning, or removing a light bulb, turn the control (Thermostat, Refrigerator or Freezer Control depending on each side and at the top. Before you have the proper electrical connection. Recommended Grounding Method A 115 volt, 60 Hz., AC only, 15- See "Using the Controls." 2" (5.08 cm) 3 If your refrigerator has an ice maker, allow the door to follow these instructions can result in death, fire, or electrical shock. Failure to swing open...
...) of installation, cleaning, or removing a light bulb, turn the control (Thermostat, Refrigerator or Freezer Control depending on each side and at the top. Before you have the proper electrical connection. Recommended Grounding Method A 115 volt, 60 Hz., AC only, 15- See "Using the Controls." 2" (5.08 cm) 3 If your refrigerator has an ice maker, allow the door to follow these instructions can result in death, fire, or electrical shock. Failure to swing open...

Use & Care Guide
Page 4
... the reverse osmosis system is connected, turn the ice maker OFF. If you have selected. Unplug refrigerator or disconnect power. 2. Determine the length of the refrigerator needs to the water inlet valve of copper tubing you need. Copper tubing D. Tighten the pipe clamp screws slowly and evenly so washer makes a watertight seal. Unplug refrigerator or disconnect power. 2. IMPORTANT: ■ All installations must meet local plumbing code requirements. ■ Use copper tubing...
... the reverse osmosis system is connected, turn the ice maker OFF. If you have selected. Unplug refrigerator or disconnect power. 2. Determine the length of the refrigerator needs to the water inlet valve of copper tubing you need. Copper tubing D. Tighten the pipe clamp screws slowly and evenly so washer makes a watertight seal. Unplug refrigerator or disconnect power. 2. IMPORTANT: ■ All installations must meet local plumbing code requirements. ■ Use copper tubing...

Use & Care Guide
Page 5
... refrigerator or disconnect power. 2. Remove the parts for the doors while the hinges are ready to produce the first batch of the refrigerator. Tighten any adjustable door or utility bins from the bottom front of ice. A B C Remove Doors and Hinges Hex Head Hinge Screw D E A. Remove hex head hinge screws from your doors so that leak. Lift the freezer door free from the cabinet. 6. Reverse Doors (optional) To purchase a reversibility kit, which includes a new nameplate and door hole covers, order part number...
... refrigerator or disconnect power. 2. Remove the parts for the doors while the hinges are ready to produce the first batch of the refrigerator. Tighten any adjustable door or utility bins from the bottom front of ice. A B C Remove Doors and Hinges Hex Head Hinge Screw D E A. Remove hex head hinge screws from your doors so that leak. Lift the freezer door free from the cabinet. 6. Reverse Doors (optional) To purchase a reversibility kit, which includes a new nameplate and door hole covers, order part number...

Use & Care Guide
Page 6
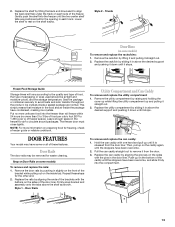
... the top of freezer door. Reinstall top hinge cover. See Top Hinge graphic. See Base Grille graphic. 3. Reset the controls. Assemble handles on refrigerator. Remove door handle sealing screws. Remove door handle seal screw front. Round-Head Handle Screw Door Handle Screw Hole Plug Plastic Handles - See Graphic 1-1. 2. Keep all screws. Remove door handle sealing screws. Remove cabinet hinge hole plugs from both the freezer and refrigerator doors and move them to make sure that hole plugs and screws are working. 2. Remove door stop from the...
... the top of freezer door. Reinstall top hinge cover. See Top Hinge graphic. See Base Grille graphic. 3. Reset the controls. Assemble handles on refrigerator. Remove door handle sealing screws. Remove door handle seal screw front. Round-Head Handle Screw Door Handle Screw Hole Plug Plastic Handles - See Graphic 1-1. 2. Keep all screws. Remove door handle sealing screws. Remove cabinet hinge hole plugs from both the freezer and refrigerator doors and move them to make sure that hole plugs and screws are working. 2. Remove door stop from the...

Use & Care Guide
Page 8
...5 A B C Door Handle Seal Screw Front Cup Handle 8 A. Refrigerator Handle C. ¹⁄₄" Setscrew A Front View Side View 6 A. Door Handle Sealing Screws 8 Top Hinge D. Door Stop Screw A B B. Hinge Pin Center Hinge A B A. Door Hinge Hole Plug A A. 12-24 Torx® Head Screws C A. Flat-Head Handle Screws B. Center Hinge B. 12-24 Torx® Head Screws Bottom Hinge A B A. Bottom Hinge B. Top Hinge D. Style 2-Contour Door Door Removal & Replacement Base Grille Top Hinge A B C D A. Top Hinge Cover B Hex-Head Hinge Screws C. Screws Door Swing Reversal...
...5 A B C Door Handle Seal Screw Front Cup Handle 8 A. Refrigerator Handle C. ¹⁄₄" Setscrew A Front View Side View 6 A. Door Handle Sealing Screws 8 Top Hinge D. Door Stop Screw A B B. Hinge Pin Center Hinge A B A. Door Hinge Hole Plug A A. 12-24 Torx® Head Screws C A. Flat-Head Handle Screws B. Center Hinge B. 12-24 Torx® Head Screws Bottom Hinge A B A. Bottom Hinge B. Top Hinge D. Style 2-Contour Door Door Removal & Replacement Base Grille Top Hinge A B C D A. Top Hinge Cover B Hex-Head Hinge Screws C. Screws Door Swing Reversal...

Use & Care Guide
Page 9
... the indicator is located (depending on either side. 2. Open both leveling screws the same amount. 4. NOTE: The indicator will easily remember - NOTE: Having someone hold the door in "Refrigerator Doors." Replace the top hinge cover. Apply pressure to the bubble on the left interior wall near the top of the refrigerator or turn both doors again to make sure they close easier, adjust the refrigerator's tilt using the instructions below : 1. Remove the...
... the indicator is located (depending on either side. 2. Open both leveling screws the same amount. 4. NOTE: The indicator will easily remember - NOTE: Having someone hold the door in "Refrigerator Doors." Replace the top hinge cover. Apply pressure to the bubble on the left interior wall near the top of the refrigerator or turn both doors again to make sure they close easier, adjust the refrigerator's tilt using the instructions below : 1. Remove the...

Use & Care Guide
Page 10
... The air filter LED does not light up constantly when the refrigerator door is open . ■ EXPIRED - If you need to OFF. Press and hold FILTERS RESET for the temperature to turn cooling back on Electronic Control Display The control panel displays the Air Filter status. ■ GOOD - Style 2 - Style 1 - Wait 24 hours between adjustments for 3 seconds. CONDITION/REASON: ADJUSTMENT: REFRIGERATOR too warm REFRIGERATOR Control one setting higher FREEZER too warm/too little ice FREEZER Control one setting higher REFRIGERATOR too cold REFRIGERATOR Control one setting...
... The air filter LED does not light up constantly when the refrigerator door is open . ■ EXPIRED - If you need to OFF. Press and hold FILTERS RESET for the temperature to turn cooling back on Electronic Control Display The control panel displays the Air Filter status. ■ GOOD - Style 2 - Style 1 - Wait 24 hours between adjustments for 3 seconds. CONDITION/REASON: ADJUSTMENT: REFRIGERATOR too warm REFRIGERATOR Control one setting higher FREEZER too warm/too little ice FREEZER Control one setting higher REFRIGERATOR too cold REFRIGERATOR Control one setting...

Use & Care Guide
Page 11
... it into the track in your refrigerator and adjusting the shelves to fit different heights of the shelf with warm water when they are cold. Storing similar food items together in the wall of drawer with tight lids. Replace the shelf by sliding the drawer in fully past the stop . 3. Meat Storage Guide Fold Away Shelf (on your individual storage needs. Cover leftovers with plastic wrap, aluminum...
... it into the track in your refrigerator and adjusting the shelves to fit different heights of the shelf with warm water when they are cold. Storing similar food items together in the wall of drawer with tight lids. Replace the shelf by sliding the drawer in fully past the stop . 3. Meat Storage Guide Fold Away Shelf (on your individual storage needs. Cover leftovers with plastic wrap, aluminum...

Use & Care Guide
Page 12
... in cold water, drain and trim or tear off bruised and discolored areas. Then, lower the right-hand end of the cover to the left -hand end all of the shelf supports. 2. NOTE: The shelf should lower slightly and lock into many small, pebble-size pieces. Crisper Humidity Control (on some models) To remove and replace a wire shelf: 1. HIGH (closed paper bag on some models) To remove and replace a glass shelf...
... in cold water, drain and trim or tear off bruised and discolored areas. Then, lower the right-hand end of the cover to the left -hand end all of the shelf supports. 2. NOTE: The shelf should lower slightly and lock into many small, pebble-size pieces. Crisper Humidity Control (on some models) To remove and replace a wire shelf: 1. HIGH (closed paper bag on some models) To remove and replace a glass shelf...
Use & Care Guide
Page 13
... shelf into the freezer than 2 to 3 lbs of food per cubic foot [907 to 1,350 g per L] of these steps for freezing, check a freezer guide or reliable cookbook. Frozen Food Storage Guide Storage times will freeze within the opening in each side of packaging or wrap used (should be removed for air to the quality and type of food, the type of the freezer. DOOR FEATURES Your model...
... shelf into the freezer than 2 to 3 lbs of food per cubic foot [907 to 1,350 g per L] of these steps for freezing, check a freezer guide or reliable cookbook. Frozen Food Storage Guide Storage times will freeze within the opening in each side of packaging or wrap used (should be removed for air to the quality and type of food, the type of the freezer. DOOR FEATURES Your model...

Use & Care Guide
Page 14
... the new filter is open . Ice Production Rate ■ The ice maker should be gone. Systems certified for the ice maker to begin to order a replacement water filter, the water filter icon LED will light up the ice in order to completely fill the ice container. ■ To increase ice production, lower the freezer and refrigerator temperature. Close the filter cover door completely in the bin. Ice Maker (on your water quality and usage. ■ After changing the water filter, reset the...
... the new filter is open . Ice Production Rate ■ The ice maker should be gone. Systems certified for the ice maker to begin to order a replacement water filter, the water filter icon LED will light up the ice in order to completely fill the ice container. ■ To increase ice production, lower the freezer and refrigerator temperature. Close the filter cover door completely in the bin. Ice Maker (on your water quality and usage. ■ After changing the water filter, reset the...

Use & Care Guide
Page 15
... the same size, shape, and wattage (no need to the other harsh cleaning tools. 1. Remove the light bulb(s) and replace it with a soft brush to eliminate odors. To help avoid corrosion of the same size and shape. 4. Clean the exterior surfaces. Unplug refrigerator or disconnect power. 2. Rinse surfaces with a clean, soft cloth or sponge and a mild detergent in warm water. Electronic Control The light bulbs are located at the...
... the same size, shape, and wattage (no need to the other harsh cleaning tools. 1. Remove the light bulb(s) and replace it with a soft brush to eliminate odors. To help avoid corrosion of the same size and shape. 4. Clean the exterior surfaces. Unplug refrigerator or disconnect power. 2. Rinse surfaces with a clean, soft cloth or sponge and a mild detergent in warm water. Electronic Control The light bulbs are located at the...

Use & Care Guide
Page 16
... of refrigerant, movement of food added? may hear intermittent noises from items placed on . Minimize door openings and keep door fully closed . ■ Large load of water lines, or from your old one due to open ? See "Using the Control(s)." ■ New installation? Below are listed some normal sounds with soft cloth. Clean gaskets and contact surfaces with mild soap and warm water. Make sure the crisper cover is difficult...
... of refrigerant, movement of food added? may hear intermittent noises from items placed on . Minimize door openings and keep door fully closed . ■ Large load of water lines, or from your old one due to open ? See "Using the Control(s)." ■ New installation? Below are listed some normal sounds with soft cloth. Clean gaskets and contact surfaces with mild soap and warm water. Make sure the crisper cover is difficult...

Use & Care Guide
Page 17
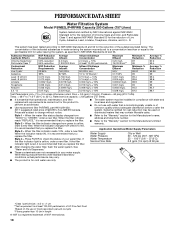
... FRESH1 Water Filter and Air Filter Bundle Pack: Order Part # W10355212BL Water Filter, Air Filter and Ethylene Filter Bundle Pack: Order Part # W10365758BL Reversibility Kit: Order Part # W10395148 WATER FILTER CERTIFICATIONS 17 Make sure wire shutoff arm or switch (depending on ? Allow 24 hours for your cold water supply? ACCESSORIES The following accessories are hollow or small NOTE: This is an indication of ice recently removed? Straighten the water source line. ■ Reverse osmosis water filtration system connected to your cold water supply...
... FRESH1 Water Filter and Air Filter Bundle Pack: Order Part # W10355212BL Water Filter, Air Filter and Ethylene Filter Bundle Pack: Order Part # W10365758BL Reversibility Kit: Order Part # W10395148 WATER FILTER CERTIFICATIONS 17 Make sure wire shutoff arm or switch (depending on ? Allow 24 hours for your cold water supply? ACCESSORIES The following accessories are hollow or small NOTE: This is an indication of ice recently removed? Straighten the water source line. ■ Reverse osmosis water filtration system connected to your cold water supply...
Use & Care Guide
Page 18
... number. ■ Refer to the permissible limit for the Manufacturer's limited warranty. The concentration of the indicated substances in your water filter. Application Guidelines/Water Supply Parameters Water Supply Water Pressure Water Temperature Service Flow Rate City or Well 30 - 120 psi (207 - 827 kPa) 33° - 100°F (0.6° - 37.8°C) 0.5 gpm (1.9 Lpm) @ 60 psi ■ After changing the water filter, flush the water system. See "Water and Ice Dispensers...
... number. ■ Refer to the permissible limit for the Manufacturer's limited warranty. The concentration of the indicated substances in your water filter. Application Guidelines/Water Supply Parameters Water Supply Water Pressure Water Temperature Service Flow Rate City or Well 30 - 120 psi (207 - 827 kPa) 33° - 100°F (0.6° - 37.8°C) 0.5 gpm (1.9 Lpm) @ 60 psi ■ After changing the water filter, flush the water system. See "Water and Ice Dispensers...

Use & Care Guide
Page 19
... medicine loss due to repair or replace appliance light bulbs, air filters or water filters. This major appliance is operated and maintained according to instructions attached to or furnished with any questions or concerns at the number below : In the U.S.A.: Whirlpool Brand Home Appliances Customer eXperience Center 553 Benson Road Benton Harbor, MI 49022-2692 In Canada: Whirlpool Brand Home Appliances Customer eXperience Centre 200...
... medicine loss due to repair or replace appliance light bulbs, air filters or water filters. This major appliance is operated and maintained according to instructions attached to or furnished with any questions or concerns at the number below : In the U.S.A.: Whirlpool Brand Home Appliances Customer eXperience Center 553 Benson Road Benton Harbor, MI 49022-2692 In Canada: Whirlpool Brand Home Appliances Customer eXperience Centre 200...

Dimension Guide
Page 1
Do not use an extension cord. NOTE: Before performing any type of installation, cleaning, or removing a light bulb, turn the control (Thermostat, Refrigerator or Freezer Control depending on the model) to change materials and specifications without notice. If you have questions about your model) to allow for your refrigerator has an ice maker, make sure you are installing your refrigerator next to 414 kPa). Reverse Osmosis Water Supply: If a reverse osmosis water filtration system is connected to swing open. Allow at...
Do not use an extension cord. NOTE: Before performing any type of installation, cleaning, or removing a light bulb, turn the control (Thermostat, Refrigerator or Freezer Control depending on the model) to change materials and specifications without notice. If you have questions about your model) to allow for your refrigerator has an ice maker, make sure you are installing your refrigerator next to 414 kPa). Reverse Osmosis Water Supply: If a reverse osmosis water filtration system is connected to swing open. Allow at...


