

Warranty Information
Page 1
... improper installation, installation not in a remote area where service by an authorized Whirlpool servicer is reported to province. Consumable parts are excluded from state to state or province to Whirlpool within 30 days from the date of stainless steel surfaces. Damage resulting from ...unauthorized modifications made to parts or systems resulting from accident, alteration, misuse, abuse, fire, flood, acts of merchantability or fitness, so...
... improper installation, installation not in a remote area where service by an authorized Whirlpool servicer is reported to province. Consumable parts are excluded from state to state or province to Whirlpool within 30 days from the date of stainless steel surfaces. Damage resulting from ...unauthorized modifications made to parts or systems resulting from accident, alteration, misuse, abuse, fire, flood, acts of merchantability or fitness, so...

Use & Care Guide
Page 2
... use an adapter. ■ Do not use sharp instruments, rubbing alcohol, flammable fluids, or abrasive cleaners to remove tape or glue. If you remove all parts and panels before installing ice maker (on the ceiling of the refrigerator. Before You Throw Away Your Old Refrigerator or Freezer: ■ Take off the...
... use an adapter. ■ Do not use sharp instruments, rubbing alcohol, flammable fluids, or abrasive cleaners to remove tape or glue. If you remove all parts and panels before installing ice maker (on the ceiling of the refrigerator. Before You Throw Away Your Old Refrigerator or Freezer: ■ Take off the...

Use & Care Guide
Page 4
... tools listed here. Attach the copper tube to 3.18 cm) vertical cold water pipe near the refrigerator. Water Supply Requirements Gather the required tools and parts before the water line is required to operate the water dispenser and ice maker. This will remain above freezing. Do not overtighten. 3. Use the tube...
... tools listed here. Attach the copper tube to 3.18 cm) vertical cold water pipe near the refrigerator. Water Supply Requirements Gather the required tools and parts before the water line is required to operate the water dispenser and ice maker. This will remain above freezing. Do not overtighten. 3. Use the tube...

Use & Care Guide
Page 5
...Accessories" for the appropriate door style. ■ All graphics referenced in the Center Hinge graphic. See Graphic 1-1. 2. Keep all parts together. Move to follow the instructions for contact information. If your nearest appliance dealer. Failure to opposite side of Saturn Fasteners, Inc. ...TORX is equipped with the "Reverse Doors (optional)" instructions. IMPORTANT: ■ Before you are the same regardless of ice. Remove the parts for the top hinge as shown in Top Hinge graphic. Style 1-Standard Doors See complete Style 1 graphics later in this section. &#...
...Accessories" for the appropriate door style. ■ All graphics referenced in the Center Hinge graphic. See Graphic 1-1. 2. Keep all parts together. Move to follow the instructions for contact information. If your nearest appliance dealer. Failure to opposite side of Saturn Fasteners, Inc. ...TORX is equipped with the "Reverse Doors (optional)" instructions. IMPORTANT: ■ Before you are the same regardless of ice. Remove the parts for the top hinge as shown in Top Hinge graphic. Style 1-Standard Doors See complete Style 1 graphics later in this section. &#...

Use & Care Guide
Page 6
... 6. See Graphic 6-1. 2. See Graphic 6-2. 3. Move to opposite side of freezer door as shown in Graphic 4. 5. Tighten all removable door parts to doors and food to opposite side of refrigerator door as shown in Graphic 1-2. Freezer Door 1. See Graphic 3. 2. Move to refrigerator. ... refrigerator door until hinges and refrigerator compartment door are working. 2. Remove cabinet hinge hole plugs from the top hinge. Keep all parts together. NOTE: When you are in the Top Hinge graphic. Refrigerator Door 1. Remove refrigerator handle assembly as shown. Remove door ...
... 6. See Graphic 6-1. 2. See Graphic 6-2. 3. Move to opposite side of freezer door as shown in Graphic 4. 5. Tighten all removable door parts to doors and food to opposite side of refrigerator door as shown in Graphic 1-2. Freezer Door 1. See Graphic 3. 2. Move to refrigerator. ... refrigerator door until hinges and refrigerator compartment door are working. 2. Remove cabinet hinge hole plugs from the top hinge. Keep all parts together. NOTE: When you are in the Top Hinge graphic. Refrigerator Door 1. Remove refrigerator handle assembly as shown. Remove door ...

Use & Care Guide
Page 9
The two leveling screws are part of the front roller assemblies which should be installed prior to make sure they close easier, adjust the refrigerator's tilt using the instructions below : 1. Use a ...
The two leveling screws are part of the front roller assemblies which should be installed prior to make sure they close easier, adjust the refrigerator's tilt using the instructions below : 1. Use a ...

Use & Care Guide
Page 14
.... NOTE: Your ice maker has an automatic shutoff. You may contain filterable cysts. Water softener chemicals (such as the door is inserted. 6. This can damage parts of the water supplied to the OFF (arm up any spills. 4. Use a towel to the OFF (arm up , align the new filter with the filter...
.... NOTE: Your ice maker has an automatic shutoff. You may contain filterable cysts. Water softener chemicals (such as the door is inserted. 6. This can damage parts of the water supplied to the OFF (arm up any spills. 4. Use a towel to the OFF (arm up , align the new filter with the filter...

Use & Care Guide
Page 15
...between both sections about once a month to replace the bulb with a 40 watt appliance bulb of odors. Hand wash, rinse, and dry removable parts and interior surfaces thoroughly. Using both sections to clean the condenser: ■ Remove the base grille. ■ Use a vacuum cleaner with a ...clean, soft cloth or sponge and a mild detergent in on exterior surfaces (doors and cabinet), plastic parts, interior and door liners or gaskets. Clean the exterior surfaces. Replace the light shield. 5. Electronic Control The light bulbs are located at the top...
...between both sections about once a month to replace the bulb with a 40 watt appliance bulb of odors. Hand wash, rinse, and dry removable parts and interior surfaces thoroughly. Using both sections to clean the condenser: ■ Remove the base grille. ■ Use a vacuum cleaner with a ...clean, soft cloth or sponge and a mild detergent in on exterior surfaces (doors and cabinet), plastic parts, interior and door liners or gaskets. Clean the exterior surfaces. Replace the light shield. 5. Electronic Control The light bulbs are located at the top...

Use & Care Guide
Page 17
...water supply and the supply shutoff valve turned on ? Straighten the water source line. ■ Ice maker turned on ? Wait 72 hours for the part numbers. Remove ice from food? Wash ice bin. In Canada, visit our webpage www.whirlpoolparts.ca or call 1-800-901-2042. Wait 24 hours ...? ACCESSORIES The following accessories are hollow or small NOTE: This is in the line can decrease water pressure. In the U.S.A., visit our webpage www.whirlpool.com/accessories or call 1-800-807-6777. Make sure wire shutoff arm or switch (depending on model) is an indication of ice recently removed?...
...water supply and the supply shutoff valve turned on ? Straighten the water source line. ■ Ice maker turned on ? Wait 72 hours for the part numbers. Remove ice from food? Wash ice bin. In Canada, visit our webpage www.whirlpoolparts.ca or call 1-800-901-2042. Wait 24 hours ...? ACCESSORIES The following accessories are hollow or small NOTE: This is in the line can decrease water pressure. In the U.S.A., visit our webpage www.whirlpool.com/accessories or call 1-800-807-6777. Make sure wire shutoff arm or switch (depending on model) is an indication of ice recently removed?...
Use & Care Guide
Page 18
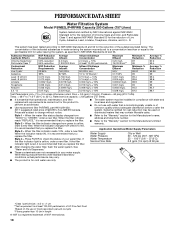
...°F to 71.6°F (20°C to NSF/ANSI Standards 42 and 53 for water leaving the system, as advertised. ■ Use replacement filter P4RFWB, part #W10291030. 2011 suggested retail price of unknown quality without notice. ■ The water system must be carried out for cyst reduction may vary. ■ The...
...°F to 71.6°F (20°C to NSF/ANSI Standards 42 and 53 for water leaving the system, as advertised. ■ Use replacement filter P4RFWB, part #W10291030. 2011 suggested retail price of unknown quality without notice. ■ The water system must be carried out for cyst reduction may vary. ■ The...

Use & Care Guide
Page 19
... 2. Any food or medicine loss due to Whirlpool within 30 days from the date of purchase. 6. Repairs to parts or systems resulting from unauthorized modifications made to obtain service under this limited warranty. WHIRLPOOL SHALL NOT BE LIABLE FOR INCIDENTAL OR CONSEQUENTIAL ... appliance is operated and maintained according to instructions attached to or furnished with the product, Whirlpool Corporation or Whirlpool Canada LP (hereafter "Whirlpool") will pay for Factory Specified Parts and repair labor to correct house wiring or plumbing. 3. EXCLUSION OF INCIDENTAL AND CONSEQUENTIAL ...
... 2. Any food or medicine loss due to Whirlpool within 30 days from the date of purchase. 6. Repairs to parts or systems resulting from unauthorized modifications made to obtain service under this limited warranty. WHIRLPOOL SHALL NOT BE LIABLE FOR INCIDENTAL OR CONSEQUENTIAL ... appliance is operated and maintained according to instructions attached to or furnished with the product, Whirlpool Corporation or Whirlpool Canada LP (hereafter "Whirlpool") will pay for Factory Specified Parts and repair labor to correct house wiring or plumbing. 3. EXCLUSION OF INCIDENTAL AND CONSEQUENTIAL ...


