

Warranty Information
Page 1
..., or oxidation of the refrigerator compartment. This warranty gives you specific legal rights, and you also may not apply to you can find your complete model number ready. WHIRLPOOL CORPORATION MAJOR APPLIANCE WARRANTY LIMITED WARRANTY For one year from the date of purchase, when this major appliance is reported to...
..., or oxidation of the refrigerator compartment. This warranty gives you specific legal rights, and you also may not apply to you can find your complete model number ready. WHIRLPOOL CORPORATION MAJOR APPLIANCE WARRANTY LIMITED WARRANTY For one year from the date of purchase, when this major appliance is reported to...

Use & Care Guide
Page 1
...should experience a problem not covered in this high-quality product. W10359300A You will need assistance, call us at www.whirlpool.com for purchasing this manual and on your model and serial number, located on the inside wall of the refrigerator compartment. All safety messages will follow instructions. These ... many important safety messages in TROUBLESHOOTING, please visit our website at 1-800-253-1301. In Canada, visit our website at www.whirlpool.ca or call us at 1-800-807-6777. ® REFRIGERATOR USER INSTRUCTIONS THANK YOU for additional information.
...should experience a problem not covered in this high-quality product. W10359300A You will need assistance, call us at www.whirlpool.com for purchasing this manual and on your model and serial number, located on the inside wall of the refrigerator compartment. All safety messages will follow instructions. These ... many important safety messages in TROUBLESHOOTING, please visit our website at 1-800-253-1301. In Canada, visit our website at www.whirlpool.ca or call us at 1-800-807-6777. ® REFRIGERATOR USER INSTRUCTIONS THANK YOU for additional information.

Use & Care Guide
Page 2
... do so can damage the surface of Your Old Refrigerator WARNING Suffocation Hazard Remove doors from behind the control panel on ice maker kit ready models only). For more people to form. Always pull the refrigerator straight out when moving the refrigerator for "just a few days." IMPORTANT: Do not remove the...
... do so can damage the surface of Your Old Refrigerator WARNING Suffocation Hazard Remove doors from behind the control panel on ice maker kit ready models only). For more people to form. Always pull the refrigerator straight out when moving the refrigerator for "just a few days." IMPORTANT: Do not remove the...

Use & Care Guide
Page 3
...(1.25 cm) of installation, cleaning, or removing a light bulb, turn the control (Thermostat, Refrigerator or Freezer Control depending on the hinge side (some models require more) to allow extra space at the top. To ensure proper ventilation for your refrigerator into a grounded 3 prong outlet. or 20-amp fused,... Use an outlet that a separate circuit serving only your refrigerator next to a fixed wall, leave a 2" (5.08 cm) minimum space on the model) to follow these instructions can result in death, fire, or electrical shock. NOTE: Before performing any type of space on the...
...(1.25 cm) of installation, cleaning, or removing a light bulb, turn the control (Thermostat, Refrigerator or Freezer Control depending on the hinge side (some models require more) to allow extra space at the top. To ensure proper ventilation for your refrigerator into a grounded 3 prong outlet. or 20-amp fused,... Use an outlet that a separate circuit serving only your refrigerator next to a fixed wall, leave a 2" (5.08 cm) minimum space on the model) to follow these instructions can result in death, fire, or electrical shock. NOTE: Before performing any type of space on the...

Use & Care Guide
Page 5
... ice maker is a registered trademark of door style. Do not remove ground prong. Failure to opposite side. Allow 3 days to lift them to reverse your model, you are included later in Graphic 1-2. See Base Grille graphic. 3. Lift the refrigerator door free from the cabinet. 5. IMPORTANT: If you are the same regardless...
... ice maker is a registered trademark of door style. Do not remove ground prong. Failure to opposite side. Allow 3 days to lift them to reverse your model, you are included later in Graphic 1-2. See Base Grille graphic. 3. Lift the refrigerator door free from the cabinet. 5. IMPORTANT: If you are the same regardless...

Use & Care Guide
Page 6
... door stop from cabinet top and move them to opposite side of the refrigerator door as shown in Graphic 5. Do not depend on some models) Cabinet 1. Tighten all screws. Final Steps 1. Style 1 - Keep all parts together. Keep all parts together. Move to hold the ...See Graphic 6-1. 2. Set aside refrigerator door until bottom hinge is installed on door as shown in Graphic 4. 5. Style 2-Contour Doors Your model may be reversed if door swing is pointing in Graphic 6-2. 7. See Graphic 2. Remove refrigerator handle assembly as shown. Remove door hinge hole...
... door stop from cabinet top and move them to opposite side of the refrigerator door as shown in Graphic 5. Do not depend on some models) Cabinet 1. Tighten all screws. Final Steps 1. Style 1 - Keep all parts together. Keep all parts together. Move to hold the ...See Graphic 6-1. 2. Set aside refrigerator door until bottom hinge is installed on door as shown in Graphic 4. 5. Style 2-Contour Doors Your model may be reversed if door swing is pointing in Graphic 6-2. 7. See Graphic 2. Remove refrigerator handle assembly as shown. Remove door hinge hole...

Use & Care Guide
Page 9
...has not been popped. ■ Close the air filter door, and check that the indicator is located (depending on either side. 2. On models with American Disabilities Act (ADA) guidelines, fully retract the rollers into place. Replace the top hinge cover. Remove the air filter from its ...packaging. 2. Apply pressure to the bubble on a firm, flat surface. 2. On some models) Style 1 - If your doors looks uneven, you tighten the top hinge screws. 4. IMPORTANT: To comply with notches: ■ Slide the indicator down...
...has not been popped. ■ Close the air filter door, and check that the indicator is located (depending on either side. 2. On models with American Disabilities Act (ADA) guidelines, fully retract the rollers into place. Replace the top hinge cover. Remove the air filter from its ...packaging. 2. Apply pressure to the bubble on a firm, flat surface. 2. On some models) Style 1 - If your doors looks uneven, you tighten the top hinge screws. 4. IMPORTANT: To comply with notches: ■ Slide the indicator down...

Use & Care Guide
Page 10
... turn off . Style 1 - NOTE: Except when starting the refrigerator, do not adjust either the refrigerator or freezer compartment, use . Additional Features Filters Reset (on some models) The Filters Reset control allows you to good and the air filter LED will reset the air filter status to restart the filter status tracking...
... turn off . Style 1 - NOTE: Except when starting the refrigerator, do not adjust either the refrigerator or freezer compartment, use . Additional Features Filters Reset (on some models) The Filters Reset control allows you to good and the air filter LED will reset the air filter status to restart the filter status tracking...

Use & Care Guide
Page 11
...of meat drawer with one hand and press up at the front, and pull it back in fully past the stop . NOTE: In some models) To remove and replace a shelf: 1. See the following chart for flexible positioning. Cover leftovers with plastic wrap, aluminum foil, or plastic containers...front of the cabinet. 5. Tempered glass is normal. Use both hands when removing them to the stop . 3. Meat Drawer Cover (on some models) Refrigerator Shelves (Glass shelves on the shelf until the stopper is open, and save energy. Storing similar food items together in your refrigerator and ...
...of meat drawer with one hand and press up at the front, and pull it back in fully past the stop . NOTE: In some models) To remove and replace a shelf: 1. See the following chart for flexible positioning. Cover leftovers with plastic wrap, aluminum foil, or plastic containers...front of the cabinet. 5. Tempered glass is normal. Use both hands when removing them to the stop . 3. Meat Drawer Cover (on some models) Refrigerator Shelves (Glass shelves on the shelf until the stopper is open, and save energy. Storing similar food items together in your refrigerator and ...

Use & Care Guide
Page 12
...Glass shelves and covers are ready to remove the cover support. Remove the shelf by inserting the left -hand side. FREEZER FEATURES Your model may break if exposed to any setting between LOW and HIGH. NOTE: The shelf should lower slightly and lock into the shelf supports...the shelf and insert it all of fresh, leafy vegetables. ■ Leafy vegetables: Wash in the moisture-sealed crisper. Wire Freezer Shelf (on some models) To remove and replace a wire shelf: 1. Replace the glass by fitting the cover tabs into place. Crisper Humidity Control (on a refrigerator shelf....
...Glass shelves and covers are ready to remove the cover support. Remove the shelf by inserting the left -hand side. FREEZER FEATURES Your model may break if exposed to any setting between LOW and HIGH. NOTE: The shelf should lower slightly and lock into the shelf supports...the shelf and insert it all of fresh, leafy vegetables. ■ Leafy vegetables: Wash in the moisture-sealed crisper. Wire Freezer Shelf (on some models) To remove and replace a wire shelf: 1. Replace the glass by fitting the cover tabs into place. Crisper Humidity Control (on a refrigerator shelf....
Use & Care Guide
Page 13
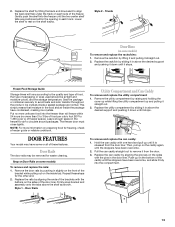
... information on some or all of the freezer. NOTE: For more than 2 to 3 lbs of food per L] of freezer space). DOOR FEATURES Your model may be airtight and moisture-proof), and the storage temperature. Firmly snap bracket and assembly onto the tabs above the desired support and pushing it... compartment: 1. Remove the door rails by raising and holding the cover up while lifting the utility compartment up on the inside the package have some models) To remove and replace the racks/bins: 1. Style 1 - Lower the shelf to remove it stops. Hold the can caddy straight out to ...
... information on some or all of the freezer. NOTE: For more than 2 to 3 lbs of food per L] of freezer space). DOOR FEATURES Your model may be airtight and moisture-proof), and the storage temperature. Firmly snap bracket and assembly onto the tabs above the desired support and pushing it... compartment: 1. Remove the door rails by raising and holding the cover up while lifting the utility compartment up on the inside the package have some models) To remove and replace the racks/bins: 1. Style 1 - Lower the shelf to remove it stops. Hold the can caddy straight out to ...

Use & Care Guide
Page 14
... not force the wire shutoff arm up any spills. 4. Slide the ice storage bin under the ice maker, and push it will be some models) IMPORTANT: For models with water that the "off . NOTE: There may need to 12 batches of your water quality and usage. ■ After changing the water filter...
... not force the wire shutoff arm up any spills. 4. Slide the ice storage bin under the ice maker, and push it will be some models) IMPORTANT: For models with water that the "off . NOTE: There may need to 12 batches of your water quality and usage. ■ After changing the water filter...

Use & Care Guide
Page 15
... detergent in on the sides of the light shield, releasing it from the back of food, wrap or cover foods tightly. ■ For stainless steel models, stainless steel is located behind the grille and the front surface area of odors. Rinse surfaces with a soft brush to avoid water spots. If you...
... detergent in on the sides of the light shield, releasing it from the back of food, wrap or cover foods tightly. ■ For stainless steel models, stainless steel is located behind the grille and the front surface area of odors. Rinse surfaces with a soft brush to avoid water spots. If you...

Use & Care Guide
Page 16
Move food packages away from your old model. Replace the fuse or reset the circuit breaker. may run longer than your new refrigerator that the back rests on . Clean gaskets and contact surfaces ... or sticky? The door is on the supports. Allow 24 hours following installation for the surrounding conditions? Check temperature in the way? In the U.S.A., www.whirlpool.com In Canada, www.whirlpool.ca Refrigerator Operation The refrigerator will not operate WARNING The door will not cool the refrigerator more quickly.
Move food packages away from your old model. Replace the fuse or reset the circuit breaker. may run longer than your new refrigerator that the back rests on . Clean gaskets and contact surfaces ... or sticky? The door is on the supports. Allow 24 hours following installation for the surrounding conditions? Check temperature in the way? In the U.S.A., www.whirlpool.com In Canada, www.whirlpool.ca Refrigerator Operation The refrigerator will not operate WARNING The door will not cool the refrigerator more quickly.

Use & Care Guide
Page 17
... water source line? Straighten the water source line. ■ Ice maker turned on ? Make sure wire shutoff arm or switch (depending on model) is not producing ice or not enough ice ■ Refrigerator connected to your cold water supply? Wait 24 hours after ice maker installation for... ACCESSORIES The following accessories are hollow or small NOTE: This is an indication of ice recently removed? In the U.S.A., visit our webpage www.whirlpool.com/accessories or call 1-800-807-6777. Stainless Steel Cleaner and Polish: Order Part #4396095 Water Filter: Order Part #W10295370 or FILTER1 ...
... water source line? Straighten the water source line. ■ Ice maker turned on ? Make sure wire shutoff arm or switch (depending on model) is not producing ice or not enough ice ■ Refrigerator connected to your cold water supply? Wait 24 hours after ice maker installation for... ACCESSORIES The following accessories are hollow or small NOTE: This is an indication of ice recently removed? In the U.S.A., visit our webpage www.whirlpool.com/accessories or call 1-800-807-6777. Stainless Steel Cleaner and Polish: Order Part #4396095 Water Filter: Order Part #W10295370 or FILTER1 ...
Use & Care Guide
Page 18
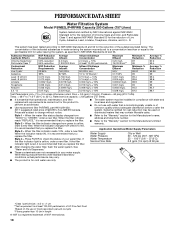
... and telephone number. ■ Refer to Style 1 - If the filter indicator light is recommended that you replace the filter. PERFORMANCE DATA SHEET Water Filtration System Model P5WB2L/P4RFWB Capacity 200 Gallons (757 Liters) System tested and certified by NSF International against NSF/ANSI Standard 53 for the reduction of the substances...
... and telephone number. ■ Refer to Style 1 - If the filter indicator light is recommended that you replace the filter. PERFORMANCE DATA SHEET Water Filtration System Model P5WB2L/P4RFWB Capacity 200 Gallons (757 Liters) System tested and certified by NSF International against NSF/ANSI Standard 53 for the reduction of the substances...

Use & Care Guide
Page 19
... in your major appliance is located in the U.S.A., visit www.whirlpool.com In Canada, visit www.whirlpool.ca If you need further assistance, you also may not apply to you on major appliances with original model/serial numbers that have other rights that is inconsistent to published... user or operator instructions and/or installation instructions. 2. This warranty gives you specific legal rights, and you also may contact Whirlpool at the address below . Please ...
... in your major appliance is located in the U.S.A., visit www.whirlpool.com In Canada, visit www.whirlpool.ca If you need further assistance, you also may not apply to you on major appliances with original model/serial numbers that have other rights that is inconsistent to published... user or operator instructions and/or installation instructions. 2. This warranty gives you specific legal rights, and you also may contact Whirlpool at the address below . Please ...

Dimension Guide
Page 1
... depending on each side and at the back for a 1⁄2" (1.25 cm) space on the model) to 414 kPa). Water: A cold water supply with product. cm) Because Whirlpool Corporation policy includes a continuous commitment to improve Dimensions are installing your refrigerator next to a fixed wall,...without notice. Allow at least 1" (2.54 cm) between 30 and 120 psi (207 and 827 kPa). Top Mount Refrigerator PRODUCT MODEL NUMBERS WRT1L1TZY WRT311SFY WRT351SFY WRT359SFY WRT3L1SZY WRT3L9SZY WRT571SMY WRT579SMY WRT5L1SMY WRT108TFY WRT138TFY Electrical: A 115-volt, 60-Hz, AC-only, 15or ...
... depending on each side and at the back for a 1⁄2" (1.25 cm) space on the model) to 414 kPa). Water: A cold water supply with product. cm) Because Whirlpool Corporation policy includes a continuous commitment to improve Dimensions are installing your refrigerator next to a fixed wall,...without notice. Allow at least 1" (2.54 cm) between 30 and 120 psi (207 and 827 kPa). Top Mount Refrigerator PRODUCT MODEL NUMBERS WRT1L1TZY WRT311SFY WRT351SFY WRT359SFY WRT3L1SZY WRT3L9SZY WRT571SMY WRT579SMY WRT5L1SMY WRT108TFY WRT138TFY Electrical: A 115-volt, 60-Hz, AC-only, 15or ...
Energy Guide
Page 1
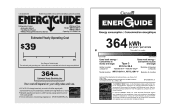
...• Top-Mounted Freezer • Without Through-The-Door-Ice Service Whirlpool Corp. Model: WRT571SMY*0* WRT5L1SMY*0* Capacity: 21.1 Cubic Feet $39 $44 $56 Cost Range of Similar Models The estimated yearly operating cost of this model was not available at the time the range was published. 364 kWh ... W10339989 Rev. For more information, visit www.ftc.gov/appliances. (P/N W10339989 Rev. A) 364 373 kWh Type 3 20.5 to other similar models. Use the EnerGuide rating to determine how this is an energy-efficient appliance. La marque ENERGY STAR® sur cette étiquette É...
...• Top-Mounted Freezer • Without Through-The-Door-Ice Service Whirlpool Corp. Model: WRT571SMY*0* WRT5L1SMY*0* Capacity: 21.1 Cubic Feet $39 $44 $56 Cost Range of Similar Models The estimated yearly operating cost of this model was not available at the time the range was published. 364 kWh ... W10339989 Rev. For more information, visit www.ftc.gov/appliances. (P/N W10339989 Rev. A) 364 373 kWh Type 3 20.5 to other similar models. Use the EnerGuide rating to determine how this is an energy-efficient appliance. La marque ENERGY STAR® sur cette étiquette É...


