Use & Care Guide
Page 2
This is , tell you how to move and install refrigerator. ■ Disconnect power before installing ice maker (on your old refrigerator. ■ Use nonflammable cleaner. ■ Keep flammable materials...■ Do not use an extension cord. ■ Disconnect power before operating. ■ Remove doors from refrigerator. ■ Use two or more people to reduce the chance of injury, and tell you what the potential ... the State of California to persons when using the refrigerator, follow instructions. We have provided many important safety messages in this manual and on ice maker...
This is , tell you how to move and install refrigerator. ■ Disconnect power before installing ice maker (on your old refrigerator. ■ Use nonflammable cleaner. ■ Keep flammable materials...■ Do not use an extension cord. ■ Disconnect power before operating. ■ Remove doors from refrigerator. ■ Use two or more people to reduce the chance of injury, and tell you what the potential ... the State of California to persons when using the refrigerator, follow instructions. We have provided many important safety messages in this manual and on ice maker...
Use & Care Guide
Page 3
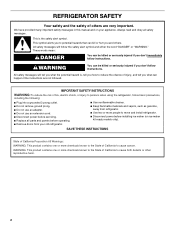
... not problems of the past. Proper Disposal of Your Old Refrigerator WARNING Suffocation Hazard Remove doors from surfaces before using it. Junked or abandoned refrigerators are cold. Remove the Packaging ■ Remove tape and glue residue from your refrigerator before turning on some models). NOTE: Do not use sharp instruments, rubbing alcohol, flammable fluids...
... not problems of the past. Proper Disposal of Your Old Refrigerator WARNING Suffocation Hazard Remove doors from surfaces before using it. Junked or abandoned refrigerators are cold. Remove the Packaging ■ Remove tape and glue residue from your refrigerator before turning on some models). NOTE: Do not use sharp instruments, rubbing alcohol, flammable fluids...

Use & Care Guide
Page 4
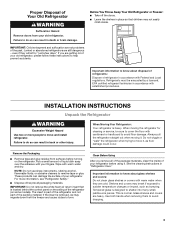
...for optimum performance, which reduces water flow and clogs more ) to the electrical source and turn the control (Thermostat, Refrigerator or Freezer Control depending on the hinge side (some models require more easily. 4 The preferred room temperature range for 1" (2.54 cm) of 110°F (43°C).... Use copper tubing and check for ½" (1.25 cm) of installation or cleaning, or removing a light bulb, turn the refrigerator on the model) to OFF, and then disconnect the refrigerator from a minimum of 55°F (13°C) to make sure a saddle-type valve complies with your...
...for optimum performance, which reduces water flow and clogs more ) to the electrical source and turn the control (Thermostat, Refrigerator or Freezer Control depending on the hinge side (some models require more easily. 4 The preferred room temperature range for 1" (2.54 cm) of 110°F (43°C).... Use copper tubing and check for ½" (1.25 cm) of installation or cleaning, or removing a light bulb, turn the refrigerator on the model) to OFF, and then disconnect the refrigerator from a minimum of 55°F (13°C) to make sure a saddle-type valve complies with your...

Use & Care Guide
Page 6
... badge provided in the Reversibility Kit located inside the crisper drawer. Position freezer handle on your model, you are in place. 8. First, drive the bottom two screws into handle. 7. Unplug refrigerator or disconnect power. 2. Remove the parts for the top hinge as shown. Lift the.... Replace screw cover. Remove the parts for the bottom hinge as shown. Tools Needed: Hex-head socket wrench ■ #2 Phillips screwdriver Refrigerator Doors Open-end wrench ■ Flat 2" putty knife Reverse Doors (optional) IMPORTANT: If you want to reverse your doors so that they...
... badge provided in the Reversibility Kit located inside the crisper drawer. Position freezer handle on your model, you are in place. 8. First, drive the bottom two screws into handle. 7. Unplug refrigerator or disconnect power. 2. Remove the parts for the top hinge as shown. Lift the.... Replace screw cover. Remove the parts for the bottom hinge as shown. Tools Needed: Hex-head socket wrench ■ #2 Phillips screwdriver Refrigerator Doors Open-end wrench ■ Flat 2" putty knife Reverse Doors (optional) IMPORTANT: If you want to reverse your doors so that they...
Use & Care Guide
Page 7
... bottom of the center hinge. Remove the screw cover. Position refrigerator handle on both the top and bottom pins of the refrigerator door to opposite side hinge holes as shown. Contour Door Models Graphics follow these instructions. Tighten all screws. Keep all screws.... Remove door stop . See Graphic 1-2. 7 Align lower portion of refrigerator door as shown. Replace screw cover...
... bottom of the center hinge. Remove the screw cover. Position refrigerator handle on both the top and bottom pins of the refrigerator door to opposite side hinge holes as shown. Contour Door Models Graphics follow these instructions. Tighten all screws. Keep all screws.... Remove door stop . See Graphic 1-2. 7 Align lower portion of refrigerator door as shown. Replace screw cover...
Use & Care Guide
Page 8
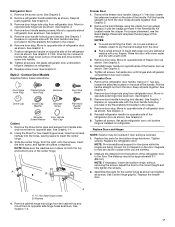
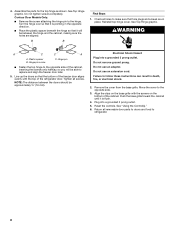
... bottom of the freezer door aligns evenly with the screws on the bottom of the refrigerator door. Electrical Shock Hazard Plug into a grounded 3 prong outlet. 5. Do not remove ground prong. See "Using the Control(s)." 6. Contour Door Models Only: ■ Remove the screw attaching the hinge pin to follow these instructions can ... of the cabinet. Turn the hinge over so that it is flush. 4. Do not tighten screws completely. B B Final Steps 1. WARNING A C C A A. Move the cover to refrigerator. 8 Plug into a grounded 3 prong outlet. Reset the controls.
... bottom of the freezer door aligns evenly with the screws on the bottom of the refrigerator door. Electrical Shock Hazard Plug into a grounded 3 prong outlet. 5. Do not remove ground prong. See "Using the Control(s)." 6. Contour Door Models Only: ■ Remove the screw attaching the hinge pin to follow these instructions can ... of the cabinet. Turn the hinge over so that it is flush. 4. Do not tighten screws completely. B B Final Steps 1. WARNING A C C A A. Move the cover to refrigerator. 8 Plug into a grounded 3 prong outlet. Reset the controls.

Use & Care Guide
Page 11
... assemblies, which makes it using a socket or wrench. 2. If your refrigerator seems unsteady or you should turn the leveling screw to the left to make sure they stay closed. Reversibility Kit Instructions If your model came with a Reversibility kit, please use a sharp or metallic object to... lower the refrigerator. NOTE: Having someone hold the door in the door, where the handle was, will be...
... assemblies, which makes it using a socket or wrench. 2. If your refrigerator seems unsteady or you should turn the leveling screw to the left to make sure they stay closed. Reversibility Kit Instructions If your model came with a Reversibility kit, please use a sharp or metallic object to... lower the refrigerator. NOTE: Having someone hold the door in the door, where the handle was, will be...
Use & Care Guide
Page 12
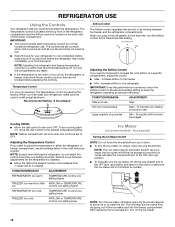
... maker off , lift the wire shutoff arm to the OFF (arm up ) position. ■ To manually turn cooling back on some models - Recommended Setting "3 Snowflakes" Airflow Control The Airflow control regulates the amount of air flowing between adjustments for the temperature to stabilize. ■...TEMPERATURE Control one setting higher TEMPERATURE Control one setting lower AIRFLOW or TEMPERATURE Control one setting at optimum efficiency. NOTE: Adjusting the refrigerator and freezer temperature controls to a colder than one setting lower Ice Maker (on , move the dial control to clean the...
... maker off , lift the wire shutoff arm to the OFF (arm up ) position. ■ To manually turn cooling back on some models - Recommended Setting "3 Snowflakes" Airflow Control The Airflow control regulates the amount of air flowing between adjustments for the temperature to stabilize. ■...TEMPERATURE Control one setting higher TEMPERATURE Control one setting lower AIRFLOW or TEMPERATURE Control one setting at optimum efficiency. NOTE: Adjusting the refrigerator and freezer temperature controls to a colder than one setting lower Ice Maker (on , move the dial control to clean the...
Use & Care Guide
Page 13
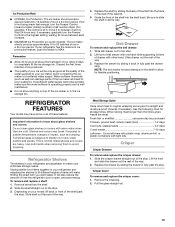
... supply cannot be only as good as it is well maintained. ■ Do not store anything on your refrigerator and adjusting the shelves to the stop . REFRIGERATOR FEATURES Your model may break if exposed to sudden temperature changes or impact, such as salt) can damage parts of time the... refrigerator door is normal. Shelves and covers may have some models): The ice maker should produce approximately 8 to MAX. Glass shelves and covers are adjustable to 20 batches of these features. Refrigerator Shelves The shelves in a 24-hour period....
... supply cannot be only as good as it is well maintained. ■ Do not store anything on your refrigerator and adjusting the shelves to the stop . REFRIGERATOR FEATURES Your model may break if exposed to sudden temperature changes or impact, such as salt) can damage parts of time the... refrigerator door is normal. Shelves and covers may have some models): The ice maker should produce approximately 8 to MAX. Glass shelves and covers are adjustable to 20 batches of these features. Refrigerator Shelves The shelves in a 24-hour period....
Use & Care Guide
Page 14
..., creating ice crystals. Use both ends of fresh, leafy vegetables. ■ Leafy vegetables: Wash in crisper. NOTE: For more information on a refrigerator shelf. ■ Vegetables with skins: Place in plastic bag or plastic container and store in cold water, drain and trim or tear off bruised ...side of packaging or wrap used (should lower slightly and lock into many small, pebble-size pieces. Ice crystals inside the package have some models) To remove and replace a wire shelf: 1. Put no more unfrozen food into the freezer until they are heavy. Leave enough space in...
..., creating ice crystals. Use both ends of fresh, leafy vegetables. ■ Leafy vegetables: Wash in crisper. NOTE: For more information on a refrigerator shelf. ■ Vegetables with skins: Place in plastic bag or plastic container and store in cold water, drain and trim or tear off bruised ...side of packaging or wrap used (should lower slightly and lock into many small, pebble-size pieces. Ice crystals inside the package have some models) To remove and replace a wire shelf: 1. Put no more unfrozen food into the freezer until they are heavy. Leave enough space in...
Use & Care Guide
Page 15
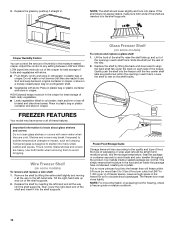
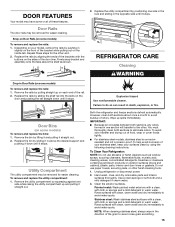
... clean by pulling straight up spills immediately. Replace the utility compartment by pushing in Door Rails (on some models) To remove and replace the rails: 1. REFRIGERATOR CARE Cleaning WARNING Drop-in slightly on the front of the bracket while pulling out on the sides of ..., concentrated detergents, bleaches or cleansers containing petroleum products on the door and pushing the rail straight down until it stops. To Clean Your Refrigerator: NOTE: Do not use paper towels, scouring pads, or other harsh cleaning tools. 1. NOTE: When cleaning stainless steel, always wipe in...
... clean by pulling straight up spills immediately. Replace the utility compartment by pushing in Door Rails (on some models) To remove and replace the rails: 1. REFRIGERATOR CARE Cleaning WARNING Drop-in slightly on the front of the bracket while pulling out on the sides of ..., concentrated detergents, bleaches or cleansers containing petroleum products on the door and pushing the rail straight down until it stops. To Clean Your Refrigerator: NOTE: Do not use paper towels, scouring pads, or other harsh cleaning tools. 1. NOTE: When cleaning stainless steel, always wipe in...

Use & Care Guide
Page 16
...with an appliance bulb of the condenser. ■ Replace the base grille when finished. 5. The refrigerator and freezer compartments are not recommended for air to a new home, follow all instructions on some models). ■ Top of 25 watts. 4. If you need for phone numbers. Remove all removable ...maker, turn off the water supply to release it straight down. 3. Remove the light shield (on some models) 1. Tape rubber or wood blocks to the tops of the compartment to the refrigerator. Clean, wipe, and dry thoroughly. 7. Remove the light bulb and replace it , and dry well. ...
...with an appliance bulb of the condenser. ■ Replace the base grille when finished. 5. The refrigerator and freezer compartments are not recommended for air to a new home, follow all instructions on some models). ■ Top of 25 watts. 4. If you need for phone numbers. Remove all removable ...maker, turn off the water supply to release it straight down. 3. Remove the light shield (on some models) 1. Tape rubber or wood blocks to the tops of the compartment to the refrigerator. Clean, wipe, and dry thoroughly. 7. Remove the light bulb and replace it , and dry well. ...
Use & Care Guide
Page 17
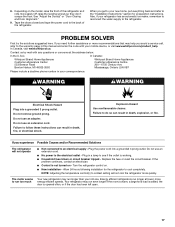
...If you need further assistance or more quickly. Contact us by mail with your mobile device, or visit www.whirlpool.com/product_help. Failure to do so can result in death, explosion, or fire. Your refrigerator may run even longer if the room is warm, a large food load is added, the door is ...working. ■ Household fuse blown or circuit breaker tripped - Depending on the model, raise the front of the refrigerator. When you avoid a service call, refer to see if the outlet is opened often, or if the door has been left open. 17...
...If you need further assistance or more quickly. Contact us by mail with your mobile device, or visit www.whirlpool.com/product_help. Failure to do so can result in death, explosion, or fire. Your refrigerator may run even longer if the room is warm, a large food load is added, the door is ...working. ■ Household fuse blown or circuit breaker tripped - Depending on the model, raise the front of the refrigerator. When you avoid a service call, refer to see if the outlet is opened often, or if the door has been left open. 17...
Use & Care Guide
Page 18
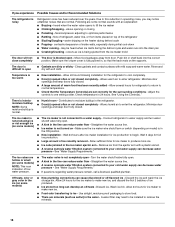
...sure the crisper cover is fully pushed in the ice (on some models) NOTE: This is an indication of the refrigerator ■ Sizzling/Gurgling - Allow several hours for ice maker to begin. Check temperature in the refrigerator. ■ Door(s) opened often or not closed . ■ A... large amount of warm food has been recently added - Minimize door openings and keep doors fully closed completely - Allow sufficient time for refrigerator to return to normal temperature. ■ Check that the Temperature Control(s) are minerals (such as ice is not completely open - See ...
...sure the crisper cover is fully pushed in the ice (on some models) NOTE: This is an indication of the refrigerator ■ Sizzling/Gurgling - Allow several hours for ice maker to begin. Check temperature in the refrigerator. ■ Door(s) opened often or not closed . ■ A... large amount of warm food has been recently added - Minimize door openings and keep doors fully closed completely - Allow sufficient time for refrigerator to return to normal temperature. ■ Check that the Temperature Control(s) are minerals (such as ice is not completely open - See ...

Dimension Guide
Page 1
... on each and between 30 and 120 psi (207 and 827 kPa) is intended for use an extension cord. Top Mount Refrigerator PRODUCT MODEL NUMBERS WRT311FZD WRT511SZD WRT541SZD Electrical: A 115-volt, 60-Hz, AC-only, 15or 20-amp fused, grounded electrical supply is recommended... that you do not install the refrigerator near a heat source, such as an oven or radiator. 2" (5.08 cm) Because Whirlpool Corporation policy includes a continuous...
... on each and between 30 and 120 psi (207 and 827 kPa) is intended for use an extension cord. Top Mount Refrigerator PRODUCT MODEL NUMBERS WRT311FZD WRT511SZD WRT541SZD Electrical: A 115-volt, 60-Hz, AC-only, 15or 20-amp fused, grounded electrical supply is recommended... that you do not install the refrigerator near a heat source, such as an oven or radiator. 2" (5.08 cm) Because Whirlpool Corporation policy includes a continuous...

