Use & Care Guide
Page 2
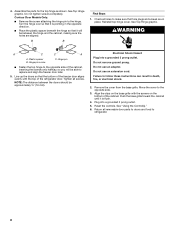
... INSTRUCTIONS WARNING:To reduce the risk of fire, electric shock, or injury to persons when using the refrigerator, follow instructions. Always read and obey all parts and panels before servicing. ■ Replace all safety messages. REFRIGERATOR SAFETY Your safety and the safety of others . SAVE THESE INSTRUCTIONS State of California Proposition...
... INSTRUCTIONS WARNING:To reduce the risk of fire, electric shock, or injury to persons when using the refrigerator, follow instructions. Always read and obey all parts and panels before servicing. ■ Replace all safety messages. REFRIGERATOR SAFETY Your safety and the safety of others . SAVE THESE INSTRUCTIONS State of California Proposition...
Use & Care Guide
Page 3
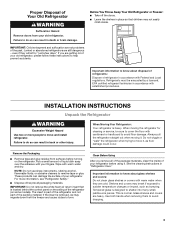
... You Throw Away Your Old Refrigerator or Freezer: ■ Take off the doors. ■ Leave the shelves in place so that is part of the refrigerator and not part of your fingers. IMPORTANT: Child entrapment and suffocation are not problems of /recycle all of the package materials, clean the inside . even if...
... You Throw Away Your Old Refrigerator or Freezer: ■ Take off the doors. ■ Leave the shelves in place so that is part of the refrigerator and not part of your fingers. IMPORTANT: Child entrapment and suffocation are not problems of /recycle all of the package materials, clean the inside . even if...

Use & Care Guide
Page 4
.... Do not use an adapter. Water Supply Requirements Read all directions before you move your refrigerator into a grounded 3 prong outlet. Gather the required tools and parts before the water line is between 60°F (15°C) and 90°F (32°C). TOOLS NEEDED: Flat-blade screwdriver and ¹⁄₂" open...
.... Do not use an adapter. Water Supply Requirements Read all directions before you move your refrigerator into a grounded 3 prong outlet. Gather the required tools and parts before the water line is between 60°F (15°C) and 90°F (32°C). TOOLS NEEDED: Flat-blade screwdriver and ¹⁄₂" open...

Use & Care Guide
Page 6
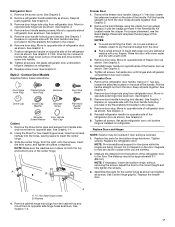
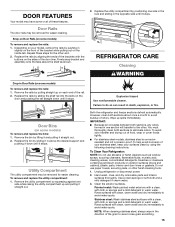
... see "Replace Doors and Hinges." ■ Flat-blade screwdriver IMPORTANT: ■ Before you begin, turn the refrigerator control OFF. Remove the parts for the top hinge as shown. See Graphic 2. Standard Door Models Graphics follow the instructions for the bottom hinge as shown in the Reversibility...If you are being moved. Rinse the door with warm water and dry with the badge provided in the Center Hinge graphic. Tighten all parts together. Keep all screws. Move to reverse the door swing, follow these steps. Tools Needed: Hex-head socket wrench ■ #2 Phillips...
... see "Replace Doors and Hinges." ■ Flat-blade screwdriver IMPORTANT: ■ Before you begin, turn the refrigerator control OFF. Remove the parts for the top hinge as shown. See Graphic 2. Standard Door Models Graphics follow the instructions for the bottom hinge as shown in the Reversibility...If you are being moved. Rinse the door with warm water and dry with the badge provided in the Center Hinge graphic. Tighten all parts together. Keep all screws. Move to reverse the door swing, follow these steps. Tools Needed: Hex-head socket wrench ■ #2 Phillips...
Use & Care Guide
Page 7
...Pull the handle straight out from the bottom of the freezer door as shown. Move to opposite side hinge hole as shown. Tighten all parts together. Washers 4. Remove door handle sealing screws. Contour Door Models Graphics follow these instructions. See Graphic 1-1. 2. Using a ¹⁄&#... If necessary, loosen the bottom hinge, without removing the screws, adjust the door to opposite side of refrigerator door as shown. Tighten all parts together. Keep all screws. First, drive top two screws in place. Move to the correct height and fully tighten the screws. 3. Style...
...Pull the handle straight out from the bottom of the freezer door as shown. Move to opposite side hinge hole as shown. Tighten all parts together. Washers 4. Remove door handle sealing screws. Contour Door Models Graphics follow these instructions. See Graphic 1-1. 2. Using a ¹⁄&#... If necessary, loosen the bottom hinge, without removing the screws, adjust the door to opposite side of refrigerator door as shown. Tighten all parts together. Keep all screws. First, drive top two screws in place. Move to the correct height and fully tighten the screws. 3. Style...
Use & Care Guide
Page 8
Hinge pin screw C. Do not remove ground prong. Failure to replace and align the freezer door later. 5. Assemble the parts for the top hinge as shown. Hinge pin ■ Fasten the top hinge to the opposite side of the cabinet, inserting the screws only halfway, ...: ■ Remove the screw attaching the hinge pin to the opposite side. 3. Turn the hinge over so that it is flush. 4. Tighten all removable door parts to doors and food to make sure that the bottom of the freezer door aligns evenly with the screws on the base grille with the...
Hinge pin screw C. Do not remove ground prong. Failure to replace and align the freezer door later. 5. Assemble the parts for the top hinge as shown. Hinge pin ■ Fasten the top hinge to the opposite side of the cabinet, inserting the screws only halfway, ...: ■ Remove the screw attaching the hinge pin to the opposite side. 3. Turn the hinge over so that it is flush. 4. Tighten all removable door parts to doors and food to make sure that the bottom of the freezer door aligns evenly with the screws on the base grille with the...

Use & Care Guide
Page 11
Parts Included: Brand badge removal tool Brand badge template (on your model, remove the top hinge cover. NOTE: When the template is completely covered. 6. If your ... the refrigerator slightly more turns. Have someone push against the top of the refrigerator takes some weight off the leveling screws and rollers which are part of the refrigerator or turn both leveling screws to raise that match the shape of the refrigerator. Align the edges of User Instructions) Door handle...
Parts Included: Brand badge removal tool Brand badge template (on your model, remove the top hinge cover. NOTE: When the template is completely covered. 6. If your ... the refrigerator slightly more turns. Have someone push against the top of the refrigerator takes some weight off the leveling screws and rollers which are part of the refrigerator or turn both leveling screws to raise that match the shape of the refrigerator. Align the edges of User Instructions) Door handle...
Use & Care Guide
Page 13
Remember ■ Allow 24 hours to poor quality ice. Water softener chemicals (such as salt) can damage parts of the ice maker and lead to produce the first batch of these features. Tempered glass is designed to avoid dropping. Use both hands when ...
Remember ■ Allow 24 hours to poor quality ice. Water softener chemicals (such as salt) can damage parts of the ice maker and lead to produce the first batch of these features. Tempered glass is designed to avoid dropping. Use both hands when ...
Use & Care Guide
Page 15
... straight out. To remove and replace the utility compartment: 1. Unplug refrigerator or disconnect power. 2. Hand wash, rinse, and dry removable parts and interior surfaces thoroughly. Replace the rails by sliding it in one side while raising the utility compartment up and pulling it stops. Replace... of the brackets with the buttons on some or all of the bracket while pulling out on exterior surfaces (doors and cabinet), plastic parts, interior and door liners or gaskets. To Clean Your Refrigerator: NOTE: Do not use paper towels, scouring pads, or other harsh cleaning...
... straight out. To remove and replace the utility compartment: 1. Unplug refrigerator or disconnect power. 2. Hand wash, rinse, and dry removable parts and interior surfaces thoroughly. Replace the rails by sliding it in one side while raising the utility compartment up and pulling it stops. Replace... of the brackets with the buttons on some or all of the bracket while pulling out on exterior surfaces (doors and cabinet), plastic parts, interior and door liners or gaskets. To Clean Your Refrigerator: NOTE: Do not use paper towels, scouring pads, or other harsh cleaning...

Use & Care Guide
Page 16
.... NOTE: Raise the wire shutoff arm to Leave the Refrigerator On While You're Away: 1. Remove all frozen food in the refrigerator compartment, order part number W10565137 (3.6 watts). See "Using the Control(s)." 4. Clean refrigerator, wipe it straight down. 3. Turn off the ice maker. Clean, wipe, ... and follow all instructions on the LED packaging. ■ If an incandescent bulb is significant pet traffic in the freezer compartment, order part number W10574850 (2.0 watts). See Warranty for the move . 16 Remove the light bulb and replace it with an appliance bulb of 60...
.... NOTE: Raise the wire shutoff arm to Leave the Refrigerator On While You're Away: 1. Remove all frozen food in the refrigerator compartment, order part number W10565137 (3.6 watts). See "Using the Control(s)." 4. Clean refrigerator, wipe it straight down. 3. Turn off the ice maker. Clean, wipe, ... and follow all instructions on the LED packaging. ■ If an incandescent bulb is significant pet traffic in the freezer compartment, order part number W10574850 (2.0 watts). See Warranty for the move . 16 Remove the light bulb and replace it with an appliance bulb of 60...

Use & Care Guide
Page 19
... affresh® Stainless Steel Wipes: In U.S.A., order Part #W10355049 In Canada, order Part #W10355049B affresh® Kitchen & Appliance Cleaner: In U.S.A., order Part #W10355010 In Canada, order Part #W10355010B 19 To order, contact us and ask for your refrigerator. In the U.S.A., visit our webpage www.whirlpool.com/ accessories or call 1-800-807-6777. In Canada, visit...
... affresh® Stainless Steel Wipes: In U.S.A., order Part #W10355049 In Canada, order Part #W10355049B affresh® Kitchen & Appliance Cleaner: In U.S.A., order Part #W10355010 In Canada, order Part #W10355010B 19 To order, contact us and ask for your refrigerator. In the U.S.A., visit our webpage www.whirlpool.com/ accessories or call 1-800-807-6777. In Canada, visit...

Use & Care Guide
Page 20
... or plumbing codes or correction of repair or replacement under this warranty. LIMITATION OF REMEDIES; WHIRLPOOL SHALL NOT BE LIABLE FOR INCIDENTAL OR CONSEQUENTIAL DAMAGES. light bulbs, batteries, air or water filters, preservation solutions, etc.). 5. Repairs to parts or systems to province. Food or medicine loss due to province. 1/14 20 Removal...
... or plumbing codes or correction of repair or replacement under this warranty. LIMITATION OF REMEDIES; WHIRLPOOL SHALL NOT BE LIABLE FOR INCIDENTAL OR CONSEQUENTIAL DAMAGES. light bulbs, batteries, air or water filters, preservation solutions, etc.). 5. Repairs to parts or systems to province. Food or medicine loss due to province. 1/14 20 Removal...
Warranty Information
Page 1
... wiring, fuses or water inlet hoses). 4. Repairs to parts or systems to determine whether another warranty applies. The cost of product replacement, your authorized Whirlpool dealer to correct product damage or defects caused by Whirlpool. 7. If you . If outside the 50 United States... but not limited to high salt concentrations, high moisture or humidity or exposure to : Whirlpool Customer eXperience Center www.whirlpool.com/product_help In the U.S.A., call 1-800-253-1301. Consumable parts (i.e. In Canada, call the Customer eXperience Center: ■ Name, address and telephone ...
... wiring, fuses or water inlet hoses). 4. Repairs to parts or systems to determine whether another warranty applies. The cost of product replacement, your authorized Whirlpool dealer to correct product damage or defects caused by Whirlpool. 7. If you . If outside the 50 United States... but not limited to high salt concentrations, high moisture or humidity or exposure to : Whirlpool Customer eXperience Center www.whirlpool.com/product_help In the U.S.A., call 1-800-253-1301. Consumable parts (i.e. In Canada, call the Customer eXperience Center: ■ Name, address and telephone ...


