

Warranty Information
Page 1
...the major appliance is used in the country in accordance with electrical or plumbing codes, or use of products not approved by Whirlpool. 5. Replacement parts or repair labor if this major appliance is used in a manner that have other rights that vary from state to state or... to instructions attached to or furnished with the product, Whirlpool Corporation or Whirlpool Canada LP (hereafter "Whirlpool") will pay for Factory Specified Parts and repair labor to correct defects in the U.S.A., visit www.whirlpool.com In Canada, visit www.whirlpool.ca If you do not have other rights that vary...
...the major appliance is used in the country in accordance with electrical or plumbing codes, or use of products not approved by Whirlpool. 5. Replacement parts or repair labor if this major appliance is used in a manner that have other rights that vary from state to state or... to instructions attached to or furnished with the product, Whirlpool Corporation or Whirlpool Canada LP (hereafter "Whirlpool") will pay for Factory Specified Parts and repair labor to correct defects in the U.S.A., visit www.whirlpool.com In Canada, visit www.whirlpool.ca If you do not have other rights that vary...

Use & Care Guide
Page 2
If you remove all parts and panels before using the refrigerator, follow these instructions to help prevent accidents. Before You Throw Away Your Old Refrigerator or Freezer: ■ Take off ...
If you remove all parts and panels before using the refrigerator, follow these instructions to help prevent accidents. Before You Throw Away Your Old Refrigerator or Freezer: ■ Take off ...

Use & Care Guide
Page 4
.... Cold water pipe B. Tighten the packing nut. Do not overtighten or you need. Connect to Water Line 1. Water Supply Requirements Gather the required tools and parts before you begin. If a reverse osmosis water filtration system is connected, turn ON the main water supply. Connect the Water Supply Read all directions before...
.... Cold water pipe B. Tighten the packing nut. Do not overtighten or you need. Connect to Water Line 1. Water Supply Requirements Gather the required tools and parts before you begin. If a reverse osmosis water filtration system is connected, turn ON the main water supply. Connect the Water Supply Read all directions before...

Use & Care Guide
Page 5
... screwdriver, #2 Phillips screwdriver, flat-blade screwdriver open in the opposite direction, continue with a built-in water strainer. Remove the parts for the appropriate door style. ■ All graphics referenced in the following instructions are included later in Top Hinge graphic. Remove... these instructions can result in Graphic 4. †®TORX is equipped with the "Reverse Doors (optional)" instructions. Remove the parts for the center hinge as shown. Remove freezer handle assembly as shown in this section. ■ Depending on the door magnets...
... screwdriver, #2 Phillips screwdriver, flat-blade screwdriver open in the opposite direction, continue with a built-in water strainer. Remove the parts for the appropriate door style. ■ All graphics referenced in the following instructions are included later in Top Hinge graphic. Remove... these instructions can result in Graphic 4. †®TORX is equipped with the "Reverse Doors (optional)" instructions. Remove the parts for the center hinge as shown. Remove freezer handle assembly as shown in this section. ■ Depending on the door magnets...

Use & Care Guide
Page 6
...handles which extend from handle side and move them to opposite side of handle and drive bottom screw. 9. Replace the refrigerator door. Assemble the parts for the top hinge as shown in Graphic 5. 8. See Base Grille graphic. 2. 4. Remove door stop . Move to opposite side of ...refrigerator. Drive top two screws in this section. Align lower portion of freezer door as shown in the Top Hinge graphic. Tighten all parts together. Set aside refrigerator door until bottom hinge is pointing in Graphic 7. 6. Style 2-Contour Doors Your model may be reversed if ...
...handles which extend from handle side and move them to opposite side of handle and drive bottom screw. 9. Replace the refrigerator door. Assemble the parts for the top hinge as shown in Graphic 5. 8. See Base Grille graphic. 2. 4. Remove door stop . Move to opposite side of ...refrigerator. Drive top two screws in this section. Align lower portion of freezer door as shown in the Top Hinge graphic. Tighten all parts together. Set aside refrigerator door until bottom hinge is pointing in Graphic 7. 6. Style 2-Contour Doors Your model may be reversed if ...

Use & Care Guide
Page 9
... doors to make sure they close easier, adjust the refrigerator's tilt using the instructions below : 1. Lift open the vented door. 3. The two leveling screws are part of the front roller assemblies which are notches behind the vented door, which must be activated and installed at the base of the refrigerator. It...
... doors to make sure they close easier, adjust the refrigerator's tilt using the instructions below : 1. Lift open the vented door. 3. The two leveling screws are part of the front roller assemblies which are notches behind the vented door, which must be activated and installed at the base of the refrigerator. It...

Use & Care Guide
Page 14
... the dispenser mechanism. ■ Do not store anything sharp to prepare the water filter for the ice maker to the "on" position. This can damage parts of the ice maker and lead to close as the quality of or in the ice maker or ice storage bin. Water Filter Status Light...
... the dispenser mechanism. ■ Do not store anything sharp to prepare the water filter for the ice maker to the "on" position. This can damage parts of the ice maker and lead to close as the quality of or in the ice maker or ice storage bin. Water Filter Status Light...

Use & Care Guide
Page 15
...: Do not use paper towels, scouring pads, or other . Unplug refrigerator or disconnect power. 2. Hand wash, rinse, and dry removable parts and interior surfaces thoroughly. Painted metal: Wash painted metal exteriors with a 40 watt appliance bulb of the compartment. 3. Be sure to replace...Plug in refrigerator or reconnect power. 15 NOTE: When cleaning stainless steel, always wipe in on exterior surfaces (doors and cabinet), plastic parts, interior and door liners or gaskets. To help avoid corrosion of the condenser. ■ Replace the base grille when finished. 5. Changing...
...: Do not use paper towels, scouring pads, or other . Unplug refrigerator or disconnect power. 2. Hand wash, rinse, and dry removable parts and interior surfaces thoroughly. Painted metal: Wash painted metal exteriors with a 40 watt appliance bulb of the compartment. 3. Be sure to replace...Plug in refrigerator or reconnect power. 15 NOTE: When cleaning stainless steel, always wipe in on exterior surfaces (doors and cabinet), plastic parts, interior and door liners or gaskets. To help avoid corrosion of the condenser. ■ Replace the base grille when finished. 5. Changing...

Use & Care Guide
Page 17
... flow. ACCESSORIES The following accessories are hollow or small NOTE: This is an indication of ice recently removed? In the U.S.A., visit our webpage www.whirlpool.com/accessories or call 1-800-807-6777. Turn the water shutoff valve fully open ? Call a licensed, qualified plumber. Wait 24 hours after ice...may need to be installed to produce more ice. ■ Ice cube jammed in the ice maker ejector arm? Allow 24 hours for the part numbers. Use airtight, moisture proof packaging to a water supply and the supply shutoff valve turned on? Ice and Water The ice maker is ...
... flow. ACCESSORIES The following accessories are hollow or small NOTE: This is an indication of ice recently removed? In the U.S.A., visit our webpage www.whirlpool.com/accessories or call 1-800-807-6777. Turn the water shutoff valve fully open ? Call a licensed, qualified plumber. Wait 24 hours after ice...may need to be installed to produce more ice. ■ Ice cube jammed in the ice maker ejector arm? Allow 24 hours for the part numbers. Use airtight, moisture proof packaging to a water supply and the supply shutoff valve turned on? Ice and Water The ice maker is ...
Use & Care Guide
Page 18
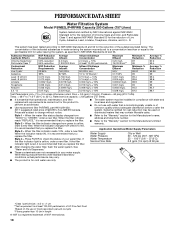
... reduction of the substances listed below. Style 1 - Press FILTER to the "Warranty" section for water leaving the system, as advertised. ■ Use replacement filter P4RFWB, part #W10291030. 2011 suggested retail price of $49.99 U.S.A./$59.99 Canada. Flow = 0.5 gpm (1.9 Lpm). When the water filter status display changes from yellow to red...
... reduction of the substances listed below. Style 1 - Press FILTER to the "Warranty" section for water leaving the system, as advertised. ■ Use replacement filter P4RFWB, part #W10291030. 2011 suggested retail price of $49.99 U.S.A./$59.99 Canada. Flow = 0.5 gpm (1.9 Lpm). When the water filter status display changes from yellow to red...

Use & Care Guide
Page 19
...of your product or you would like to parts or systems resulting from warranty coverage. 4. Repairs to schedule service, you also may have been removed, altered or cannot be provided by an authorized Whirlpool servicer is used for product service if your ...according to instructions attached to or furnished with the product, Whirlpool Corporation or Whirlpool Canada LP (hereafter "Whirlpool") will pay for Factory Specified Parts and repair labor to correct defects in a remote area where service by a Whirlpool designated service company. Mississauga, Ontario L5N 0B7 Please include...
...of your product or you would like to parts or systems resulting from warranty coverage. 4. Repairs to schedule service, you also may have been removed, altered or cannot be provided by an authorized Whirlpool servicer is used for product service if your ...according to instructions attached to or furnished with the product, Whirlpool Corporation or Whirlpool Canada LP (hereafter "Whirlpool") will pay for Factory Specified Parts and repair labor to correct defects in a remote area where service by a Whirlpool designated service company. Mississauga, Ontario L5N 0B7 Please include...


