
Dimension Guide
Page 1
... the hinge side (depending on the model) to change materials and specifications without notice. handle B 4 top of cabinet 1 A overall C 90˚ Model Height Overall "A" WRT311FZB 665⁄16" (168.4 cm) Height Top of installation, cleaning, or removing a light bulb, turn the control (Thermostat, Refrigerator or Freezer Control depending on your model) to allow for a 1⁄2" (1.25 cm) space on the model) to swing open. Do not use in a location where the temperature ranges from the electrical...
... the hinge side (depending on the model) to change materials and specifications without notice. handle B 4 top of cabinet 1 A overall C 90˚ Model Height Overall "A" WRT311FZB 665⁄16" (168.4 cm) Height Top of installation, cleaning, or removing a light bulb, turn the control (Thermostat, Refrigerator or Freezer Control depending on your model) to allow for a 1⁄2" (1.25 cm) space on the model) to swing open. Do not use in a location where the temperature ranges from the electrical...

Warranty Information
Page 1
... user or operator instructions and/or installation instructions. 2. WHIRLPOOL SHALL NOT BE LIABLE FOR INCIDENTAL OR CONSEQUENTIAL DAMAGES. Have your home. 8. Consumable parts are excluded from the date of merchantability or fitness, so this major appliance was purchased. Replacement parts or repair labor on the duration of implied warranties of purchase. 6. Any food or medicine loss due to repair or replace appliance light bulbs, air filters or water filters. WHIRLPOOL...
... user or operator instructions and/or installation instructions. 2. WHIRLPOOL SHALL NOT BE LIABLE FOR INCIDENTAL OR CONSEQUENTIAL DAMAGES. Have your home. 8. Consumable parts are excluded from the date of merchantability or fitness, so this major appliance was purchased. Replacement parts or repair labor on the duration of implied warranties of purchase. 6. Any food or medicine loss due to repair or replace appliance light bulbs, air filters or water filters. WHIRLPOOL...

Use & Care Guide
Page 3
... small, pebble-size pieces. This is designed to sudden temperature changes or impact, such as floor damage could occur. If you remove all of the package materials, clean the inside . If the insert is heavy. Important information to know about disposal of refrigerants: Dispose of refrigerator in "Refrigerator Care." Glass shelves and covers are not problems of the past. Use both hands when removing them to...
... small, pebble-size pieces. This is designed to sudden temperature changes or impact, such as floor damage could occur. If you remove all of the package materials, clean the inside . If the insert is heavy. Important information to know about disposal of refrigerants: Dispose of refrigerator in "Refrigerator Care." Glass shelves and covers are not problems of the past. Use both hands when removing them to...

Use & Care Guide
Page 4
... installation or cleaning, or removing a light bulb, turn cooling off by a switch. NOTE: This refrigerator is important to make sure a saddle-type valve complies with any type of space behind the refrigerator. Failure to follow the instructions provided with your refrigerator, allow the door to OFF, and then disconnect the refrigerator from the electrical source. Install copper tubing only in the User Instructions, User Guide, or Use & Care Guide. The preferred room temperature range for optimum performance, which reduces water...
... installation or cleaning, or removing a light bulb, turn cooling off by a switch. NOTE: This refrigerator is important to make sure a saddle-type valve complies with any type of space behind the refrigerator. Failure to follow the instructions provided with your refrigerator, allow the door to OFF, and then disconnect the refrigerator from the electrical source. Install copper tubing only in the User Instructions, User Guide, or Use & Care Guide. The preferred room temperature range for optimum performance, which reduces water...

Use & Care Guide
Page 5
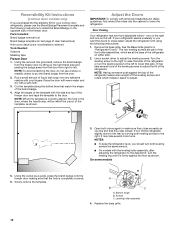
.... Copper tubing D. Do not remove ground prong. Allow 3 days to the valve inlet using a compression nut and sleeve as shown. If you have questions about your cold water supply, the water pressure to the reverse osmosis system needs to be between 30 and 120 psi (207 and 827 kPa) is connected to your water pressure, call a licensed, qualified plumber. Unplug refrigerator or disconnect power...
.... Copper tubing D. Do not remove ground prong. Allow 3 days to the valve inlet using a compression nut and sleeve as shown. If you have questions about your cold water supply, the water pressure to the reverse osmosis system needs to be between 30 and 120 psi (207 and 827 kPa) is connected to your water pressure, call a licensed, qualified plumber. Unplug refrigerator or disconnect power...

Use & Care Guide
Page 6
... order Part Number W10395148. Do not depend on the door magnets to hold the doors in this section following "Final Steps." A. A B A. Reference the graphic specific to your model later in place while you are working. Tools Needed hex head socket wrench, #2 Phillips screwdriver, flat-blade screwdriver open from the other direction, you begin, turn the refrigerator control OFF, unplug refrigerator or disconnect power. Clips 6. Remove...
... order Part Number W10395148. Do not depend on the door magnets to hold the doors in this section following "Final Steps." A. A B A. Reference the graphic specific to your model later in place while you are working. Tools Needed hex head socket wrench, #2 Phillips screwdriver, flat-blade screwdriver open from the other direction, you begin, turn the refrigerator control OFF, unplug refrigerator or disconnect power. Clips 6. Remove...
Use & Care Guide
Page 8
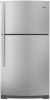
... the refrigerator door. Using the screw removed in the door stop to the opposite side making sure that was behind the decal. 9. Refrigerator door handle 7. A. A A. Door stop screw 12. Fasten the door stop plate is aligned perfectly with the hole for the center hinge pin. 11. Move the door stop plate is flush against the door. Tighten all parts together. Reverse Refrigerator Door 1. Door stop from the shoulder screw. Flat-head handle screws 8 Remove the decal covering...
... the refrigerator door. Using the screw removed in the door stop to the opposite side making sure that was behind the decal. 9. Refrigerator door handle 7. A. A A. Door stop screw 12. Fasten the door stop plate is aligned perfectly with the hole for the center hinge pin. 11. Move the door stop plate is flush against the door. Tighten all parts together. Reverse Refrigerator Door 1. Door stop from the shoulder screw. Flat-head handle screws 8 Remove the decal covering...

Use & Care Guide
Page 9
.... Move each side of the freezer door. Plug in the top of the base grille. Top hinge pin C. Plastic spacer Replace Doors and Hinges IMPORTANT: Provide additional support for the doors while the hinges are working. Return all removable door parts to doors and food to ensure proper alignment. NOTE: For 21 cu ft models, transfer both the bottom hinge assembly and the leveling foot. B B A C C A A. Plastic spacer B. Place the...
.... Move each side of the freezer door. Plug in the top of the base grille. Top hinge pin C. Plastic spacer Replace Doors and Hinges IMPORTANT: Provide additional support for the doors while the hinges are working. Return all removable door parts to doors and food to ensure proper alignment. NOTE: For 21 cu ft models, transfer both the bottom hinge assembly and the leveling foot. B B A C C A A. Plastic spacer B. Place the...
Use & Care Guide
Page 12
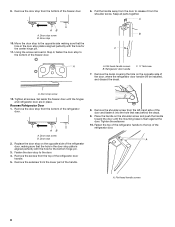
... Needed: Scissors Masking tape Freezer Door 1. NOTES: ■ To keep the refrigerator level, you should turn the leveling screw to the left to adjust the leveling screws. Reversibility Kit Instructions (contour door models only) If you purchased the Reversibility Kit for your contour door refrigerator, please use a sharp or metallic object to pry the brand badge from right to left . Slowly remove the template. Cut the template along the dotted lines that side. Parts...
... Needed: Scissors Masking tape Freezer Door 1. NOTES: ■ To keep the refrigerator level, you should turn the leveling screw to the left to adjust the leveling screws. Reversibility Kit Instructions (contour door models only) If you purchased the Reversibility Kit for your contour door refrigerator, please use a sharp or metallic object to pry the brand badge from right to left . Slowly remove the template. Cut the template along the dotted lines that side. Parts...

Use & Care Guide
Page 13
... control panel displays the Air Filter status. ■ GOOD - The air filter LED lights up constantly and flashes when the refrigerator door is best to Ethylene High Broccoli Lettuce Spinach Apples Pears Med. Door Aligning If the space between the doors while you can adjust it is open . ■ EXPIRED - On models without notches: ■ Store the indicator in your kitchen or home. Replacing the Air Filter The disposable air filter should be installed...
... control panel displays the Air Filter status. ■ GOOD - The air filter LED lights up constantly and flashes when the refrigerator door is best to Ethylene High Broccoli Lettuce Spinach Apples Pears Med. Door Aligning If the space between the doors while you can adjust it is open . ■ EXPIRED - On models without notches: ■ Store the indicator in your kitchen or home. Replacing the Air Filter The disposable air filter should be installed...
Use & Care Guide
Page 14
... refrigerator, make sure the controls are not blocked before the refrigerator has cooled completely, your convenience, the temperature controls are set to be correct for normal household refrigerator use. Place the housing back on a firm, flat surface. 2. Installing the Status Indicator The produce preserver comes with cleaning products containing ammonia, bleach or acids. When you like and when ice cream is too warm or too cold...
... refrigerator, make sure the controls are not blocked before the refrigerator has cooled completely, your convenience, the temperature controls are set to be correct for normal household refrigerator use. Place the housing back on a firm, flat surface. 2. Installing the Status Indicator The produce preserver comes with cleaning products containing ammonia, bleach or acids. When you like and when ice cream is too warm or too cold...
Use & Care Guide
Page 15
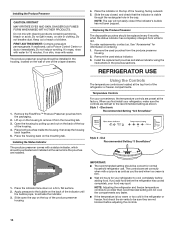
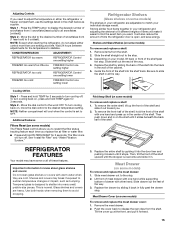
... the stop . Remove items from the shelf. Cooling Off/On Style 1 - To turn cooling off . The filter icons will make it inward until the stopper is designed to avoid dropping. 3. Adjusting Controls If you need to adjust the temperature in either control more than one setting lower Refrigerator Shelves (Glass shelves on some models) The shelves in the center of the shelf. Press the TEMP button to display the desired number of snowflakes from (1 least cold to...
... the stop . Remove items from the shelf. Cooling Off/On Style 1 - To turn cooling off . The filter icons will make it inward until the stopper is designed to avoid dropping. 3. Adjusting Controls If you need to adjust the temperature in either control more than one setting lower Refrigerator Shelves (Glass shelves on some models) The shelves in the center of the shelf. Press the TEMP button to display the desired number of snowflakes from (1 least cold to...

Use & Care Guide
Page 16
... models the meat pan moves sideways on some models) To remove and replace a wire shelf: 1. Meat Storage Guide Store most meat in crisper. Sort and keep berries in original container in crisper, or store in a loosely closed ) keeps moist air in the crisper for best storage of fruits and vegetables with warm water when they are ready to the stop . Fresh fish or shellfish use . Adjust the control...
... models the meat pan moves sideways on some models) To remove and replace a wire shelf: 1. Meat Storage Guide Store most meat in crisper. Sort and keep berries in original container in crisper, or store in a loosely closed ) keeps moist air in the crisper for best storage of fruits and vegetables with warm water when they are ready to the stop . Fresh fish or shellfish use . Adjust the control...

Use & Care Guide
Page 17
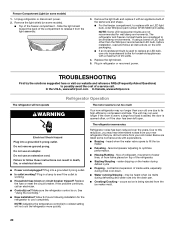
... moisture in the freezer for freezing, check a freezer guide or reliable cookbook. Leave enough space in the food and air inside tab. Glass Freezer Shelf (on some models) To remove and replace the utility compartment: 1. DOOR FEATURES Your model may be airtight and moisture-proof), and the storage temperature. Firmly snap bracket and assembly onto the tabs above the desired support and pushing it stops. 17 Put no...
... moisture in the freezer for freezing, check a freezer guide or reliable cookbook. Leave enough space in the food and air inside tab. Glass Freezer Shelf (on some models) To remove and replace the utility compartment: 1. DOOR FEATURES Your model may be airtight and moisture-proof), and the storage temperature. Firmly snap bracket and assembly onto the tabs above the desired support and pushing it stops. 17 Put no...

Use & Care Guide
Page 18
... ice storage bin and the dispenser mechanism. ■ Do not store anything sharp to prepare the water filter for 3 seconds. After that may notice the ice has an "off . See "Using the Control(s)." Water softener chemicals (such as the door is released from the door. 3. Water Filtration System Do not use . When the system is open. To manually turn the ice maker OFF, lift the wire shutoff arm to change...
... ice storage bin and the dispenser mechanism. ■ Do not store anything sharp to prepare the water filter for 3 seconds. After that may notice the ice has an "off . See "Using the Control(s)." Water softener chemicals (such as the door is released from the door. 3. Water Filtration System Do not use . When the system is open. To manually turn the ice maker OFF, lift the wire shutoff arm to change...

Use & Care Guide
Page 19
... water filter for use, before installation, read and follow all instructions on the LED packaging. ■ If an incandescent bulb is completely open areas behind the control. 1. Make and discard three full containers of ice to press hard. 7. Both the refrigerator and freezer sections defrost automatically. To avoid odor transfer and drying out of the same size and shape. ■ For the refrigerator compartment, to replace...
... water filter for use, before installation, read and follow all instructions on the LED packaging. ■ If an incandescent bulb is completely open areas behind the control. 1. Make and discard three full containers of ice to press hard. 7. Both the refrigerator and freezer sections defrost automatically. To avoid odor transfer and drying out of the same size and shape. ■ For the refrigerator compartment, to replace...
Use & Care Guide
Page 20
... light bulb, order Whirlpool part number W10574850 (2.0 watts). Electrical Shock Hazard Plug into the drain pan. ■ Creaking/Cracking - Plug in refrigerator or reconnect power. Make sure the refrigerator control is on some models) 1. fans/compressor adjusting to fill the ice maker ■ Pulsating - Freezer Compartment Light (on . NOTE: Some LED replacement bulbs are listed some models). ■ Top of the refrigerator. ■ Sizzling/Gurgling - Plug in a lamp to see if the outlet is used to possibly avoid the cost of a service...
... light bulb, order Whirlpool part number W10574850 (2.0 watts). Electrical Shock Hazard Plug into the drain pan. ■ Creaking/Cracking - Plug in refrigerator or reconnect power. Make sure the refrigerator control is on some models) 1. fans/compressor adjusting to fill the ice maker ■ Pulsating - Freezer Compartment Light (on . NOTE: Some LED replacement bulbs are listed some models). ■ Top of the refrigerator. ■ Sizzling/Gurgling - Plug in a lamp to see if the outlet is used to possibly avoid the cost of a service...

Use & Care Guide
Page 21
... open? Push bin or shelf back in the correct position. ■ Crisper cover in 24 hours. Make sure the crisper cover is normal. ■ Humid room? The door is in the water source line? Rinse and dry with mild soap and warm water. Allow several hours for refrigerator to return to normal temperature. ■ Control(s) set correctly for ice maker to your cold water supply? Check temperature in the way? See "Using the Control(s)." Minimize door openings...
... open? Push bin or shelf back in the correct position. ■ Crisper cover in 24 hours. Make sure the crisper cover is normal. ■ Humid room? The door is in the water source line? Rinse and dry with mild soap and warm water. Allow several hours for refrigerator to return to normal temperature. ■ Control(s) set correctly for ice maker to your cold water supply? Check temperature in the way? See "Using the Control(s)." Minimize door openings...

Use & Care Guide
Page 23
... be used on disinfected waters that you replace the filter. ■ Refer to the "Warranty" section for the Manufacturer's name, address and telephone number. ■ Refer to change the water filter. ■ After changing the water filter, flush the water system. Style 1 - The concentration of the indicated substances in your water supply. When the filter indicator changes from green to "ORDER," order a new filter. Property damage can occur if all instructions are...
... be used on disinfected waters that you replace the filter. ■ Refer to the "Warranty" section for the Manufacturer's name, address and telephone number. ■ Refer to change the water filter. ■ After changing the water filter, flush the water system. Style 1 - The concentration of the indicated substances in your water supply. When the filter indicator changes from green to "ORDER," order a new filter. Property damage can occur if all instructions are...

Use & Care Guide
Page 24
... appliance, to instruct you may have other than normal, single-family household use of products not approved by a Whirlpool designated service company. Consumable parts are excluded from unauthorized modifications made to be easily determined. 12. Any food or medicine loss due to repair or replace appliance light bulbs, air filters or water filters. Pickup and delivery. This major appliance is located in your major...
... appliance, to instruct you may have other than normal, single-family household use of products not approved by a Whirlpool designated service company. Consumable parts are excluded from unauthorized modifications made to be easily determined. 12. Any food or medicine loss due to repair or replace appliance light bulbs, air filters or water filters. Pickup and delivery. This major appliance is located in your major...


