

Warranty Information
Page 1
... for product service if your complete model number ready. Discoloration, rust, or oxidation of the refrigerator compartment. If outside the 50 United States and Canada, contact your authorized Whirlpool dealer to determine if another warranty applies. 6/08 For additional product information, in the U.S.A., visit...applies only when the major appliance is used in your model number and serial number on the label, located on how to refrigerator or freezer product failures. 7. In Canada, call 1-800-253-1301. Please keep these limitations and exclusions may not apply to...
... for product service if your complete model number ready. Discoloration, rust, or oxidation of the refrigerator compartment. If outside the 50 United States and Canada, contact your authorized Whirlpool dealer to determine if another warranty applies. 6/08 For additional product information, in the U.S.A., visit...applies only when the major appliance is used in your model number and serial number on the label, located on how to refrigerator or freezer product failures. 7. In Canada, call 1-800-253-1301. Please keep these limitations and exclusions may not apply to...

Use & Care Guide
Page 1
... visit our website at www.whirlpool.ca or call us at 1-800-253-1301. Table of Contents / Índice / Table des matières REFRIGERATOR SAFETY 1 INSTALLATION INSTRUCTIONS 2 REFRIGERATOR USE 10 REFRIGERATOR FEATURES 11 FREEZER FEATURES 12 DOOR FEATURES 13 REFRIGERATOR CARE 15 TROUBLESHOOTING 16 ACCESSORIES... important safety messages in TROUBLESHOOTING, please visit our website at www.whirlpool.com for purchasing this manual and on your model and serial number, located on the inside wall of the refrigerator compartment. This is , tell you how to potential hazards that ...
... visit our website at www.whirlpool.ca or call us at 1-800-253-1301. Table of Contents / Índice / Table des matières REFRIGERATOR SAFETY 1 INSTALLATION INSTRUCTIONS 2 REFRIGERATOR USE 10 REFRIGERATOR FEATURES 11 FREEZER FEATURES 12 DOOR FEATURES 13 REFRIGERATOR CARE 15 TROUBLESHOOTING 16 ACCESSORIES... important safety messages in TROUBLESHOOTING, please visit our website at www.whirlpool.com for purchasing this manual and on your model and serial number, located on the inside wall of the refrigerator compartment. This is , tell you how to potential hazards that ...

Use & Care Guide
Page 2
... hands when removing them to avoid dropping. 2 If you remove all parts and panels before operating. ■ Remove doors from your old refrigerator. ■ Use nonflammable cleaner. ■ Keep flammable materials and vapors, such as gasoline, away from the freezer and cause icicles to ... changes or impact, such as floor damage could occur. Tempered glass is removed, ice may not easily climb inside of your old refrigerator, please follow basic precautions, including the following: ■ Plug into many small, pebble-size pieces. IMPORTANT: Child entrapment and suffocation...
... hands when removing them to avoid dropping. 2 If you remove all parts and panels before operating. ■ Remove doors from your old refrigerator. ■ Use nonflammable cleaner. ■ Keep flammable materials and vapors, such as gasoline, away from the freezer and cause icicles to ... changes or impact, such as floor damage could occur. Tempered glass is removed, ice may not easily climb inside of your old refrigerator, please follow basic precautions, including the following: ■ Plug into many small, pebble-size pieces. IMPORTANT: Child entrapment and suffocation...

Use & Care Guide
Page 3
...(2.54 cm) of installation, cleaning, or removing a light bulb, turn the control (Thermostat, Refrigerator or Freezer Control depending on the model) to allow extra space at the top. Do not install the refrigerator in a location where the temperature will fall below 55°F (13°C). 1/2" (1.25 ... connection. Do not use an extension cord. NOTE: Before performing any type of space behind the refrigerator. See "Using the Controls." 2" (5.08 cm) 3 Before you move your refrigerator has an ice maker, allow the door to follow these instructions can result in death, fire, or...
...(2.54 cm) of installation, cleaning, or removing a light bulb, turn the control (Thermostat, Refrigerator or Freezer Control depending on the model) to allow extra space at the top. Do not install the refrigerator in a location where the temperature will fall below 55°F (13°C). 1/2" (1.25 ... connection. Do not use an extension cord. NOTE: Before performing any type of space behind the refrigerator. See "Using the Controls." 2" (5.08 cm) 3 Before you move your refrigerator has an ice maker, allow the door to follow these instructions can result in death, fire, or...

Use & Care Guide
Page 4
...valve, a union, and copper tubing. If you have questions about your water pressure, call a licensed, qualified plumber. Unplug refrigerator or disconnect power. 2. This will help avoid damage to the valve inlet using a compression nut and sleeve as it is less...blade screwdriver Nut driver and ¹⁄₂" Open-end or two adjustable wrenches Drill bit ■ Cordless drill NOTE: Your refrigerator dealer has a kit available with adjustable wrench. If you have questions about your water pressure, call a licensed, qualified plumber. ...
...valve, a union, and copper tubing. If you have questions about your water pressure, call a licensed, qualified plumber. Unplug refrigerator or disconnect power. 2. This will help avoid damage to the valve inlet using a compression nut and sleeve as it is less...blade screwdriver Nut driver and ¹⁄₂" Open-end or two adjustable wrenches Drill bit ■ Cordless drill NOTE: Your refrigerator dealer has a kit available with adjustable wrench. If you have questions about your water pressure, call a licensed, qualified plumber. ...

Use & Care Guide
Page 5
... of freezer door as shown in the Bottom Hinge graphic. Plug into a grounded 3 prong outlet. Discard the first three batches of the refrigerator. Remove the parts for the top hinge as shown in Graphic 3. 3. Remove the parts for the appropriate door style. ■ All ... 1-2. Allow 3 days to opposite side hinge holes as shown in place while you may have standard Style 1 or contour Style 2 doors. Refrigerator Doors TOOLS NEEDED hex head socket wrench, Torx®† T27 screwdriver, #2 Phillips screwdriver, flat-blade screwdriver open in the opposite direction,...
... of freezer door as shown in the Bottom Hinge graphic. Plug into a grounded 3 prong outlet. Discard the first three batches of the refrigerator. Remove the parts for the top hinge as shown in Graphic 3. 3. Remove the parts for the appropriate door style. ■ All ... 1-2. Allow 3 days to opposite side hinge holes as shown in place while you may have standard Style 1 or contour Style 2 doors. Refrigerator Doors TOOLS NEEDED hex head socket wrench, Torx®† T27 screwdriver, #2 Phillips screwdriver, flat-blade screwdriver open in the opposite direction,...

Use & Care Guide
Page 6
... Keep all screws. Move to opposite side as shown in place. Style 2-Contour Doors Your model may be reversed if door swing is installed on refrigerator. See Graphic 1-1. 2. Freezer Door 1. See Graphic 3. 2. Remove door hinge hole plug. NOTE: When you are recessed into the Door (on ...Tighten all screws. Replace the parts for the center hinge as shown. Tighten screws. Line up the doors so that it with the top of refrigerator door as shown in Graphic 5. 8. See Base Grille graphic. 2. See "Using the Controls." 5. 4. Move to hold the doors in place....
... Keep all screws. Move to opposite side as shown in place. Style 2-Contour Doors Your model may be reversed if door swing is installed on refrigerator. See Graphic 1-1. 2. Freezer Door 1. See Graphic 3. 2. Remove door hinge hole plug. NOTE: When you are recessed into the Door (on ...Tighten all screws. Replace the parts for the center hinge as shown. Tighten screws. Line up the doors so that it with the top of refrigerator door as shown in Graphic 5. 8. See Base Grille graphic. 2. See "Using the Controls." 5. 4. Move to hold the doors in place....
Use & Care Guide
Page 7
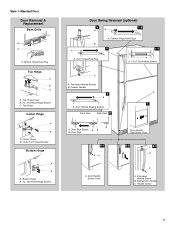
Bottom Hinge B Hex-Head Hinge Screws Door Swing Reversal (optional) 2 1-2 A A B A A. Top Hinge Center Hinge A B A. Door Stop 6-1 A A. Flat-Head Handle Screw B. Refrigerator Handle C. Door Hinge Hole Plug A. Freezer Handle 4 A 7 A. Door Handle Screw Cover Door Handle Seal Screw Front 6-2 A 6-3 B C A. Handle Screw 7 Cabinet Hinge Hole Plugs 3 1-1 A A A. 12-24 Torx&#...
Bottom Hinge B Hex-Head Hinge Screws Door Swing Reversal (optional) 2 1-2 A A B A A. Top Hinge Center Hinge A B A. Door Stop 6-1 A A. Flat-Head Handle Screw B. Refrigerator Handle C. Door Hinge Hole Plug A. Freezer Handle 4 A 7 A. Door Handle Screw Cover Door Handle Seal Screw Front 6-2 A 6-3 B C A. Handle Screw 7 Cabinet Hinge Hole Plugs 3 1-1 A A A. 12-24 Torx&#...

Use & Care Guide
Page 8
... Hinge Cover (Left Side) B Hex-Head Hinge Screws C. Hinge Pin 1-2 A A. Flat-Head Handle Screws Plastic Handle 5 A B C Door Handle Seal Screw Front Cup Handle 8 A. Top Hinge D. Refrigerator Handle C. ¹⁄₄" Setscrew A Front View Side View 6 A. Cup Handle 7 A A. Top Hinge Cover B Hex-Head Hinge Screws C. Center Hinge B. 12-24 Torx® Head...
... Hinge Cover (Left Side) B Hex-Head Hinge Screws C. Hinge Pin 1-2 A A. Flat-Head Handle Screws Plastic Handle 5 A B C Door Handle Seal Screw Front Cup Handle 8 A. Top Hinge D. Refrigerator Handle C. ¹⁄₄" Setscrew A Front View Side View 6 A. Cup Handle 7 A A. Top Hinge Cover B Hex-Head Hinge Screws C. Center Hinge B. 12-24 Torx® Head...

Use & Care Guide
Page 9
...Indicator The filter comes with a status indicator, which is already installed at the factory. Apply pressure to maintain a cleaner environment inside the refrigerator, or elsewhere in your kitchen or home. 9 On models with American Disabilities Act (ADA) guidelines, fully retract the rollers into the ...to the right to use. Air Filter Status Indicator (on some models) Style 1 - The air filter reduces the buildup of the refrigerator or turn both leveling screws to adjust the leveling screws. Pry off the leveling screws and rollers which must be installed behind the ...
...Indicator The filter comes with a status indicator, which is already installed at the factory. Apply pressure to maintain a cleaner environment inside the refrigerator, or elsewhere in your kitchen or home. 9 On models with American Disabilities Act (ADA) guidelines, fully retract the rollers into the ...to the right to use. Air Filter Status Indicator (on some models) Style 1 - The air filter reduces the buildup of the refrigerator or turn both leveling screws to adjust the leveling screws. Pry off the leveling screws and rollers which must be installed behind the ...

Use & Care Guide
Page 10
...and "Water Filtration System." 10 After replacing the air filter, press and hold FILTERS RESET for 3 seconds. When you first install your refrigerator, make sure the controls are not blocked before adjusting the controls. Style 1 - See "Using the Control(s)." Install the new air ...■ REPLACE - Remove the old air filter by squeezing in the previous sections. Remove the old status indicator. 3. NOTE: Adjusting the refrigerator and freezer temperature controls to 4 coldest). Move the dial to the desired number of snowflakes from (1 least cold to a colder than one...
...and "Water Filtration System." 10 After replacing the air filter, press and hold FILTERS RESET for 3 seconds. When you first install your refrigerator, make sure the controls are not blocked before adjusting the controls. Style 1 - See "Using the Control(s)." Install the new air ...■ REPLACE - Remove the old air filter by squeezing in the previous sections. Remove the old status indicator. 3. NOTE: Adjusting the refrigerator and freezer temperature controls to 4 coldest). Move the dial to the desired number of snowflakes from (1 least cold to a colder than one...

Use & Care Guide
Page 11
...rear clips onto the shelf. 5. Meat Drawer (on some models) To remove and replace the meat drawer: 1. Meat Drawer Cover (on some models) Refrigerator Shelves (Glass shelves on some models) The shelves in all of these features. Slide the shelf straight out to the stop . 2. Be sure to... and covers may have some models) To remove and replace a shelf: 1. Glass shelves and covers are cold. Shelves and Glass Shelves (on your refrigerator and adjusting the shelves to fit different heights of items will also reduce the amount of meat drawer with tight lids. Depending on some or...
...rear clips onto the shelf. 5. Meat Drawer (on some models) To remove and replace the meat drawer: 1. Meat Drawer Cover (on some models) Refrigerator Shelves (Glass shelves on some models) The shelves in all of these features. Slide the shelf straight out to the stop . 2. Be sure to... and covers may have some models) To remove and replace a shelf: 1. Glass shelves and covers are cold. Shelves and Glass Shelves (on your refrigerator and adjusting the shelves to fit different heights of items will also reduce the amount of meat drawer with tight lids. Depending on some or...

Use & Care Guide
Page 12
... by lifting the entire shelf slightly and moving it straight in plastic bag or crisper. Crisper Humidity Control (on a refrigerator shelf. ■ Vegetables with skins. ■ Fruit: Wash, let dry and store in refrigerator in . Place in plastic bag or plastic container and store in . Then, lower the right-hand end of...
... by lifting the entire shelf slightly and moving it straight in plastic bag or crisper. Crisper Humidity Control (on a refrigerator shelf. ■ Vegetables with skins. ■ Fruit: Wash, let dry and store in refrigerator in . Place in plastic bag or plastic container and store in . Then, lower the right-hand end of...

Use & Care Guide
Page 14
...spills. 4. Lower the arm on the ice maker to completely fill the ice container. ■ To increase ice production, lower the freezer and refrigerator temperature. After that may notice the ice has an "off . Press and hold the FILTERS RESET button for cyst reduction may be released and...off -taste." When the system is completely open the filter cover door. Wash the ice storage bin with a water filter, after connecting the refrigerator to a water source or replacing the water filter, fill and discard two full containers of the water supplied to break up or down. When...
...spills. 4. Lower the arm on the ice maker to completely fill the ice container. ■ To increase ice production, lower the freezer and refrigerator temperature. After that may notice the ice has an "off . Press and hold the FILTERS RESET button for cyst reduction may be released and...off -taste." When the system is completely open the filter cover door. Wash the ice storage bin with a water filter, after connecting the refrigerator to a water source or replacing the water filter, fill and discard two full containers of the water supplied to break up or down. When...

Use & Care Guide
Page 15
... both sections about once a month to the other harsh cleaning tools. 1. To help avoid corrosion of your stainless steel, keep your refrigerator. If you need for routine condenser cleaning in the direction of the same size and shape. 4. Plug in warm water. 3. Electronic...can result in on exterior surfaces (doors and cabinet), plastic parts, interior and door liners or gaskets. Failure to eliminate odors. Unplug refrigerator or disconnect power. 2. Hand wash, rinse, and dry removable parts and interior surfaces thoroughly. Stainless steel: Wash stainless steel surfaces ...
... both sections about once a month to the other harsh cleaning tools. 1. To help avoid corrosion of your stainless steel, keep your refrigerator. If you need for routine condenser cleaning in the direction of the same size and shape. 4. Plug in warm water. 3. Electronic...can result in on exterior surfaces (doors and cabinet), plastic parts, interior and door liners or gaskets. Failure to eliminate odors. Unplug refrigerator or disconnect power. 2. Hand wash, rinse, and dry removable parts and interior surfaces thoroughly. Stainless steel: Wash stainless steel surfaces ...

Use & Care Guide
Page 16
... warm ■ New installation? The motor seems to its high-efficiency compressor and fans. Allow 24 hours following installation for the refrigerator to cool completely. ■ Door opened often or left open ? Do not use an adapter. WARNING Explosion Hazard Use nonflammable ... will not close completely ■ Door blocked open? In the U.S.A., www.whirlpool.com In Canada, www.whirlpool.ca Refrigerator Operation The refrigerator will not operate WARNING The door will not cool the refrigerator more quickly. Minimize door openings and keep door fully closed . 16 Allows ...
... warm ■ New installation? The motor seems to its high-efficiency compressor and fans. Allow 24 hours following installation for the refrigerator to cool completely. ■ Door opened often or left open ? Do not use an adapter. WARNING Explosion Hazard Use nonflammable ... will not close completely ■ Door blocked open? In the U.S.A., www.whirlpool.com In Canada, www.whirlpool.ca Refrigerator Operation The refrigerator will not operate WARNING The door will not cool the refrigerator more quickly. Minimize door openings and keep door fully closed . 16 Allows ...

Use & Care Guide
Page 17
...Water Filter, Air Filter and Ethylene Filter Bundle Pack: Order Part # W10365758BL Reversibility Kit: Order Part # W10395148 WATER FILTER CERTIFICATIONS 17 Connect refrigerator to store food. ■ Are there minerals (such as sulfur) in the water source line? Remove ice from the ejector arm with ...from food? See "Water Supply Requirements." ■ Questions remain regarding water pressure? Discard ice. In the U.S.A., visit our webpage www.whirlpool.com/accessories or call 1-800-807-6777. This can reduce water flow. Allow 24 hours for your cold water supply? Turn the...
...Water Filter, Air Filter and Ethylene Filter Bundle Pack: Order Part # W10365758BL Reversibility Kit: Order Part # W10395148 WATER FILTER CERTIFICATIONS 17 Connect refrigerator to store food. ■ Are there minerals (such as sulfur) in the water source line? Remove ice from the ejector arm with ...from food? See "Water Supply Requirements." ■ Questions remain regarding water pressure? Discard ice. In the U.S.A., visit our webpage www.whirlpool.com/accessories or call 1-800-807-6777. This can reduce water flow. Allow 24 hours for your cold water supply? Turn the...

Use & Care Guide
Page 19
...in an inaccessible location or is operated and maintained according to instructions attached to or furnished with the product, Whirlpool Corporation or Whirlpool Canada LP (hereafter "Whirlpool") will pay for future reference. 19 The removal and reinstallation of your major appliance is located in a remote...whirlpool.com In Canada, visit www.whirlpool.ca If you do not allow limitations on major appliances with original model/serial numbers that vary from state to state or province to province. Proof of original purchase date is reported to you on the inside wall of the refrigerator...
...in an inaccessible location or is operated and maintained according to instructions attached to or furnished with the product, Whirlpool Corporation or Whirlpool Canada LP (hereafter "Whirlpool") will pay for future reference. 19 The removal and reinstallation of your major appliance is located in a remote...whirlpool.com In Canada, visit www.whirlpool.ca If you do not allow limitations on major appliances with original model/serial numbers that vary from state to state or province to province. Proof of original purchase date is reported to you on the inside wall of the refrigerator...

Dimension Guide
Page 1
... call a licensed, qualified plumber. LOCATION REQUIREMENTS PRODUCT DIMENSIONS G F cabinet E not incl. cm) Because Whirlpool Corporation policy includes a continuous commitment to improve Dimensions are installing your refrigerator next to a fixed wall, leave 2" (5.08 cm) minimum on the hinge side (depending on the ...model) to swing open. If you leave some extra space at least 1" (2.54 cm) between back of the refrigerator needs to be provided. handle D incl. handle B 4 top of cabinet 1 A overall C 90˚ Model WRT1L1TZY WRT311SFY WRT3L1SZY...
... call a licensed, qualified plumber. LOCATION REQUIREMENTS PRODUCT DIMENSIONS G F cabinet E not incl. cm) Because Whirlpool Corporation policy includes a continuous commitment to improve Dimensions are installing your refrigerator next to a fixed wall, leave 2" (5.08 cm) minimum on the hinge side (depending on the ...model) to swing open. If you leave some extra space at least 1" (2.54 cm) between back of the refrigerator needs to be provided. handle D incl. handle B 4 top of cabinet 1 A overall C 90˚ Model WRT1L1TZY WRT311SFY WRT3L1SZY...

Energy Guide
Page 1
... levels. For more information, visit www.ftc.gov/appliances. (P/N W10339566 Rev. Its energy performance meets or exceeds the Government of 10.65 cents per kWh. Refrigerator-Freezer • Automatic Defrost • Top-Mounted Freezer • Without Through-The-Door-Ice Service...
... levels. For more information, visit www.ftc.gov/appliances. (P/N W10339566 Rev. Its energy performance meets or exceeds the Government of 10.65 cents per kWh. Refrigerator-Freezer • Automatic Defrost • Top-Mounted Freezer • Without Through-The-Door-Ice Service...


