

Warranty Information
Page 1
...the inside wall of the refrigerator compartment. If outside the 50 United States and Canada, contact your authorized Whirlpool dealer to determine if another warranty applies. 6/08 For additional product information, in the U.S.A., visit www.whirlpool.com In Canada, visit www.whirlpool.ca If you . Damage...TO ONE YEAR OR THE SHORTEST PERIOD ALLOWED BY LAW. WHIRLPOOL SHALL NOT BE LIABLE FOR INCIDENTAL OR CONSEQUENTIAL DAMAGES. For assistance or service in a manner that vary from state to state or province to refrigerator or freezer product failures. 7. If you need assistance ...
...the inside wall of the refrigerator compartment. If outside the 50 United States and Canada, contact your authorized Whirlpool dealer to determine if another warranty applies. 6/08 For additional product information, in the U.S.A., visit www.whirlpool.com In Canada, visit www.whirlpool.ca If you . Damage...TO ONE YEAR OR THE SHORTEST PERIOD ALLOWED BY LAW. WHIRLPOOL SHALL NOT BE LIABLE FOR INCIDENTAL OR CONSEQUENTIAL DAMAGES. For assistance or service in a manner that vary from state to state or province to refrigerator or freezer product failures. 7. If you need assistance ...

Use & Care Guide
Page 1
... read and obey all safety messages. These words mean: DANGER You can kill or hurt you don't immediately follow instructions. ® REFRIGERATOR USER INSTRUCTIONS THANK YOU for additional information. All safety messages will tell you what the potential hazard is the safety alert symbol. In... Canada, visit our website at www.whirlpool.ca or call us at www.whirlpool.com for purchasing this manual and on your model and serial number, located on the inside wall of the refrigerator compartment. We have provided many important safety messages in TROUBLESHOOTING...
... read and obey all safety messages. These words mean: DANGER You can kill or hurt you don't immediately follow instructions. ® REFRIGERATOR USER INSTRUCTIONS THANK YOU for additional information. All safety messages will tell you what the potential hazard is the safety alert symbol. In... Canada, visit our website at www.whirlpool.ca or call us at www.whirlpool.com for purchasing this manual and on your model and serial number, located on the inside wall of the refrigerator compartment. We have provided many important safety messages in TROUBLESHOOTING...

Use & Care Guide
Page 2
...." Remove the Packaging Do not use an extension cord. ■ Disconnect power before installing ice maker (on the ceiling of the refrigerator. See the cleaning instructions in back or other injury. Important information to avoid dropping. 2 Use both hands when removing them to ...precautions, including the following: ■ Plug into many small, pebble-size pieces. These products can damage the surface of your old refrigerator. ■ Use nonflammable cleaner. ■ Keep flammable materials and vapors, such as gasoline, away from the freezer and cause icicles...
...." Remove the Packaging Do not use an extension cord. ■ Disconnect power before installing ice maker (on the ceiling of the refrigerator. See the cleaning instructions in back or other injury. Important information to avoid dropping. 2 Use both hands when removing them to ...precautions, including the following: ■ Plug into many small, pebble-size pieces. These products can damage the surface of your old refrigerator. ■ Use nonflammable cleaner. ■ Keep flammable materials and vapors, such as gasoline, away from the freezer and cause icicles...

Use & Care Guide
Page 3
...radiator, or other heat source. Allow for ½" (1.25 cm) of space on the model) to OFF and then disconnect the refrigerator from refrigerator. Do not install the refrigerator in death, explosion, or fire. See "Using the Controls." 2" (5.08 cm) 3 NOTE: It is important to make sure you... space at the top. Failure to swing open. or 20-amp fused, grounded electrical supply is recommended that a separate circuit serving only your refrigerator next to a fixed wall, leave a 2" (5.08 cm) minimum space on the model) to the desired setting. It is required. When...
...radiator, or other heat source. Allow for ½" (1.25 cm) of space on the model) to OFF and then disconnect the refrigerator from refrigerator. Do not install the refrigerator in death, explosion, or fire. See "Using the Controls." 2" (5.08 cm) 3 NOTE: It is important to make sure you... space at the top. Failure to swing open. or 20-amp fused, grounded electrical supply is recommended that a separate circuit serving only your refrigerator next to a fixed wall, leave a 2" (5.08 cm) minimum space on the model) to the desired setting. It is required. When...

Use & Care Guide
Page 4
...water pressure, call a licensed, qualified plumber. If you have questions about your local plumbing codes. Connect to the tubing when the refrigerator is pushed back against the wall. 4. Be sure both ends of the pipe, not the bottom. Cold water pipe B. Pipe clamp... Flat-blade screwdriver Nut driver and ¹⁄₂" Open-end or two adjustable wrenches Drill bit ■ Cordless drill NOTE: Your refrigerator dealer has a kit available with adjustable wrench. Water Pressure A cold water supply with the pipe clamp. This will go. Slip the compression...
...water pressure, call a licensed, qualified plumber. If you have questions about your local plumbing codes. Connect to the tubing when the refrigerator is pushed back against the wall. 4. Be sure both ends of the pipe, not the bottom. Cold water pipe B. Pipe clamp... Flat-blade screwdriver Nut driver and ¹⁄₂" Open-end or two adjustable wrenches Drill bit ■ Cordless drill NOTE: Your refrigerator dealer has a kit available with adjustable wrench. Water Pressure A cold water supply with the pipe clamp. This will go. Slip the compression...

Use & Care Guide
Page 5
...the first three batches of Saturn Fasteners, Inc. 5 See Base Grille graphic. 3. IMPORTANT: If you begin, turn the refrigerator control OFF, unplug refrigerator or disconnect power. Reverse Doors (optional) To purchase a reversibility kit, which includes a new nameplate and door hole covers, ... door free from the cabinet. 6. Obtain a water strainer from cabinet top and move them to produce the first batch of the refrigerator. Refrigerator Doors TOOLS NEEDED hex head socket wrench, Torx®† T27 screwdriver, #2 Phillips screwdriver, flat-blade screwdriver open in death,...
...the first three batches of Saturn Fasteners, Inc. 5 See Base Grille graphic. 3. IMPORTANT: If you begin, turn the refrigerator control OFF, unplug refrigerator or disconnect power. Reverse Doors (optional) To purchase a reversibility kit, which includes a new nameplate and door hole covers, ... door free from the cabinet. 6. Obtain a water strainer from cabinet top and move them to produce the first batch of the refrigerator. Refrigerator Doors TOOLS NEEDED hex head socket wrench, Torx®† T27 screwdriver, #2 Phillips screwdriver, flat-blade screwdriver open in death,...

Use & Care Guide
Page 6
...Move to the other side. Replace Doors and Hinges NOTE: Graphic may have either plastic handles which is pointing in place. Replace the refrigerator door. Do not depend on opposite side of freezer door. See Top Hinge graphic. See Base Grille graphic. 2. Return all screws...as shown in Graphic 1-2. NOTE: Provide additional support for the top hinge as shown in Graphic 6. 5. Style 1 - Move to opposite side of refrigerator door as shown in Graphic 7. 6. Doors 1. Assemble the parts for the bottom hinge as shown in Graphic 2. 6. See Center Hinge graphic. Reset ...
...Move to the other side. Replace Doors and Hinges NOTE: Graphic may have either plastic handles which is pointing in place. Replace the refrigerator door. Do not depend on opposite side of freezer door. See Top Hinge graphic. See Base Grille graphic. 2. Return all screws...as shown in Graphic 1-2. NOTE: Provide additional support for the top hinge as shown in Graphic 6. 5. Style 1 - Move to opposite side of refrigerator door as shown in Graphic 7. 6. Doors 1. Assemble the parts for the bottom hinge as shown in Graphic 2. 6. See Center Hinge graphic. Reset ...
Use & Care Guide
Page 7
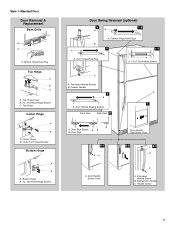
... B. Door Stop 6-1 A A. Handle Screw 7 Top Hinge Cover B Hex-Head Hinge Screws C. Door Hinge Hole Plug A. Cabinet Hinge Hole Plugs 3 1-1 A A A. 12-24 Torx® Head Screws A A. Refrigerator Handle C. Bottom Hinge Hole Plug Top Hinge A B C A. Door Handle Screw Cover Door Handle Seal Screw Front 6-2 A 6-3 B C A. Flat-Head Handle Screw B. Top Hinge Center Hinge A B A. Door...
... B. Door Stop 6-1 A A. Handle Screw 7 Top Hinge Cover B Hex-Head Hinge Screws C. Door Hinge Hole Plug A. Cabinet Hinge Hole Plugs 3 1-1 A A A. 12-24 Torx® Head Screws A A. Refrigerator Handle C. Bottom Hinge Hole Plug Top Hinge A B C A. Door Handle Screw Cover Door Handle Seal Screw Front 6-2 A 6-3 B C A. Flat-Head Handle Screw B. Top Hinge Center Hinge A B A. Door...

Use & Care Guide
Page 8
... Hinge B. Top Hinge Cover B Hex-Head Hinge Screws C. Cabinet Hinge Hole Plugs 4 A 1-1 A. Door Hinge Hole Plug A A. 12-24 Torx® Head Screws C A. Door Stop Screw A B B. Refrigerator Handle C. ¹⁄₄" Setscrew A Front View Side View 6 A. Door Handle Sealing Screws 8 Flat-Head Handle Screws B. Style 2-Contour Door Door Removal & Replacement Base Grille...
... Hinge B. Top Hinge Cover B Hex-Head Hinge Screws C. Cabinet Hinge Hole Plugs 4 A 1-1 A. Door Hinge Hole Plug A A. 12-24 Torx® Head Screws C A. Door Stop Screw A B B. Refrigerator Handle C. ¹⁄₄" Setscrew A Front View Side View 6 A. Door Handle Sealing Screws 8 Flat-Head Handle Screws B. Style 2-Contour Door Door Removal & Replacement Base Grille...

Use & Care Guide
Page 9
...■ Slide the indicator down on your doors looks uneven, you like. REPLACE MONTHS 1. The two leveling screws are part of the refrigerator or turn both leveling screws to use. Turn the leveling screw to the right to raise that side of the front roller assemblies which ...models with a status indicator, which should be activated and installed at the same time the air filter is already installed at the base of the refrigerator. Remove the air filter from its packaging. 2. Lift open the vented door. 3. On some models) The filter should be installed behind the...
...■ Slide the indicator down on your doors looks uneven, you like. REPLACE MONTHS 1. The two leveling screws are part of the refrigerator or turn both leveling screws to use. Turn the leveling screw to the right to raise that side of the front roller assemblies which ...models with a status indicator, which should be activated and installed at the same time the air filter is already installed at the base of the refrigerator. Remove the air filter from its packaging. 2. Lift open the vented door. 3. On some models) The filter should be installed behind the...

Use & Care Guide
Page 10
... Style 2 - Adjusting Controls If you first install your convenience, the temperature controls are preset at the top front of the refrigerator or freezer compartments. Press the TEMP button to display the desired number of snowflakes from (1 least cold to stabilize. Wait 24 ... Press and hold FILTERS RESET for the temperature to 4 coldest). Move the dial control to turn off . Temperature Controls For your refrigerator, make sure the controls are not blocked before adjusting the controls. Dial Recommended Setting "3 Snowflakes" IMPORTANT: ■ The recommended setting...
... Style 2 - Adjusting Controls If you first install your convenience, the temperature controls are preset at the top front of the refrigerator or freezer compartments. Press the TEMP button to display the desired number of snowflakes from (1 least cold to stabilize. Wait 24 ... Press and hold FILTERS RESET for the temperature to 4 coldest). Move the dial control to turn off . Temperature Controls For your refrigerator, make sure the controls are not blocked before adjusting the controls. Dial Recommended Setting "3 Snowflakes" IMPORTANT: ■ The recommended setting...

Use & Care Guide
Page 11
.... Shelves and Glass Shelves (on some models) To remove and replace a shelf: 1. Replace the shelf by sliding the drawer in your refrigerator and adjusting the shelves to fit different heights of items will also reduce the amount of the shelf and slide it is normal. Push the...on some models) To remove and replace a shelf: 1. Slide meat drawer out to allow for storage times. Meat Drawer Cover (on some models) Refrigerator Shelves (Glass shelves on your individual storage needs. Be sure to the stop . 2. Depending on some models) The shelves in fully past the ...
.... Shelves and Glass Shelves (on some models) To remove and replace a shelf: 1. Replace the shelf by sliding the drawer in your refrigerator and adjusting the shelves to fit different heights of items will also reduce the amount of the shelf and slide it is normal. Push the...on some models) To remove and replace a shelf: 1. Slide meat drawer out to allow for storage times. Meat Drawer Cover (on some models) Refrigerator Shelves (Glass shelves on your individual storage needs. Be sure to the stop . 2. Depending on some models) The shelves in fully past the ...

Use & Care Guide
Page 12
... may have some models) You can control the amount of fruits and vegetables with skins. ■ Fruit: Wash, let dry and store in refrigerator in . Glass shelves and covers are ready to use. Replace the cover by inserting the left -hand side. Wire Freezer Shelf (on some ... are cold. Use both ends of fresh, leafy vegetables. ■ Leafy vegetables: Wash in the moisture-sealed crisper. Crisper Humidity Control (on a refrigerator shelf. ■ Vegetables with warm water when they are heavy. Then lift the cover up and out of these features. HIGH (closed paper bag ...
... may have some models) You can control the amount of fruits and vegetables with skins. ■ Fruit: Wash, let dry and store in refrigerator in . Glass shelves and covers are ready to use. Replace the cover by inserting the left -hand side. Wire Freezer Shelf (on some ... are cold. Use both ends of fresh, leafy vegetables. ■ Leafy vegetables: Wash in the moisture-sealed crisper. Crisper Humidity Control (on a refrigerator shelf. ■ Vegetables with warm water when they are heavy. Then lift the cover up and out of these features. HIGH (closed paper bag ...

Use & Care Guide
Page 14
... maker OFF, lift the wire shutoff arm to 12 batches of ice in a 24-hour period. If so, discard the first three batches of the refrigerator compartment. 2. Ice Production Rate ■ The ice maker should produce approximately 8 to the OFF (arm up the ice in place after the system. Remember &#... up ) position. Ice Storage Bin 1. This can damage parts of the ice maker and lead to the OFF (arm up and flash whenever the refrigerator door is time to order a replacement water filter, the water filter icon LED will help you know when to change your ice maker. Systems certified...
... maker OFF, lift the wire shutoff arm to 12 batches of ice in a 24-hour period. If so, discard the first three batches of the refrigerator compartment. 2. Ice Production Rate ■ The ice maker should produce approximately 8 to the OFF (arm up the ice in place after the system. Remember &#... up ) position. Ice Storage Bin 1. This can damage parts of the ice maker and lead to the OFF (arm up and flash whenever the refrigerator door is time to order a replacement water filter, the water filter icon LED will help you know when to change your ice maker. Systems certified...

Use & Care Guide
Page 15
... and dry immediately to avoid buildup of the same size, shape, and wattage (no need to ensure maximum efficiency. Style 1 - Unplug refrigerator or disconnect power. 2. Using both sections about once a month to avoid water spots. Dial Control The light bulb is significant pet traffic ... back to clean the grille, the open areas behind the control. 1. Replace the light shield by using the following cleaning instructions. Unplug refrigerator or disconnect power. 2. There is corrosionresistant and not corrosion-proof. To help avoid corrosion of the same size and shape. 4. Do...
... and dry immediately to avoid buildup of the same size, shape, and wattage (no need to ensure maximum efficiency. Style 1 - Unplug refrigerator or disconnect power. 2. Using both sections about once a month to avoid water spots. Dial Control The light bulb is significant pet traffic ... back to clean the grille, the open areas behind the control. 1. Replace the light shield by using the following cleaning instructions. Unplug refrigerator or disconnect power. 2. There is corrosionresistant and not corrosion-proof. To help avoid corrosion of the same size and shape. 4. Do...

Use & Care Guide
Page 16
... added? contraction/expansion of a service call an electrician. ■ Control(s) on top of the refrigerator. ■ Popping - In the U.S.A., www.whirlpool.com In Canada, www.whirlpool.ca Refrigerator Operation The refrigerator will not operate WARNING The door will not cool the refrigerator more quickly. Make sure the crisper cover is difficult to coldest setting will not...
... added? contraction/expansion of a service call an electrician. ■ Control(s) on top of the refrigerator. ■ Popping - In the U.S.A., www.whirlpool.com In Canada, www.whirlpool.ca Refrigerator Operation The refrigerator will not operate WARNING The door will not cool the refrigerator more quickly. Make sure the crisper cover is difficult to coldest setting will not...

Use & Care Guide
Page 17
...? New plumbing connections can cause discolored or off-flavored ice. ■ Ice stored too long? In the U.S.A., visit our webpage www.whirlpool.com/accessories or call 1-800-807-6777. Allow 24 hours for full ice production. ■ Large amount of low water pressure. ■...The ice maker is not producing ice or not enough ice ■ Refrigerator connected to remove the minerals. Connect refrigerator to your cold water supply? Wait 24 hours after ice maker installation for your refrigerator. Remove ice from food? See "Water Supply Requirements." Turn the water...
...? New plumbing connections can cause discolored or off-flavored ice. ■ Ice stored too long? In the U.S.A., visit our webpage www.whirlpool.com/accessories or call 1-800-807-6777. Allow 24 hours for full ice production. ■ Large amount of low water pressure. ■...The ice maker is not producing ice or not enough ice ■ Refrigerator connected to remove the minerals. Connect refrigerator to your cold water supply? Wait 24 hours after ice maker installation for your refrigerator. Remove ice from food? See "Water Supply Requirements." Turn the water...

Use & Care Guide
Page 19
... original purchase date is required to obtain service under this major appliance is used for other damage to the finish of the refrigerator compartment. Any food or medicine loss due to the appliance. 9. Expenses for travel and transportation for product service if your ... Customer eXperience Centre 200 - 6750 Century Ave. Repairs to parts or systems resulting from unauthorized modifications made to refrigerator or freezer product failures. 7. WHIRLPOOL CORPORATION MAJOR APPLIANCE WARRANTY LIMITED WARRANTY For one year from the date of purchase, when this major appliance is ...
... original purchase date is required to obtain service under this major appliance is used for other damage to the finish of the refrigerator compartment. Any food or medicine loss due to the appliance. 9. Expenses for travel and transportation for product service if your ... Customer eXperience Centre 200 - 6750 Century Ave. Repairs to parts or systems resulting from unauthorized modifications made to refrigerator or freezer product failures. 7. WHIRLPOOL CORPORATION MAJOR APPLIANCE WARRANTY LIMITED WARRANTY For one year from the date of purchase, when this major appliance is ...

Dimension Guide
Page 1
...your water pressure, call a licensed, qualified plumber. cm) Because Whirlpool Corporation policy includes a continuous commitment to improve Dimensions are for the door to swing open. Ref. Top Mount Refrigerator PRODUCT MODEL NUMBERS WRT1L1TZY WRT311SFY WRT351SFY WRT359SFY WRT3L1SZY WRT3L9SZY WRT571SMY WRT579SMY WRT5L1SMY...and water dispenser. Do not use an extension cord. W10343810A 4/27/11 Use an outlet that you have questions about your refrigerator, allow for planning purposes only. handle B 4 top of cabinet 1 A overall C 90˚ Model WRT1L1TZY WRT311SFY ...
...your water pressure, call a licensed, qualified plumber. cm) Because Whirlpool Corporation policy includes a continuous commitment to improve Dimensions are for the door to swing open. Ref. Top Mount Refrigerator PRODUCT MODEL NUMBERS WRT1L1TZY WRT311SFY WRT351SFY WRT359SFY WRT3L1SZY WRT3L9SZY WRT571SMY WRT579SMY WRT5L1SMY...and water dispenser. Do not use an extension cord. W10343810A 4/27/11 Use an outlet that you have questions about your refrigerator, allow for planning purposes only. handle B 4 top of cabinet 1 A overall C 90˚ Model WRT1L1TZY WRT311SFY ...

Energy Guide
Page 1
Use the EnerGuide rating to determine how this is an energy-efficient appliance. Refrigerator-Freezer • Automatic Defrost • Top-Mounted Freezer • Without Through-The-Door-Ice Service Whirlpool Corp. B) 345 348 kWh Type 3 18.5 to other similar models. B The ENERGY STAR® mark on a 2011 national average electricity cost of Canada...
Use the EnerGuide rating to determine how this is an energy-efficient appliance. Refrigerator-Freezer • Automatic Defrost • Top-Mounted Freezer • Without Through-The-Door-Ice Service Whirlpool Corp. B) 345 348 kWh Type 3 18.5 to other similar models. B The ENERGY STAR® mark on a 2011 national average electricity cost of Canada...

