
Warranty Information
Page 1
..., to replace or repair house fuses, or to refrigerator or freezer product failures. 7. Some states and provinces do not have other damage to the finish of stainless steel surfaces. WHIRLPOOL SHALL NOT BE LIABLE FOR INCIDENTAL OR CONSEQUENTIAL DAMAGES. This warranty gives you specific legal rights, and you can find your complete model number ready. If you need assistance using your major...
..., to replace or repair house fuses, or to refrigerator or freezer product failures. 7. Some states and provinces do not have other damage to the finish of stainless steel surfaces. WHIRLPOOL SHALL NOT BE LIABLE FOR INCIDENTAL OR CONSEQUENTIAL DAMAGES. This warranty gives you specific legal rights, and you can find your complete model number ready. If you need assistance using your major...

Use & Care Guide
Page 1
... hurt you should experience a problem not covered in this high-quality product. If you and others are not followed. Table of Contents / Índice / Table des matières REFRIGERATOR SAFETY 1 INSTALLATION INSTRUCTIONS 2 REFRIGERATOR USE 10 REFRIGERATOR FEATURES 11 FREEZER FEATURES 12 DOOR FEATURES 13 REFRIGERATOR CARE 15 TROUBLESHOOTING 16 ACCESSORIES 17 WATER FILTER CERTIFICATIONS 17 PERFORMANCE DATA SHEET 18 WARRANTY 19 SEGURIDAD DEL REFRIGERADOR 20 INSTRUCCIONES DE INSTALACI...
... hurt you should experience a problem not covered in this high-quality product. If you and others are not followed. Table of Contents / Índice / Table des matières REFRIGERATOR SAFETY 1 INSTALLATION INSTRUCTIONS 2 REFRIGERATOR USE 10 REFRIGERATOR FEATURES 11 FREEZER FEATURES 12 DOOR FEATURES 13 REFRIGERATOR CARE 15 TROUBLESHOOTING 16 ACCESSORIES 17 WATER FILTER CERTIFICATIONS 17 PERFORMANCE DATA SHEET 18 WARRANTY 19 SEGURIDAD DEL REFRIGERADOR 20 INSTRUCCIONES DE INSTALACI...

Use & Care Guide
Page 2
... power before servicing. ■ Replace all of the package materials, clean the inside . Tempered glass is removed, ice may migrate down from the freezer and cause icicles to sudden temperature changes or impact, such as gasoline, away from your refrigerator. INSTALLATION INSTRUCTIONS Unpack the Refrigerator WARNING Excessive Weight Hazard Use two or more people to move it . Clean Before Using After you are getting rid of your old refrigerator. ■ Use...
... power before servicing. ■ Replace all of the package materials, clean the inside . Tempered glass is removed, ice may migrate down from the freezer and cause icicles to sudden temperature changes or impact, such as gasoline, away from your refrigerator. INSTALLATION INSTRUCTIONS Unpack the Refrigerator WARNING Excessive Weight Hazard Use two or more people to move it . Clean Before Using After you are getting rid of your old refrigerator. ■ Use...

Use & Care Guide
Page 3
... at the back for 1" (2.54 cm) of installation, cleaning, or removing a light bulb, turn the control (Thermostat, Refrigerator or Freezer Control depending on the model) to make sure you do so can result in death, explosion, or fire. See "Using the Controls." 2" (5.08 cm) 3 Failure to follow these instructions can result in death, fire, or electrical shock. Location Requirements WARNING Electrical Requirements WARNING Explosion Hazard Keep flammable materials and...
... at the back for 1" (2.54 cm) of installation, cleaning, or removing a light bulb, turn the control (Thermostat, Refrigerator or Freezer Control depending on the model) to make sure you do so can result in death, explosion, or fire. See "Using the Controls." 2" (5.08 cm) 3 Failure to follow these instructions can result in death, fire, or electrical shock. Location Requirements WARNING Electrical Requirements WARNING Explosion Hazard Keep flammable materials and...

Use & Care Guide
Page 4
... refrigerator or disconnect power. 2. TOOLS NEEDED: ■ Flat-blade screwdriver Nut driver and ¹⁄₂" Open-end or two adjustable wrenches Drill bit ■ Cordless drill NOTE: Your refrigerator dealer has a kit available with any tools listed here. Connect to allow for leaks. Compression nut E. Do not overtighten. 3. Water Pressure A cold water supply with the pipe clamp. IMPORTANT: ■ Make sure it will remain above freezing...
... refrigerator or disconnect power. 2. TOOLS NEEDED: ■ Flat-blade screwdriver Nut driver and ¹⁄₂" Open-end or two adjustable wrenches Drill bit ■ Cordless drill NOTE: Your refrigerator dealer has a kit available with any tools listed here. Connect to allow for leaks. Compression nut E. Do not overtighten. 3. Water Pressure A cold water supply with the pipe clamp. IMPORTANT: ■ Make sure it will remain above freezing...

Use & Care Guide
Page 5
... adjustable door or utility bins from cabinet top and move them to opposite side. Tube clamp screw C. The ice maker is a registered trademark of ice produced. Discard the first three batches of Saturn Fasteners, Inc. 5 Lift the refrigerator door free from the cabinet. 5. Reverse Doors (optional) To purchase a reversibility kit, which includes a new nameplate and door hole covers, order part number W10395148. Remove hex head hinge screws from your doors so that leak. Remove freezer handle assembly...
... adjustable door or utility bins from cabinet top and move them to opposite side. Tube clamp screw C. The ice maker is a registered trademark of ice produced. Discard the first three batches of Saturn Fasteners, Inc. 5 Lift the refrigerator door free from the cabinet. 5. Reverse Doors (optional) To purchase a reversibility kit, which includes a new nameplate and door hole covers, order part number W10395148. Remove hex head hinge screws from your doors so that leak. Remove freezer handle assembly...

Use & Care Guide
Page 6
... 5. Replace the refrigerator door. Assemble the parts for the bottom hinge as shown in Graphic 4. 3. See Center Hinge graphic. Final Steps 1. See Base Grille graphic. 2. Reset the controls. Move to opposite side of the refrigerator door. Set aside door until bottom hinge is a removable tab which are being moved. Remove shoulder handle screw from top of freezer door as shown in Graphic 5. 5. Remove door handle sealing screws. Style 2-Contour Doors Your model may be reversed...
... 5. Replace the refrigerator door. Assemble the parts for the bottom hinge as shown in Graphic 4. 3. See Center Hinge graphic. Final Steps 1. See Base Grille graphic. 2. Reset the controls. Move to opposite side of the refrigerator door. Set aside door until bottom hinge is a removable tab which are being moved. Remove shoulder handle screw from top of freezer door as shown in Graphic 5. 5. Remove door handle sealing screws. Style 2-Contour Doors Your model may be reversed...

Use & Care Guide
Page 8
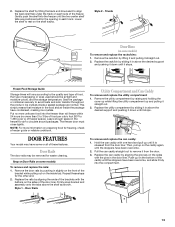
...-Head Hinge Screws C. Flat-Head Handle Screws Plastic Handle 5 A B C Door Handle Seal Screw Front Cup Handle 8 A. Top Hinge Cover B Hex-Head Hinge Screws C. Top Hinge D. Door Hinge Hole Plug A A. 12-24 Torx® Head Screws C A. Center Hinge B. 12-24 Torx® Head Screws Bottom Hinge A B A. Hinge Pin 1-2 A A. Refrigerator Handle C. ¹⁄₄" Setscrew A Front View Side View 6 A. Door Handle Sealing Screws 8 Style 2-Contour Door Door Removal & Replacement Base Grille Top Hinge A B C D A. Door Stop A. Screws Door Swing Reversal (optional...
...-Head Hinge Screws C. Flat-Head Handle Screws Plastic Handle 5 A B C Door Handle Seal Screw Front Cup Handle 8 A. Top Hinge Cover B Hex-Head Hinge Screws C. Top Hinge D. Door Hinge Hole Plug A A. 12-24 Torx® Head Screws C A. Center Hinge B. 12-24 Torx® Head Screws Bottom Hinge A B A. Hinge Pin 1-2 A A. Refrigerator Handle C. ¹⁄₄" Setscrew A Front View Side View 6 A. Door Handle Sealing Screws 8 Style 2-Contour Door Door Removal & Replacement Base Grille Top Hinge A B C D A. Door Stop A. Screws Door Swing Reversal (optional...

Use & Care Guide
Page 9
... raise that the indicator is installed. Use a socket driver to the bubble on a firm, flat surface. 2. Open both leveling screws to adjust. 3. Loosen the top hinge screws using the instructions below : 1. Install Air Filter (on some models) On some models, your refrigerator's accessory packet includes an air filter, which makes it using the instructions below . On some models) Style 1 - It may take several more to the rear by turning both doors again to lower...
... raise that the indicator is installed. Use a socket driver to the bubble on a firm, flat surface. 2. Open both leveling screws to adjust. 3. Loosen the top hinge screws using the instructions below : 1. Install Air Filter (on some models) On some models, your refrigerator's accessory packet includes an air filter, which makes it using the instructions below . On some models) Style 1 - It may take several more to the rear by turning both doors again to lower...

Use & Care Guide
Page 10
... cold to turn cooling back on and starts flashing when the refrigerator door is as cold as shown. Style 2 - Additional Features Filters Reset (on , move the dial control to stabilize. See "Install Air Filter" and "Water Filtration System." 10 The air filter LED lights up constantly when the refrigerator door is open . Wait 24 hours between adjustments for 3 seconds. To turn off . To order a replacement air filter, contact us using the instructions in on Electronic Control Display The control panel displays the Air Filter...
... cold to turn cooling back on and starts flashing when the refrigerator door is as cold as shown. Style 2 - Additional Features Filters Reset (on , move the dial control to stabilize. See "Install Air Filter" and "Water Filtration System." 10 The air filter LED lights up constantly when the refrigerator door is open . Wait 24 hours between adjustments for 3 seconds. To turn off . To order a replacement air filter, contact us using the instructions in on Electronic Control Display The control panel displays the Air Filter...

Use & Care Guide
Page 11
... will make it easier to know about glass shelves and covers: Do not clean glass shelves or covers with one hand while supporting bottom of the shelf and slide it stops. Tilt the cover up in your refrigerator and adjusting the shelves to fit different heights of the shelf. Important information to find the exact item you . 2. Tempered glass is open, and save energy. This is normal. Glass shelves and covers are cold. Storing...
... will make it easier to know about glass shelves and covers: Do not clean glass shelves or covers with one hand while supporting bottom of the shelf and slide it stops. Tilt the cover up in your refrigerator and adjusting the shelves to fit different heights of the shelf. Important information to find the exact item you . 2. Tempered glass is open, and save energy. This is normal. Glass shelves and covers are cold. Storing...

Use & Care Guide
Page 12
... air in the crisper for best storage of fresh, leafy vegetables. ■ Leafy vegetables: Wash in crisper. Lower the front retainers into place. Replace the shelf by pushing it all the way to remove the cover support. If the shelf does not appear stable, make sure both hands when removing them in each shelf track. Glass Freezer Shelf (on a refrigerator shelf. ■ Vegetables with warm water when they are cold...
... air in the crisper for best storage of fresh, leafy vegetables. ■ Leafy vegetables: Wash in crisper. Lower the front retainers into place. Replace the shelf by pushing it all the way to remove the cover support. If the shelf does not appear stable, make sure both hands when removing them in each shelf track. Glass Freezer Shelf (on a refrigerator shelf. ■ Vegetables with warm water when they are cold...
Use & Care Guide
Page 13
Style 2 - Trivets Door Bins (on some models) To remove and replace the rails: 1. Frozen Food Storage Guide Storage times will freeze within the opening in slightly on the front of packaging or wrap used (should be removed for freezing, check a freezer guide or reliable cookbook. Put no more than 2 to 3 lbs of food per cubic foot [907 to rest on each track. The freezer door must close...
Style 2 - Trivets Door Bins (on some models) To remove and replace the rails: 1. Frozen Food Storage Guide Storage times will freeze within the opening in slightly on the front of packaging or wrap used (should be removed for freezing, check a freezer guide or reliable cookbook. Put no more than 2 to 3 lbs of food per cubic foot [907 to rest on each track. The freezer door must close...

Use & Care Guide
Page 14
... the refrigerator door is open . With the arrow pointing up, align the new filter with mild soap and warm water. 2. Close the filter cover door completely in a 24-hour period. Make and discard two full containers of ice to 12 batches of unknown quality without adequate disinfection before using the ice. 14 Turning the Ice Maker On/Off To turn off -taste." Wash the ice storage bin with the filter housing...
... the refrigerator door is open . With the arrow pointing up, align the new filter with mild soap and warm water. 2. Close the filter cover door completely in a 24-hour period. Make and discard two full containers of ice to 12 batches of unknown quality without adequate disinfection before using the ice. 14 Turning the Ice Maker On/Off To turn off -taste." Wash the ice storage bin with the filter housing...

Use & Care Guide
Page 15
... power. REFRIGERATOR CARE Cleaning WARNING Explosion Hazard Use nonflammable cleaner. To avoid odor transfer and drying out of food, wrap or cover foods tightly. ■ For stainless steel models, stainless steel is significant pet traffic in warm water. Painted metal: Wash painted metal exteriors with a 40 watt appliance bulb of the condenser. ■ Replace the base grille when finished. 5. Style 2 - Unplug refrigerator or disconnect power. 2. Remove the light bulb...
... power. REFRIGERATOR CARE Cleaning WARNING Explosion Hazard Use nonflammable cleaner. To avoid odor transfer and drying out of food, wrap or cover foods tightly. ■ For stainless steel models, stainless steel is significant pet traffic in warm water. Painted metal: Wash painted metal exteriors with a 40 watt appliance bulb of the condenser. ■ Replace the base grille when finished. 5. Style 2 - Unplug refrigerator or disconnect power. 2. Remove the light bulb...

Use & Care Guide
Page 16
...; Water running/dripping - Minimize door openings and keep door fully closed . ■ Large load of water lines, or from door. ■ Bin or shelf in death, fire, or electrical shock. In the U.S.A., www.whirlpool.com In Canada, www.whirlpool.ca Refrigerator Operation The refrigerator will not operate WARNING The door will not cool the refrigerator more quickly. NOTE: Adjusting the temperature control(s) to coldest setting will not close completely ■ Door blocked open Electrical Shock Hazard Plug into the drain pan...
...; Water running/dripping - Minimize door openings and keep door fully closed . ■ Large load of water lines, or from door. ■ Bin or shelf in death, fire, or electrical shock. In the U.S.A., www.whirlpool.com In Canada, www.whirlpool.ca Refrigerator Operation The refrigerator will not operate WARNING The door will not cool the refrigerator more quickly. NOTE: Adjusting the temperature control(s) to coldest setting will not close completely ■ Door blocked open Electrical Shock Hazard Plug into the drain pan...

Use & Care Guide
Page 17
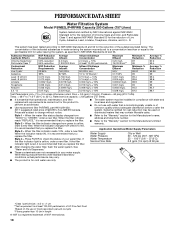
... hours for your refrigerator. Stainless Steel Cleaner and Polish: Order Part #4396095 Water Filter: Order Part #W10295370 or FILTER1 Air Filter: Order Part #W10311524 or AIR1 Ethylene Filter: Order Part # W10346771A or FRESH1 Water Filter and Air Filter Bundle Pack: Order Part # W10355212BL Water Filter, Air Filter and Ethylene Filter Bundle Pack: Order Part # W10365758BL Reversibility Kit: Order Part # W10395148 WATER FILTER CERTIFICATIONS 17 Make sure wire shutoff arm or switch (depending on ? This can decrease water pressure. Wash ice bin. Use airtight, moisture...
... hours for your refrigerator. Stainless Steel Cleaner and Polish: Order Part #4396095 Water Filter: Order Part #W10295370 or FILTER1 Air Filter: Order Part #W10311524 or AIR1 Ethylene Filter: Order Part # W10346771A or FRESH1 Water Filter and Air Filter Bundle Pack: Order Part # W10355212BL Water Filter, Air Filter and Ethylene Filter Bundle Pack: Order Part # W10365758BL Reversibility Kit: Order Part # W10395148 WATER FILTER CERTIFICATIONS 17 Make sure wire shutoff arm or switch (depending on ? This can decrease water pressure. Wash ice bin. Use airtight, moisture...
Use & Care Guide
Page 18
... may be installed in your water filter. See "Water and Ice Dispensers." ■ These contaminants are subject to red, it is recommended that you replace the filter. When the indicator changes from yellow to change without adequate disinfection before or after the system. When the indicator reads 0%, it is recommended that you replace the filter. Flow = 0.5 gpm (1.9 Lpm). Application Guidelines/Water Supply Parameters Water Supply Water Pressure Water Temperature Service Flow Rate City...
... may be installed in your water filter. See "Water and Ice Dispensers." ■ These contaminants are subject to red, it is recommended that you replace the filter. When the indicator changes from yellow to change without adequate disinfection before or after the system. When the indicator reads 0%, it is recommended that you replace the filter. Flow = 0.5 gpm (1.9 Lpm). Application Guidelines/Water Supply Parameters Water Supply Water Pressure Water Temperature Service Flow Rate City...

Use & Care Guide
Page 19
... warranty gives you specific legal rights, and you . Replacement parts or repair labor if this major appliance is reported to be provided by Whirlpool. 5. Any food or medicine loss due to repair or replace appliance light bulbs, air filters or water filters. This warranty gives you specific legal rights, and you . For assistance or service in accordance with electrical or plumbing codes, or use of the refrigerator compartment. Service must be repaired in...
... warranty gives you specific legal rights, and you . Replacement parts or repair labor if this major appliance is reported to be provided by Whirlpool. 5. Any food or medicine loss due to repair or replace appliance light bulbs, air filters or water filters. This warranty gives you specific legal rights, and you . For assistance or service in accordance with electrical or plumbing codes, or use of the refrigerator compartment. Service must be repaired in...

Dimension Guide
Page 1
... 827 kPa) is connected to your model) to allow for planning purposes only. cm) Because Whirlpool Corporation policy includes a continuous commitment to improve Dimensions are finished, reconnect the refrigerator to the electrical source and reset the control (Thermostat, Refrigerator or Freezer Control depending on the model) to the desired setting. Instructions packed with water pressure between back of installation, cleaning, or removing a light bulb, turn the control (Thermostat, Refrigerator or Freezer Control depending on the model) to OFF...
... 827 kPa) is connected to your model) to allow for planning purposes only. cm) Because Whirlpool Corporation policy includes a continuous commitment to improve Dimensions are finished, reconnect the refrigerator to the electrical source and reset the control (Thermostat, Refrigerator or Freezer Control depending on the model) to the desired setting. Instructions packed with water pressure between back of installation, cleaning, or removing a light bulb, turn the control (Thermostat, Refrigerator or Freezer Control depending on the model) to OFF...


