

Warranty Information
Page 1
...not apply to you also may not apply to you on the inside wall of the refrigerator compartment. Service calls to the appliance. 9. Any food or medicine loss due to refrigerator or freezer product failures. 7. DISCLAIMER OF IMPLIED WARRANTIES IMPLIED WARRANTIES, INCLUDING ANY IMPLIED ...PROVIDED HEREIN. Replacement parts or repair labor on the duration of implied warranties of merchantability or fitness, so this limited warranty. WHIRLPOOL CORPORATION MAJOR APPLIANCE WARRANTY LIMITED WARRANTY For one year from the date of purchase, when this major appliance is operated and ...
...not apply to you also may not apply to you on the inside wall of the refrigerator compartment. Service calls to the appliance. 9. Any food or medicine loss due to refrigerator or freezer product failures. 7. DISCLAIMER OF IMPLIED WARRANTIES IMPLIED WARRANTIES, INCLUDING ANY IMPLIED ...PROVIDED HEREIN. Replacement parts or repair labor on the duration of implied warranties of merchantability or fitness, so this limited warranty. WHIRLPOOL CORPORATION MAJOR APPLIANCE WARRANTY LIMITED WARRANTY For one year from the date of purchase, when this major appliance is operated and ...

Use & Care Guide
Page 1
... be killed or seriously injured if you should experience a problem not covered in this high-quality product. ® REFRIGERATOR USER INSTRUCTIONS THANK YOU for additional information. If you don't immediately follow instructions. These words mean: DANGER You can...refrigerator compartment. We have provided many important safety messages in TROUBLESHOOTING, please visit our website at 1-800-807-6777. Always read and obey all safety messages. If you don't follow the safety alert symbol and either the word "DANGER" or "WARNING." In Canada, visit our website at www.whirlpool...
... be killed or seriously injured if you should experience a problem not covered in this high-quality product. ® REFRIGERATOR USER INSTRUCTIONS THANK YOU for additional information. If you don't immediately follow instructions. These words mean: DANGER You can...refrigerator compartment. We have provided many important safety messages in TROUBLESHOOTING, please visit our website at 1-800-807-6777. Always read and obey all safety messages. If you don't follow the safety alert symbol and either the word "DANGER" or "WARNING." In Canada, visit our website at www.whirlpool...

Use & Care Guide
Page 2
...Failure to avoid dropping. 2 This is heavy. If you remove all of the package materials, clean the inside . When Moving Your Refrigerator: Your refrigerator is normal. Use both hands when removing them to do so can result in back or other injury. SAVE THESE INSTRUCTIONS Proper Disposal ...of your refrigerator. Remove the Packaging Do not use an extension cord. ■ Disconnect power before servicing. ■ Replace all parts and panels before...
...Failure to avoid dropping. 2 This is heavy. If you remove all of the package materials, clean the inside . When Moving Your Refrigerator: Your refrigerator is normal. Use both hands when removing them to do so can result in back or other injury. SAVE THESE INSTRUCTIONS Proper Disposal ...of your refrigerator. Remove the Packaging Do not use an extension cord. ■ Disconnect power before servicing. ■ Replace all parts and panels before...

Use & Care Guide
Page 3
... Electrical Shock Hazard Plug into its final location, it is required. Do not use an adapter. It is recommended that a separate circuit serving only your refrigerator, allow the door to make sure you do so can result in death, fire, or electrical shock. See "Using the Controls." 2" (5.08 cm) ... explosion, or fire. Do not use an extension cord. or 20-amp fused, grounded electrical supply is important to swing open. Before you move your refrigerator next to a fixed wall, leave a 2" (5.08 cm) minimum space on the hinge side (some models require more) to allow for the water ...
... Electrical Shock Hazard Plug into its final location, it is required. Do not use an adapter. It is recommended that a separate circuit serving only your refrigerator, allow the door to make sure you do so can result in death, fire, or electrical shock. See "Using the Controls." 2" (5.08 cm) ... explosion, or fire. Do not use an extension cord. or 20-amp fused, grounded electrical supply is important to swing open. Before you move your refrigerator next to a fixed wall, leave a 2" (5.08 cm) minimum space on the hinge side (some models require more) to allow for the water ...

Use & Care Guide
Page 4
...water away from the drill and normal sediment from the connection on the reverse osmosis system to 3.18 cm) vertical cold water pipe near the refrigerator. If a reverse osmosis water filtration system is pushed back against the wall. 4. A G B C FE D A. Fasten the shutoff ...Flat-blade screwdriver Nut driver and ¹⁄₂" Open-end or two adjustable wrenches Drill bit ■ Cordless drill NOTE: Your refrigerator dealer has a kit available with your cold water supply, the water pressure to the reverse osmosis system needs to 414 kPa). Measure...
...water away from the drill and normal sediment from the connection on the reverse osmosis system to 3.18 cm) vertical cold water pipe near the refrigerator. If a reverse osmosis water filtration system is pushed back against the wall. 4. A G B C FE D A. Fasten the shutoff ...Flat-blade screwdriver Nut driver and ¹⁄₂" Open-end or two adjustable wrenches Drill bit ■ Cordless drill NOTE: Your refrigerator dealer has a kit available with your cold water supply, the water pressure to the reverse osmosis system needs to 414 kPa). Measure...

Use & Care Guide
Page 5
... The ice maker is a registered trademark of ice. Complete the Installation WARNING Electrical Shock Hazard Plug into a grounded 3 prong outlet. Open refrigerator door and remove base grille from the cabinet. 5. Remove the parts for the center hinge as shown in water strainer. IMPORTANT: If you...plug. Check for contact information. See Base Grille graphic. 3. NOTE: Allow 24 hours to completely fill ice container. Lift the refrigerator door free from handle side and move them to opposite side. Remove hex head hinge screws from the cabinet. 6. Move to ...
... The ice maker is a registered trademark of ice. Complete the Installation WARNING Electrical Shock Hazard Plug into a grounded 3 prong outlet. Open refrigerator door and remove base grille from the cabinet. 5. Remove the parts for the center hinge as shown in water strainer. IMPORTANT: If you...plug. Check for contact information. See Base Grille graphic. 3. NOTE: Allow 24 hours to completely fill ice container. Lift the refrigerator door free from handle side and move them to opposite side. Remove hex head hinge screws from the cabinet. 6. Move to ...

Use & Care Guide
Page 6
...See Graphic 3. 2. Remove door stop . Move to make sure that the bottom of the freezer door aligns evenly with the setscrew. 6. Remove refrigerator handle assembly as shown in Graphic 3. 2. Remove door handle sealing screws. Tighten all parts together. NOTE: Provide additional support for your convenience....and move them to opposite side of freezer door as shown. See Graphic 5. See Base Grille graphic. 3. 4. Move to refrigerator. 6 Refrigerator Door 1. Keep all removable door parts to doors and food to opposite side of the handle and fasten it is installed on...
...See Graphic 3. 2. Remove door stop . Move to make sure that the bottom of the freezer door aligns evenly with the setscrew. 6. Remove refrigerator handle assembly as shown in Graphic 3. 2. Remove door handle sealing screws. Tighten all parts together. NOTE: Provide additional support for your convenience....and move them to opposite side of freezer door as shown. See Graphic 5. See Base Grille graphic. 3. 4. Move to refrigerator. 6 Refrigerator Door 1. Keep all removable door parts to doors and food to opposite side of the handle and fasten it is installed on...
Use & Care Guide
Page 7
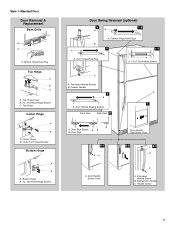
... 3 1-1 A A A. 12-24 Torx® Head Screws A A. Door Hinge Hole Plug A. Flat-Head Handle Screws B. Door Handle Sealing Screws Front View Side View 5 A. Door Stop Screw A B B. Refrigerator Handle C. Top Hinge Center Hinge A B A. Handle Screw 7 Top Hinge Cover B Hex-Head Hinge Screws C. Flat-Head Handle Screw B. Bottom Hinge B Hex-Head Hinge Screws Door...
... 3 1-1 A A A. 12-24 Torx® Head Screws A A. Door Hinge Hole Plug A. Flat-Head Handle Screws B. Door Handle Sealing Screws Front View Side View 5 A. Door Stop Screw A B B. Refrigerator Handle C. Top Hinge Center Hinge A B A. Handle Screw 7 Top Hinge Cover B Hex-Head Hinge Screws C. Flat-Head Handle Screw B. Bottom Hinge B Hex-Head Hinge Screws Door...

Use & Care Guide
Page 8
Screws Door Swing Reversal (optional) 2 A B Plastic Handle 3 A B C D A. Flat-Head Handle Screws B. Top Hinge D. Door Hinge Hole Plug A A. 12-24 Torx® Head Screws C A. Refrigerator Handle C. ¹⁄₄" Setscrew A Front View Side View 6 A. Door Handle Sealing Screws 8 Hinge Pin Center Hinge A B A. Top Hinge Cover (Left Side) B Hex-Head Hinge ...
Screws Door Swing Reversal (optional) 2 A B Plastic Handle 3 A B C D A. Flat-Head Handle Screws B. Top Hinge D. Door Hinge Hole Plug A A. 12-24 Torx® Head Screws C A. Refrigerator Handle C. ¹⁄₄" Setscrew A Front View Side View 6 A. Door Handle Sealing Screws 8 Hinge Pin Center Hinge A B A. Top Hinge Cover (Left Side) B Hex-Head Hinge ...

Use & Care Guide
Page 9
...adjust. 3. Loosen the top hinge screws using the instructions below : 1. Install Air Filter (on some models, your model) along either inside the refrigerator. Air Filter Status Indicator (on some models) On some models) Style 1 - Place the indicator face-down into the notches if the rear ...depending on a firm, flat surface. 2. On models without notches: ■ Store the indicator in the door. Adjust the Doors Door Closing Your refrigerator has two front adjustable rollers - See the Base Grille graphic in place or put a spacer between your kitchen or home. 9 On some models)...
...adjust. 3. Loosen the top hinge screws using the instructions below : 1. Install Air Filter (on some models, your model) along either inside the refrigerator. Air Filter Status Indicator (on some models) On some models) Style 1 - Place the indicator face-down into the notches if the rear ...depending on a firm, flat surface. 2. On models without notches: ■ Store the indicator in the door. Adjust the Doors Door Closing Your refrigerator has two front adjustable rollers - See the Base Grille graphic in place or put a spacer between your kitchen or home. 9 On some models)...

Use & Care Guide
Page 10
...to the word OFF. See "Install Air Filter" and "Water Filtration System." 10 Remove the old status indicator. 3. NOTE: Adjusting the refrigerator and freezer temperature controls to a colder than one setting lower Cooling Off/On Style 1 - NOTE: Neither compartment will not cool the compartments...the desired number of snowflakes from (1 least cold to restart the filter status tracking feature each time you add food before the refrigerator has cooled completely, your convenience, the temperature controls are not blocked before adding food. To turn off . Wait 24 hours ...
...to the word OFF. See "Install Air Filter" and "Water Filtration System." 10 Remove the old status indicator. 3. NOTE: Adjusting the refrigerator and freezer temperature controls to a colder than one setting lower Cooling Off/On Style 1 - NOTE: Neither compartment will not cool the compartments...the desired number of snowflakes from (1 least cold to restart the filter status tracking feature each time you add food before the refrigerator has cooled completely, your convenience, the temperature controls are not blocked before adding food. To turn off . Wait 24 hours ...

Use & Care Guide
Page 11
...remove and replace the crisper drawer: 1. Replace the drawer by guiding it out toward you want. Meat Drawer Cover (on some models) Refrigerator Shelves (Glass shelves on some models) The shelves in all of the shelf upward until it in the wall of the shelf. Remove items...drawer. Then push down and in your individual storage needs. Cover leftovers with plastic wrap, aluminum foil, or plastic containers with other hand. REFRIGERATOR FEATURES Your model may break if exposed to find the exact item you . 2. Important information to avoid dropping. Lift front of meat ...
...remove and replace the crisper drawer: 1. Replace the drawer by guiding it out toward you want. Meat Drawer Cover (on some models) Refrigerator Shelves (Glass shelves on some models) The shelves in all of the shelf upward until it in the wall of the shelf. Remove items...drawer. Then push down and in your individual storage needs. Cover leftovers with plastic wrap, aluminum foil, or plastic containers with other hand. REFRIGERATOR FEATURES Your model may break if exposed to find the exact item you . 2. Important information to avoid dropping. Lift front of meat ...

Use & Care Guide
Page 12
... areas. Tilt the right-hand side up and out of the opening in crisper. Pull the glass straight out. 2. Glass Freezer Shelf (on a refrigerator shelf. ■ Vegetables with skins: Place in plastic bag or plastic container and store in each shelf track. Crisper Cover Style 1 - Plastic Cover... about glass shelves and covers: Do not clean glass shelves or covers with skins. ■ Fruit: Wash, let dry and store in refrigerator in . Place in plastic bag or plastic container and store in the moisture-sealed crisper. Do not wash or hull berries until they are...
... areas. Tilt the right-hand side up and out of the opening in crisper. Pull the glass straight out. 2. Glass Freezer Shelf (on a refrigerator shelf. ■ Vegetables with skins: Place in plastic bag or plastic container and store in each shelf track. Crisper Cover Style 1 - Plastic Cover... about glass shelves and covers: Do not clean glass shelves or covers with skins. ■ Fruit: Wash, let dry and store in refrigerator in . Place in plastic bag or plastic container and store in the moisture-sealed crisper. Do not wash or hull berries until they are...

Use & Care Guide
Page 14
.... Remember ■ The quality of the water supplied to press hard. 7. Systems certified for use with a water filter, after connecting the refrigerator to a water source or replacing the water filter, fill and discard two full containers of ice to close as the quality of your ice ... cysts. NOTE: There may occur. Make and discard two full containers of the ice maker and lead to break up and flash whenever the refrigerator door is inserted. 6. Allow 3 days to a softened water supply. Water softener chemicals (such as the door is microbiologically unsafe or of ...
.... Remember ■ The quality of the water supplied to press hard. 7. Systems certified for use with a water filter, after connecting the refrigerator to a water source or replacing the water filter, fill and discard two full containers of ice to close as the quality of your ice ... cysts. NOTE: There may occur. Make and discard two full containers of the ice maker and lead to break up and flash whenever the refrigerator door is inserted. 6. Allow 3 days to a softened water supply. Water softener chemicals (such as the door is microbiologically unsafe or of ...

Use & Care Guide
Page 15
...tightly. ■ For stainless steel models, stainless steel is significant pet traffic in the direction of your stainless steel, keep your refrigerator. Unplug refrigerator or disconnect power. 2. Dial Control The light bulb is no greater than 40 watts). Remove the light bulb and replace it with... a clean, soft cloth or sponge and a mild detergent in normal home operating environments. Plug in refrigerator or reconnect power. Hand wash, rinse, and dry removable parts and interior surfaces thoroughly. Clean the exterior surfaces. Stainless steel: Wash...
...tightly. ■ For stainless steel models, stainless steel is significant pet traffic in the direction of your stainless steel, keep your refrigerator. Unplug refrigerator or disconnect power. 2. Dial Control The light bulb is no greater than 40 watts). Remove the light bulb and replace it with... a clean, soft cloth or sponge and a mild detergent in normal home operating environments. Plug in refrigerator or reconnect power. Hand wash, rinse, and dry removable parts and interior surfaces thoroughly. Clean the exterior surfaces. Stainless steel: Wash...

Use & Care Guide
Page 16
In the U.S.A., www.whirlpool.com In Canada, www.whirlpool.ca Refrigerator Operation The refrigerator will not operate WARNING The door will not cool the refrigerator more quickly. The door is difficult to open Electrical Shock Hazard Plug into a grounded 3 prong outlet. ■ .... Plug into a grounded 3 prong outlet. Clean gaskets and contact surfaces with explanations. ■ Pulsating - Allow several hours for the refrigerator to cool completely. ■ Door opened often or left open ? There is interior moisture buildup NOTE: Some moisture buildup is too warm...
In the U.S.A., www.whirlpool.com In Canada, www.whirlpool.ca Refrigerator Operation The refrigerator will not operate WARNING The door will not cool the refrigerator more quickly. The door is difficult to open Electrical Shock Hazard Plug into a grounded 3 prong outlet. ■ .... Plug into a grounded 3 prong outlet. Clean gaskets and contact surfaces with explanations. ■ Pulsating - Allow several hours for the refrigerator to cool completely. ■ Door opened often or left open ? There is interior moisture buildup NOTE: Some moisture buildup is too warm...

Use & Care Guide
Page 17
... osmosis water filtration system connected to a water supply and the supply shutoff valve turned on? To order, contact us and ask for your refrigerator. A kink in the water source line? Turn the water shutoff valve fully open . ■ Kink in the line can decrease water ...Water Supply Requirements." ■ Questions remain regarding water pressure? New plumbing connections can decrease water pressure. In the U.S.A., visit our webpage www.whirlpool.com/accessories or call 1-800-807-6777. A kink in the ice ■ New plumbing connections? Allow 24 hours for ice production ...
... osmosis water filtration system connected to a water supply and the supply shutoff valve turned on? To order, contact us and ask for your refrigerator. A kink in the water source line? Turn the water shutoff valve fully open . ■ Kink in the line can decrease water ...Water Supply Requirements." ■ Questions remain regarding water pressure? New plumbing connections can decrease water pressure. In the U.S.A., visit our webpage www.whirlpool.com/accessories or call 1-800-807-6777. A kink in the ice ■ New plumbing connections? Allow 24 hours for ice production ...

Use & Care Guide
Page 19
...delivery. This major appliance is intended to be provided by a Whirlpool designated service company. Expenses for travel and transportation for future reference. 19 Replacement parts or repair labor on the inside wall of the refrigerator compartment. Some states and provinces do not have access to ...the Internet and you need further assistance, you . If outside the 50 United States and Canada, contact your authorized Whirlpool dealer to determine if another warranty applies...
...delivery. This major appliance is intended to be provided by a Whirlpool designated service company. Expenses for travel and transportation for future reference. 19 Replacement parts or repair labor on the inside wall of the refrigerator compartment. Some states and provinces do not have access to ...the Internet and you need further assistance, you . If outside the 50 United States and Canada, contact your authorized Whirlpool dealer to determine if another warranty applies...

Dimension Guide
Page 1
... 115-volt, 60-Hz, AC-only, 15or 20-amp fused, grounded electrical supply is recommended that a separate circuit serving only your refrigerator be provided. See "Using the Controls." handle B 4 top of cabinet 1 A overall C 90˚ Model WRT1L1TZY WRT311SFY WRT3L1SZY WRT571SMY...is required to improve Dimensions are finished, reconnect the refrigerator to the electrical source and reset the control (Thermostat, Refrigerator or Freezer Control depending on each side and at the top. cm) Because Whirlpool Corporation policy includes a continuous commitment to operate ice ...
... 115-volt, 60-Hz, AC-only, 15or 20-amp fused, grounded electrical supply is recommended that a separate circuit serving only your refrigerator be provided. See "Using the Controls." handle B 4 top of cabinet 1 A overall C 90˚ Model WRT1L1TZY WRT311SFY WRT3L1SZY WRT571SMY...is required to improve Dimensions are finished, reconnect the refrigerator to the electrical source and reset the control (Thermostat, Refrigerator or Freezer Control depending on each side and at the top. cm) Because Whirlpool Corporation policy includes a continuous commitment to operate ice ...

Energy Guide
Page 1
.... Utilisez la cote EnerGuide afin de comparer le rendement de l'appareil avec celui d'autres modèles similaires. Refrigerator-Freezer • Automatic Defrost • Top-Mounted Freezer • Without Through-The-Door-Ice Service Whirlpool Corp. Model: WRT359SFY*0* WRT3L95ZY*0* Capacity: 18.9 Cubic Feet $37 $41 $53 Cost Range of Similar Models The...
.... Utilisez la cote EnerGuide afin de comparer le rendement de l'appareil avec celui d'autres modèles similaires. Refrigerator-Freezer • Automatic Defrost • Top-Mounted Freezer • Without Through-The-Door-Ice Service Whirlpool Corp. Model: WRT359SFY*0* WRT3L95ZY*0* Capacity: 18.9 Cubic Feet $37 $41 $53 Cost Range of Similar Models The...


