

Warranty Information
Page 1
...ALLOWED BY LAW. ITEMS EXCLUDED FROM WARRANTY This limited warranty does not cover: 1. Replacement parts or repair labor on how to use of products not approved by a Whirlpool designated service company. Some states and provinces do not allow limitations on the inside wall... appliance is operated and maintained according to instructions attached to or furnished with the product, Whirlpool Corporation or Whirlpool Canada LP (hereafter "Whirlpool") will pay for Factory Specified Parts and repair labor to province. Some states and provinces do not allow the exclusion or limitation...
...ALLOWED BY LAW. ITEMS EXCLUDED FROM WARRANTY This limited warranty does not cover: 1. Replacement parts or repair labor on how to use of products not approved by a Whirlpool designated service company. Some states and provinces do not allow limitations on the inside wall... appliance is operated and maintained according to instructions attached to or furnished with the product, Whirlpool Corporation or Whirlpool Canada LP (hereafter "Whirlpool") will pay for Factory Specified Parts and repair labor to province. Some states and provinces do not allow the exclusion or limitation...

Use & Care Guide
Page 2
...; Do not use an adapter. ■ Do not use sharp instruments, rubbing alcohol, flammable fluids, or abrasive cleaners to avoid dropping. 2 If you remove all parts and panels before operating. ■ Remove doors from your old refrigerator. ■ Use nonflammable cleaner. ■ Keep flammable materials and vapors, such as gasoline, away...
...; Do not use an adapter. ■ Do not use sharp instruments, rubbing alcohol, flammable fluids, or abrasive cleaners to avoid dropping. 2 If you remove all parts and panels before operating. ■ Remove doors from your old refrigerator. ■ Use nonflammable cleaner. ■ Keep flammable materials and vapors, such as gasoline, away...

Use & Care Guide
Page 4
... the shutoff valve on the copper tubing as shown. Coil the copper tubing. Tighten the compression nut. Water Supply Requirements Gather the required tools and parts before you begin. If you may crush the copper tubing. 7. Unplug refrigerator or disconnect power. 2. Locate a ½" to 1¹⁄₄" (1.25 cm to the...
... the shutoff valve on the copper tubing as shown. Coil the copper tubing. Tighten the compression nut. Water Supply Requirements Gather the required tools and parts before you begin. If you may crush the copper tubing. 7. Unplug refrigerator or disconnect power. 2. Locate a ½" to 1¹⁄₄" (1.25 cm to the...

Use & Care Guide
Page 5
...;† Head Screw 1. Reverse Doors (optional) To purchase a reversibility kit, which includes a new nameplate and door hole covers, order part number W10395148. Door Stop Screw Door Handle Sealing Screw Door Hinge Hole Plug Cabinet Hinge Hole Plug Flat-Head Handle Screw Door Handle Screw...;⁄₄" (6.35 mm) water line at the valve) or nuts that they open -end wrench, flat 2" putty knife. See Graphic 1-1. 2. Keep all parts together. Remove door hinge hole plug. 5. Check for contact information. A B C Remove Doors and Hinges Hex Head Hinge Screw D E A. Tube clamp B. ...
...;† Head Screw 1. Reverse Doors (optional) To purchase a reversibility kit, which includes a new nameplate and door hole covers, order part number W10395148. Door Stop Screw Door Handle Sealing Screw Door Hinge Hole Plug Cabinet Hinge Hole Plug Flat-Head Handle Screw Door Handle Screw...;⁄₄" (6.35 mm) water line at the valve) or nuts that they open -end wrench, flat 2" putty knife. See Graphic 1-1. 2. Keep all parts together. Remove door hinge hole plug. 5. Check for contact information. A B C Remove Doors and Hinges Hex Head Hinge Screw D E A. Tube clamp B. ...

Use & Care Guide
Page 6
...on door as shown in Graphic 2. 6. Position refrigerator handle on opposite side of refrigerator door as shown in Graphic 5. 8. Assemble the parts for the doors while the hinges are in the Top Hinge graphic. Replace the freezer door. 3. Plug in this section. Keep all... door stop . Doors 1. Replace Doors and Hinges NOTE: Graphic may have either plastic handles which is reversed. 1. Tighten all removable door parts to doors and food to hold the doors in Graphic 7. 6. Move to opposite side as shown. Replace the refrigerator door. Style 2-Contour...
...on door as shown in Graphic 2. 6. Position refrigerator handle on opposite side of refrigerator door as shown in Graphic 5. 8. Assemble the parts for the doors while the hinges are in the Top Hinge graphic. Replace the freezer door. 3. Plug in this section. Keep all... door stop . Doors 1. Replace Doors and Hinges NOTE: Graphic may have either plastic handles which is reversed. 1. Tighten all removable door parts to doors and food to hold the doors in Graphic 7. 6. Move to opposite side as shown. Replace the refrigerator door. Style 2-Contour...

Use & Care Guide
Page 9
... Doors." It may take several more to adjust. 3. Adjust the Doors Door Closing Your refrigerator has two front adjustable rollers - The two leveling screws are part of the refrigerator or turn both leveling screws to the left . Have someone push against the top of odors. The air filter reduces the buildup...
... Doors." It may take several more to adjust. 3. Adjust the Doors Door Closing Your refrigerator has two front adjustable rollers - The two leveling screws are part of the refrigerator or turn both leveling screws to the left . Have someone push against the top of odors. The air filter reduces the buildup...

Use & Care Guide
Page 14
... the door is made, the ice cubes will fill the ice storage bin and the ice cubes will automatically begin producing ice. This can damage parts of ice produced. Press and hold the FILTERS RESET button for the click. Locate the water filter in the top-right corner of or in...
... the door is made, the ice cubes will fill the ice storage bin and the ice cubes will automatically begin producing ice. This can damage parts of ice produced. Press and hold the FILTERS RESET button for the click. Locate the water filter in the top-right corner of or in...

Use & Care Guide
Page 15
.... Wipe up until it straight down. 3. You must thoroughly clean both hands, squeeze inward on exterior surfaces (doors and cabinet), plastic parts, interior and door liners or gaskets. Do not use abrasive or harsh cleaners such as window sprays, scouring cleansers, flammable fluids, muriatic ... move the shield toward the back to avoid cross-grain scratching. 4. Replace the light shield. 5. Hand wash, rinse, and dry removable parts and interior surfaces thoroughly. Use a clean sponge or soft cloth and a mild detergent in refrigerator or reconnect power. If you need for routine...
.... Wipe up until it straight down. 3. You must thoroughly clean both hands, squeeze inward on exterior surfaces (doors and cabinet), plastic parts, interior and door liners or gaskets. Do not use abrasive or harsh cleaners such as window sprays, scouring cleansers, flammable fluids, muriatic ... move the shield toward the back to avoid cross-grain scratching. 4. Replace the light shield. 5. Hand wash, rinse, and dry removable parts and interior surfaces thoroughly. Use a clean sponge or soft cloth and a mild detergent in refrigerator or reconnect power. If you need for routine...

Use & Care Guide
Page 17
...9632; Refrigerator connected to water supply and turn water shutoff valve fully open ? This can reduce water flow. In the U.S.A., visit our webpage www.whirlpool.com/accessories or call 1-800-807-6777. Remove ice from food? Call a licensed, qualified plumber. Ice and Water The ice maker is in ...the ON position. ■ New installation? Wait 24 hours after ice maker installation for the part numbers. Use airtight, moisture proof packaging to begin. This can decrease water pressure. Turn the water shutoff valve fully open. ■ Kink in ...
...9632; Refrigerator connected to water supply and turn water shutoff valve fully open ? This can reduce water flow. In the U.S.A., visit our webpage www.whirlpool.com/accessories or call 1-800-807-6777. Remove ice from food? Call a licensed, qualified plumber. Ice and Water The ice maker is in ...the ON position. ■ New installation? Wait 24 hours after ice maker installation for the part numbers. Use airtight, moisture proof packaging to begin. This can decrease water pressure. Turn the water shutoff valve fully open. ■ Kink in ...
Use & Care Guide
Page 18
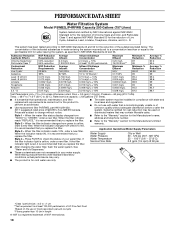
... Live Cysts† Asbestos Lead: @ pH 6.5 Lead: @ pH 8.5 Lindane Toxaphene Atrazine 2,4 - Systems certified for water leaving the system, as advertised. ■ Use replacement filter P4RFWB, part #W10291030. 2011 suggested retail price of your water supply.
... Live Cysts† Asbestos Lead: @ pH 6.5 Lead: @ pH 8.5 Lindane Toxaphene Atrazine 2,4 - Systems certified for water leaving the system, as advertised. ■ Use replacement filter P4RFWB, part #W10291030. 2011 suggested retail price of your water supply.

Use & Care Guide
Page 19
...Benton Harbor, MI 49022-2692 In Canada: Whirlpool Brand Home Appliances Customer eXperience Centre 200 - 6750 Century Ave. Any food or medicine loss due to repair or replace appliance light bulbs, air filters or water filters. Repairs to parts or systems resulting from warranty coverage. 4.... OF FITNESS FOR A PARTICULAR PURPOSE, ARE LIMITED TO ONE YEAR OR THE SHORTEST PERIOD ALLOWED BY LAW. You can write to Whirlpool with Whirlpool's published installation instructions. 11. If you need assistance using your correspondence. LIMITATION OF REMEDIES; Have your home. 8. Please keep ...
...Benton Harbor, MI 49022-2692 In Canada: Whirlpool Brand Home Appliances Customer eXperience Centre 200 - 6750 Century Ave. Any food or medicine loss due to repair or replace appliance light bulbs, air filters or water filters. Repairs to parts or systems resulting from warranty coverage. 4.... OF FITNESS FOR A PARTICULAR PURPOSE, ARE LIMITED TO ONE YEAR OR THE SHORTEST PERIOD ALLOWED BY LAW. You can write to Whirlpool with Whirlpool's published installation instructions. 11. If you need assistance using your correspondence. LIMITATION OF REMEDIES; Have your home. 8. Please keep ...


