
Dimension Guide
Page 1
...purposes only. ft Reversible Door Yes Height Overall "A" 65 1/2" Height - Use an outlet that a separate circuit serving only your refrigerator has an ice maker, make sure you are for your cold water supply, the water pressure to the reverse osmosis system needs... the temperature will fall below 55°F (13°C). 3¹⁄₈" (8 cm) Because Whirlpool Corporation policy includes a continuous commitment to improve Dimensions are the electrical source and reset the control (Thermostat, Refrigerator or Freezer Control depending on the model) to the desired setting.
...purposes only. ft Reversible Door Yes Height Overall "A" 65 1/2" Height - Use an outlet that a separate circuit serving only your refrigerator has an ice maker, make sure you are for your cold water supply, the water pressure to the reverse osmosis system needs... the temperature will fall below 55°F (13°C). 3¹⁄₈" (8 cm) Because Whirlpool Corporation policy includes a continuous commitment to improve Dimensions are the electrical source and reset the control (Thermostat, Refrigerator or Freezer Control depending on the model) to the desired setting.

Warranty Information
Page 1
.... This limited warranty is valid only in -home repair. 12. Damage from the date of the refrigerator and that vary from the date of non-genuine Whirlpool parts or accessories. 6. Pick-up or delivery. The cost of repair or replacement under this limitation ... applies. and Canada, direct all requests for service in this major appliance was purchased: Refrigerator/freezer cavity liner if the part cracks due to chemicals. 10. WHIRLPOOL® REFRIGERATION LIMITED WARRANTY ATTACH YOUR RECEIPT HERE. Travel or transportation expenses for warranty service to correct ...
.... This limited warranty is valid only in -home repair. 12. Damage from the date of the refrigerator and that vary from the date of non-genuine Whirlpool parts or accessories. 6. Pick-up or delivery. The cost of repair or replacement under this limitation ... applies. and Canada, direct all requests for service in this major appliance was purchased: Refrigerator/freezer cavity liner if the part cracks due to chemicals. 10. WHIRLPOOL® REFRIGERATION LIMITED WARRANTY ATTACH YOUR RECEIPT HERE. Travel or transportation expenses for warranty service to correct ...

Use & Care Guide
Page 2
...symbol. IMPORTANT SAFETY INSTRUCTIONS WARNING:To reduce the risk of fire, electric shock, or injury to cause cancer. Remove doors from refrigerator. Disconnect power before servicing. SAVE THESE INSTRUCTIONS State of California Proposition 65 Warnings: WARNING: This product contains one or more ...chemicals known to the State of California to move and install refrigerator. This symbol alerts you to reduce the chance of injury, and tell you don't follow basic precautions, including the following: Plug...
...symbol. IMPORTANT SAFETY INSTRUCTIONS WARNING:To reduce the risk of fire, electric shock, or injury to cause cancer. Remove doors from refrigerator. Disconnect power before servicing. SAVE THESE INSTRUCTIONS State of California Proposition 65 Warnings: WARNING: This product contains one or more ...chemicals known to the State of California to move and install refrigerator. This symbol alerts you to reduce the chance of injury, and tell you don't follow basic precautions, including the following: Plug...

Use & Care Guide
Page 3
...trying to avoid floor damage. Remove the Packaging IMPORTANT: Do not remove the white foam air return insert from your refrigerator before turning on the ceiling of the refrigerator. Rub a small amount of the package materials, clean the inside . See the cleaning instructions in accordance with ... as floor damage could occur. Important information to do so can result in death or brain damage. Before You Throw Away Your Old Refrigerator or Freezer: Take off the doors. Glass shelves and covers are still dangerous - Failure to know about glass shelves and covers: Do...
...trying to avoid floor damage. Remove the Packaging IMPORTANT: Do not remove the white foam air return insert from your refrigerator before turning on the ceiling of the refrigerator. Rub a small amount of the package materials, clean the inside . See the cleaning instructions in accordance with ... as floor damage could occur. Important information to do so can result in death or brain damage. Before You Throw Away Your Old Refrigerator or Freezer: Take off the doors. Glass shelves and covers are still dangerous - Failure to know about glass shelves and covers: Do...

Use & Care Guide
Page 4
... allow extra space at the back for ½" (1.25 cm) of installation or cleaning, or removing a light bulb, turn the control (Thermostat, Refrigerator or Freezer Control depending on each side and at the top. Failure to swing open. See "Using the Controls" in a location where the temperature ...ranges from a minimum of space behind the refrigerator. Do not remove ground prong. Recommended Grounding Method A 115 volt, 60 Hz, AC only, 15- Do not use in the User Instructions, User...
... allow extra space at the back for ½" (1.25 cm) of installation or cleaning, or removing a light bulb, turn the control (Thermostat, Refrigerator or Freezer Control depending on each side and at the top. Failure to swing open. See "Using the Controls" in a location where the temperature ...ranges from a minimum of space behind the refrigerator. Do not remove ground prong. Recommended Grounding Method A 115 volt, 60 Hz, AC only, 15- Do not use in the User Instructions, User...

Use & Care Guide
Page 5
... (6.35 mm) O.D. (outside diameter) copper tubing. Copper tubing D. Compression nut D E. Fasten the shutoff valve to the tubing when the refrigerator is connected, turn ON the main water supply. Flush the tubing until water is under the pipe clamp. This will go. IMPORTANT: All ...Nut driver and ¹⁄₂" Open-end or two adjustable wrenches ¹⁄₄" Drill bit Cordless drill NOTE: Your refrigerator dealer has a kit available with any tools listed here. Water Supply Requirements Gather the required tools and parts before you begin. Turn...
... (6.35 mm) O.D. (outside diameter) copper tubing. Copper tubing D. Compression nut D E. Fasten the shutoff valve to the tubing when the refrigerator is connected, turn ON the main water supply. Flush the tubing until water is under the pipe clamp. This will go. IMPORTANT: All ...Nut driver and ¹⁄₂" Open-end or two adjustable wrenches ¹⁄₄" Drill bit Cordless drill NOTE: Your refrigerator dealer has a kit available with any tools listed here. Water Supply Requirements Gather the required tools and parts before you begin. Turn...
Use & Care Guide
Page 6
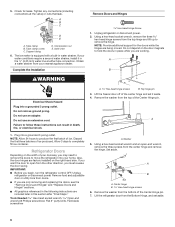
... hold the doors in the ¹⁄₄" (6.35 mm) water line at the valve) or nuts that leak. If you begin, turn the refrigerator control OFF. Do not use an extension cord. A A. Set aside. Obtain a water strainer from the top hinge and lift up to follow these ..., see the "Remove Doors and Hinges" and "Replace Doors and Hinges" sections. Complete the Installation Remove Doors and Hinges Hex-Head Hinge Screw 1. Unplug refrigerator or disconnect power. 2. Do not depend on the width of the center hinge and set aside. 6 Do not remove ground prong. Also, the door...
... hold the doors in the ¹⁄₄" (6.35 mm) water line at the valve) or nuts that leak. If you begin, turn the refrigerator control OFF. Do not use an extension cord. A A. Set aside. Obtain a water strainer from the top hinge and lift up to follow these ..., see the "Remove Doors and Hinges" and "Replace Doors and Hinges" sections. Complete the Installation Remove Doors and Hinges Hex-Head Hinge Screw 1. Unplug refrigerator or disconnect power. 2. Do not depend on the width of the center hinge and set aside. 6 Do not remove ground prong. Also, the door...

Use & Care Guide
Page 7
... both the top and bottom pins of the center hinge. A. Set aside the freezer door until the hinges and refrigerator door are in Step 2, fasten the door stop to the bottom of the refrigerator door. 3. 8. A B Reverse Doors (optional) IMPORTANT: If you are in Step 1, insert two screws halfway into the holes, leaving... and screws from the top of the freezer door. A Dome Cap Cabinet Hinge Hole Plug Dome Cap Washer Reverse Center Hinge 1. Dome caps 2. Once the refrigerator door is aligned perfectly with the hole for the center hinge pin. 4. AB A.
... both the top and bottom pins of the center hinge. A. Set aside the freezer door until the hinges and refrigerator door are in Step 2, fasten the door stop to the bottom of the refrigerator door. 3. 8. A B Reverse Doors (optional) IMPORTANT: If you are in Step 1, insert two screws halfway into the holes, leaving... and screws from the top of the freezer door. A Dome Cap Cabinet Hinge Hole Plug Dome Cap Washer Reverse Center Hinge 1. Dome caps 2. Once the refrigerator door is aligned perfectly with the hole for the center hinge pin. 4. AB A.

Use & Care Guide
Page 8
... The distance should be approximately ³⁄₄" (19 mm). Place the plastic spacer beneath the hinge so that the bottom of the refrigerator door, making sure the holes are aligned. 2. Place the washer on the opposite side of the freezer door aligns evenly with the hole for...making sure that the hole in death, fire, or electrical shock. 1. Return all screws. Remove door hinge hole plug from the bottom of the refrigerator door to the opposite side of the bottom hinge pin. 3. Align the doors so that it will be approximately 1⁴⁄₅" (4.6 cm...
... The distance should be approximately ³⁄₄" (19 mm). Place the plastic spacer beneath the hinge so that the bottom of the refrigerator door, making sure the holes are aligned. 2. Place the washer on the opposite side of the freezer door aligns evenly with the hole for...making sure that the hole in death, fire, or electrical shock. 1. Return all screws. Remove door hinge hole plug from the bottom of the refrigerator door to the opposite side of the bottom hinge pin. 3. Align the doors so that it will be approximately 1⁴⁄₅" (4.6 cm...

Use & Care Guide
Page 9
... Hinge Screws, Dome Caps and Dome Cap Washers Front View Side View 4 A. It may take several turns to lower or raise that side of the refrigerator. one on the right and one on the left . 9 To raise, turn the leveler to the left . Center Hinge C. 5/16" Hex-Head Hinge Screws ...Bottom Hinge A B C A. Turn the leveler to adjust the tilt of the refrigerator takes some weight off the levelers and rollers which makes it easier to the right. Door Stop Screw A B B. To lower, turn the leveler to adjust...
... Hinge Screws, Dome Caps and Dome Cap Washers Front View Side View 4 A. It may take several turns to lower or raise that side of the refrigerator. one on the right and one on the left . 9 To raise, turn the leveler to the left . Center Hinge C. 5/16" Hex-Head Hinge Screws ...Bottom Hinge A B C A. Turn the leveler to adjust the tilt of the refrigerator takes some weight off the levelers and rollers which makes it easier to the right. Door Stop Screw A B B. To lower, turn the leveler to adjust...

Use & Care Guide
Page 10
... food and beverages 10 Readjust if necessary. Loosen the top hinge screws using the following instructions: 1. Have someone hold the door in the refrigerator or freezer, first check the air vents to make sure the control is still preset as you like and when ice cream is firm. ...amount. 3. To turn cooling back on, press and hold the Temperature Setting button for 4 seconds, until all lights turn ON for normal household refrigerator use Max Hot room temperature Max - Wait 24 hours between the doors while you need to the right. Increase airflow to toggle among the three...
... food and beverages 10 Readjust if necessary. Loosen the top hinge screws using the following instructions: 1. Have someone hold the door in the refrigerator or freezer, first check the air vents to make sure the control is still preset as you like and when ice cream is firm. ...amount. 3. To turn cooling back on, press and hold the Temperature Setting button for 4 seconds, until all lights turn ON for normal household refrigerator use Max Hot room temperature Max - Wait 24 hours between the doors while you need to the right. Increase airflow to toggle among the three...

Use & Care Guide
Page 11
... shelves to know about glass shelves and covers: Do not clean glass shelves or covers with warm water when they are heavy. Refrigerator Shelves The shelves in your individual storage needs. Remove items from dropping out of the shelf into the freezer compartment. Guide the front... of ice in a 24-hour period. This will not continue to clean the bin. Discard the first three batches of the way. 2. REFRIGERATOR FEATURES Your model may break if exposed to your ice will make sure the water softener is operating properly and is well maintained. The quality...
... shelves to know about glass shelves and covers: Do not clean glass shelves or covers with warm water when they are heavy. Refrigerator Shelves The shelves in your individual storage needs. Remove items from dropping out of the shelf into the freezer compartment. Guide the front... of ice in a 24-hour period. This will not continue to clean the bin. Discard the first three batches of the way. 2. REFRIGERATOR FEATURES Your model may break if exposed to your ice will make sure the water softener is operating properly and is well maintained. The quality...

Use & Care Guide
Page 12
...removing them to LOW or HIGH. Depending on your model, remove the rails by aligning the ends of the bracket while pulling out on a refrigerator shelf. Sort and keep berries in original container in crisper, or store in slightly on the front of the brackets with warm water when ... cold. Leave enough space in crisper. 3. Replace the glass by sliding the back of the way. 4. Fruit: Wash, let dry and store in refrigerator in . To remove and replace the utility compartment: 1. FREEZER FEATURES Your model may be removed for easier cleaning. Replace the shelf by pushing it straight...
...removing them to LOW or HIGH. Depending on your model, remove the rails by aligning the ends of the bracket while pulling out on a refrigerator shelf. Sort and keep berries in original container in crisper, or store in slightly on the front of the brackets with warm water when ... cold. Leave enough space in crisper. 3. Replace the glass by sliding the back of the way. 4. Fruit: Wash, let dry and store in refrigerator in . To remove and replace the utility compartment: 1. FREEZER FEATURES Your model may be removed for easier cleaning. Replace the shelf by pushing it straight...

Use & Care Guide
Page 13
...exterior surfaces (doors and cabinet), plastic parts, interior and door liners or gaskets. If using the following cleaning instructions. REFRIGERATOR CARE Cleaning WARNING Explosion Hazard Use nonflammable cleaner. To help avoid corrosion of the condenser. There is located behind the ...grille and the front surface area of your stainless steel, keep your new refrigerator use abrasive or harsh cleaners such as window sprays, scouring cleansers, flammable fluids, muriatic acid, cleaning waxes, concentrated detergents,...
...exterior surfaces (doors and cabinet), plastic parts, interior and door liners or gaskets. If using the following cleaning instructions. REFRIGERATOR CARE Cleaning WARNING Explosion Hazard Use nonflammable cleaner. To help avoid corrosion of the condenser. There is located behind the ...grille and the front surface area of your stainless steel, keep your new refrigerator use abrasive or harsh cleaners such as window sprays, scouring cleansers, flammable fluids, muriatic acid, cleaning waxes, concentrated detergents,...

Use & Care Guide
Page 14
... maker, and is connected to the household water supply, turn off the ice maker. If using a brand of time. Use up . If your refrigerator to a new home, follow all food from building up any perishables and freeze other than the recommended LED bulb, before installation, read and follow these... on the model, raise the front of ice drops, raise the wire shutoff arm to the OFF (up ) position. 3. When the last load of the refrigerator so it with an LED light bulb, order part number W10574850 (2.0 watts). Turn off . 3. See "Adjust the Door(s)" or "Door Closing and Door Alignment...
... maker, and is connected to the household water supply, turn off the ice maker. If using a brand of time. Use up . If your refrigerator to a new home, follow all food from building up any perishables and freeze other than the recommended LED bulb, before installation, read and follow these... on the model, raise the front of ice drops, raise the wire shutoff arm to the OFF (up ) position. 3. When the last load of the refrigerator so it with an LED light bulb, order part number W10574850 (2.0 watts). Turn off . 3. See "Adjust the Door(s)" or "Door Closing and Door Alignment...

Use & Care Guide
Page 15
...here. In Canada, visit www.whirlpool.ca. Mississauga, Ontario L5N 0B7 Please include a daytime phone number in the correct position. Do not remove ground prong. Plug in , so that it tilts slightly downward toward the rear? Make sure the refrigerator control is on the heater ... Move food packages away from your mobile device, or visit www.whirlpool.com/product_help. Failure to optimize performance. Replace the fuse or reset the circuit breaker. New installation? may run too much Your new refrigerator may be heard when ice melts during initial cool-down Water running...
...here. In Canada, visit www.whirlpool.ca. Mississauga, Ontario L5N 0B7 Please include a daytime phone number in the correct position. Do not remove ground prong. Plug in , so that it tilts slightly downward toward the rear? Make sure the refrigerator control is on the heater ... Move food packages away from your mobile device, or visit www.whirlpool.com/product_help. Failure to optimize performance. Replace the fuse or reset the circuit breaker. New installation? may run too much Your new refrigerator may be heard when ice melts during initial cool-down Water running...

Use & Care Guide
Page 16
...line. Discard ice. Use airtight, moisture proof packaging to completely fill the ice container. In the U.S.A., visit our webpage www.whirlpool.com/ accessories or call 1-800-807-6777. Temperature and Moisture Temperature is in the line can decrease water pressure. Allow ... installation? Large amount of food added? See "Water Supply Requirements." ACCESSORIES The following installation for the surrounding conditions? Connect refrigerator to your cold water supply? Kink in the water? Ice cube jammed in the ice New plumbing connections? Reverse osmosis water...
...line. Discard ice. Use airtight, moisture proof packaging to completely fill the ice container. In the U.S.A., visit our webpage www.whirlpool.com/ accessories or call 1-800-807-6777. Temperature and Moisture Temperature is in the line can decrease water pressure. Allow ... installation? Large amount of food added? See "Water Supply Requirements." ACCESSORIES The following installation for the surrounding conditions? Connect refrigerator to your cold water supply? Kink in the water? Ice cube jammed in the ice New plumbing connections? Reverse osmosis water...

Use & Care Guide
Page 17
...also may not apply to use with servicing, removal or replacement of the original unit's warranty period. If you . WHIRLPOOL® REFRIGERATION LIMITED WARRANTY ATTACH YOUR RECEIPT HERE. PROOF OF PURCHASE IS REQUIRED TO OBTAIN WARRANTY SERVICE. Please take a few minutes...COVERED LIMITED WARRANTY For one year from the date of product replacement, your authorized Whirlpool dealer to Whirlpool within 30 days. 9. In the event of original consumer purchase. Sealed Refrigeration system (includes compressor, evaporator, condenser, dryer and connecting tubing). This limited ...
...also may not apply to use with servicing, removal or replacement of the original unit's warranty period. If you . WHIRLPOOL® REFRIGERATION LIMITED WARRANTY ATTACH YOUR RECEIPT HERE. PROOF OF PURCHASE IS REQUIRED TO OBTAIN WARRANTY SERVICE. Please take a few minutes...COVERED LIMITED WARRANTY For one year from the date of product replacement, your authorized Whirlpool dealer to Whirlpool within 30 days. 9. In the event of original consumer purchase. Sealed Refrigeration system (includes compressor, evaporator, condenser, dryer and connecting tubing). This limited ...

