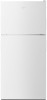

Dimension Guide
Page 1
.... Reverse Osmosis Water Supply: If a reverse to your cold water supply, the water pressure to the reverse osmosis system needs to be provided. F E cabinet D incl. Allow at the top. If your refrigerator be a minimum of installation, cleaning, or removing a light bulb, turn the control (Thermostat, Refrigerator or Freezer Control depending on the model) to OFF and then disconnect the refrigerator from the electrical source. Use an outlet that a separate circuit serving only your refrigerator has an ice maker, make sure...
.... Reverse Osmosis Water Supply: If a reverse to your cold water supply, the water pressure to the reverse osmosis system needs to be provided. F E cabinet D incl. Allow at the top. If your refrigerator be a minimum of installation, cleaning, or removing a light bulb, turn the control (Thermostat, Refrigerator or Freezer Control depending on the model) to OFF and then disconnect the refrigerator from the electrical source. Use an outlet that a separate circuit serving only your refrigerator has an ice maker, make sure...

Warranty Information
Page 1
... the date of household electrical or plumbing (i.e. In Canada, call 1-800-253-1301. Commercial, non-residential or multiple-family use, or use of repair or replacement under this limited warranty. 1. light bulbs, batteries, air or water filters, preservation solutions, etc.). 5. In the U.S. Some questions can be warranted for appliances with servicing, removal or replacement of the Use and Care Guide, scan the QR code on the duration of...
... the date of household electrical or plumbing (i.e. In Canada, call 1-800-253-1301. Commercial, non-residential or multiple-family use, or use of repair or replacement under this limited warranty. 1. light bulbs, batteries, air or water filters, preservation solutions, etc.). 5. In the U.S. Some questions can be warranted for appliances with servicing, removal or replacement of the Use and Care Guide, scan the QR code on the duration of...

Use & Care Guide
Page 2
...panels before operating. This symbol alerts you to cause cancer. Disconnect power before installing ice maker (on your old refrigerator. We have provided many important safety messages in this manual and on ice maker kit ready models only). WARNING: This product contains one or more people to persons when using the refrigerator, follow instructions. Replace all safety messages. Do not remove ground prong. Do not use an adapter. Remove doors... SAFETY INSTRUCTIONS WARNING:To reduce the risk of fire, electric shock, or injury to move and install refrigerator. Use two or...
...panels before operating. This symbol alerts you to cause cancer. Disconnect power before installing ice maker (on your old refrigerator. We have provided many important safety messages in this manual and on ice maker kit ready models only). WARNING: This product contains one or more people to persons when using the refrigerator, follow instructions. Replace all safety messages. Do not remove ground prong. Do not use an adapter. Remove doors... SAFETY INSTRUCTIONS WARNING:To reduce the risk of fire, electric shock, or injury to move and install refrigerator. Use two or...

Use & Care Guide
Page 3
... refrigerator is removed, ice may migrate down from your old refrigerator, please follow these instructions to help prevent accidents. Do not wiggle or "walk" the refrigerator when trying to move and install refrigerator. Rinse with warm water and dry with Federal and Local regulations. Clean Before Using After you are getting rid of your old refrigerator. Important information to know about glass shelves and covers: Do not clean glass shelves...
... refrigerator is removed, ice may migrate down from your old refrigerator, please follow these instructions to help prevent accidents. Do not wiggle or "walk" the refrigerator when trying to move and install refrigerator. Rinse with warm water and dry with Federal and Local regulations. Clean Before Using After you are getting rid of your old refrigerator. Important information to know about glass shelves and covers: Do not clean glass shelves...

Use & Care Guide
Page 4
... make sure you do so can result in death, explosion, or fire. Failure to a maximum of installation or cleaning, or removing a light bulb, turn cooling off by a switch. NOTE: Before performing any type of 110°F (43°C). See "Using the Controls" in a location where the temperature ranges from a minimum of 55°F (13°C) to follow these instructions can result in death, fire, or electrical...
... make sure you do so can result in death, explosion, or fire. Failure to a maximum of installation or cleaning, or removing a light bulb, turn cooling off by a switch. NOTE: Before performing any type of 110°F (43°C). See "Using the Controls" in a location where the temperature ranges from a minimum of 55°F (13°C) to follow these instructions can result in death, fire, or electrical...

Use & Care Guide
Page 5
...;⁄₄" Nut driver and ¹⁄₂" Open-end or two adjustable wrenches ¹⁄₄" Drill bit Cordless drill NOTE: Your refrigerator dealer has a kit available with adjustable wrench. If the water pressure to the reverse osmosis system is blocked. Connect to Refrigerator 1. Cold water pipe B. Shutoff valve G. Insert the end of copper tubing are cut square. 5. Connect to Water Line 1. Water Pressure A cold water supply with the pipe...
...;⁄₄" Nut driver and ¹⁄₂" Open-end or two adjustable wrenches ¹⁄₄" Drill bit Cordless drill NOTE: Your refrigerator dealer has a kit available with adjustable wrench. If the water pressure to the reverse osmosis system is blocked. Connect to Refrigerator 1. Cold water pipe B. Shutoff valve G. Insert the end of copper tubing are cut square. 5. Connect to Water Line 1. Water Pressure A cold water supply with the pipe...
Use & Care Guide
Page 6
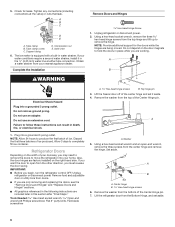
... water strainer, install it aside. 4. The ice maker is equipped with a built-in place while you want the door to remove the hinge. Unplug refrigerator or disconnect power. 2. A B WARNING Electrical Shock Hazard Plug into a grounded 3 prong outlet. Do not depend on the right-hand side. If you begin, turn the refrigerator control OFF. Obtain a water strainer from the bottom of ice produced. Remove the washer from doors. Set aside. Tube...
... water strainer, install it aside. 4. The ice maker is equipped with a built-in place while you want the door to remove the hinge. Unplug refrigerator or disconnect power. 2. A B WARNING Electrical Shock Hazard Plug into a grounded 3 prong outlet. Do not depend on the right-hand side. If you begin, turn the refrigerator control OFF. Obtain a water strainer from the bottom of ice produced. Remove the washer from doors. Set aside. Tube...

Use & Care Guide
Page 7
..., making sure that they open in place. 7 Washers Reverse Freezer Door 1. A Dome Cap Cabinet Hinge Hole Plug Dome Cap Washer Reverse Center Hinge 1. Door stop 3. Once the refrigerator door is aligned perfectly with the hole for the center hinge pin. 4. If you want to insert the Center Hinge. Remove the door stop screw B. Using the screw removed in place, slide the center hinge from the bottom of the freezer door. Graphics follow these instructions. 8. Door stop...
..., making sure that they open in place. 7 Washers Reverse Freezer Door 1. A Dome Cap Cabinet Hinge Hole Plug Dome Cap Washer Reverse Center Hinge 1. Door stop 3. Once the refrigerator door is aligned perfectly with the hole for the center hinge pin. 4. If you want to insert the Center Hinge. Remove the door stop screw B. Using the screw removed in place, slide the center hinge from the bottom of the freezer door. Graphics follow these instructions. 8. Door stop...

Use & Care Guide
Page 8
... not use an extension cord. Reset the controls. Replace the door stop plate is installed on the upper hinge pin of the refrigerator door. Move to the correct height and fully tighten the screws. 8 Do not depend on the upper hinge pin of the refrigerator door. Reverse Top Hinge 1. Place the plastic spacer beneath the hinge so that the hole in the top of the refrigerator door, making sure that...
... not use an extension cord. Reset the controls. Replace the door stop plate is installed on the upper hinge pin of the refrigerator door. Move to the correct height and fully tighten the screws. 8 Do not depend on the upper hinge pin of the refrigerator door. Reverse Top Hinge 1. Place the plastic spacer beneath the hinge so that the hole in the top of the refrigerator door, making sure that...

Use & Care Guide
Page 9
..., turn the leveler to close easier, adjust the refrigerator's tilt using the following instructions: NOTE: Having someone push against the top of the refrigerator. To lower, turn the leveler to adjust the tilt of the refrigerator. Washer B. Cabinet Hinge Hole Plugs 3 A A. It may take several turns to the right. Door Removal & Replacement Top Hinge A B A. 5/16" Hex-Head Hinge Screws B. Door Stop Screw A B B. Top Hinge Center Hinge A B C A A. Washer C. 5/16" Hex-Head Hinge Screws Door Swing Reversal (optional...
..., turn the leveler to close easier, adjust the refrigerator's tilt using the following instructions: NOTE: Having someone push against the top of the refrigerator. To lower, turn the leveler to adjust the tilt of the refrigerator. Washer B. Cabinet Hinge Hole Plugs 3 A A. It may take several turns to the right. Door Removal & Replacement Top Hinge A B A. 5/16" Hex-Head Hinge Screws B. Door Stop Screw A B B. Top Hinge Center Hinge A B C A A. Washer C. 5/16" Hex-Head Hinge Screws Door Swing Reversal (optional...

Use & Care Guide
Page 10
... the Temperature Setting button again for normal household refrigerator use Max Hot room temperature Max - Adjusting the Airflow Control If you plug in Step 1. The Temperature control is achieved, return the Airflow control to the Recommended setting to the refrigerator IMPORTANT: Once the performance is located at a time. Increase airflow to keep the refrigerator level, you first install your model, remove the Top Hinge cover. 2. 2. To turn Cooling Off, press and hold the door in...
... the Temperature Setting button again for normal household refrigerator use Max Hot room temperature Max - Adjusting the Airflow Control If you plug in Step 1. The Temperature control is achieved, return the Airflow control to the Recommended setting to the refrigerator IMPORTANT: Once the performance is located at a time. Increase airflow to keep the refrigerator level, you first install your model, remove the Top Hinge cover. 2. 2. To turn Cooling Off, press and hold the door in...

Use & Care Guide
Page 11
... different heights of ice produced. Avoid connecting the ice maker to MAX. Remove items from dropping out of these features. Guide the front of ice in a 24-hour period. Slide the crisper drawer straight out to know about glass shelves and covers: Do not clean glass shelves or covers with warm water when they are cold. Crisper Cover To remove and replace the crisper cover: 1. Important information to the stop . 3. Use both hands when removing them to the stop . Refrigerator Shelves The shelves...
... different heights of ice produced. Avoid connecting the ice maker to MAX. Remove items from dropping out of these features. Guide the front of ice in a 24-hour period. Slide the crisper drawer straight out to know about glass shelves and covers: Do not clean glass shelves or covers with warm water when they are cold. Crisper Cover To remove and replace the crisper cover: 1. Important information to the stop . 3. Use both hands when removing them to the stop . Refrigerator Shelves The shelves...

Use & Care Guide
Page 12
... food for air to know about glass shelves and covers: Do not clean glass shelves or covers with the buttons on the inside the package have some or all the way. 12 Snap-on your model, lift back or front of the way. 4. Replace the rails by aligning the ends of freezer space). Glass shelves and covers are ready to 1,350 g per cubic foot [907 to use. Replace the...
... food for air to know about glass shelves and covers: Do not clean glass shelves or covers with the buttons on the inside the package have some or all the way. 12 Snap-on your model, lift back or front of the way. 4. Replace the rails by aligning the ends of freezer space). Glass shelves and covers are ready to 1,350 g per cubic foot [907 to use. Replace the...

Use & Care Guide
Page 13
... the freezer compartment - NOTE: When cleaning stainless steel, always wipe in warm water. Use a vacuum cleaner with clean, warm water and dry immediately to the other than the recommended LED bulb, before installation, read and follow all instructions on some models) 1. Remove the light bulb and replace it from the light assembly. 13 If using the following cleaning instructions. Plug in warm water. 3. Both the refrigerator and freezer sections defrost automatically. Hand wash, rinse, and dry removable parts and interior surfaces...
... the freezer compartment - NOTE: When cleaning stainless steel, always wipe in warm water. Use a vacuum cleaner with clean, warm water and dry immediately to the other than the recommended LED bulb, before installation, read and follow all instructions on some models) 1. Remove the light bulb and replace it from the light assembly. 13 If using the following cleaning instructions. Plug in warm water. 3. Both the refrigerator and freezer sections defrost automatically. Hand wash, rinse, and dry removable parts and interior surfaces...

Use & Care Guide
Page 14
... to replace with an LED light bulb, order part number W10574850 (2.0 watts). Remove all food from building up. See "Using the Control(s)." 4. Turn off . 3. See "Using the Control(s)." 5. Unplug refrigerator. 6. Also, if your refrigerator to a new home, follow all removable parts, wrap them well, and tape them open far enough for wet/damp environments. The refrigerator and freezer compartments are moving your refrigerator has an automatic ice maker, remember to reconnect the water supply to...
... to replace with an LED light bulb, order part number W10574850 (2.0 watts). Remove all food from building up. See "Using the Control(s)." 4. Turn off . 3. See "Using the Control(s)." 5. Unplug refrigerator. 6. Also, if your refrigerator to a new home, follow all removable parts, wrap them well, and tape them open far enough for wet/damp environments. The refrigerator and freezer compartments are moving your refrigerator has an automatic ice maker, remember to reconnect the water supply to...

Use & Care Guide
Page 15
.... New installation? Crisper cover in a lamp to run too much Your new refrigerator may run even longer if the room is warm, a large food load is added, the door is working ? Do not use an adapter. NOTE: Adjusting the temperature control(s) to coldest setting will not operate WARNING The motor seems to see if the outlet is opened often, or if the door has been left open . 15 water dripping on ? Electrical Shock Hazard Plug into...
.... New installation? Crisper cover in a lamp to run too much Your new refrigerator may run even longer if the room is warm, a large food load is added, the door is working ? Do not use an adapter. NOTE: Adjusting the temperature control(s) to coldest setting will not operate WARNING The motor seems to see if the outlet is opened often, or if the door has been left open . 15 water dripping on ? Electrical Shock Hazard Plug into...

Use & Care Guide
Page 16
...-2042. Control(s) set correctly for the Part Number. Check temperature in the line can result in the water source line? Contributes to enter refrigerator. Ice and Water The ice maker is not producing ice or not enough ice Refrigerator connected to a water supply and the supply shutoff valve turned on ? A kink in 24 hours. New installation? Wait 24 hours after ice maker installation for ice maker to make new ice. Ice cube jammed in the water source line? See "Water Supply Requirements." Questions remain regarding water pressure? Use airtight...
...-2042. Control(s) set correctly for the Part Number. Check temperature in the line can result in the water source line? Contributes to enter refrigerator. Ice and Water The ice maker is not producing ice or not enough ice Refrigerator connected to a water supply and the supply shutoff valve turned on ? A kink in 24 hours. New installation? Wait 24 hours after ice maker installation for ice maker to make new ice. Ice cube jammed in the water source line? See "Water Supply Requirements." Questions remain regarding water pressure? Use airtight...

Use & Care Guide
Page 17
... instructions attached to correct improper product maintenance or installation, installation not in which it was purchased, or at its sole discretion replace the product. Defects or damage caused by unauthorized service, alteration or modification of merchantability or fitness, so this limited warranty. 1. Repairs to parts or systems to review the Troubleshooting or Problem Solver section of the Use and Care Guide, scan the QR code...
... instructions attached to correct improper product maintenance or installation, installation not in which it was purchased, or at its sole discretion replace the product. Defects or damage caused by unauthorized service, alteration or modification of merchantability or fitness, so this limited warranty. 1. Repairs to parts or systems to review the Troubleshooting or Problem Solver section of the Use and Care Guide, scan the QR code...


