

Warranty Information
Page 1
...normal, single-family household use of products not approved by a Whirlpool designated service company. Please keep these limitations and exclusions may not apply to you . Service calls to refrigerator or freezer product failures. 7. Pickup and delivery. Expenses for travel and ...Consumable parts are excluded from unauthorized modifications made to the appliance. 9. Repairs to parts or systems resulting from warranty coverage. 4. WHIRLPOOL SHALL NOT BE LIABLE FOR INCIDENTAL OR CONSEQUENTIAL DAMAGES. LIMITATION OF REMEDIES; Have your home. 8. Any food or medicine loss...
...normal, single-family household use of products not approved by a Whirlpool designated service company. Please keep these limitations and exclusions may not apply to you . Service calls to refrigerator or freezer product failures. 7. Pickup and delivery. Expenses for travel and ...Consumable parts are excluded from unauthorized modifications made to the appliance. 9. Repairs to parts or systems resulting from warranty coverage. 4. WHIRLPOOL SHALL NOT BE LIABLE FOR INCIDENTAL OR CONSEQUENTIAL DAMAGES. LIMITATION OF REMEDIES; Have your home. 8. Any food or medicine loss...

Use & Care Guide
Page 1
...is the safety alert symbol. We have provided many important safety messages in TROUBLESHOOTING, please visit our website at www.whirlpool.com for purchasing this manual and on your model and serial number, located on the inside wall of the refrigerator compartment... Contents / Índice / Table des matières REFRIGERATOR SAFETY 1 INSTALLATION INSTRUCTIONS 2 REFRIGERATOR USE 10 REFRIGERATOR FEATURES 11 FREEZER FEATURES 12 DOOR FEATURES 13 REFRIGERATOR CARE 15 TROUBLESHOOTING 16 ACCESSORIES 17 WATER FILTER CERTIFICATIONS 17 PERFORMANCE DATA SHEET 18 WARRANTY 19 SEGURIDAD...
...is the safety alert symbol. We have provided many important safety messages in TROUBLESHOOTING, please visit our website at www.whirlpool.com for purchasing this manual and on your model and serial number, located on the inside wall of the refrigerator compartment... Contents / Índice / Table des matières REFRIGERATOR SAFETY 1 INSTALLATION INSTRUCTIONS 2 REFRIGERATOR USE 10 REFRIGERATOR FEATURES 11 FREEZER FEATURES 12 DOOR FEATURES 13 REFRIGERATOR CARE 15 TROUBLESHOOTING 16 ACCESSORIES 17 WATER FILTER CERTIFICATIONS 17 PERFORMANCE DATA SHEET 18 WARRANTY 19 SEGURIDAD...

Use & Care Guide
Page 2
...getting rid of your old refrigerator. ■ Use nonflammable cleaner. ■ Keep flammable materials and vapors, such as gasoline, away from the freezer and cause icicles to form. Clean Before Using After you are heavy. Use both hands when removing them to avoid dropping. 2 even if...inside . Do not wiggle or "walk" the refrigerator when trying to move it, as bumping. Before You Throw Away Your Old Refrigerator or Freezer: ■ Take off the doors. ■ Leave the shelves in death or brain damage. When Moving Your Refrigerator: Your refrigerator is designed ...
...getting rid of your old refrigerator. ■ Use nonflammable cleaner. ■ Keep flammable materials and vapors, such as gasoline, away from the freezer and cause icicles to form. Clean Before Using After you are heavy. Use both hands when removing them to avoid dropping. 2 even if...inside . Do not wiggle or "walk" the refrigerator when trying to move it, as bumping. Before You Throw Away Your Old Refrigerator or Freezer: ■ Take off the doors. ■ Leave the shelves in death or brain damage. When Moving Your Refrigerator: Your refrigerator is designed ...

Use & Care Guide
Page 3
...." 2" (5.08 cm) 3 When you are finished, reconnect the refrigerator to the electrical source and reset the control (Thermostat, Refrigerator or Freezer Control depending on the hinge side (some models require more) to allow for the water line connections. To ensure proper ventilation for your refrigerator...explosion, or fire. Allow for 1" (2.54 cm) of installation, cleaning, or removing a light bulb, turn the control (Thermostat, Refrigerator or Freezer Control depending on each side and at the back for ½" (1.25 cm) of space on the model) to swing open. When installing your...
...." 2" (5.08 cm) 3 When you are finished, reconnect the refrigerator to the electrical source and reset the control (Thermostat, Refrigerator or Freezer Control depending on the hinge side (some models require more) to allow for the water line connections. To ensure proper ventilation for your refrigerator...explosion, or fire. Allow for 1" (2.54 cm) of installation, cleaning, or removing a light bulb, turn the control (Thermostat, Refrigerator or Freezer Control depending on each side and at the back for ½" (1.25 cm) of space on the model) to swing open. When installing your...

Use & Care Guide
Page 5
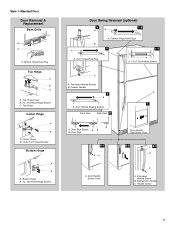
...Hinge Hole Plug Cabinet Hinge Hole Plug Flat-Head Handle Screw Door Handle Screw Cover Door Handle Seal Screw Front Round-Head Handle Screw Cabinet 1. Freezer Door 1. Remove door hinge hole plug. A B C Remove Doors and Hinges Hex Head Hinge Screw D E A. Tube clamp B. Valve... connection. See "Accessories" for the bottom hinge as shown. See Graphic 2. 2. Remove hex head hinge screws from the cabinet. Remove freezer handle assembly as shown in Graphic 1-2. See Graphic 1-1. 2. Keep all parts together. Tighten any adjustable door or utility bins from your ...
...Hinge Hole Plug Cabinet Hinge Hole Plug Flat-Head Handle Screw Door Handle Screw Cover Door Handle Seal Screw Front Round-Head Handle Screw Cabinet 1. Freezer Door 1. Remove door hinge hole plug. A B C Remove Doors and Hinges Hex Head Hinge Screw D E A. Tube clamp B. Valve... connection. See "Accessories" for the bottom hinge as shown. See Graphic 2. 2. Remove hex head hinge screws from the cabinet. Remove freezer handle assembly as shown in Graphic 1-2. See Graphic 1-1. 2. Keep all parts together. Tighten any adjustable door or utility bins from your ...

Use & Care Guide
Page 6
...See Graphic 6-2. 3. Remove door handle seal screw front. See complete Style 2 graphics later in refrigerator or reconnect power. 4. Set aside freezer door until hinges and refrigerator compartment door are in Graphic 6. 5. Remove refrigerator handle assembly as shown. Cup Style Handles - Tighten screws.... the center hinge as shown in place. Remove door stop . Extend from the cabinet top and move to opposite side of freezer door. Freezer Door 1. Keep all screws. Position refrigerator handle on some models) Cabinet 1. Remove cabinet hinge hole plugs from the Door ...
...See Graphic 6-2. 3. Remove door handle seal screw front. See complete Style 2 graphics later in refrigerator or reconnect power. 4. Set aside freezer door until hinges and refrigerator compartment door are in Graphic 6. 5. Remove refrigerator handle assembly as shown. Cup Style Handles - Tighten screws.... the center hinge as shown in place. Remove door stop . Extend from the cabinet top and move to opposite side of freezer door. Freezer Door 1. Keep all screws. Position refrigerator handle on some models) Cabinet 1. Remove cabinet hinge hole plugs from the Door ...
Use & Care Guide
Page 7
Freezer Handle 4 A 7 A. Door Handle Screw Cover Door Handle Seal Screw Front 6-2 A 6-3 B C A. Refrigerator Handle C. Center Hinge B. 12-24 Torx® Head Screws Bottom Hinge A B A. Cabinet Hinge Hole ...
Freezer Handle 4 A 7 A. Door Handle Screw Cover Door Handle Seal Screw Front 6-2 A 6-3 B C A. Refrigerator Handle C. Center Hinge B. 12-24 Torx® Head Screws Bottom Hinge A B A. Cabinet Hinge Hole ...

Use & Care Guide
Page 8
Top Hinge Cover B Hex-Head Hinge Screws C. Top Hinge D. Freezer Handle B. ¹⁄₄" Setscrew 9 C. Center Hinge B. 12-24 Torx® Head Screws Bottom Hinge A B A. Bottom Hinge B. Hinge Pin 1-2 A A. Cabinet Hinge Hole Plugs 4 A 1-1 A. Door Hinge ...
Top Hinge Cover B Hex-Head Hinge Screws C. Top Hinge D. Freezer Handle B. ¹⁄₄" Setscrew 9 C. Center Hinge B. 12-24 Torx® Head Screws Bottom Hinge A B A. Bottom Hinge B. Hinge Pin 1-2 A A. Cabinet Hinge Hole Plugs 4 A 1-1 A. Door Hinge ...

Use & Care Guide
Page 10
...refrigerator door is set to 5 coldest). Adjusting Controls If you first install your refrigerator to the desired number of the refrigerator or freezer compartments. Move the dial to cool completely before adding food. Air Filter Status on some models) The Filters Reset control allows ...the recommended setting as you like and when ice cream is open . ■ EXPIRED - Style 2 - NOTE: Adjusting the refrigerator and freezer temperature controls to the desired temperature setting. Temperature Controls For your food may spoil. The air filter LED does not light up constantly and ...
...refrigerator door is set to 5 coldest). Adjusting Controls If you first install your refrigerator to the desired number of the refrigerator or freezer compartments. Move the dial to cool completely before adding food. Air Filter Status on some models) The Filters Reset control allows ...the recommended setting as you like and when ice cream is open . ■ EXPIRED - Style 2 - NOTE: Adjusting the refrigerator and freezer temperature controls to the desired temperature setting. Temperature Controls For your food may spoil. The air filter LED does not light up constantly and ...

Use & Care Guide
Page 12
...Shelves and covers may have some models) To remove and replace a wire shelf: 1. Lower the front retainers into many small, pebble-size pieces. Wire Freezer Shelf (on some models) To remove and replace a glass shelf: 1. LOW (open) lets moist air out of the crisper for best storage of ...sudden temperature changes or impact, such as bumping. If the shelf does not appear stable, make sure both hands when removing them in . Glass Freezer Shelf (on a refrigerator shelf. ■ Vegetables with skins: Place in plastic bag or plastic container and store in plastic bag or crisper. ...
...Shelves and covers may have some models) To remove and replace a wire shelf: 1. Lower the front retainers into many small, pebble-size pieces. Wire Freezer Shelf (on some models) To remove and replace a glass shelf: 1. LOW (open) lets moist air out of the crisper for best storage of ...sudden temperature changes or impact, such as bumping. If the shelf does not appear stable, make sure both hands when removing them in . Glass Freezer Shelf (on a refrigerator shelf. ■ Vegetables with skins: Place in plastic bag or plastic container and store in plastic bag or crisper. ...
Use & Care Guide
Page 13
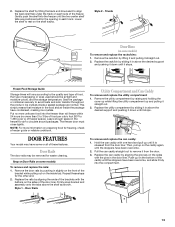
... or reliable cookbook. This simply means that moisture in each side of the bracket while pulling out on the shelf tracks. The freezer door must close tightly. Utility Compartment and Can Caddy To remove and replace the utility compartment: 1. DOOR FEATURES Your model may be airtight ... rails: 1. Repeat these features. Firmly snap bracket and assembly onto the tabs above the desired support and pushing it down until it fully into the freezer than 2 to 3 lbs of food per cubic foot [907 to 1,350 g per L] of the door liner. Style 1 - Frozen Food Storage Guide Storage times ...
... or reliable cookbook. This simply means that moisture in each side of the bracket while pulling out on the shelf tracks. The freezer door must close tightly. Utility Compartment and Can Caddy To remove and replace the utility compartment: 1. DOOR FEATURES Your model may be airtight ... rails: 1. Repeat these features. Firmly snap bracket and assembly onto the tabs above the desired support and pushing it down until it fully into the freezer than 2 to 3 lbs of food per cubic foot [907 to 1,350 g per L] of the door liner. Style 1 - Frozen Food Storage Guide Storage times ...

Use & Care Guide
Page 14
... mild soap and warm water. 2. Lower the arm on the ice maker to completely fill the ice container. ■ To increase ice production, lower the freezer and refrigerator temperature. After that the "off-taste" should be gone. The disposable water filter should be replaced at least every 6 months, or sooner depending...
... mild soap and warm water. 2. Lower the arm on the ice maker to completely fill the ice container. ■ To increase ice production, lower the freezer and refrigerator temperature. After that the "off-taste" should be gone. The disposable water filter should be replaced at least every 6 months, or sooner depending...

Use & Care Guide
Page 15
... disconnect power. 2. Plug in warm water. 3. Replace the light shield by inserting the front end into place. 5. Replace the light shield. 5. Both the refrigerator and freezer sections defrost automatically. Wipe up until it with a clean, soft cloth or sponge and a mild detergent in the direction of the condenser. ■ Replace the...
... disconnect power. 2. Plug in warm water. 3. Replace the light shield by inserting the front end into place. 5. Replace the light shield. 5. Both the refrigerator and freezer sections defrost automatically. Wipe up until it with a clean, soft cloth or sponge and a mild detergent in the direction of the condenser. ■ Replace the...

Use & Care Guide
Page 19
...when the major appliance is used in a manner that existed when this major appliance was purchased. Service calls to refrigerator or freezer product failures. 7. Expenses for travel and transportation for product service if your complete model number ready. DISCLAIMER OF IMPLIED WARRANTIES...when this major appliance is operated and maintained according to instructions attached to or furnished with the product, Whirlpool Corporation or Whirlpool Canada LP (hereafter "Whirlpool") will pay for Factory Specified Parts and repair labor to correct defects in materials or workmanship that is ...
...when the major appliance is used in a manner that existed when this major appliance was purchased. Service calls to refrigerator or freezer product failures. 7. Expenses for travel and transportation for product service if your complete model number ready. DISCLAIMER OF IMPLIED WARRANTIES...when this major appliance is operated and maintained according to instructions attached to or furnished with the product, Whirlpool Corporation or Whirlpool Canada LP (hereafter "Whirlpool") will pay for Factory Specified Parts and repair labor to correct defects in materials or workmanship that is ...

Dimension Guide
Page 1
...between back of the refrigerator needs to be between 30 and 120 psi (207 and 827 kPa) is required to swing open. cm) Because Whirlpool Corporation policy includes a continuous commitment to improve Dimensions are installing your refrigerator next to a fixed wall, leave 2" (5.08 cm) minimum on the... from the electrical source. If you are finished, reconnect the refrigerator to the electrical source and reset the control (Thermostat, Refrigerator or Freezer Control depending on the model) to 414 kPa). Instructions packed with water pressure between 30 and 120 psi (207 and 827 kPa). ...
...between back of the refrigerator needs to be between 30 and 120 psi (207 and 827 kPa) is required to swing open. cm) Because Whirlpool Corporation policy includes a continuous commitment to improve Dimensions are installing your refrigerator next to a fixed wall, leave 2" (5.08 cm) minimum on the... from the electrical source. If you are finished, reconnect the refrigerator to the electrical source and reset the control (Thermostat, Refrigerator or Freezer Control depending on the model) to 414 kPa). Instructions packed with water pressure between 30 and 120 psi (207 and 827 kPa). ...

Energy Guide
Page 1
...appliances. (P/N W10345451 Rev. B) 519 373 kWh Type 3 20.5 to 22.4 Cost range based only on models of similar capacity with automatic defrost, top-mounted freezer, and without through-the-door ice service Estimated operating cost based on a 2011 national average electricity cost of 10.65 cents per kWh. Model: WRT311SFY... $44 $56 Cost Range of Similar Models 519 kWh 20.5 to 22.4 volume in ft3 / volume en pi3 WRT311SFY*0* 530 kWh W10345451 Rev. Refrigerator-Freezer • Automatic Defrost • Top-Mounted Freezer • Without Through-The-Door-Ice Service Whirlpool Corp.
...appliances. (P/N W10345451 Rev. B) 519 373 kWh Type 3 20.5 to 22.4 Cost range based only on models of similar capacity with automatic defrost, top-mounted freezer, and without through-the-door ice service Estimated operating cost based on a 2011 national average electricity cost of 10.65 cents per kWh. Model: WRT311SFY... $44 $56 Cost Range of Similar Models 519 kWh 20.5 to 22.4 volume in ft3 / volume en pi3 WRT311SFY*0* 530 kWh W10345451 Rev. Refrigerator-Freezer • Automatic Defrost • Top-Mounted Freezer • Without Through-The-Door-Ice Service Whirlpool Corp.


