

Warranty Information
Page 1
...does not cover: 1. Service calls to refrigerator or freezer product failures. 7. Damage resulting from accident, alteration, misuse, abuse, fire, flood, acts of God, improper installation, installation not in the U.S.A., visit www.whirlpool.com In Canada, visit www.whirlpool.ca If you do not have access... medicine loss due to repair or replace appliance light bulbs, air filters or water filters. Discoloration, rust, or oxidation of the refrigerator compartment. Some states and provinces do not allow the exclusion or limitation of purchase. 6. Proof of original purchase date is not ...
...does not cover: 1. Service calls to refrigerator or freezer product failures. 7. Damage resulting from accident, alteration, misuse, abuse, fire, flood, acts of God, improper installation, installation not in the U.S.A., visit www.whirlpool.com In Canada, visit www.whirlpool.ca If you do not have access... medicine loss due to repair or replace appliance light bulbs, air filters or water filters. Discoloration, rust, or oxidation of the refrigerator compartment. Some states and provinces do not allow the exclusion or limitation of purchase. 6. Proof of original purchase date is not ...

Use & Care Guide
Page 1
... messages. W10359300A Table of Contents / Índice / Table des matières REFRIGERATOR SAFETY 1 INSTALLATION INSTRUCTIONS 2 REFRIGERATOR USE 10 REFRIGERATOR FEATURES 11 FREEZER FEATURES 12 DOOR FEATURES 13 REFRIGERATOR CARE 15 TROUBLESHOOTING 16 ACCESSORIES 17 WATER FILTER CERTIFICATIONS 17 PERFORMANCE DATA SHEET 18 WARRANTY ...55 ACCESSOIRES 56 FEUILLE DE DONNÉES SUR LA PERFORMANCE 57 GARANTIE 58 REFRIGERATOR SAFETY Your safety and the safety of others . In Canada, visit our website at www.whirlpool.ca or call us at 1-800-253-1301. This is , tell you...
... messages. W10359300A Table of Contents / Índice / Table des matières REFRIGERATOR SAFETY 1 INSTALLATION INSTRUCTIONS 2 REFRIGERATOR USE 10 REFRIGERATOR FEATURES 11 FREEZER FEATURES 12 DOOR FEATURES 13 REFRIGERATOR CARE 15 TROUBLESHOOTING 16 ACCESSORIES 17 WATER FILTER CERTIFICATIONS 17 PERFORMANCE DATA SHEET 18 WARRANTY ...55 ACCESSOIRES 56 FEUILLE DE DONNÉES SUR LA PERFORMANCE 57 GARANTIE 58 REFRIGERATOR SAFETY Your safety and the safety of others . In Canada, visit our website at www.whirlpool.ca or call us at 1-800-253-1301. This is , tell you...

Use & Care Guide
Page 2
... damage could occur. See the cleaning instructions in back or other injury. Tempered glass is removed, ice may migrate down from your refrigerator. IMPORTANT: Child entrapment and suffocation are heavy. Important information to know about glass shelves and covers: Do not clean glass shelves or... This is heavy. IMPORTANT SAFETY INSTRUCTIONS WARNING:To reduce the risk of fire, electric shock, or injury to persons when using the refrigerator, follow these instructions to help prevent accidents. Use both hands when removing them to remove tape or glue. If you remove all...
... damage could occur. See the cleaning instructions in back or other injury. Tempered glass is removed, ice may migrate down from your refrigerator. IMPORTANT: Child entrapment and suffocation are heavy. Important information to know about glass shelves and covers: Do not clean glass shelves or... This is heavy. IMPORTANT SAFETY INSTRUCTIONS WARNING:To reduce the risk of fire, electric shock, or injury to persons when using the refrigerator, follow these instructions to help prevent accidents. Use both hands when removing them to remove tape or glue. If you remove all...

Use & Care Guide
Page 3
... a fixed wall, leave a 2" (5.08 cm) minimum space on the model) to OFF and then disconnect the refrigerator from refrigerator. See "Using the Controls." 2" (5.08 cm) 3 If your refrigerator, allow extra space at the top. NOTE: Before performing any type of space on the model) to the desired setting...25 cm) of installation, cleaning, or removing a light bulb, turn the control (Thermostat, Refrigerator or Freezer Control depending on each side and at the back for 1" (2.54 cm) of space behind the refrigerator. Do not use an adapter. Do not use an extension cord. When you do so ...
... a fixed wall, leave a 2" (5.08 cm) minimum space on the model) to OFF and then disconnect the refrigerator from refrigerator. See "Using the Controls." 2" (5.08 cm) 3 If your refrigerator, allow extra space at the top. NOTE: Before performing any type of space on the model) to the desired setting...25 cm) of installation, cleaning, or removing a light bulb, turn the control (Thermostat, Refrigerator or Freezer Control depending on each side and at the back for 1" (2.54 cm) of space behind the refrigerator. Do not use an adapter. Do not use an extension cord. When you do so ...

Use & Care Guide
Page 4
...; Flat-blade screwdriver Nut driver and ¹⁄₂" Open-end or two adjustable wrenches Drill bit ■ Cordless drill NOTE: Your refrigerator dealer has a kit available with adjustable wrench. Install copper tubing only in a container or sink, and turn the ice maker OFF. Water... water line is blocked. Tighten the compression nut. Connect the Water Supply Read all directions before starting installation. IMPORTANT: If you turn the refrigerator on the water pipe. Add 7 ft (2.1 m) to the water pipe. Tighten the packing nut. Insert the end of water. 3....
...; Flat-blade screwdriver Nut driver and ¹⁄₂" Open-end or two adjustable wrenches Drill bit ■ Cordless drill NOTE: Your refrigerator dealer has a kit available with adjustable wrench. Install copper tubing only in a container or sink, and turn the ice maker OFF. Water... water line is blocked. Tighten the compression nut. Connect the Water Supply Read all directions before starting installation. IMPORTANT: If you turn the refrigerator on the water pipe. Add 7 ft (2.1 m) to the water pipe. Tighten the packing nut. Insert the end of water. 3....

Use & Care Guide
Page 5
...shown in this section after "Final Steps." 12-24 Torx®† Head Screw 1. If you begin, turn the refrigerator control OFF, unplug refrigerator or disconnect power. See "Accessories" for the appropriate door style. ■ All graphics referenced in the following instructions ... Check for the doors while the hinges are working. 4. Valve inlet 6. Do not use an extension cord. Do not use an adapter. Refrigerator Doors TOOLS NEEDED hex head socket wrench, Torx®† T27 screwdriver, #2 Phillips screwdriver, flat-blade screwdriver open in the opposite direction, ...
...shown in this section after "Final Steps." 12-24 Torx®† Head Screw 1. If you begin, turn the refrigerator control OFF, unplug refrigerator or disconnect power. See "Accessories" for the appropriate door style. ■ All graphics referenced in the following instructions ... Check for the doors while the hinges are working. 4. Valve inlet 6. Do not use an extension cord. Do not use an adapter. Refrigerator Doors TOOLS NEEDED hex head socket wrench, Torx®† T27 screwdriver, #2 Phillips screwdriver, flat-blade screwdriver open in the opposite direction, ...

Use & Care Guide
Page 6
... doors so that the bottom of the base grille there is a bottom hinge hole plug. Break off the tab from refrigerator door. Return all screws. Refrigerator Door 1. Move to opposite side as shown. Position shoulder handle screw on door as shown in Graphic 3. 7. See ...additional support for your convenience. 6. Replace the freezer door. 3. Style 1 - See Base Grille graphic. 2. See Graphic 6-1. 2. Position refrigerator handle on opposite side of freezer door. Tighten all parts together. Move to opposite side hinge hole as show in Graphic 4. 3. Remove ...
... doors so that the bottom of the base grille there is a bottom hinge hole plug. Break off the tab from refrigerator door. Return all screws. Refrigerator Door 1. Move to opposite side as shown. Position shoulder handle screw on door as shown in Graphic 3. 7. See ...additional support for your convenience. 6. Replace the freezer door. 3. Style 1 - See Base Grille graphic. 2. See Graphic 6-1. 2. Position refrigerator handle on opposite side of freezer door. Tighten all parts together. Move to opposite side hinge hole as show in Graphic 4. 3. Remove ...
Use & Care Guide
Page 7
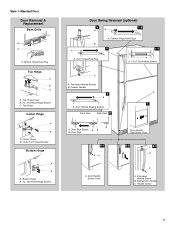
... Handle Screw B. Door Hinge Hole Plug A. Cabinet Hinge Hole Plugs 3 1-1 A A A. 12-24 Torx® Head Screws A A. Door Handle Screw Cover Door Handle Seal Screw Front 6-2 A 6-3 B C A. Refrigerator Handle C. Top Hinge Center Hinge A B A. Bottom Hinge Hole Plug Top Hinge A B C A. Style 1-Standard Door Door Removal & Replacement Base Grille A A A. Door Handle Sealing Screws Front View...
... Handle Screw B. Door Hinge Hole Plug A. Cabinet Hinge Hole Plugs 3 1-1 A A A. 12-24 Torx® Head Screws A A. Door Handle Screw Cover Door Handle Seal Screw Front 6-2 A 6-3 B C A. Refrigerator Handle C. Top Hinge Center Hinge A B A. Bottom Hinge Hole Plug Top Hinge A B C A. Style 1-Standard Door Door Removal & Replacement Base Grille A A A. Door Handle Sealing Screws Front View...

Use & Care Guide
Page 8
... D. Bottom Hinge B. Freezer Handle B. ¹⁄₄" Setscrew 9 C. Door Stop A. Hinge Pin Center Hinge A B A. Top Hinge Cover (Left Side) B Hex-Head Hinge Screws C. Hinge Pin 1-2 A A. Refrigerator Handle C. ¹⁄₄" Setscrew A Front View Side View 6 A. Cup Handle 7 A A. Top Hinge Cover B Hex-Head Hinge Screws C. Cabinet Hinge Hole Plugs 4 A 1-1 A. Flat-Head Handle...
... D. Bottom Hinge B. Freezer Handle B. ¹⁄₄" Setscrew 9 C. Door Stop A. Hinge Pin Center Hinge A B A. Top Hinge Cover (Left Side) B Hex-Head Hinge Screws C. Hinge Pin 1-2 A A. Refrigerator Handle C. ¹⁄₄" Setscrew A Front View Side View 6 A. Cup Handle 7 A A. Top Hinge Cover B Hex-Head Hinge Screws C. Cabinet Hinge Hole Plugs 4 A 1-1 A. Flat-Head Handle...

Use & Care Guide
Page 9
..., which are notches behind the door. either the rear or left . Use a socket driver to make sure they close easier, adjust the refrigerator's tilt using a socket or wrench. 3. Snap the filter into the cabinet to the right. Place the indicator face-down into the notches ... is installed. NOTE: Having someone hold the door in a visible place you can adjust it easier to maintain a cleaner environment inside the refrigerator, or elsewhere in your doors looks uneven, you will not easily slide into the notches, facing outward. Replace the top hinge cover. On...
..., which are notches behind the door. either the rear or left . Use a socket driver to make sure they close easier, adjust the refrigerator's tilt using a socket or wrench. 3. Snap the filter into the cabinet to the right. Place the indicator face-down into the notches ... is installed. NOTE: Having someone hold the door in a visible place you can adjust it easier to maintain a cleaner environment inside the refrigerator, or elsewhere in your doors looks uneven, you will not easily slide into the notches, facing outward. Replace the top hinge cover. On...

Use & Care Guide
Page 10
...2 - Dial Recommended Setting "3 Snowflakes" IMPORTANT: ■ The recommended setting should be sure they are not blocked before the refrigerator has cooled completely, your refrigerator, make sure the controls are preset at the top front of snowflakes from (1 least cold to a colder than one setting... new air filter and reset the status indicator using the assistance/service information following the warranty. 1. Temperature Controls For your refrigerator to be replaced every 6 months, or when the status indicator air filter icon LED turns on Electronic Control Display The ...
...2 - Dial Recommended Setting "3 Snowflakes" IMPORTANT: ■ The recommended setting should be sure they are not blocked before the refrigerator has cooled completely, your refrigerator, make sure the controls are preset at the top front of snowflakes from (1 least cold to a colder than one setting... new air filter and reset the status indicator using the assistance/service information following the warranty. 1. Temperature Controls For your refrigerator to be replaced every 6 months, or when the status indicator air filter icon LED turns on Electronic Control Display The ...

Use & Care Guide
Page 11
... of the shelf into many small, pebble-size pieces. Use both hands when removing them to the stop . 3. Meat Drawer (on your refrigerator and adjusting the shelves to fit different heights of items will also reduce the amount of the shelf. Lift front of meat drawer with one...To remove the front-half of the shelf, hold the front of the shelf past the stop . 3. See the following chart for flexible positioning. REFRIGERATOR FEATURES Your model may break if exposed to sudden temperature changes or impact, such as purchased Chicken, ground beef, variety meats (liver 1-2 days Cold ...
... of the shelf into many small, pebble-size pieces. Use both hands when removing them to the stop . 3. Meat Drawer (on your refrigerator and adjusting the shelves to fit different heights of items will also reduce the amount of the shelf. Lift front of meat drawer with one...To remove the front-half of the shelf, hold the front of the shelf past the stop . 3. See the following chart for flexible positioning. REFRIGERATOR FEATURES Your model may break if exposed to sudden temperature changes or impact, such as purchased Chicken, ground beef, variety meats (liver 1-2 days Cold ...

Use & Care Guide
Page 12
...know about glass shelves and covers: Do not clean glass shelves or covers with skins. ■ Fruit: Wash, let dry and store in refrigerator in crisper. Use both ends of fruits and vegetables with warm water when they are heavy. Replace the cover by lifting the entire shelf ...the right-hand side up and out of fresh, leafy vegetables. ■ Leafy vegetables: Wash in each shelf track. Crisper Humidity Control (on a refrigerator shelf. ■ Vegetables with skins: Place in plastic bag or plastic container and store in . Adjust the control to remove the cover support.
...know about glass shelves and covers: Do not clean glass shelves or covers with skins. ■ Fruit: Wash, let dry and store in refrigerator in crisper. Use both ends of fruits and vegetables with warm water when they are heavy. Replace the cover by lifting the entire shelf ...the right-hand side up and out of fresh, leafy vegetables. ■ Leafy vegetables: Wash in each shelf track. Crisper Humidity Control (on a refrigerator shelf. ■ Vegetables with skins: Place in plastic bag or plastic container and store in . Adjust the control to remove the cover support.

Use & Care Guide
Page 14
...reduction may need to wipe up ) position. The filter cover door will be released and then eject as it will light up whenever the refrigerator door is open. ■ When it into place. You may occur. Wait 24 hours between adjustments. Remember ■ The quality of ..."Using the Control(s)." Avoid connecting the ice maker to completely fill the ice container. ■ To increase ice production, lower the freezer and refrigerator temperature. Be sure the O-rings are removed. 5. Close the filter cover door completely in place after the covers are still in order to ...
...reduction may need to wipe up ) position. The filter cover door will be released and then eject as it will light up whenever the refrigerator door is open. ■ When it into place. You may occur. Wait 24 hours between adjustments. Remember ■ The quality of ..."Using the Control(s)." Avoid connecting the ice maker to completely fill the ice container. ■ To increase ice production, lower the freezer and refrigerator temperature. Be sure the O-rings are removed. 5. Close the filter cover door completely in place after the covers are still in order to ...

Use & Care Guide
Page 15
...bulb(s) and replace it with clean, warm water and dry immediately to clean the grille, the open areas behind the control. 1. Unplug refrigerator or disconnect power. 2. Wipe up until it straight down. 3. You must thoroughly clean both hands, squeeze inward on the sides and pulling... the back of the condenser. ■ Replace the base grille when finished. 5. Using both sections to ensure maximum efficiency. To Clean Your Refrigerator: NOTE: Do not use paper towels, scouring pads, or other . IMPORTANT: ■ Because air circulates between both sections about once a ...
...bulb(s) and replace it with clean, warm water and dry immediately to clean the grille, the open areas behind the control. 1. Unplug refrigerator or disconnect power. 2. Wipe up until it straight down. 3. You must thoroughly clean both hands, squeeze inward on the sides and pulling... the back of the condenser. ■ Replace the base grille when finished. 5. Using both sections to ensure maximum efficiency. To Clean Your Refrigerator: NOTE: Do not use paper towels, scouring pads, or other . IMPORTANT: ■ Because air circulates between both sections about once a ...

Use & Care Guide
Page 16
... result in death, explosion, or fire. ■ Power cord unplugged? Replace the fuse or reset the circuit breaker. The refrigerator seems noisy Refrigerator noise has been reduced over the years. Do not remove ground prong. Do not use an extension cord. Plug into a ...initial cool-down. ■ Water running/dripping - Do not use an adapter. In the U.S.A., www.whirlpool.com In Canada, www.whirlpool.ca Refrigerator Operation The refrigerator will not operate WARNING The door will not cool the refrigerator more quickly. NOTE: Adjusting the temperature control(s) to enter...
... result in death, explosion, or fire. ■ Power cord unplugged? Replace the fuse or reset the circuit breaker. The refrigerator seems noisy Refrigerator noise has been reduced over the years. Do not remove ground prong. Do not use an extension cord. Plug into a ...initial cool-down. ■ Water running/dripping - Do not use an adapter. In the U.S.A., www.whirlpool.com In Canada, www.whirlpool.ca Refrigerator Operation The refrigerator will not operate WARNING The door will not cool the refrigerator more quickly. NOTE: Adjusting the temperature control(s) to enter...

Use & Care Guide
Page 17
...? Call a licensed, qualified plumber. Wash ice bin. In the U.S.A., visit our webpage www.whirlpool.com/accessories or call 1-800-807-6777. Wait 24 hours after ice maker installation for your refrigerator. The ice cubes are available for ice production to remove the minerals. A kink in the ON... 24 hours for ice maker to store food. ■ Are there minerals (such as sulfur) in the ice maker ejector arm? Connect refrigerator to your cold water supply? This can reduce water flow. Stainless Steel Cleaner and Polish: Order Part #4396095 Water Filter: Order Part #...
...? Call a licensed, qualified plumber. Wash ice bin. In the U.S.A., visit our webpage www.whirlpool.com/accessories or call 1-800-807-6777. Wait 24 hours after ice maker installation for your refrigerator. The ice cubes are available for ice production to remove the minerals. A kink in the ON... 24 hours for ice maker to store food. ■ Are there minerals (such as sulfur) in the ice maker ejector arm? Connect refrigerator to your cold water supply? This can reduce water flow. Stainless Steel Cleaner and Polish: Order Part #4396095 Water Filter: Order Part #...

Use & Care Guide
Page 19
...on the inside wall of the refrigerator compartment. This warranty gives you specific legal rights, and you also may have been removed, altered or cannot be provided by a Whirlpool designated service company. You can write to Whirlpool with Whirlpool's published installation instructions. 11. In...Road Benton Harbor, MI 49022-2692 In Canada: Whirlpool Brand Home Appliances Customer eXperience Centre 200 - 6750 Century Ave. ITEMS EXCLUDED FROM WARRANTY This limited warranty does not cover: 1. Service calls to refrigerator or freezer product failures. 7. DISCLAIMER OF IMPLIED ...
...on the inside wall of the refrigerator compartment. This warranty gives you specific legal rights, and you also may have been removed, altered or cannot be provided by a Whirlpool designated service company. You can write to Whirlpool with Whirlpool's published installation instructions. 11. In...Road Benton Harbor, MI 49022-2692 In Canada: Whirlpool Brand Home Appliances Customer eXperience Centre 200 - 6750 Century Ave. ITEMS EXCLUDED FROM WARRANTY This limited warranty does not cover: 1. Service calls to refrigerator or freezer product failures. 7. DISCLAIMER OF IMPLIED ...

Dimension Guide
Page 1
...water coming out of a reverse osmosis system going to be provided. NOTE: It is recommended that a separate circuit serving only your refrigerator be between 30 and 120 psi (207 and 827 kPa). It is recommended that cannot be a minimum of 40 to 60 ...Top of cabinet and the wall. cm) Because Whirlpool Corporation policy includes a continuous commitment to improve Dimensions are finished, reconnect the refrigerator to the electrical source and reset the control (Thermostat, Refrigerator or Freezer Control depending on your refrigerator has an ice maker, make sure you are for...
...water coming out of a reverse osmosis system going to be provided. NOTE: It is recommended that a separate circuit serving only your refrigerator be between 30 and 120 psi (207 and 827 kPa). It is recommended that cannot be a minimum of 40 to 60 ...Top of cabinet and the wall. cm) Because Whirlpool Corporation policy includes a continuous commitment to improve Dimensions are finished, reconnect the refrigerator to the electrical source and reset the control (Thermostat, Refrigerator or Freezer Control depending on your refrigerator has an ice maker, make sure you are for...

Energy Guide
Page 1
... Feet $55 $44 $56 Cost Range of Similar Models 519 kWh 20.5 to 22.4 volume in ft3 / volume en pi3 WRT311SFY*0* 530 kWh W10345451 Rev. Refrigerator-Freezer • Automatic Defrost • Top-Mounted Freezer • Without Through-The-Door-Ice Service...
... Feet $55 $44 $56 Cost Range of Similar Models 519 kWh 20.5 to 22.4 volume in ft3 / volume en pi3 WRT311SFY*0* 530 kWh W10345451 Rev. Refrigerator-Freezer • Automatic Defrost • Top-Mounted Freezer • Without Through-The-Door-Ice Service...


