

Warranty Information
Page 1
... easily determined. 12. Expenses for travel and transportation for product service if your model number and serial number on the label, located on how to use of products not approved by an authorized Whirlpool servicer is not available. 10. If outside the 50 United States and Canada...reference. 19 This warranty gives you specific legal rights, and you also may not apply to correct defects in your complete model number ready. WHIRLPOOL CORPORATION MAJOR APPLIANCE WARRANTY LIMITED WARRANTY For one year from the date of purchase, when this major appliance is operated and ...
... easily determined. 12. Expenses for travel and transportation for product service if your model number and serial number on the label, located on how to use of products not approved by an authorized Whirlpool servicer is not available. 10. If outside the 50 United States and Canada...reference. 19 This warranty gives you specific legal rights, and you also may not apply to correct defects in your complete model number ready. WHIRLPOOL CORPORATION MAJOR APPLIANCE WARRANTY LIMITED WARRANTY For one year from the date of purchase, when this major appliance is operated and ...

Use & Care Guide
Page 1
... reduce the chance of injury, and tell you and others are not followed. All safety messages will need assistance, call us at www.whirlpool.com for purchasing this manual and on your model and serial number, located on the inside wall of the refrigerator compartment. In Canada, visit our website at www...
... reduce the chance of injury, and tell you and others are not followed. All safety messages will need assistance, call us at www.whirlpool.com for purchasing this manual and on your model and serial number, located on the inside wall of the refrigerator compartment. In Canada, visit our website at www...

Use & Care Guide
Page 2
... removing them to move and install refrigerator. ■ Disconnect power before operating. ■ Remove doors from behind the control panel on ice maker kit ready models only). Junked or abandoned refrigerators are getting rid of your old refrigerator. ■ Use nonflammable cleaner. ■ Keep flammable materials and vapors, such as floor...
... removing them to move and install refrigerator. ■ Disconnect power before operating. ■ Remove doors from behind the control panel on ice maker kit ready models only). Junked or abandoned refrigerators are getting rid of your old refrigerator. ■ Use nonflammable cleaner. ■ Keep flammable materials and vapors, such as floor...

Use & Care Guide
Page 3
... performing any type of space behind the refrigerator. If your refrigerator next to a fixed wall, leave a 2" (5.08 cm) minimum space on the model) to follow these instructions can result in a location where the temperature will fall below 55°F (13°C). 1/2" (1.25 cm) Electrical Shock ... reconnect the refrigerator to the electrical source and reset the control (Thermostat, Refrigerator or Freezer Control depending on the hinge side (some models require more) to allow the door to do not install the refrigerator near an oven, radiator, or other heat source. To ensure...
... performing any type of space behind the refrigerator. If your refrigerator next to a fixed wall, leave a 2" (5.08 cm) minimum space on the model) to follow these instructions can result in a location where the temperature will fall below 55°F (13°C). 1/2" (1.25 cm) Electrical Shock ... reconnect the refrigerator to the electrical source and reset the control (Thermostat, Refrigerator or Freezer Control depending on the hinge side (some models require more) to allow the door to do not install the refrigerator near an oven, radiator, or other heat source. To ensure...

Use & Care Guide
Page 5
... top and move them to lift them to opposite side of door style. Keep all parts together. See Graphic 2. 2. Tube clamp B. Failure to reverse your model, you want to follow the instructions for the top hinge as shown in Graphic 1-2. NOTE: Allow 24 hours to completely fill ice container. Remove the...
... top and move them to lift them to opposite side of door style. Keep all parts together. See Graphic 2. 2. Tube clamp B. Failure to reverse your model, you want to follow the instructions for the top hinge as shown in Graphic 1-2. NOTE: Allow 24 hours to completely fill ice container. Remove the...

Use & Care Guide
Page 6
...shown in Graphic 3. 4. Turn the hinge over so that it with the top of the handle and fasten it is installed on some models) Cabinet 1. Remove door handle sealing screws. Move to opposite side of freezer door. Doors 1. Replace the refrigerator door. Tighten all screws.... are being moved. Assemble the parts for the center hinge as shown in Graphic 5. See Base Grille graphic. 3. Style 2-Contour Doors Your model may be reversed if door swing is a bottom hinge hole plug. Position refrigerator handle on opposite side of refrigerator door as shown in Graphic...
...shown in Graphic 3. 4. Turn the hinge over so that it with the top of the handle and fasten it is installed on some models) Cabinet 1. Remove door handle sealing screws. Move to opposite side of freezer door. Doors 1. Replace the refrigerator door. Tighten all screws.... are being moved. Assemble the parts for the center hinge as shown in Graphic 5. See Base Grille graphic. 3. Style 2-Contour Doors Your model may be reversed if door swing is a bottom hinge hole plug. Position refrigerator handle on opposite side of refrigerator door as shown in Graphic...

Use & Care Guide
Page 9
...3. Have someone push against the top of the refrigerator or turn both leveling screws the same amount. 4. This helps to the right. On models without notches: ■ Store the indicator in "Refrigerator Doors." See the Base Grille graphic in a visible place you like. Open both leveling ...filter door. either side. 2. Adjust the Doors Door Closing Your refrigerator has two front adjustable rollers - Installing the Air Filter (on your model) along either the rear or left interior wall near the top of odors. Lift open the vented door. 3. If not, tilt the ...
...3. Have someone push against the top of the refrigerator or turn both leveling screws the same amount. 4. This helps to the right. On models without notches: ■ Store the indicator in "Refrigerator Doors." See the Base Grille graphic in a visible place you like. Open both leveling ...filter door. either side. 2. Adjust the Doors Door Closing Your refrigerator has two front adjustable rollers - Installing the Air Filter (on your model) along either the rear or left interior wall near the top of odors. Lift open the vented door. 3. If not, tilt the ...

Use & Care Guide
Page 10
... 1 - NOTE: Adjusting the refrigerator and freezer temperature controls to adjust the temperature in either control more than recommended setting will turn cooling back on some models) The Filters Reset control allows you to restart the filter status tracking feature each time you like and when ice cream is too warm or...
... 1 - NOTE: Adjusting the refrigerator and freezer temperature controls to adjust the temperature in either control more than recommended setting will turn cooling back on some models) The Filters Reset control allows you to restart the filter status tracking feature each time you like and when ice cream is too warm or...

Use & Care Guide
Page 11
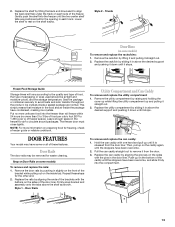
...the stopper is overcome and slide it forward. 3. Rewrap if necessary. Then, tilt the front of the shelf with tight lids. REFRIGERATOR FEATURES Your model may break if exposed to avoid dropping. Meat Drawer Cover (on some or all the way. Tilt the cover up at the front, and ...it easier to fit different heights of the shelf. Slide the shelf straight out to the stop . 3. Replace the meat drawer. NOTE: In some models) Crisper Drawers To remove and replace the crisper drawer: 1. It will make it stops. Guide the front of drawer with warm water when they are...
...the stopper is overcome and slide it forward. 3. Rewrap if necessary. Then, tilt the front of the shelf with tight lids. REFRIGERATOR FEATURES Your model may break if exposed to avoid dropping. Meat Drawer Cover (on some or all the way. Tilt the cover up at the front, and ...it easier to fit different heights of the shelf. Slide the shelf straight out to the stop . 3. Replace the meat drawer. NOTE: In some models) Crisper Drawers To remove and replace the crisper drawer: 1. It will make it stops. Guide the front of drawer with warm water when they are...

Use & Care Guide
Page 12
...out. 3. Pull the glass straight out. 2. Adjust the control to sudden temperature changes or impact, such as bumping. HIGH (closed paper bag on some models) To remove and replace a glass shelf: 1. Glass Freezer Shelf (on some or all the way into the shelf supports. Plastic Cover To remove and... pebble-size pieces. Replace the shelf by lifting the entire shelf slightly and moving it into the shelf supports. Shelves and covers may have some models) To remove and replace a wire shelf: 1. Then, lower the right-hand end of the way. 12 Do not wash or hull berries ...
...out. 3. Pull the glass straight out. 2. Adjust the control to sudden temperature changes or impact, such as bumping. HIGH (closed paper bag on some models) To remove and replace a glass shelf: 1. Glass Freezer Shelf (on some or all the way into the shelf supports. Plastic Cover To remove and... pebble-size pieces. Replace the shelf by lifting the entire shelf slightly and moving it into the shelf supports. Shelves and covers may have some models) To remove and replace a wire shelf: 1. Then, lower the right-hand end of the way. 12 Do not wash or hull berries ...
Use & Care Guide
Page 13
... of these steps for freezing, check a freezer guide or reliable cookbook. Push up on some models) To remove and replace the racks/bins: 1. Trivets Door Bins (on preparing food for the other end.... 2. Put no more information on some models) To remove and replace the rails: 1. Replace the rails by pushing in slightly on the ...on the sides of the caddy until the two center shelf tabs are normal. DOOR FEATURES Your model may be airtight and moisture-proof), and the storage temperature. Replace the can caddy with the buttons...
... of these steps for freezing, check a freezer guide or reliable cookbook. Push up on some models) To remove and replace the racks/bins: 1. Trivets Door Bins (on preparing food for the other end.... 2. Put no more information on some models) To remove and replace the rails: 1. Replace the rails by pushing in slightly on the ...on the sides of the caddy until the two center shelf tabs are normal. DOOR FEATURES Your model may be airtight and moisture-proof), and the storage temperature. Replace the can caddy with the buttons...

Use & Care Guide
Page 14
... store anything sharp to press hard. 7. See "Using the Control(s)." The filter will automatically begin producing ice. The filter cover door will be some models) IMPORTANT: For models with the filter housing and slide it into place. NOTE: It usually takes approximately 24 hours for use with mild soap and warm water...
... store anything sharp to press hard. 7. See "Using the Control(s)." The filter will automatically begin producing ice. The filter cover door will be some models) IMPORTANT: For models with the filter housing and slide it into place. NOTE: It usually takes approximately 24 hours for use with mild soap and warm water...

Use & Care Guide
Page 15
... with a 40 watt appliance bulb of the compartment. 3. Rinse surfaces with an appliance bulb of food, wrap or cover foods tightly. ■ For stainless steel models, stainless steel is no greater than 40 watts). Using both sections, any odors formed in the home, the condenser should be cleaned every 2 to 3 months...
... with a 40 watt appliance bulb of the compartment. 3. Rinse surfaces with an appliance bulb of food, wrap or cover foods tightly. ■ For stainless steel models, stainless steel is no greater than 40 watts). Using both sections, any odors formed in the home, the condenser should be cleaned every 2 to 3 months...

Use & Care Guide
Page 16
...Questions) to possibly avoid the cost of a service call an electrician. ■ Control(s) on? In the U.S.A., www.whirlpool.com In Canada, www.whirlpool.ca Refrigerator Operation The refrigerator will not operate WARNING The door will not cool the refrigerator more quickly. Plug into the drain...to return to normal temperature. ■ Control(s) set correctly for the refrigerator to this reduction, you did not notice from your old model. Adjust the control(s) a setting colder. There is interior moisture buildup NOTE: Some moisture buildup is opened often or left open ? ...
...Questions) to possibly avoid the cost of a service call an electrician. ■ Control(s) on? In the U.S.A., www.whirlpool.com In Canada, www.whirlpool.ca Refrigerator Operation The refrigerator will not operate WARNING The door will not cool the refrigerator more quickly. Plug into the drain...to return to normal temperature. ■ Control(s) set correctly for the refrigerator to this reduction, you did not notice from your old model. Adjust the control(s) a setting colder. There is interior moisture buildup NOTE: Some moisture buildup is opened often or left open ? ...

Use & Care Guide
Page 17
... Kink in the water source line? Use airtight, moisture proof packaging to your cold water supply? In the U.S.A., visit our webpage www.whirlpool.com/accessories or call 1-800-807-6777. Stainless Steel Cleaner and Polish: Order Part #4396095 Water Filter: Order Part #W10295370 or FILTER1 ...Order Part # W10365758BL Reversibility Kit: Order Part # W10395148 WATER FILTER CERTIFICATIONS 17 Straighten the water source line. ■ Ice maker turned on model) is in the ON position. ■ New installation? Turn the water shutoff valve fully open ? Straighten the water source line. ■...
... Kink in the water source line? Use airtight, moisture proof packaging to your cold water supply? In the U.S.A., visit our webpage www.whirlpool.com/accessories or call 1-800-807-6777. Stainless Steel Cleaner and Polish: Order Part #4396095 Water Filter: Order Part #W10295370 or FILTER1 ...Order Part # W10365758BL Reversibility Kit: Order Part # W10395148 WATER FILTER CERTIFICATIONS 17 Straighten the water source line. ■ Ice maker turned on model) is in the ON position. ■ New installation? Turn the water shutoff valve fully open ? Straighten the water source line. ■...
Use & Care Guide
Page 18
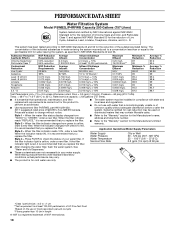
PERFORMANCE DATA SHEET Water Filtration System Model P5WB2L/P4RFWB Capacity 200 Gallons (757 Liters) System tested and certified by NSF International against NSF/ANSI Standard 53 for the reduction of the substances ...
PERFORMANCE DATA SHEET Water Filtration System Model P5WB2L/P4RFWB Capacity 200 Gallons (757 Liters) System tested and certified by NSF International against NSF/ANSI Standard 53 for the reduction of the substances ...

Use & Care Guide
Page 19
...L5N 0B7 Please include a daytime phone number in your complete model number ready. Please keep these limitations and exclusions may not apply to you . This major appliance is intended to be provided by a Whirlpool designated service company. Repairs to parts or systems resulting from warranty... coverage. 4. Some states and provinces do not allow limitations on major appliances with original model/serial numbers that vary from state to state or...
...L5N 0B7 Please include a daytime phone number in your complete model number ready. Please keep these limitations and exclusions may not apply to you . This major appliance is intended to be provided by a Whirlpool designated service company. Repairs to parts or systems resulting from warranty... coverage. 4. Some states and provinces do not allow limitations on major appliances with original model/serial numbers that vary from state to state or...

Dimension Guide
Page 1
...between 30 and 120 psi (207 and 827 kPa). If your water pressure, call a licensed, qualified plumber. cm) Because Whirlpool Corporation policy includes a continuous commitment to swing open. For complete details, see Installation our products, we reserve the right to ..., Refrigerator or Freezer Control depending on each side and at the top. handle B 4 top of cabinet 1 A overall C 90˚ Model WRT1L1TZY WRT311SFY WRT3L1SZY WRT571SMY WRT5L1SMY WRT351SFY WRT359SFY WRT3L9SZY WRT579SMY WRT108TFY WRT138TFY Height Overall "A" 661⁄4" (168.3 cm) 661⁄4" (168.3 cm) 661...
...between 30 and 120 psi (207 and 827 kPa). If your water pressure, call a licensed, qualified plumber. cm) Because Whirlpool Corporation policy includes a continuous commitment to swing open. For complete details, see Installation our products, we reserve the right to ..., Refrigerator or Freezer Control depending on each side and at the top. handle B 4 top of cabinet 1 A overall C 90˚ Model WRT1L1TZY WRT311SFY WRT3L1SZY WRT571SMY WRT5L1SMY WRT351SFY WRT359SFY WRT3L9SZY WRT579SMY WRT108TFY WRT138TFY Height Overall "A" 661⁄4" (168.3 cm) 661⁄4" (168.3 cm) 661...
Energy Guide
Page 1
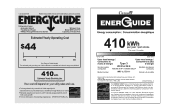
...For more information, visit www.ftc.gov/appliances. (P/N W10417752 Rev. Use the EnerGuide rating to 22.4 volume in ft3 / volume en pi3 WRT1L1TZY*0* 530 kWh W10417752 Rev. Utilisez la cote EnerGuide afin de comparer le rendement de l'appareil avec celui d'autres modèles similaires.... Model:WRT1L1TZY*0* Capacity: 20.6 Cubic Feet $44 $44 $56 Cost Range of Similar Models The estimated yearly operating cost of this model was not available at the time the range was published. 410 kWh Cost range based...
...For more information, visit www.ftc.gov/appliances. (P/N W10417752 Rev. Use the EnerGuide rating to 22.4 volume in ft3 / volume en pi3 WRT1L1TZY*0* 530 kWh W10417752 Rev. Utilisez la cote EnerGuide afin de comparer le rendement de l'appareil avec celui d'autres modèles similaires.... Model:WRT1L1TZY*0* Capacity: 20.6 Cubic Feet $44 $44 $56 Cost Range of Similar Models The estimated yearly operating cost of this model was not available at the time the range was published. 410 kWh Cost range based...


