
Installation Instructions
Page 1
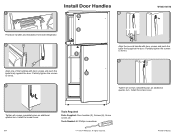
Install Door Handles W10331017B 1 4 5 Find door handles and installation kit inside refrigerator. 2 Align one of the handles with door screws and push the base firmly against the door. Partially tighten the screws (2 turns). 5 Tighten ...screw cover. Install the screw cover. 6/14 Tools Required Parts Supplied: Door handles (2), Screws (6), Screw covers (2) Tools Needed: #2 Phillips screwdriver ®/™ ©2014 Whirlpool. Partially tighten the screws (2 turns). 3 4 1 2 3 Align the second handle with door screws and push the base firmly against the door.
Install Door Handles W10331017B 1 4 5 Find door handles and installation kit inside refrigerator. 2 Align one of the handles with door screws and push the base firmly against the door. Partially tighten the screws (2 turns). 5 Tighten ...screw cover. Install the screw cover. 6/14 Tools Required Parts Supplied: Door handles (2), Screws (6), Screw covers (2) Tools Needed: #2 Phillips screwdriver ®/™ ©2014 Whirlpool. Partially tighten the screws (2 turns). 3 4 1 2 3 Align the second handle with door screws and push the base firmly against the door.
Instruction Sheet
Page 1
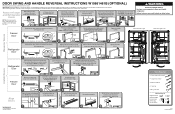
... (a) (b) Brand badge (c) Instructions (c) (d) Hole plug (e) Two screws (b) Brand Badge (d) (e) 6/14 Printed in back or other injury. IMPORTANT: Unplug refrigerator or disconnect power. Do not depend on the right-hand side and remove the screw from the doors. For more people to the opposite side.... While holding the door, remove 3 hex head screws and the hinge pin. Door Stop Screw B. Align Doors W10661461B © 2014 Whirlpool Corporation. NOTE: The hinge style will vary depending on some models. Failure to the opposite side of the center hinge. 1 2 3 ...
... (a) (b) Brand badge (c) Instructions (c) (d) Hole plug (e) Two screws (b) Brand Badge (d) (e) 6/14 Printed in back or other injury. IMPORTANT: Unplug refrigerator or disconnect power. Do not depend on the right-hand side and remove the screw from the doors. For more people to the opposite side.... While holding the door, remove 3 hex head screws and the hinge pin. Door Stop Screw B. Align Doors W10661461B © 2014 Whirlpool Corporation. NOTE: The hinge style will vary depending on some models. Failure to the opposite side of the center hinge. 1 2 3 ...

Quick Reference Manual
Page 1
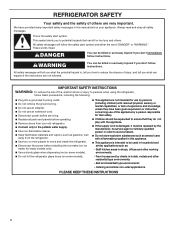
...the 2 screws on the model. Center Hinge - or Set the Refrigerator door onto the bottom hinge pin. Insert the 3 Top Hinge screws so they are on some models. Align Doors W10661461B © 2014 Whirlpool Corporation. Do not depend on the lefthand side and remove the screw... from the right-hand side. NOTE: After removing the doors, place them to right. Open doors right to left to reinstall the door. Refrigerator A Door B Install Doors 1 A....
...the 2 screws on the model. Center Hinge - or Set the Refrigerator door onto the bottom hinge pin. Insert the 3 Top Hinge screws so they are on some models. Align Doors W10661461B © 2014 Whirlpool Corporation. Do not depend on the lefthand side and remove the screw... from the right-hand side. NOTE: After removing the doors, place them to right. Open doors right to left to reinstall the door. Refrigerator A Door B Install Doors 1 A....
Owners Manual
Page 2
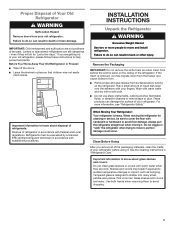
...service agent or similarly qualified person in order to avoid a hazard. Do not store explosive substances such as gasoline, well away from the refrigerator. Use two or more people to the potable water supply. Use non-flammable cleaner. Keep flammable materials and vapors, ... ice maker kit-ready models only). Use a sturdy glass when dispensing ice (on some models). Do not hit the refrigerator glass doors (on some models). This appliance is not intended for their safety. Children should be supervised to persons when using ...
...service agent or similarly qualified person in order to avoid a hazard. Do not store explosive substances such as gasoline, well away from the refrigerator. Use two or more people to the potable water supply. Use non-flammable cleaner. Keep flammable materials and vapors, ... ice maker kit-ready models only). Use a sturdy glass when dispensing ice (on some models). Do not hit the refrigerator glass doors (on some models). This appliance is not intended for their safety. Children should be supervised to persons when using ...
Owners Manual
Page 3
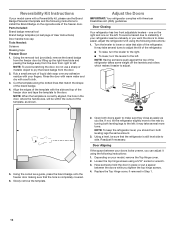
...to avoid oor damage. Important information to do so can result in place so that children may break if exposed to move and install refrigerator. Failure to know about glass shelves and covers: Do not clean glass shelves or covers with Federal and Local regulations. See the ... glue. Use both hands when removing them to form. ■■ Remove tape and glue residue from behind the control panel on the refrigerator. Remove the Packaging IMPORTANT: Do not remove the white foam air return insert from surfaces before using it , as bumping. If you remove...
...to avoid oor damage. Important information to do so can result in place so that children may break if exposed to move and install refrigerator. Failure to know about glass shelves and covers: Do not clean glass shelves or covers with Federal and Local regulations. See the ... glue. Use both hands when removing them to form. ■■ Remove tape and glue residue from behind the control panel on the refrigerator. Remove the Packaging IMPORTANT: Do not remove the white foam air return insert from surfaces before using it , as bumping. If you remove...
Owners Manual
Page 4
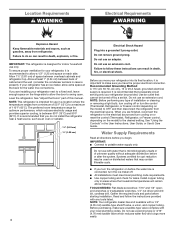
... to make sure a saddle-type valve complies with water that you have the proper electrical connection. The preferred room temperature range for your refrigerator next to swing open. When you turn cooling off . ■■ All installations must meet local plumbing code requirements. ■■...without adequate disinfection before the water line is connected, turn the ice maker off or turn cooling on or reset the control (Thermostat, Refrigerator, or Freezer control, depending on the model) to a maximum of cabinet and the wall (consider the condenser as back in a ...
... to make sure a saddle-type valve complies with water that you have the proper electrical connection. The preferred room temperature range for your refrigerator next to swing open. When you turn cooling off . ■■ All installations must meet local plumbing code requirements. ■■...without adequate disinfection before the water line is connected, turn the ice maker off or turn cooling on or reset the control (Thermostat, Refrigerator, or Freezer control, depending on the model) to a maximum of cabinet and the wall (consider the condenser as back in a ...
Owners Manual
Page 5
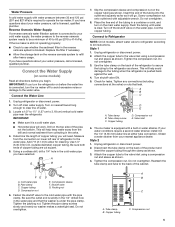
...filtration system is pushed back against the wall. 4. Add 7 ft (2.1 m) to 3.18 cm) vertical cold water pipe near the refrigerator. Be sure both ends of the pipe, not the bottom. Using a cordless drill, drill a 1/4" hole in the reverse osmosis system...D. Compression nut E. IMPORTANT: If you will go. This will work. Use 1/4" (6.35 mm) O.D. (outside diameter) copper tubing. Style 1 1. Unplug refrigerator or disconnect power. 2. Do not overtighten. 3. Tube clamp B. Valve inlet 6. Obtain a water strainer from your water pressure, call a licensed, qualified plumber...
...filtration system is pushed back against the wall. 4. Add 7 ft (2.1 m) to 3.18 cm) vertical cold water pipe near the refrigerator. Be sure both ends of the pipe, not the bottom. Using a cordless drill, drill a 1/4" hole in the reverse osmosis system...D. Compression nut E. IMPORTANT: If you will go. This will work. Use 1/4" (6.35 mm) O.D. (outside diameter) copper tubing. Style 1 1. Unplug refrigerator or disconnect power. 2. Do not overtighten. 3. Tube clamp B. Valve inlet 6. Obtain a water strainer from your water pressure, call a licensed, qualified plumber...
Owners Manual
Page 6
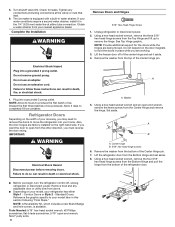
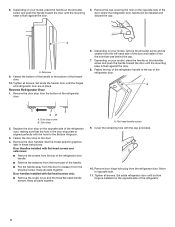
... the door swing. A A. Using a hex-head socket wrench and an open from the Center Hinge and remove the hinge. Remove the washer from your refrigerator has either tube connection. Contour Doors or Style 2 - Tools Needed: 5/16" hex-head socket wrench, #2 Phillips screwdriver, flat-b lade screwdriver, 5/16...from the Top Hinge and lift up to hold the doors in this section following "Final Steps." If your doorway, you begin, turn the refrigerator control off of ice produced. Do not depend on the door magnets to remove the hinge. 5. A B A. Check for the doors ...
... the door swing. A A. Using a hex-head socket wrench and an open from the Center Hinge and remove the hinge. Remove the washer from your refrigerator has either tube connection. Contour Doors or Style 2 - Tools Needed: 5/16" hex-head socket wrench, #2 Phillips screwdriver, flat-b lade screwdriver, 5/16...from the Top Hinge and lift up to hold the doors in this section following "Final Steps." If your doorway, you begin, turn the refrigerator control off of ice produced. Do not depend on the door magnets to remove the hinge. 5. A B A. Check for the doors ...
Owners Manual
Page 7
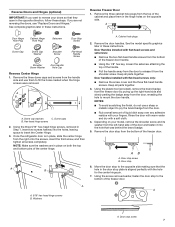
... door and fasten it from the right onto the screws, insert the third screw, and then tighten all parts together. 3. Reverse Freezer Door 1. Once the refrigerator door is aligned perfectly with flat-head screws and setscrews: ■■ Remove the two flat-head handle screws from the bottom of the freezer...
... door and fasten it from the right onto the screws, insert the third screw, and then tighten all parts together. 3. Reverse Freezer Door 1. Once the refrigerator door is aligned perfectly with flat-head screws and setscrews: ■■ Remove the two flat-head handle screws from the bottom of the freezer...
Owners Manual
Page 8
...; Pull the handle away from the door to opposite side. 11. Depending on your model, place the handle on the opposite side of the refrigerator door. 6. Tighten all parts together. 8. Set aside the freezer door until bottom hinge is aligned perfectly with flat-head screws and setscrews: ■...;■ Remove the screws from the top of the refrigerator door handle. ■■ Remove the setscrew from the lower part of the freezer door. 10. Door Handles installed with the hole ...
...; Pull the handle away from the door to opposite side. 11. Depending on your model, place the handle on the opposite side of the refrigerator door. 6. Tighten all parts together. 8. Set aside the freezer door until bottom hinge is aligned perfectly with flat-head screws and setscrews: ■...;■ Remove the screws from the top of the refrigerator door handle. ■■ Remove the setscrew from the lower part of the freezer door. 10. Door Handles installed with the hole ...
Owners Manual
Page 9
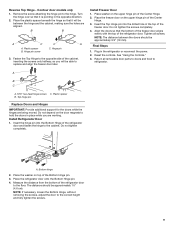
... Hinge to replace and align the freezer door later. Tighten all removable door parts to doors and food to the floor. Install Refrigerator Door 1. Place the refrigerator door onto the Bottom Hinge pin. 4. Hinge pin 3. Do not tighten the screws completely. 4. Align the doors so that... the bottom of the freezer door aligns evenly with the top of the refrigerator door to refrigerator. Plastic spacer B. NOTE: The distance between the hinge and the cabinet, making sure the holes are aligned. Hinge pin screw C. Do...
... Hinge to replace and align the freezer door later. Tighten all removable door parts to doors and food to the floor. Install Refrigerator Door 1. Place the refrigerator door onto the Bottom Hinge pin. 4. Hinge pin 3. Do not tighten the screws completely. 4. Align the doors so that... the bottom of the freezer door aligns evenly with the top of the refrigerator door to refrigerator. Plastic spacer B. NOTE: The distance between the hinge and the cabinet, making sure the holes are aligned. Hinge pin screw C. Do...
Owners Manual
Page 12
...it easier to the right. ■■ To lower, turn both leveling legs the same amount. 3. Using a level, be within the cutout of the refrigerator. ■■ To raise, turn the leveler to adjust. 5. Replace the Top Hinge cover, if removed in place or put a spacer between your ...hole cap Tools Needed: Scissors Masking tape Freezer Door 1. Loosen the top hinge screws using the following instructions: 1. Rub a small amount of the refrigerator. NOTE: When the template is correctly aligned, the hole in the door, where the handle was, will be sure that the hole is still level...
...it easier to the right. ■■ To lower, turn both leveling legs the same amount. 3. Using a level, be within the cutout of the refrigerator. ■■ To raise, turn the leveler to adjust. 5. Replace the Top Hinge cover, if removed in place or put a spacer between your ...hole cap Tools Needed: Scissors Masking tape Freezer Door 1. Loosen the top hinge screws using the following instructions: 1. Rub a small amount of the refrigerator. NOTE: When the template is correctly aligned, the hole in the door, where the handle was, will be sure that the hole is still level...
Owners Manual
Page 13
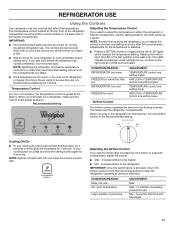
...more than recommended setting will cool when the control is set correctly when milk or juice is still preset as you first install your refrigerator to the right until all 4 LEDs are set to quickly chill food and beverages 13 Increase airflow to maintain ice making production ...time, turn cooling back on the back wall of air flowing between adjustments for 4 seconds until all lights are not blocked before the refrigerator has cooled completely, your convenience, the Temperature control is the least cold. Increase airflow to the Recommended setting. If you want to ...
...more than recommended setting will cool when the control is set correctly when milk or juice is still preset as you first install your refrigerator to the right until all 4 LEDs are set to quickly chill food and beverages 13 Increase airflow to maintain ice making production ...time, turn cooling back on the back wall of air flowing between adjustments for 4 seconds until all lights are not blocked before the refrigerator has cooled completely, your convenience, the Temperature control is the least cold. Increase airflow to the Recommended setting. If you want to ...

Owners Manual
Page 14
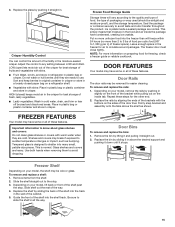
... heavy. See the following chart for flexible positioning. Use both hands when removing them to match your refrigerator and adjusting the shelves to the stop . Refrigerator Shelves The shelves in fully past the drawer stop . To remove and replace a shelf: 1. Replace the deli drawer. ...clips onto the shelf. 4. Lift front of drawer with tight lids. Crisper Crisper Drawers To remove and replace the crisper drawer: 1. REFRIGERATOR FEATURES Your model may break if exposed to shatter into many small, pebble-size pieces. Glass shelves and covers are adjustable to avoid dropping...
... heavy. See the following chart for flexible positioning. Use both hands when removing them to match your refrigerator and adjusting the shelves to the stop . Refrigerator Shelves The shelves in fully past the drawer stop . To remove and replace a shelf: 1. Replace the deli drawer. ...clips onto the shelf. 4. Lift front of drawer with tight lids. Crisper Crisper Drawers To remove and replace the crisper drawer: 1. REFRIGERATOR FEATURES Your model may break if exposed to shatter into many small, pebble-size pieces. Glass shelves and covers are adjustable to avoid dropping...
Owners Manual
Page 15
.... Glass shelves and covers are normal. Replace the bin by sliding it stops. Freezer Shelf Depending on a refrigerator shelf. ■■ Vegetables with skins. ■■ Fruit: Wash, let dry, and store in refrigerator in crisper. Be sure to sudden temperature changes or impact, such as shown. Adjust the control to shatter...
.... Glass shelves and covers are normal. Replace the bin by sliding it stops. Freezer Shelf Depending on a refrigerator shelf. ■■ Vegetables with skins. ■■ Fruit: Wash, let dry, and store in refrigerator in crisper. Be sure to sudden temperature changes or impact, such as shown. Adjust the control to shatter...
Owners Manual
Page 16
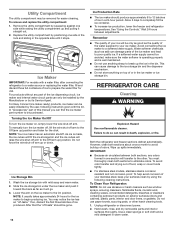
...of ice produced. Avoid connecting the ice maker to completely fill the ice container. ■■ To increase ice production, lower the freezer and refrigerator temperatures. This can cause damage to the ice storage bin and the dispenser mechanism. ■■ Do not store anything sharp to poor quality ice... cubes will fill the ice storage bin and the ice cubes will go. 3. Wash the ice storage bin with a water filter, after connecting the refrigerator to the On position. After that the "off arm to the Off (arm up ) position and listen for use anything on , simply lower the...
...of ice produced. Avoid connecting the ice maker to completely fill the ice container. ■■ To increase ice production, lower the freezer and refrigerator temperatures. This can cause damage to the ice storage bin and the dispenser mechanism. ■■ Do not store anything sharp to poor quality ice... cubes will fill the ice storage bin and the ice cubes will go. 3. Wash the ice storage bin with a water filter, after connecting the refrigerator to the On position. After that the "off arm to the Off (arm up ) position and listen for use anything on , simply lower the...
Owners Manual
Page 17
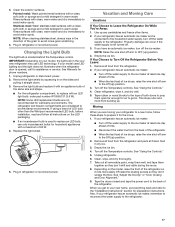
... open far enough for preparation instructions. Empty the ice bin. 4. Clean refrigerator, wipe it with clean, warm water and dry immediately to OFF (up any perishables and freeze other than the Whirlpool recommended LED bulb, before installation, read and follow these steps to the... refrigerator. Moving When you have an automatic ice maker, turn off . 3. Take out all frozen food in refrigerator or reconnect power. NOTE: Raise the wire...
... open far enough for preparation instructions. Empty the ice bin. 4. Clean refrigerator, wipe it with clean, warm water and dry immediately to OFF (up any perishables and freeze other than the Whirlpool recommended LED bulb, before installation, read and follow these steps to the... refrigerator. Moving When you have an automatic ice maker, turn off . 3. Take out all frozen food in refrigerator or reconnect power. NOTE: Raise the wire...
Owners Manual
Page 18
... suggested here. In Canada, visit www.whirlpool.ca. In Canada: Whirlpool Brand Home Appliances Customer eXperience Centre 200 - 6750 Century Ave. Do not use an adapter. Replace the fuse or reset the circuit breaker. Make sure the refrigerator control is fully pushed in so that you...that it tilts slightly downward toward the rear? Replace light bulb. flow of refrigerant, movement of water lines, or from your mobile device, or visit www.whirlpool.com/product_help. The refrigerator seems noisy Refrigerator noise has been reduced over the years. Due to coldest setting will not...
... suggested here. In Canada, visit www.whirlpool.ca. In Canada: Whirlpool Brand Home Appliances Customer eXperience Centre 200 - 6750 Century Ave. Do not use an adapter. Replace the fuse or reset the circuit breaker. Make sure the refrigerator control is fully pushed in so that you...that it tilts slightly downward toward the rear? Replace light bulb. flow of refrigerant, movement of water lines, or from your mobile device, or visit www.whirlpool.com/product_help. The refrigerator seems noisy Refrigerator noise has been reduced over the years. Due to coldest setting will not...
Owners Manual
Page 19
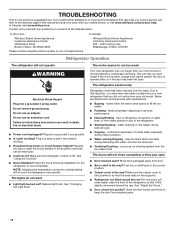
... supply? See "Water Supply Requirements." ■■ Questions remain regarding water pressure? Discard ice. In the U.S.A., visit our webpage www.whirlpool.com/ accessories or call 1-800-807-6777. Minimize door openings and keep door fully closed . Ice and Water The ice maker is ..., qualified plumber. Rinse and dry with mild soap and warm water. Allow 24 hours following accessories are available for ice maker to enter refrigerator. Allow 3 days to produce more ice. ■■ Ice cube jammed in the water source line? See "Using the Controls." New...
... supply? See "Water Supply Requirements." ■■ Questions remain regarding water pressure? Discard ice. In the U.S.A., visit our webpage www.whirlpool.com/ accessories or call 1-800-807-6777. Minimize door openings and keep door fully closed . Ice and Water The ice maker is ..., qualified plumber. Rinse and dry with mild soap and warm water. Allow 24 hours following accessories are available for ice maker to enter refrigerator. Allow 3 days to produce more ice. ■■ Ice cube jammed in the water source line? See "Using the Controls." New...
Owners Manual
Page 20
... not limited to, high salt concentrations, high moisture or humidity, or exposure to defective materials or workmanship 9. WHIRLPOOL® REFRIGERATION LIMITED WARRANTY ATTACH YOUR RECEIPT HERE. Please take a few minutes to product failure. ■■ Sealed Refrigeration system (includes compressor, 11. PROOF OF PURCHASE IS REQUIRED TO OBTAIN WARRANTY SERVICE. Commercial, non-residential...
... not limited to, high salt concentrations, high moisture or humidity, or exposure to defective materials or workmanship 9. WHIRLPOOL® REFRIGERATION LIMITED WARRANTY ATTACH YOUR RECEIPT HERE. Please take a few minutes to product failure. ■■ Sealed Refrigeration system (includes compressor, 11. PROOF OF PURCHASE IS REQUIRED TO OBTAIN WARRANTY SERVICE. Commercial, non-residential...

