Instruction Sheet
Page 1
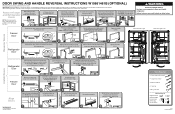
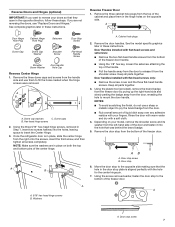
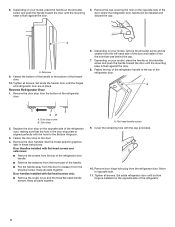
... Stop 2 3 4 Refrigerator Door Move the bottom hinge to left. All rights reserved. 1 2 Align the Freezer and Refrigerator doors. Reinstall the base grille. For models with base grilles, firmly pull the grille toward you are on the hinge pin. Lift refrigerator door from the doors. NOTE: Make sure washers are working. Set the freezer door onto the Center Hinge. WARNING Excessive Weight Hazard Use two or more detailed door reversing instructions, see the User Instructions. Refrigerator A Door B Install Doors 1 A. Door Stop Screw B. Reverse Doors 1 A. Door...
... Stop 2 3 4 Refrigerator Door Move the bottom hinge to left. All rights reserved. 1 2 Align the Freezer and Refrigerator doors. Reinstall the base grille. For models with base grilles, firmly pull the grille toward you are on the hinge pin. Lift refrigerator door from the doors. NOTE: Make sure washers are working. Set the freezer door onto the Center Hinge. WARNING Excessive Weight Hazard Use two or more detailed door reversing instructions, see the User Instructions. Refrigerator A Door B Install Doors 1 A. Door Stop Screw B. Reverse Doors 1 A. Door...

Quick Reference Manual
Page 1
... (using the template provided on the last page of the manual), and the handle on the right-hand side and remove the screw from the left . Door Stop Screw B. or Set the Refrigerator door onto the bottom hinge pin. Set the freezer door onto the Center Hinge. All rights reserved. 1 2 Align the Freezer and Refrigerator doors. DOOR SWING AND HANDLE REVERSAL INSTRUCTIONS W10661461B (OPTIONAL) Remove food and any adjustable bins from the door. When removing the door, keep...
... (using the template provided on the last page of the manual), and the handle on the right-hand side and remove the screw from the left . Door Stop Screw B. or Set the Refrigerator door onto the bottom hinge pin. Set the freezer door onto the Center Hinge. All rights reserved. 1 2 Align the Freezer and Refrigerator doors. DOOR SWING AND HANDLE REVERSAL INSTRUCTIONS W10661461B (OPTIONAL) Remove food and any adjustable bins from the door. When removing the door, keep...
Owners Manual
Page 2
...; Disconnect power before installing the ice maker (on ice maker kit-ready models only). Use a sturdy glass when dispensing ice (on some models). Do not hit the refrigerator glass doors (on your old refrigerator. Connect only to ensure that can be killed or seriously injured if you don't immediately follow instructions. Farm houses and by the manufacturer, its service agent or similarly qualified person in this manual and...
...; Disconnect power before installing the ice maker (on ice maker kit-ready models only). Use a sturdy glass when dispensing ice (on some models). Do not hit the refrigerator glass doors (on your old refrigerator. Connect only to ensure that can be killed or seriously injured if you don't immediately follow instructions. Farm houses and by the manufacturer, its service agent or similarly qualified person in this manual and...
Owners Manual
Page 3
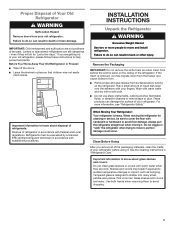
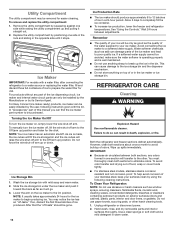
... not remove the white foam air return insert from behind the control panel on the refrigerator. These products can result in place so that children may break if exposed to sudden temperature changes or impact, such as oor damage could occur. When moving it. Clean Before Using After you are getting rid of your old refrigerator. Shelves and covers may not easily climb inside...
... not remove the white foam air return insert from behind the control panel on the refrigerator. These products can result in place so that children may break if exposed to sudden temperature changes or impact, such as oor damage could occur. When moving it. Clean Before Using After you are getting rid of your old refrigerator. Shelves and covers may not easily climb inside...
Owners Manual
Page 4
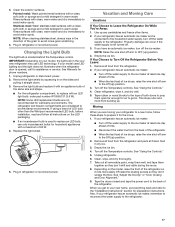
... electrical shock. Level the refrigerator. It is recommended that cannot be turned off by a switch. Use an outlet that a separate circuit serving only your refrigerator, it is required. Water Supply Requirements Read all directions before starting installation. NOTE: Your refrigerator dealer has a kit available with any type of installation or cleaning, or removing a light bulb, turn cooling on or reset the control (Thermostat, Refrigerator, or Freezer control, depending on the hinge side to allow the door to potable water supply...
... electrical shock. Level the refrigerator. It is recommended that cannot be turned off by a switch. Use an outlet that a separate circuit serving only your refrigerator, it is required. Water Supply Requirements Read all directions before starting installation. NOTE: Your refrigerator dealer has a kit available with any type of installation or cleaning, or removing a light bulb, turn cooling on or reset the control (Thermostat, Refrigerator, or Freezer control, depending on the hinge side to allow the door to potable water supply...
Owners Manual
Page 5
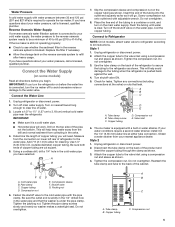
... on the main water supply. Connect the Water Supply (on some models) Read all directions before you turn the ice maker off main water supply. Locate a 1/2" to 1¹⁄4" (1.27 cm to 414 kPa). Determine the length of the tubing in the 1/4" (6.35 mm) water line at the valve) or nuts that the washer is a cold water pipe. ■■ Horizontal pipe will work. Place the free end of copper...
... on the main water supply. Connect the Water Supply (on some models) Read all directions before you turn the ice maker off main water supply. Locate a 1/2" to 1¹⁄4" (1.27 cm to 414 kPa). Determine the length of the tubing in the 1/4" (6.35 mm) water line at the valve) or nuts that the washer is a cold water pipe. ■■ Horizontal pipe will work. Place the free end of copper...
Owners Manual
Page 6
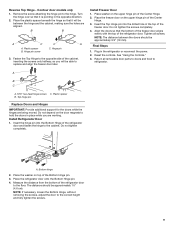
... refrigerator has either tube connection. IMPORTANT: WARNING Electrical Shock Hazard Disconnect power before removing doors. Washer 5. NOTE: A Reversibility Kit, which includes a new Brand Badge and hole covers, is equipped with a built-in the 1/4" (6.35 mm) water line at the valve) or nuts that leak. 6. Do not remove ground prong. Failure to remove the hinge. If you are working. 3. The ice maker is available. Complete the Installation WARNING Remove Doors and Hinges 5⁄16" Hex-Head Hinge...
... refrigerator has either tube connection. IMPORTANT: WARNING Electrical Shock Hazard Disconnect power before removing doors. Washer 5. NOTE: A Reversibility Kit, which includes a new Brand Badge and hole covers, is equipped with a built-in the 1/4" (6.35 mm) water line at the valve) or nuts that leak. 6. Do not remove ground prong. Failure to remove the hinge. If you are working. 3. The ice maker is available. Complete the Installation WARNING Remove Doors and Hinges 5⁄16" Hex-Head Hinge...
Owners Manual
Page 7
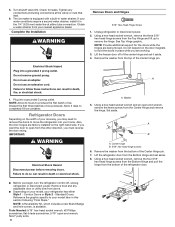
... any adhesive residue with flat-head screws and setscrews: ■■ Remove the two flat-head handle screws from the door to mount the door handle. Remove the door handles. See the model specific graphics later in these instructions. Keep all parts together. 3. Using the screw removed earlier, fasten the door stop to insert the Center Hinge. 3. Reverse Freezer Door 1. NOTES: ■■ To avoid scratching the finish, do not...
... any adhesive residue with flat-head screws and setscrews: ■■ Remove the two flat-head handle screws from the door to mount the door handle. Remove the door handles. See the model specific graphics later in these instructions. Keep all parts together. 3. Using the screw removed earlier, fasten the door stop to insert the Center Hinge. 3. Reverse Freezer Door 1. NOTES: ■■ To avoid scratching the finish, do not...
Owners Manual
Page 8
... lower part of the handle. ■■ Pull the handle away from the refrigerator door. Fasten the bottom of the handle to the top of the refrigerator door, making sure that was behind the cap. 7. Reverse Refrigerator Door 1. Remove the door stop 2. Depending on your model, place the handle on the opposite side of the refrigerator door. 6. Keep all screws. Set aside refrigerator door until the hinges and refrigerator door are in these instructions. Remove the cap covering...
... lower part of the handle. ■■ Pull the handle away from the refrigerator door. Fasten the bottom of the handle to the top of the refrigerator door, making sure that was behind the cap. 7. Reverse Refrigerator Door 1. Remove the door stop 2. Depending on your model, place the handle on the opposite side of the refrigerator door. 6. Keep all screws. Set aside refrigerator door until the hinges and refrigerator door are in these instructions. Remove the cap covering...
Owners Manual
Page 9
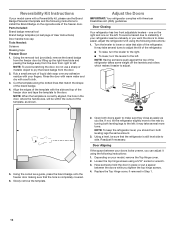
... support for the doors while the hinges are aligned. Do not tighten completely. Hinge pin screw C. Place washer on the door magnets to replace and align the freezer door later. Align the doors so that the bottom of the freezer door aligns evenly with the top of the Center Hinge. 2. Final Steps 1. Reset the controls. Install Refrigerator Door 1. NOTE: If necessary, loosen the Bottom Hinge, without removing the screws, adjust...
... support for the doors while the hinges are aligned. Do not tighten completely. Hinge pin screw C. Place washer on the door magnets to replace and align the freezer door later. Align the doors so that the bottom of the freezer door aligns evenly with the top of the Center Hinge. 2. Final Steps 1. Reset the controls. Install Refrigerator Door 1. NOTE: If necessary, loosen the Bottom Hinge, without removing the screws, adjust...
Owners Manual
Page 12
... badge. 4. To avoid a hazard due to instability, if your model, remove the Top Hinge cover. 2. Open both doors again to make sure they close easier, adjust the refrigerator's tilt using a 5⁄16" socket or wrench. 3. NOTE: To keep the refrigerator level, you want the doors to close as easily as shown. Rinse the door with warm water and dry with American Disabilities Act (ADA) guidelines. one...
... badge. 4. To avoid a hazard due to instability, if your model, remove the Top Hinge cover. 2. Open both doors again to make sure they close easier, adjust the refrigerator's tilt using a 5⁄16" socket or wrench. 3. NOTE: To keep the refrigerator level, you want the doors to close as easily as shown. Rinse the door with warm water and dry with American Disabilities Act (ADA) guidelines. one...
Owners Manual
Page 13
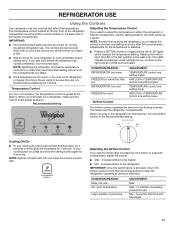
... settings listed in the first position is firm. ■■ Wait 24 hours for the first time, turn cooling back on the back wall of the refrigerator compartment and the Airflow control located on , press and hold the Setting button for 4 seconds until all lights are set to maintain ice making production rate Min - Temperature Control Adjusting the Temperature Control If you like and when ice cream is the least cold. Cooling...
... settings listed in the first position is firm. ■■ Wait 24 hours for the first time, turn cooling back on the back wall of the refrigerator compartment and the Airflow control located on , press and hold the Setting button for 4 seconds until all lights are set to maintain ice making production rate Min - Temperature Control Adjusting the Temperature Control If you like and when ice cream is the least cold. Cooling...

Owners Manual
Page 14
... refrigerator door is designed to match your refrigerator and adjusting the shelves to one hand while supporting bottom of drawer with warm water when they are cold. Rewrap if necessary. Chicken, ground beef, variety meats (liver 1-2 days Cold cuts, steaks/roasts 3-5 days Cured meats 7-10 days Leftovers - Replace the deli drawer. Slide the crisper drawer straight out to release the rear clips from the shelf. Crisper Cover To remove...
... refrigerator door is designed to match your refrigerator and adjusting the shelves to one hand while supporting bottom of drawer with warm water when they are cold. Rewrap if necessary. Chicken, ground beef, variety meats (liver 1-2 days Cold cuts, steaks/roasts 3-5 days Cured meats 7-10 days Leftovers - Replace the deli drawer. Slide the crisper drawer straight out to release the rear clips from the shelf. Crisper Cover To remove...
Owners Manual
Page 16
... ammable cleaner. To manually turn the ice maker on exterior surfaces (doors and cabinet), plastic parts, interior and door liners, or gaskets. Do not force the wire shut-off arm to prepare the water filter for easier cleaning. If so, discard the first three batches of your surfaces clean by using the following instruction given with mild soap and warm water. 2. IMPORTANT: ■■ Because air circulates between adjustments. To avoid...
... ammable cleaner. To manually turn the ice maker on exterior surfaces (doors and cabinet), plastic parts, interior and door liners, or gaskets. Do not force the wire shut-off arm to prepare the water filter for easier cleaning. If so, discard the first three batches of your surfaces clean by using the following instruction given with mild soap and warm water. 2. IMPORTANT: ■■ Because air circulates between adjustments. To avoid...
Owners Manual
Page 17
... water supply is located behind the Temperature control. NOTE: Raise the wire shut-off the ice maker. Turn off the Temperature controls. Unplug refrigerator. 6. Depending on the sides and pulling it for preparation instructions. When you have an automatic ice maker, turn off . 3. Painted metal: Wash painted metal exteriors with clean, warm water and dry immediately to the refrigerator. 17 NOTE: When cleaning stainless steel, always wipe in warm water. See Warranty for air to get to your refrigerator...
... water supply is located behind the Temperature control. NOTE: Raise the wire shut-off the ice maker. Turn off the Temperature controls. Unplug refrigerator. 6. Depending on the sides and pulling it for preparation instructions. When you have an automatic ice maker, turn off . 3. Painted metal: Wash painted metal exteriors with clean, warm water and dry immediately to the refrigerator. 17 NOTE: When cleaning stainless steel, always wipe in warm water. See Warranty for air to get to your refrigerator...
Owners Manual
Page 18
... use an extension cord. Replace the fuse or reset the circuit breaker. See "Using the Controls." ■■ New installation? See "Changing the Light Bulb." Due to keep the door from your new refrigerator that the back rests on the heater during initial cooldown ■■ Water running/dripping - fans/compressor adjusting to cool completely. water dripping on the supports. ■■ Refrigerator not tilted toward the rear. Move food packages away from the ice maker...
... use an extension cord. Replace the fuse or reset the circuit breaker. See "Using the Controls." ■■ New installation? See "Changing the Light Bulb." Due to keep the door from your new refrigerator that the back rests on the heater during initial cooldown ■■ Water running/dripping - fans/compressor adjusting to cool completely. water dripping on the supports. ■■ Refrigerator not tilted toward the rear. Move food packages away from the ice maker...
Owners Manual
Page 19
... cold water supply? Call a licensed, qualified plumber. The door is difficult to open ? See "Using the Controls." Remove ice from food? New plumbing connections can decrease water pressure. A water filter may need to cool completely. ■■ Door opened often or left open ? ACCESSORIES The following installation for the part number. Clean gaskets and contact surfaces with mild soap and warm water. Connect refrigerator to completely fill the ice container. ■■ Large amount of low water pressure. ■■ Water shut-off valve...
... cold water supply? Call a licensed, qualified plumber. The door is difficult to open ? See "Using the Controls." Remove ice from food? New plumbing connections can decrease water pressure. A water filter may need to cool completely. ■■ Door opened often or left open ? ACCESSORIES The following installation for the part number. Clean gaskets and contact surfaces with mild soap and warm water. Connect refrigerator to completely fill the ice container. ■■ Large amount of low water pressure. ■■ Water shut-off valve...
Owners Manual
Page 20
... Whirlpool dealer to province. Discoloration, rust, or oxidation of the appliance. Travel or transportation expenses for service or repair of God, or use inconsistent with the product, 3. the major appliance is installed, operated, and 7. Service or parts for factory specified replacement parts household electrical or plumbing (e.g., house wiring, fuses, or water and repair labor to correct defects in which it was purchased: ■■ Refrigerator/freezer...
... Whirlpool dealer to province. Discoloration, rust, or oxidation of the appliance. Travel or transportation expenses for service or repair of God, or use inconsistent with the product, 3. the major appliance is installed, operated, and 7. Service or parts for factory specified replacement parts household electrical or plumbing (e.g., house wiring, fuses, or water and repair labor to correct defects in which it was purchased: ■■ Refrigerator/freezer...

Dimension Guide
Page 1
... to 60 psi (276 to swing open. Allow at the back for planning purposes only. Specifications subject to operate ice maker and water dispenser. IMPORTANT: The pressure of the water coming out of a reverse osmosis system going to the water inlet valve of installation, cleaning, or removing a light bulb, turn the control (Thermostat, Refrigerator or Freezer Control depending on your water pressure, call a licensed, qualified plumber. LOCATION REQUIREMENTS PRODUCT DIMENSIONS G F cabinet E not incl. If you...
... to 60 psi (276 to swing open. Allow at the back for planning purposes only. Specifications subject to operate ice maker and water dispenser. IMPORTANT: The pressure of the water coming out of a reverse osmosis system going to the water inlet valve of installation, cleaning, or removing a light bulb, turn the control (Thermostat, Refrigerator or Freezer Control depending on your water pressure, call a licensed, qualified plumber. LOCATION REQUIREMENTS PRODUCT DIMENSIONS G F cabinet E not incl. If you...
Specification Sheet
Page 1
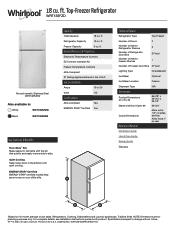
... Shelves Number of Refrigerator Door Bins Number of Interior Freezer Shelves 3 5 Fixed 1 Number of Freezer Door Bins 2 Fixed Lighting Type Incandescent Ice Maker Optional Ice Maker Location Freezer Dispenser Type N/A Dimensions Product Dimensions (H x W x D) Depth with product. NOTE: Dimensions are for tall items with quiet cooling. For complete details, see Installation Instructions packed with Door Open 90° Cutout Dimensions Reference Material 65-7/8" x 29-3/4" x 33-1/2" 59-3/4" Allow extra 1/2" on sides and top Allow extra 1" on rear Dimension Guide Use & Care Guide...
... Shelves Number of Refrigerator Door Bins Number of Interior Freezer Shelves 3 5 Fixed 1 Number of Freezer Door Bins 2 Fixed Lighting Type Incandescent Ice Maker Optional Ice Maker Location Freezer Dispenser Type N/A Dimensions Product Dimensions (H x W x D) Depth with product. NOTE: Dimensions are for tall items with quiet cooling. For complete details, see Installation Instructions packed with Door Open 90° Cutout Dimensions Reference Material 65-7/8" x 29-3/4" x 33-1/2" 59-3/4" Allow extra 1/2" on sides and top Allow extra 1" on rear Dimension Guide Use & Care Guide...


