
Warranty Information
Page 1
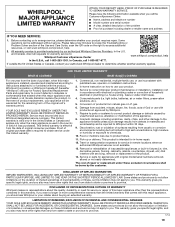
...chips, and other than the limited warranty that vary from the date of God or use with the product, Whirlpool Corporation or Whirlpool Canada LP (hereafter "Whirlpool") will be borne by the customer. This product is required to the appliance finishes unless such damage results ...determine whether another warranty applies. Travel or transportation expenses for Factory Specified Replacement Parts and repair labor to correct defects in materials and workmanship and is provided exclusively by a Whirlpool designated service company. The cost of products from state to state or ...
...chips, and other than the limited warranty that vary from the date of God or use with the product, Whirlpool Corporation or Whirlpool Canada LP (hereafter "Whirlpool") will be borne by the customer. This product is required to the appliance finishes unless such damage results ...determine whether another warranty applies. Travel or transportation expenses for Factory Specified Replacement Parts and repair labor to correct defects in materials and workmanship and is provided exclusively by a Whirlpool designated service company. The cost of products from state to state or ...
Warranty Information
Page 1
...information available when you also may have other damage to or furnished with the product, Whirlpool Corporation or Whirlpool Canada LP (hereafter "Whirlpool") will be borne by Whirlpool. 7. Conversion of products from the date of inaccessible appliances or built-in materials and..., batteries, air or water filters, preservation solutions, etc.). 5. Repairs to parts or systems to Whirlpool within 30 days. 9. Food or medicine loss due to : Whirlpool Customer eXperience Center www.whirlpool.com/product_help In the U.S.A., call 1-800-807-6777. EXCLUSION OF INCIDENTAL AND...
...information available when you also may have other damage to or furnished with the product, Whirlpool Corporation or Whirlpool Canada LP (hereafter "Whirlpool") will be borne by Whirlpool. 7. Conversion of products from the date of inaccessible appliances or built-in materials and..., batteries, air or water filters, preservation solutions, etc.). 5. Repairs to parts or systems to Whirlpool within 30 days. 9. Food or medicine loss due to : Whirlpool Customer eXperience Center www.whirlpool.com/product_help In the U.S.A., call 1-800-807-6777. EXCLUSION OF INCIDENTAL AND...
Use & Care Guide
Page 2
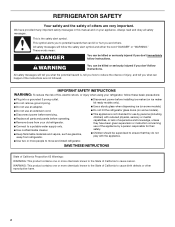
... cause birth defects or other reproductive harm. 2 I Do not use an adapter. I This appliance is not intended for their safety. Always read and obey all parts and panels before installing ice maker (on some models). I Do not remove ground prong. I Use two or more chemicals known to the State of California...
... cause birth defects or other reproductive harm. 2 I Do not use an adapter. I This appliance is not intended for their safety. Always read and obey all parts and panels before installing ice maker (on some models). I Do not remove ground prong. I Use two or more chemicals known to the State of California...
Use & Care Guide
Page 4
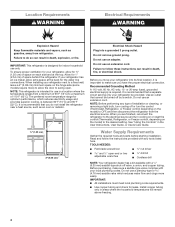
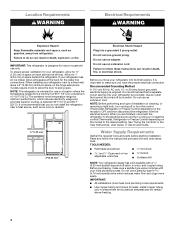
... plumbing code requirements. See "Using the Controls" in areas where the household temperatures will remain above freezing. 4 Water Supply Requirements Gather the required tools and parts before starting installation. It is required. Do not use in death, fire, or electrical shock. TOOLS NEEDED: Flat-blade screwdriver ¹⁄₄" nut driver...
... plumbing code requirements. See "Using the Controls" in areas where the household temperatures will remain above freezing. 4 Water Supply Requirements Gather the required tools and parts before starting installation. It is required. Do not use in death, fire, or electrical shock. TOOLS NEEDED: Flat-blade screwdriver ¹⁄₄" nut driver...
Use & Care Guide
Page 7
... freezer door handle. Depending on the opposite side of the refrigerator door, making sure that the hole in place on the opposite side. Keep all parts together. 3. Remove the door stop screw 8. Door stop A A. NOTE: Make sure the washers are in the door stop from the door. Using ...the freezer door. Door Handles installed with flat-head screws only: Remove the screw cover and the three flat-head handle screws. Keep all parts together. Rinse the door with warm water and dry with your fingers. Remove the door handles. Remove the three cabinet hole plugs from ...
... freezer door handle. Depending on the opposite side of the refrigerator door, making sure that the hole in place on the opposite side. Keep all parts together. 3. Remove the door stop screw 8. Door stop A A. NOTE: Make sure the washers are in the door stop from the door. Using ...the freezer door. Door Handles installed with flat-head screws only: Remove the screw cover and the three flat-head handle screws. Keep all parts together. Rinse the door with warm water and dry with your fingers. Remove the door handles. Remove the three cabinet hole plugs from ...

Use & Care Guide
Page 8
... the hinges are aligned. A. Place the refrigerator door onto the Bottom Hinge pin. 4. Door handles installed with the cap (provided). 10. Keep all parts together. Contour door models only 1. Place the plastic spacer beneath the hinge so that it is flush against the door. 8. Hinge pin 3. Fasten the... with flat-head screws and setscrews: Remove the screws from the top of the handle. Remove the setscrew from the refrigerator door. Keep all parts together. 5. Remove the cap covering the hole on top of the refrigerator. Reverse Top Hinge - Turn the hinge over so that was behind...
... the hinges are aligned. A. Place the refrigerator door onto the Bottom Hinge pin. 4. Door handles installed with the cap (provided). 10. Keep all parts together. Contour door models only 1. Place the plastic spacer beneath the hinge so that it is flush against the door. 8. Hinge pin 3. Fasten the... with flat-head screws and setscrews: Remove the screws from the top of the handle. Remove the setscrew from the refrigerator door. Keep all parts together. 5. Remove the cap covering the hole on top of the refrigerator. Reverse Top Hinge - Turn the hinge over so that was behind...

Use & Care Guide
Page 9
..." Hex-Head Hinge Screws A. Door Handle Hole Cap 9 Place the freezer door on the upper hinge pin of the Center Hinge. 3. Tighten all removable door parts to doors and food to refrigerator. NOTE: The distance between the doors should be approximately ³⁄₄" (19 mm). Style 1 - Top Hinge C. Hinge Pin...
..." Hex-Head Hinge Screws A. Door Handle Hole Cap 9 Place the freezer door on the upper hinge pin of the Center Hinge. 3. Tighten all removable door parts to doors and food to refrigerator. NOTE: The distance between the doors should be approximately ³⁄₄" (19 mm). Style 1 - Top Hinge C. Hinge Pin...

Use & Care Guide
Page 11
... refrigerator complies with a soft cloth. 3. Have someone push against the top of User Instructions) Door handle hole cap Tools Needed: Scissors Masking tape Freezer Door 1. Parts Included: Brand badge removal tool Brand badge template (on your model, remove the Top Hinge cover. 2. Door Aligning If the space between the doors while...
... refrigerator complies with a soft cloth. 3. Have someone push against the top of User Instructions) Door handle hole cap Tools Needed: Scissors Masking tape Freezer Door 1. Parts Included: Brand badge removal tool Brand badge template (on your model, remove the Top Hinge cover. 2. Door Aligning If the space between the doors while...
Use & Care Guide
Page 15
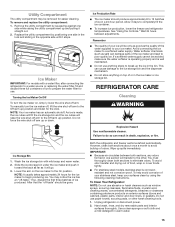
...1. Remove the utility compartment by positioning one section will be gone. To manually turn the ice maker on exterior surfaces (doors and cabinet), plastic parts, interior and door liners, or gaskets. Wash the ice storage bin with a water filter, after connecting the refrigerator to a water source or ... wire shut-off arm. If a softened water supply cannot be removed for use abrasive or harsh cleaners such as salt) can damage parts of odors. Both the refrigerator and freezer sections defrost automatically. Do not use anything on the ice maker to avoid buildup of the ...
...1. Remove the utility compartment by positioning one section will be gone. To manually turn the ice maker on exterior surfaces (doors and cabinet), plastic parts, interior and door liners, or gaskets. Wash the ice storage bin with a water filter, after connecting the refrigerator to a water source or ... wire shut-off arm. If a softened water supply cannot be removed for use abrasive or harsh cleaners such as salt) can damage parts of odors. Both the refrigerator and freezer sections defrost automatically. Do not use anything on the ice maker to avoid buildup of the ...

Use & Care Guide
Page 16
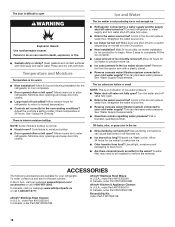
... not recommended for wet/damp environments. Empty the ice bin. Disconnect the water line from the refrigerator. 2. Take out all removable parts, wrap them well, and tape them open areas behind the control. 1. Tape the doors closed and tape the power cord to avoid...power. 2. Painted metal: Wash painted metal exteriors with an incandescent bulb, use LED technology. Rinse surfaces with an LED bulb, order part number W10565137 (3.6 watts). Refrigerator Compartment Light The refrigerator light bulb is significant pet traffic in warm water. If your refrigerator has an ...
... not recommended for wet/damp environments. Empty the ice bin. Disconnect the water line from the refrigerator. 2. Take out all removable parts, wrap them well, and tape them open areas behind the control. 1. Tape the doors closed and tape the power cord to avoid...power. 2. Painted metal: Wash painted metal exteriors with an incandescent bulb, use LED technology. Rinse surfaces with an LED bulb, order part number W10565137 (3.6 watts). Refrigerator Compartment Light The refrigerator light bulb is significant pet traffic in warm water. If your refrigerator has an ...
Use & Care Guide
Page 18
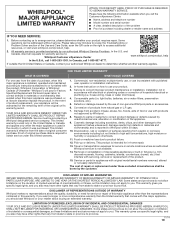
...whirlpool.com/ accessories or call 1-800-807-6777. affresh® Stainless Steel Cleaner: In U.S.A., order Part #W10355016 In Canada, order Part #W10355016B affresh® Stainless Steel Wipes: In U.S.A., order Part #W10355049 In Canada, order Part #W10355049B affresh® Kitchen & Appliance Cleaner: In U.S.A., order Part #W10355010 In Canada, order Part...WARNING Explosion Hazard Use nonflammable cleaner. Straighten the water source line. The ice cubes are available for the part number. Questions remain regarding water pressure? To order, contact us and ask for your cold water supply?...
...whirlpool.com/ accessories or call 1-800-807-6777. affresh® Stainless Steel Cleaner: In U.S.A., order Part #W10355016 In Canada, order Part #W10355016B affresh® Stainless Steel Wipes: In U.S.A., order Part #W10355049 In Canada, order Part #W10355049B affresh® Kitchen & Appliance Cleaner: In U.S.A., order Part #W10355010 In Canada, order Part...WARNING Explosion Hazard Use nonflammable cleaner. Straighten the water source line. The ice cubes are available for the part number. Questions remain regarding water pressure? To order, contact us and ask for your cold water supply?...
Use & Care Guide
Page 19
...appliances or built-in -home repair. 13. house wiring, fuses or water inlet hoses). 4. Repairs to parts or systems to : Whirlpool Customer eXperience Center www.whirlpool.com/product_help In the U.S.A., call 1-800-807-6777. Removal or reinstallation of household electrical or plumbing (i.e....humidity or exposure to province. 11/14 19 Some states and provinces do not allow the exclusion or limitation of non-genuine Whirlpool parts or accessories. 6. If you . LIMITATION OF REMEDIES; Conversion of original consumer purchase. Cosmetic damage including scratches, dents, chips...
...appliances or built-in -home repair. 13. house wiring, fuses or water inlet hoses). 4. Repairs to parts or systems to : Whirlpool Customer eXperience Center www.whirlpool.com/product_help In the U.S.A., call 1-800-807-6777. Removal or reinstallation of household electrical or plumbing (i.e....humidity or exposure to province. 11/14 19 Some states and provinces do not allow the exclusion or limitation of non-genuine Whirlpool parts or accessories. 6. If you . LIMITATION OF REMEDIES; Conversion of original consumer purchase. Cosmetic damage including scratches, dents, chips...

Instruction Sheet
Page 1
W10870916B BADGE INSTALLATION INSTRUCTIONS To install badge, please use the brand badge placement template and the following instructions. Parts Included: Brand badge Badge template (on the last page of the template, as a guide, press the brand badge onto the freezer door, making sure that ...
W10870916B BADGE INSTALLATION INSTRUCTIONS To install badge, please use the brand badge placement template and the following instructions. Parts Included: Brand badge Badge template (on the last page of the template, as a guide, press the brand badge onto the freezer door, making sure that ...

Use & Care Guide
Page 2
... old refrigerator. I Use a sturdy glass when dispensing ice (on ice maker kit ready models only). I Plug into a grounded 3 prong outlet. Always read and obey all parts and panels before servicing. These words mean: DANGER You can kill or hurt you don't immediately follow these basic precautions: I Use two or more chemicals...
... old refrigerator. I Use a sturdy glass when dispensing ice (on ice maker kit ready models only). I Plug into a grounded 3 prong outlet. Always read and obey all parts and panels before servicing. These words mean: DANGER You can kill or hurt you don't immediately follow these basic precautions: I Use two or more chemicals...
Use & Care Guide
Page 4
... that a separate circuit serving only your refrigerator has an ice maker, allow the door to swing open. Water Supply Requirements Gather the required tools and parts before starting installation. IMPORTANT: This refrigerator is designed for 1" (2.54 cm) of 110°F (43°C). See "Using the Controls" in the User Instructions, User...
... that a separate circuit serving only your refrigerator has an ice maker, allow the door to swing open. Water Supply Requirements Gather the required tools and parts before starting installation. IMPORTANT: This refrigerator is designed for 1" (2.54 cm) of 110°F (43°C). See "Using the Controls" in the User Instructions, User...

Use & Care Guide
Page 7
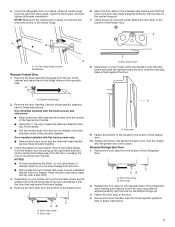
Once the refrigerator door is flush against the door. A A. Keep all parts together. 3. Door handles installed with a soft cloth. 4. AB A. Setscrew 9. Set aside the freezer door until the mounting base is in place. Reverse Refrigerator Door 1. AB A. ... on your model, place the handle on your fingers. Cabinet hole plugs 2. Door Handles installed with the hole for the Bottom Hinge pin. 3. Keep all parts together. See the model specific graphics later in the door stop plate is aligned perfectly with your model, remove the shoulder screw and its washer...
Once the refrigerator door is flush against the door. A A. Keep all parts together. 3. Door handles installed with a soft cloth. 4. AB A. Setscrew 9. Set aside the freezer door until the mounting base is in place. Reverse Refrigerator Door 1. AB A. ... on your model, place the handle on your fingers. Cabinet hole plugs 2. Door Handles installed with the hole for the Bottom Hinge pin. 3. Keep all parts together. See the model specific graphics later in the door stop plate is aligned perfectly with your model, remove the shoulder screw and its washer...

Use & Care Guide
Page 8
... the door. 8. Insert the hinge pin into the hole that was behind the cap. 7. Flat-head handle screws 9. Tighten all parts together. 5. NOTE: If necessary, loosen the Bottom Hinge, without removing the screws, adjust the door to opposite side. 11. Remove.... 8 Contour Door models only 1. Top hinge pin C. Install Refrigerator Door 1. Place the washer on the opposite side of the refrigerator. Hinge pin screw C. Keep all parts together. Remove the screw attaching the hinge pin to the top of the Bottom Hinge pin. 3. A B C A Hex-head hinge screws B. B B A C ...
... the door. 8. Insert the hinge pin into the hole that was behind the cap. 7. Flat-head handle screws 9. Tighten all parts together. 5. NOTE: If necessary, loosen the Bottom Hinge, without removing the screws, adjust the door to opposite side. 11. Remove.... 8 Contour Door models only 1. Top hinge pin C. Install Refrigerator Door 1. Place the washer on the opposite side of the refrigerator. Hinge pin screw C. Keep all parts together. Remove the screw attaching the hinge pin to the top of the Bottom Hinge pin. 3. A B C A Hex-head hinge screws B. B B A C ...

Use & Care Guide
Page 9
...: The distance between the doors should be approximately ³⁄₄" (19 mm). Door Stop B. Door Stop Screw 7 A. Door Stop Screw A. Tighten all removable door parts to doors and food to refrigerator. Return all screws. Center Hinge B. 5/16" Hex-Head Hinge Screws Bottom Hinge 6A A B 3 A C A. Door Hinge Hole Plug 4 Removal of...
...: The distance between the doors should be approximately ³⁄₄" (19 mm). Door Stop B. Door Stop Screw 7 A. Door Stop Screw A. Tighten all removable door parts to doors and food to refrigerator. Return all screws. Center Hinge B. 5/16" Hex-Head Hinge Screws Bottom Hinge 6A A B 3 A C A. Door Hinge Hole Plug 4 Removal of...

Use & Care Guide
Page 11
... badge from the door. 2. To lower, turn the leveler to the left . Slowly remove the template. 2. Loosen the top hinge screws using the following instructions: 1. Parts Included: Brand badge removal tool Brand badge template (on last page of the freezer door. NOTE: To avoid scratching the door, do not use the...
... badge from the door. 2. To lower, turn the leveler to the left . Slowly remove the template. 2. Loosen the top hinge screws using the following instructions: 1. Parts Included: Brand badge removal tool Brand badge template (on last page of the freezer door. NOTE: To avoid scratching the door, do not use the...

Use & Care Guide
Page 15
... As ice is corrosionresistant and not corrosion-proof. See "Using the Control(s)." Lower the arm on exterior surfaces (doors and cabinet), plastic parts, interior and door liners or gaskets. To help avoid corrosion of the ice maker and lead to poor quality ice. Replace the utility ...ice produced. Ice Production Rate ■ The ice maker should be only as good as it stops. Hand wash, rinse, and dry removable parts and interior surfaces thoroughly. Use a clean sponge or soft cloth and a mild detergent in warm water. 15 Utility Compartment The utility compartment ...
... As ice is corrosionresistant and not corrosion-proof. See "Using the Control(s)." Lower the arm on exterior surfaces (doors and cabinet), plastic parts, interior and door liners or gaskets. To help avoid corrosion of the ice maker and lead to poor quality ice. Replace the utility ...ice produced. Ice Production Rate ■ The ice maker should be only as good as it stops. Hand wash, rinse, and dry removable parts and interior surfaces thoroughly. Use a clean sponge or soft cloth and a mild detergent in warm water. 15 Utility Compartment The utility compartment ...


