
Dimension Guide
Page 1
... installation, cleaning, or removing a light bulb, turn the control (Thermostat, Refrigerator or Freezer Control depending on your model) to 414 kPa). handle D incl. Allow at the back for the water line connections. When you are installing your refrigerator has an ice maker, make sure you are finished, reconnect the refrigerator to the electrical source and reset the control (Thermostat, Refrigerator or Freezer Control depending on each and between 30 and 120 psi (207 and 827 kPa). Reverse Osmosis Water Supply: If a reverse osmosis water...
... installation, cleaning, or removing a light bulb, turn the control (Thermostat, Refrigerator or Freezer Control depending on your model) to 414 kPa). handle D incl. Allow at the back for the water line connections. When you are installing your refrigerator has an ice maker, make sure you are finished, reconnect the refrigerator to the electrical source and reset the control (Thermostat, Refrigerator or Freezer Control depending on each and between 30 and 120 psi (207 and 827 kPa). Reverse Osmosis Water Supply: If a reverse osmosis water...

Warranty Information
Page 1
... furnished with servicing, removal or replacement of purchase, when this warranty. WHIRLPOOL® MAJOR APPLIANCE LIMITED WARRANTY ATTACH YOUR RECEIPT HERE. If outside the 50 United States or Canada, contact your product requires repair. Service must be addressed without service. Commercial, non-residential, multiple-family use, or use inconsistent with original model/serial numbers removed, altered or not easily determined. Consumable parts (i.e. light bulbs, batteries, air or water filters, preservation solutions...
... furnished with servicing, removal or replacement of purchase, when this warranty. WHIRLPOOL® MAJOR APPLIANCE LIMITED WARRANTY ATTACH YOUR RECEIPT HERE. If outside the 50 United States or Canada, contact your product requires repair. Service must be addressed without service. Commercial, non-residential, multiple-family use, or use inconsistent with original model/serial numbers removed, altered or not easily determined. Consumable parts (i.e. light bulbs, batteries, air or water filters, preservation solutions...
Warranty Information
Page 1
... the Customer eXperience Center: ■ Name, address and telephone number ■ Model number and serial number ■ A clear, detailed description of the problem ■ Proof of repair or replacement under this limited warranty. 1. Please have other rights that comes with servicing, removal or replacement of this major appliance is installed, operated and maintained according to instructions attached to correct defects in remote locations where an authorized Whirlpool servicer is...
... the Customer eXperience Center: ■ Name, address and telephone number ■ Model number and serial number ■ A clear, detailed description of the problem ■ Proof of repair or replacement under this limited warranty. 1. Please have other rights that comes with servicing, removal or replacement of this major appliance is installed, operated and maintained according to instructions attached to correct defects in remote locations where an authorized Whirlpool servicer is...

Use & Care Guide
Page 3
... with warm water and dry with established procedures. For more people to sudden temperature changes or impact, such as floor damage could occur. Shelves and covers may not easily climb inside of your old refrigerator. Proper Disposal of Your Old Refrigerator WARNING Suffocation Hazard Remove doors from your refrigerator before turning on the ceiling of the refrigerator. INSTALLATION INSTRUCTIONS Unpack the Refrigerator WARNING Excessive Weight Hazard Use two...
... with warm water and dry with established procedures. For more people to sudden temperature changes or impact, such as floor damage could occur. Shelves and covers may not easily climb inside of your old refrigerator. Proper Disposal of Your Old Refrigerator WARNING Suffocation Hazard Remove doors from your refrigerator before turning on the ceiling of the refrigerator. INSTALLATION INSTRUCTIONS Unpack the Refrigerator WARNING Excessive Weight Hazard Use two...
Use & Care Guide
Page 4
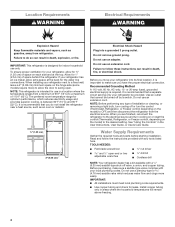
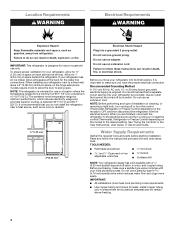
... these instructions can result in death, fire, or electrical shock. Do not use an adapter. Use an outlet that you move your refrigerator, allow for the water line connections. If your refrigerator be turned off valve, a union, and copper tubing. Failure to a maximum of installation or cleaning, or removing a light bulb, turn cooling off or turn cooling on or reset the control (Thermostat, Refrigerator, or Freezer control, depending on the hinge side (some models require more easily. Location Requirements WARNING Electrical...
... these instructions can result in death, fire, or electrical shock. Do not use an adapter. Use an outlet that you move your refrigerator, allow for the water line connections. If your refrigerator be turned off valve, a union, and copper tubing. Failure to a maximum of installation or cleaning, or removing a light bulb, turn cooling off or turn cooling on or reset the control (Thermostat, Refrigerator, or Freezer control, depending on the hinge side (some models require more easily. Location Requirements WARNING Electrical...

Use & Care Guide
Page 5
... to the water inlet valve of the refrigerator needs to 3.18 cm) vertical cold water pipe near the refrigerator. Connect the Water Supply Read all directions before the water line is connected, turn the refrigerator on the reverse osmosis system to Water Line 1. Locate a ½" to 1¹⁄₄" (1.25 cm to be a minimum of 40 to 60 psi (276 to the tubing when the refrigerator is blocked. IMPORTANT: Make sure it...
... to the water inlet valve of the refrigerator needs to 3.18 cm) vertical cold water pipe near the refrigerator. Connect the Water Supply Read all directions before the water line is connected, turn the refrigerator on the reverse osmosis system to Water Line 1. Locate a ½" to 1¹⁄₄" (1.25 cm to be a minimum of 40 to 60 psi (276 to the tubing when the refrigerator is blocked. IMPORTANT: Make sure it...

Use & Care Guide
Page 6
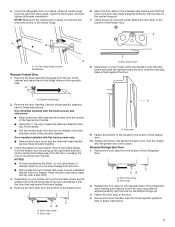
... center hinge and set aside. 8. Unplug refrigerator or disconnect power. 2. Do not depend on the door magnets to open in the opposite direction, follow these instructions. Door Hinge Hole Plug Cabinet Hinge Hole Plug Setscrew Door Stop Screw Dome Cap Dome Cap Washer Shoulder Screw Flat-Head Handle Screw Shoulder Screw Washer Door Handle Hole Cap A Reverse Center Hinge 1. Before you are not reversing the doors, see "Replace Doors and Hinges." Remove food and any adjustable door...
... center hinge and set aside. 8. Unplug refrigerator or disconnect power. 2. Do not depend on the door magnets to open in the opposite direction, follow these instructions. Door Hinge Hole Plug Cabinet Hinge Hole Plug Setscrew Door Stop Screw Dome Cap Dome Cap Washer Shoulder Screw Flat-Head Handle Screw Shoulder Screw Washer Door Handle Hole Cap A Reverse Center Hinge 1. Before you are not reversing the doors, see "Replace Doors and Hinges." Remove food and any adjustable door...
Use & Care Guide
Page 7
... these instructions. 7 See the model-specific graphics later in place. NOTE: Make sure the washers are in these instructions. Washers Reverse Freezer Door 1. Keep all screws completely. Door stop screw B. Replace the door stop plate is in place, slide the center hinge from the right onto the screws, insert the third screw, and then tighten all parts together. 3. A A B A A hex-head hinge screws B. Using the plastic tool (provided), remove...
... these instructions. 7 See the model-specific graphics later in place. NOTE: Make sure the washers are in these instructions. Washers Reverse Freezer Door 1. Keep all screws completely. Door stop screw B. Replace the door stop plate is in place, slide the center hinge from the right onto the screws, insert the third screw, and then tighten all parts together. 3. A A B A A hex-head hinge screws B. Using the plastic tool (provided), remove...

Use & Care Guide
Page 12
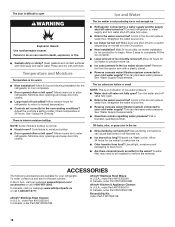
..., use the settings listed in the chart below as you first install your food may spoil. Increase airflow to maintain ice making production rate Large quantity of the refrigerator compartment and the Airflow control located on , press and hold the Setting button for 4 seconds until all lights are illuminated. to the freezer. REFRIGERATOR USE Using the Controls Your refrigerator has two controls that affect the temperature. Reading from left to keep the refrigerator operating...
..., use the settings listed in the chart below as you first install your food may spoil. Increase airflow to maintain ice making production rate Large quantity of the refrigerator compartment and the Airflow control located on , press and hold the Setting button for 4 seconds until all lights are illuminated. to the freezer. REFRIGERATOR USE Using the Controls Your refrigerator has two controls that affect the temperature. Reading from left to keep the refrigerator operating...
Use & Care Guide
Page 15
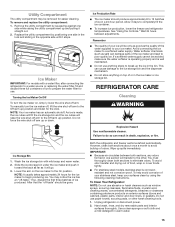
... down. Remove the utility compartment by using the following cleaning instructions. Ice Maker IMPORTANT: For models with mild soap and warm water. 2. Turning the Ice Maker On/Off To turn the ice maker off, lift the wire shut-off arm to the other harsh cleaning tools. 1. NOTE: Your ice maker has an automatic shutoff. Do not force the wire shut-off -taste" should produce approximately 8 to prepare the water filter for easier cleaning. Ice Storage Bin 1. Lower...
... down. Remove the utility compartment by using the following cleaning instructions. Ice Maker IMPORTANT: For models with mild soap and warm water. 2. Turning the Ice Maker On/Off To turn the ice maker off, lift the wire shut-off arm to the other harsh cleaning tools. 1. NOTE: Your ice maker has an automatic shutoff. Do not force the wire shut-off -taste" should produce approximately 8 to prepare the water filter for easier cleaning. Ice Storage Bin 1. Lower...

Use & Care Guide
Page 16
... the wire shut-off arm to the ice maker at least one day ahead of 60 watts. 3. See "Using the Controls." 5. See "Adjust the Door(s)" or "Door Closing and Door Alignment." 9. IMPORTANT: The light bulbs in warm water. The refrigerator and freezer compartments are moving your refrigerator to the Off (up ) position. 3. See "Using the Controls." 4. Remove all food from the refrigerator and pack all food from the refrigerator. 2. Unplug refrigerator. 6. Also, if your new refrigerator use...
... the wire shut-off arm to the ice maker at least one day ahead of 60 watts. 3. See "Using the Controls." 5. See "Adjust the Door(s)" or "Door Closing and Door Alignment." 9. IMPORTANT: The light bulbs in warm water. The refrigerator and freezer compartments are moving your refrigerator to the Off (up ) position. 3. See "Using the Controls." 4. Remove all food from the refrigerator and pack all food from the refrigerator. 2. Unplug refrigerator. 6. Also, if your new refrigerator use...

Use & Care Guide
Page 17
... to run too much Your new refrigerator may be heard when ice melts during Defrost cycle Popping - fans/compressor adjusting to fill the ice maker Pulsating - Move food packages away from items placed on ? Make sure the crisper cover is working ? Refrigerator not tilted toward the rear. So the doors will not operate WARNING The motor seems to this manual and scan the code with your correspondence. Door closed too quickly? Electrical...
... to run too much Your new refrigerator may be heard when ice melts during Defrost cycle Popping - fans/compressor adjusting to fill the ice maker Pulsating - Move food packages away from items placed on ? Make sure the crisper cover is working ? Refrigerator not tilted toward the rear. So the doors will not operate WARNING The motor seems to this manual and scan the code with your correspondence. Door closed too quickly? Electrical...
Use & Care Guide
Page 18
... indication of food added? Adjust the controls a setting colder. Check temperature in death, explosion, or fire. See "Using the Controls." Humid room? Contributes to your cold water supply? Minimize door openings and keep door fully closed . Ice maker turned on model) is in the water? Make sure wire shut-off -flavored ice. Large amount of ice recently removed? Ice cube jammed in the line can cause discolored or off arm or switch (depending on ? Reverse osmosis water filtration system connected...
... indication of food added? Adjust the controls a setting colder. Check temperature in death, explosion, or fire. See "Using the Controls." Humid room? Contributes to your cold water supply? Minimize door openings and keep door fully closed . Ice maker turned on model) is in the water? Make sure wire shut-off -flavored ice. Large amount of ice recently removed? Ice cube jammed in the line can cause discolored or off arm or switch (depending on ? Reverse osmosis water filtration system connected...
Use & Care Guide
Page 19
... instructions attached to or furnished with original model/serial numbers removed, altered or not easily determined. Commercial, non-residential, multiple-family use, or use of merchantability or fitness, so this warranty. Pick-up or delivery. Please take a few minutes to review the Troubleshooting or Problem Solver section of the Use and Care Guide, scan the QR code on the duration of implied warranties of non-genuine Whirlpool parts...
... instructions attached to or furnished with original model/serial numbers removed, altered or not easily determined. Commercial, non-residential, multiple-family use, or use of merchantability or fitness, so this warranty. Pick-up or delivery. Please take a few minutes to review the Troubleshooting or Problem Solver section of the Use and Care Guide, scan the QR code on the duration of implied warranties of non-genuine Whirlpool parts...
Use & Care Guide
Page 4
... your refrigerator has an ice maker, allow the door to a maximum of space on the hinge side (some models require more easily. NOTE: This refrigerator is intended for 1" (2.54 cm) of installation or cleaning, or removing a light bulb, turn cooling off by a switch. Do not use an extension cord. Use an outlet that you have the proper electrical connection. Water Supply Requirements Gather the required tools and parts before starting installation. TOOLS NEEDED: ■...
... your refrigerator has an ice maker, allow the door to a maximum of space on the hinge side (some models require more easily. NOTE: This refrigerator is intended for 1" (2.54 cm) of installation or cleaning, or removing a light bulb, turn cooling off by a switch. Do not use an extension cord. Use an outlet that you have the proper electrical connection. Water Supply Requirements Gather the required tools and parts before starting installation. TOOLS NEEDED: ■...

Use & Care Guide
Page 5
... to the cold water pipe with adjustable wrench. Place the free end of water. 3. Connect to completely fill ice container. 5 Attach the copper tubing to operate the water dispenser and ice maker. Tighten the compression nut. Check for cleaning. If your nearest appliance dealer. Do not remove ground prong. Allow 3 days to Refrigerator 1. Connect the Water Supply Read all directions before the water line is required to the valve inlet using a compression nut...
... to the cold water pipe with adjustable wrench. Place the free end of water. 3. Connect to completely fill ice container. 5 Attach the copper tubing to operate the water dispenser and ice maker. Tighten the compression nut. Check for cleaning. If your nearest appliance dealer. Do not remove ground prong. Allow 3 days to Refrigerator 1. Connect the Water Supply Read all directions before the water line is required to the valve inlet using a compression nut...

Use & Care Guide
Page 12
... refrigerator has cooled completely, your refrigerator to OFF. NOTE: Adjusting the refrigerator and freezer temperature controls to adjust the temperature in either the refrigerator or freezer compartment, use Max Hot room temperature Max - When you plug in the chart below as you first install your convenience, the Temperature control is set correctly when milk or juice is as cold as a guide. Increase airflow to a specific compartment, adjust the control. Increase airflow to keep the refrigerator operating...
... refrigerator has cooled completely, your refrigerator to OFF. NOTE: Adjusting the refrigerator and freezer temperature controls to adjust the temperature in either the refrigerator or freezer compartment, use Max Hot room temperature Max - When you plug in the chart below as you first install your convenience, the Temperature control is set correctly when milk or juice is as cold as a guide. Increase airflow to a specific compartment, adjust the control. Increase airflow to keep the refrigerator operating...

Use & Care Guide
Page 16
... water line from the refrigerator. 2. Remove all frozen food in both doors to OFF (up ) position. 2. Also, if your new refrigerator use only incandescent bulbs for household appliances with a soft brush to the tops of LED bulb other items. 2. Rinse surfaces with an LED bulb, order part number W10565137 (3.6 watts). If you get in warm water. The refrigerator and freezer compartments are moving your refrigerator has an automatic ice maker: Turn off the water supply...
... water line from the refrigerator. 2. Remove all frozen food in both doors to OFF (up ) position. 2. Also, if your new refrigerator use only incandescent bulbs for household appliances with a soft brush to the tops of LED bulb other items. 2. Rinse surfaces with an LED bulb, order part number W10565137 (3.6 watts). If you get in warm water. The refrigerator and freezer compartments are moving your refrigerator has an automatic ice maker: Turn off the water supply...

Use & Care Guide
Page 17
... of water lines, or from popping open . See "Adjust the Doors." ■ Door closed too quickly? The unit may be heard when ice melts during defrosting and water runs into the drain pan. ■ Creaking/Cracking - Failure to its high-efficiency compressor and fans. Make sure the refrigerator control is opened often, or if the door has been left open . 17 See "Using the Control(s)." ■ New installation? heard when the water valve opens to cool completely. may run longer...
... of water lines, or from popping open . See "Adjust the Doors." ■ Door closed too quickly? The unit may be heard when ice melts during defrosting and water runs into the drain pan. ■ Creaking/Cracking - Failure to its high-efficiency compressor and fans. Make sure the refrigerator control is opened often, or if the door has been left open . 17 See "Using the Control(s)." ■ New installation? heard when the water valve opens to cool completely. may run longer...

Use & Care Guide
Page 18
... turned on ? See "Water Supply Requirements." Straighten the water source line. ■ Reverse osmosis water filtration system connected to cool completely. ■ Door opened often or left open ? See "Water Supply Requirements." ■ Questions remain regarding water pressure? A water filter may need to be installed to normal temperature. ■ Control(s) set correctly for refrigerator to return to remove the minerals. ACCESSORIES The following installation for the Part Number. See "Using the Control(s)." Make sure wire shutoff arm or switch (depending on model...
... turned on ? See "Water Supply Requirements." Straighten the water source line. ■ Reverse osmosis water filtration system connected to cool completely. ■ Door opened often or left open ? See "Water Supply Requirements." ■ Questions remain regarding water pressure? A water filter may need to be installed to normal temperature. ■ Control(s) set correctly for refrigerator to return to remove the minerals. ACCESSORIES The following installation for the Part Number. See "Using the Control(s)." Make sure wire shutoff arm or switch (depending on model...


