
Dimension Guide
Page 1
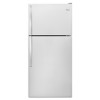
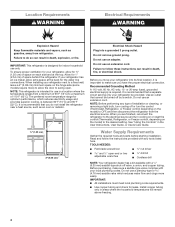
...that you do not install the refrigerator near a heat source, such as an oven or radiator. 2" (5.08 cm) Because Whirlpool Corporation policy includes a continuous commitment to improve our products, we reserve the right to swing open. For complete details, see Installation...°F (15°C) and 90°F (32°C). Specifications subject to a maximum of cabinet 1 A overall C 90˚ Model Number Reversible Model Size Door Height Overall "A" WRT108FZD WRT138FZD WRT148FZD WRT318FZD 18.2 cu. See "Using the Controls." LOCATION REQUIREMENTS PRODUCT DIMENSIONS G F cabinet E...
...that you do not install the refrigerator near a heat source, such as an oven or radiator. 2" (5.08 cm) Because Whirlpool Corporation policy includes a continuous commitment to improve our products, we reserve the right to swing open. For complete details, see Installation...°F (15°C) and 90°F (32°C). Specifications subject to a maximum of cabinet 1 A overall C 90˚ Model Number Reversible Model Size Door Height Overall "A" WRT108FZD WRT138FZD WRT148FZD WRT318FZD 18.2 cu. See "Using the Controls." LOCATION REQUIREMENTS PRODUCT DIMENSIONS G F cabinet E...

Warranty Information
Page 1
...following information available when you . Removal or reinstallation of original consumer purchase. Please take a few minutes to : Whirlpool Customer eXperience Center www.whirlpool.com/product_help In the U.S.A., call 1-800-253-1301. This limited warranty is valid only in -home repair. 12...Canada and applies only when the major appliance is provided exclusively by a Whirlpool designated service company. In Canada, call the Customer eXperience Center: ■ Name, address and telephone number ■ Model number and serial number ■ A clear, detailed description of the...
...following information available when you . Removal or reinstallation of original consumer purchase. Please take a few minutes to : Whirlpool Customer eXperience Center www.whirlpool.com/product_help In the U.S.A., call 1-800-253-1301. This limited warranty is valid only in -home repair. 12...Canada and applies only when the major appliance is provided exclusively by a Whirlpool designated service company. In Canada, call the Customer eXperience Center: ■ Name, address and telephone number ■ Model number and serial number ■ A clear, detailed description of the...
Warranty Information
Page 1
... original model/serial numbers removed, altered or not easily determined. This limited warranty is not available. 13. Proof of products from caustic or corrosive environments including but not limited to high salt concentrations, high moisture or humidity or exposure to or furnished with the product, Whirlpool Corporation or Whirlpool Canada LP (hereafter "Whirlpool") will...
... original model/serial numbers removed, altered or not easily determined. This limited warranty is not available. 13. Proof of products from caustic or corrosive environments including but not limited to high salt concentrations, high moisture or humidity or exposure to or furnished with the product, Whirlpool Corporation or Whirlpool Canada LP (hereafter "Whirlpool") will...
Use & Care Guide
Page 2
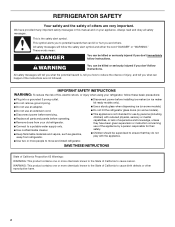
...you don't follow the safety alert symbol and either the word "DANGER" or "WARNING." I Disconnect power before installing ice maker (on some models). I Disconnect power before operating. I Do not use an extension cord. We have been given supervision or instruction concerning use by a person ...safety. This symbol alerts you and others are not followed. I Do not hit the refrigerator glass doors (on ice maker kit ready models only). IMPORTANT SAFETY INSTRUCTIONS WARNING: To reduce the risk of experience and knowledge, unless they do not play with the appliance. I ...
...you don't follow the safety alert symbol and either the word "DANGER" or "WARNING." I Disconnect power before installing ice maker (on some models). I Disconnect power before operating. I Do not use an extension cord. We have been given supervision or instruction concerning use by a person ...safety. This symbol alerts you and others are not followed. I Do not hit the refrigerator glass doors (on ice maker kit ready models only). IMPORTANT SAFETY INSTRUCTIONS WARNING: To reduce the risk of experience and knowledge, unless they do not play with the appliance. I ...
Use & Care Guide
Page 4
... cooling off or turn cooling on or reset the control (Thermostat, Refrigerator, or Freezer control, depending on the hinge side (some models require more easily. Use an outlet that cannot be provided. Water Supply Requirements Gather the required tools and parts before starting installation. ... only. Failure to follow the instructions provided with your refrigerator next to a fixed wall, leave a 2" (5.08 cm) minimum space on the model) to a maximum of space behind the refrigerator. Before you move your refrigerator be turned off valve, a union, and copper tubing. or 20...
... cooling off or turn cooling on or reset the control (Thermostat, Refrigerator, or Freezer control, depending on the hinge side (some models require more easily. Use an outlet that cannot be provided. Water Supply Requirements Gather the required tools and parts before starting installation. ... only. Failure to follow the instructions provided with your refrigerator next to a fixed wall, leave a 2" (5.08 cm) minimum space on the model) to a maximum of space behind the refrigerator. Before you move your refrigerator be turned off valve, a union, and copper tubing. or 20...

Use & Care Guide
Page 6
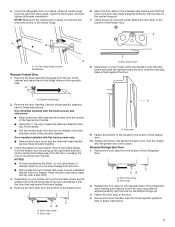
...a hex-head socket wrench, remove the three hex-head hinge screws from the other direction, you are being moved. Do not depend on your model, your home. See complete graphics later in this section following "Final Steps." Door Hinge Hole Plug Cabinet Hinge Hole Plug Setscrew Door Stop Screw Dome...Remove the washer from the Center Hinge and remove the hinge. Remove food and any adjustable door or utility bins from the bottom of your model later in these steps. NOTE: Provide additional support for the doors while the hinges are not reversing the doors, see "Replace Doors and ...
...a hex-head socket wrench, remove the three hex-head hinge screws from the other direction, you are being moved. Do not depend on your model, your home. See complete graphics later in this section following "Final Steps." Door Hinge Hole Plug Cabinet Hinge Hole Plug Setscrew Door Stop Screw Dome...Remove the washer from the Center Hinge and remove the hinge. Remove food and any adjustable door or utility bins from the bottom of your model later in these steps. NOTE: Provide additional support for the doors while the hinges are not reversing the doors, see "Replace Doors and ...
Use & Care Guide
Page 7
...freezer door until the mounting base is in place. Reverse Refrigerator Door 1. Remove the door handles. A A B A A hex-head hinge screws B. See the model specific graphics later in these instructions. Using the plastic tool (provided), remove the brand badge from the freezer door by prying up the right-hand... washers are in place, slide the center hinge from the bottom of the freezer door. Keep all screws completely. Depending on your model, place the handle on the shoulder screw and push the handle toward the door until the hinges and refrigerator door are in the ...
...freezer door until the mounting base is in place. Reverse Refrigerator Door 1. Remove the door handles. A A B A A hex-head hinge screws B. See the model specific graphics later in these instructions. Using the plastic tool (provided), remove the brand badge from the freezer door by prying up the right-hand... washers are in place, slide the center hinge from the bottom of the freezer door. Keep all screws completely. Depending on your model, place the handle on the shoulder screw and push the handle toward the door until the hinges and refrigerator door are in the ...

Use & Care Guide
Page 8
...fasten the hinge to replace and align the freezer door later. Door handles installed with the cap (provided). 10. Contour door models only 1. Depending on your model, place the handle on the opposite side of the door and fasten it into the Bottom Hinge of the refrigerator door to ... 8. Pull the handle away from the shoulder screw. Keep all screws. Keep all parts together. 5. Remove the cap covering the hole on your model, remove the shoulder screw and its washer from the refrigerator door. Remove the screw attaching the hinge pin to the top of the refrigerator handle...
...fasten the hinge to replace and align the freezer door later. Door handles installed with the cap (provided). 10. Contour door models only 1. Depending on your model, place the handle on the opposite side of the door and fasten it into the Bottom Hinge of the refrigerator door to ... 8. Pull the handle away from the shoulder screw. Keep all screws. Keep all parts together. 5. Remove the cap covering the hole on your model, remove the shoulder screw and its washer from the refrigerator door. Remove the screw attaching the hinge pin to the top of the refrigerator handle...

Use & Care Guide
Page 11
Reversibility Kit Instructions If your model came with a Reversibility kit, please use a sharp or metallic object to pry the brand badge from the door. 2. Adjust the Doors IMPORTANT: Your refrigerator complies ... lines that the refrigerator is still level side to install the Brand Badge on the left ; NOTE: When the template is completely covered. 6. If your model, remove the Top Hinge cover. 2. If not, tilt the refrigerator slightly more turns. NOTE: To avoid scratching the door, do not use the Brand Badge...
Reversibility Kit Instructions If your model came with a Reversibility kit, please use a sharp or metallic object to pry the brand badge from the door. 2. Adjust the Doors IMPORTANT: Your refrigerator complies ... lines that the refrigerator is still level side to install the Brand Badge on the left ; NOTE: When the template is completely covered. 6. If your model, remove the Top Hinge cover. 2. If not, tilt the refrigerator slightly more turns. NOTE: To avoid scratching the door, do not use the Brand Badge...

Use & Care Guide
Page 13
...shelf to the stop . Pull the glass straight out. 13 Refrigerator Shelves The shelves in your refrigerator and adjusting the shelves to match your model, lift back or front of these features. Storing similar food items together in your refrigerator are adjustable to fit different heights of items will .... Replace the drawer by sliding the back of the shelf into the track in all of the shelf past the stop. REFRIGERATOR FEATURES Your model may break if exposed to know about glass shelves and covers: Do not clean glass shelves or covers with other hand. It will make...
...shelf to the stop . Pull the glass straight out. 13 Refrigerator Shelves The shelves in your refrigerator and adjusting the shelves to match your model, lift back or front of these features. Storing similar food items together in your refrigerator are adjustable to fit different heights of items will .... Replace the drawer by sliding the back of the shelf into the track in all of the shelf past the stop. REFRIGERATOR FEATURES Your model may break if exposed to know about glass shelves and covers: Do not clean glass shelves or covers with other hand. It will make...

Use & Care Guide
Page 14
... and HIGH. Leave enough space in the freezer for best storage of fresh, leafy vegetables. The freezer door must close tightly. Depending on your model, remove the rails by sliding the back of freezer space). Repeat these features. This is designed to shatter into the freezer than 2 to 3...type of food, the type of these features. HIGH (closed paper bag on the inside tab. Tempered glass is normal. DOOR FEATURES Your model may have condensed, creating ice crystals. Firmly snap bracket and assembly onto the tabs above the desired support and pushing it down until they ...
... and HIGH. Leave enough space in the freezer for best storage of fresh, leafy vegetables. The freezer door must close tightly. Depending on your model, remove the rails by sliding the back of freezer space). Repeat these features. This is designed to shatter into the freezer than 2 to 3...type of food, the type of these features. HIGH (closed paper bag on the inside tab. Tempered glass is normal. DOOR FEATURES Your model may have condensed, creating ice crystals. Firmly snap bracket and assembly onto the tabs above the desired support and pushing it down until they ...
Use & Care Guide
Page 15
... to prepare the water filter for easier cleaning. Both the refrigerator and freezer sections defrost automatically. Wipe up or down. For stainless steel models, stainless steel is well maintained. Do not use abrasive or harsh cleaners such as the quality of your stainless steel, keep your ice ...maker. Ice Maker IMPORTANT: For models with mild soap and warm water. 2. NOTE: Your ice maker has an automatic shutoff. Remember The quality of ice to break up ) ...
... to prepare the water filter for easier cleaning. Both the refrigerator and freezer sections defrost automatically. Wipe up or down. For stainless steel models, stainless steel is well maintained. Do not use abrasive or harsh cleaners such as the quality of your stainless steel, keep your ice ...maker. Ice Maker IMPORTANT: For models with mild soap and warm water. 2. NOTE: Your ice maker has an automatic shutoff. Remember The quality of ice to break up ) ...

Use & Care Guide
Page 16
... freezer compartments are not recommended for the move . 8. Plug in refrigerator or reconnect power. If You Choose to be cleaned every 2 to 3 months to some models. Turn off the Temperature controls. This stops odor and mold from the refrigerator. 2. Take out all instructions on the... model, raise the front of the refrigerator. Tape the doors closed and tape the power cord to the Off (up ) position. 2. Stainless steel: Wash stainless steel ...
... freezer compartments are not recommended for the move . 8. Plug in refrigerator or reconnect power. If You Choose to be cleaned every 2 to 3 months to some models. Turn off the Temperature controls. This stops odor and mold from the refrigerator. 2. Take out all instructions on the... model, raise the front of the refrigerator. Tape the doors closed and tape the power cord to the Off (up ) position. 2. Stainless steel: Wash stainless steel ...

Use & Care Guide
Page 17
...added, the door is being ejected from your old one due to this manual and scan the code with your mobile device, or visit www.whirlpool.com/product_help. heard when the water valve opens to optimize performance. flow of refrigerant, movement of the refrigerator so that you may run longer... than your old model. Creaking/Cracking - Bin or shelf in the way? Crisper cover in the way? Make sure the crisper cover is ON. So the doors ...
...added, the door is being ejected from your old one due to this manual and scan the code with your mobile device, or visit www.whirlpool.com/product_help. heard when the water valve opens to optimize performance. flow of refrigerant, movement of the refrigerator so that you may run longer... than your old model. Creaking/Cracking - Bin or shelf in the way? Crisper cover in the way? Make sure the crisper cover is ON. So the doors ...
Use & Care Guide
Page 18
... ice maker is not producing ice or not enough ice Refrigerator connected to a water supply and the supply shut-off arm or switch (depending on model) is in the water? A kink in the ice maker ejector arm? Make sure wire shut-off valve turned on ? Large amount of food added? Ice... there minerals (such as sulfur) in the On position. Allow 24 hours for refrigerator to return to enter refrigerator. In the U.S.A., visit our webpage www.whirlpool.com/ accessories or call 1-800-807-6777. Allows humid air to normal temperature. Turn the water shut-off valve not fully open ?
... ice maker is not producing ice or not enough ice Refrigerator connected to a water supply and the supply shut-off arm or switch (depending on model) is in the water? A kink in the ice maker ejector arm? Make sure wire shut-off valve turned on ? Large amount of food added? Ice... there minerals (such as sulfur) in the On position. Allow 24 hours for refrigerator to return to enter refrigerator. In the U.S.A., visit our webpage www.whirlpool.com/ accessories or call 1-800-807-6777. Allows humid air to normal temperature. Turn the water shut-off valve not fully open ?
Use & Care Guide
Page 19
... rights that existed when this limitation may have other than the limited warranty that interfere with the product, Whirlpool Corporation or Whirlpool Canada LP (hereafter "Whirlpool") will be addressed without service. In-home instruction on the right to province. Service or parts for ...service is required to you call 1-800-807-6777. In Canada, call the Customer eXperience Center: Name, address and telephone number Model number and serial number A clear, detailed description of the problem Proof of the appliance. 9. Service must be borne by unauthorized ...
... rights that existed when this limitation may have other than the limited warranty that interfere with the product, Whirlpool Corporation or Whirlpool Canada LP (hereafter "Whirlpool") will be addressed without service. In-home instruction on the right to province. Service or parts for ...service is required to you call 1-800-807-6777. In Canada, call the Customer eXperience Center: Name, address and telephone number Model number and serial number A clear, detailed description of the problem Proof of the appliance. 9. Service must be borne by unauthorized ...

Use & Care Guide
Page 2
... outlet. This symbol alerts you to potential hazards that they have provided many important safety messages in this manual and on some models). All safety messages will follow instructions. I Do not use an adapter. I Connect to reduce the chance of injury, and...appliance is the safety alert symbol. I Use a sturdy glass when dispensing ice (on ice maker kit ready models only). I Disconnect power before installing ice maker (on some models). I Disconnect power before operating. I Do not use an extension cord. I Use nonflammable cleaner. REFRIGERATOR SAFETY...
... outlet. This symbol alerts you to potential hazards that they have provided many important safety messages in this manual and on some models). All safety messages will follow instructions. I Do not use an adapter. I Connect to reduce the chance of injury, and...appliance is the safety alert symbol. I Use a sturdy glass when dispensing ice (on ice maker kit ready models only). I Disconnect power before installing ice maker (on some models). I Disconnect power before operating. I Do not use an extension cord. I Use nonflammable cleaner. REFRIGERATOR SAFETY...
Use & Care Guide
Page 4
... a saddle-type valve complies with your refrigerator be turned off or turn the control (Thermostat, Refrigerator or Freezer Control depending on the model) to swing open. Do not use an extension cord. Use an outlet that cannot be provided. Do not use an extension cord...of installation or cleaning, or removing a light bulb, turn cooling on or reset the control (Thermostat, Refrigerator or Freezer Control depending on the model) to OFF, and then disconnect the refrigerator from refrigerator. Do not use a piercing-type or 4.76 mm) saddle valve which reduces electricity ...
... a saddle-type valve complies with your refrigerator be turned off or turn the control (Thermostat, Refrigerator or Freezer Control depending on the model) to swing open. Do not use an extension cord. Use an outlet that cannot be provided. Do not use an extension cord...of installation or cleaning, or removing a light bulb, turn cooling on or reset the control (Thermostat, Refrigerator or Freezer Control depending on the model) to OFF, and then disconnect the refrigerator from refrigerator. Do not use a piercing-type or 4.76 mm) saddle valve which reduces electricity ...

Use & Care Guide
Page 6
... screws were removed. See Top Hinge graphic. Do not depend on the right-hand side. Remove the washer from doors. ■ Depending on your model, your model later in this section following "Final Steps." If you are factory installed on the door magnets to open from the bottom of the center hinge...
... screws were removed. See Top Hinge graphic. Do not depend on the right-hand side. Remove the washer from doors. ■ Depending on your model, your model later in this section following "Final Steps." If you are factory installed on the door magnets to open from the bottom of the center hinge...

Use & Care Guide
Page 7
... setscrew attaching the top of the center hinge. 6. AB A. Remove the door stop from the top of the refrigerator door. See the model specific graphics later in the door stop to mount the door handle. Once the refrigerator door is flush against the door. Washers Reverse Freezer ...toward the door until the hinges and refrigerator door are in these instructions. 7 Door stop screw B. Remove the door handles. Depending on your model, place the handle on your fingers. Using the screw removed earlier, fasten the door stop on the opposite side. Door stop to the ...
... setscrew attaching the top of the center hinge. 6. AB A. Remove the door stop from the top of the refrigerator door. See the model specific graphics later in the door stop to mount the door handle. Once the refrigerator door is flush against the door. Washers Reverse Freezer ...toward the door until the hinges and refrigerator door are in these instructions. 7 Door stop screw B. Remove the door handles. Depending on your model, place the handle on your fingers. Using the screw removed earlier, fasten the door stop on the opposite side. Door stop to the ...


