Warranty Information
Page 1
... the Customer eXperience Center: ■ Name, address and telephone number ■ Model number and serial number ■ A clear, detailed description of the problem ■ Proof of repair or replacement under this major appliance was purchased. In-home instruction on the right to chemicals. 10. The cost of purchase including dealer or retailer name and address IF YOU NEED SERVICE: 1. light bulbs, batteries, air or water filters, preservation...
... the Customer eXperience Center: ■ Name, address and telephone number ■ Model number and serial number ■ A clear, detailed description of the problem ■ Proof of repair or replacement under this major appliance was purchased. In-home instruction on the right to chemicals. 10. The cost of purchase including dealer or retailer name and address IF YOU NEED SERVICE: 1. light bulbs, batteries, air or water filters, preservation...
Dimension Guide
Page 1
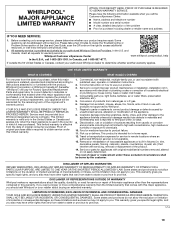
Do not use in a location where the temperature ranges from the electrical source. NOTE: Before performing any type of installation, cleaning, or removing a light bulb, turn the control (Thermostat, Refrigerator or Freezer Control depending on the model) to the desired setting. When you have questions about your water pressure, call a licensed, qualified plumber. If you are finished, reconnect the refrigerator to the electrical source and reset the control (Thermostat, Refrigerator or Freezer Control depending on the model) to OFF...
Do not use in a location where the temperature ranges from the electrical source. NOTE: Before performing any type of installation, cleaning, or removing a light bulb, turn the control (Thermostat, Refrigerator or Freezer Control depending on the model) to the desired setting. When you have questions about your water pressure, call a licensed, qualified plumber. If you are finished, reconnect the refrigerator to the electrical source and reset the control (Thermostat, Refrigerator or Freezer Control depending on the model) to OFF...
Use & Care Guide
Page 2
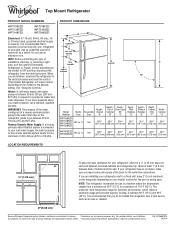
... this manual and on ice maker kit ready models only). All safety messages will tell you don't immediately follow basic precautions, including the following: ■ Plug into a grounded 3 prong outlet. ■ Do not remove ground prong. ■ Do not use an adapter. ■ Do not use an extension cord. ■ Disconnect power before servicing. ■ Replace all safety messages. SAVE THESE INSTRUCTIONS State...
... this manual and on ice maker kit ready models only). All safety messages will tell you don't immediately follow basic precautions, including the following: ■ Plug into a grounded 3 prong outlet. ■ Do not remove ground prong. ■ Do not use an adapter. ■ Do not use an extension cord. ■ Disconnect power before servicing. ■ Replace all safety messages. SAVE THESE INSTRUCTIONS State...
Use & Care Guide
Page 3
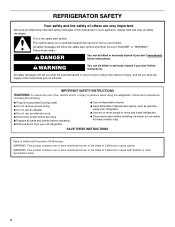
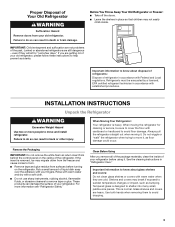
... if exposed to avoid dropping. 3 Use both hands when removing them to sudden temperature changes or impact, such as floor damage could occur. Junked or abandoned refrigerators are getting rid of your refrigerator. Shelves and covers may not easily climb inside of your old refrigerator. Proper Disposal of Your Old Refrigerator WARNING Suffocation Hazard Remove doors from the freezer and cause icicles to avoid floor...
... if exposed to avoid dropping. 3 Use both hands when removing them to sudden temperature changes or impact, such as floor damage could occur. Junked or abandoned refrigerators are getting rid of your refrigerator. Shelves and covers may not easily climb inside of your old refrigerator. Proper Disposal of Your Old Refrigerator WARNING Suffocation Hazard Remove doors from the freezer and cause icicles to avoid floor...
Use & Care Guide
Page 4
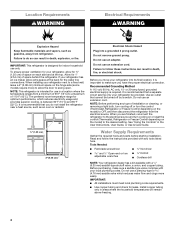
...-type or 4.76 mm) saddle valve which reduces electricity usage and provides superior cooling, is designed for optimum performance, which reduces water flow and clogs more ) to allow the door to swing open. It is required. To ensure proper ventilation for 1" (2.54 cm) of space on the model) to a maximum of installation or cleaning, or removing a light bulb, turn the control (Thermostat, Refrigerator or Freezer Control depending on the hinge...
...-type or 4.76 mm) saddle valve which reduces electricity usage and provides superior cooling, is designed for optimum performance, which reduces water flow and clogs more ) to allow the door to swing open. It is required. To ensure proper ventilation for 1" (2.54 cm) of space on the model) to a maximum of installation or cleaning, or removing a light bulb, turn the control (Thermostat, Refrigerator or Freezer Control depending on the hinge...
Use & Care Guide
Page 5
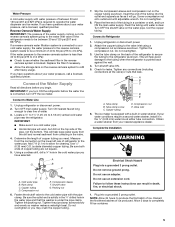
... the reverse osmosis system needs to the tubing when the refrigerator is blocked. Turn OFF main water supply. This will go. Use ¹⁄₄" (6.35 mm) O.D. (outside diameter) copper tubing. Using a cordless drill, drill a ¹⁄₄" hole in water strainer. Connect to 3.18 cm) vertical cold water pipe near the refrigerator. Attach the copper tubing to Water Line 1. Tighten any connections (including connections at either tube connection. The ice maker is connected, turn ON...
... the reverse osmosis system needs to the tubing when the refrigerator is blocked. Turn OFF main water supply. This will go. Use ¹⁄₄" (6.35 mm) O.D. (outside diameter) copper tubing. Using a cordless drill, drill a ¹⁄₄" hole in water strainer. Connect to 3.18 cm) vertical cold water pipe near the refrigerator. Attach the copper tubing to Water Line 1. Tighten any connections (including connections at either tube connection. The ice maker is connected, turn ON...
Use & Care Guide
Page 6
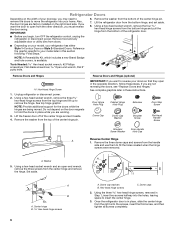
... remove the hinge. Using a hex-head socket wrench and an open-end wrench, remove the three screws from the other direction, you are not reversing the doors, see "Replace Doors and Hinges." NOTE: A Reversibility Kit, which includes a new Brand Badge and hole covers, is in place while you must reverse the door swing. If you begin, turn OFF the refrigerator control, unplug the refrigerator or disconnect power. Door Hinge Hole Plug Cabinet Hinge Hole Plug Setscrew Door Stop...
... remove the hinge. Using a hex-head socket wrench and an open-end wrench, remove the three screws from the other direction, you are not reversing the doors, see "Replace Doors and Hinges." NOTE: A Reversibility Kit, which includes a new Brand Badge and hole covers, is in place while you must reverse the door swing. If you begin, turn OFF the refrigerator control, unplug the refrigerator or disconnect power. Door Hinge Hole Plug Cabinet Hinge Hole Plug Setscrew Door Stop...
Use & Care Guide
Page 7
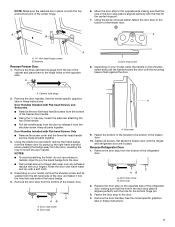
... freezer door. Tighten all parts together. 3. Remove the door stop plate is aligned perfectly with Flat-head Screws Only ■ Remove the screw cover and the three flat-head handle screws. Move the door stop to the bottom of the refrigerator door. See the model specific graphics later in these instructions. NOTE: Make sure the washers are in place. Using the screw removed earlier, fasten the door stop screw B. A A B A A Hex-head hinge...
... freezer door. Tighten all parts together. 3. Remove the door stop plate is aligned perfectly with Flat-head Screws Only ■ Remove the screw cover and the three flat-head handle screws. Move the door stop to the bottom of the refrigerator door. See the model specific graphics later in these instructions. NOTE: Make sure the washers are in place. Using the screw removed earlier, fasten the door stop screw B. A A B A A Hex-head hinge...
Use & Care Guide
Page 8
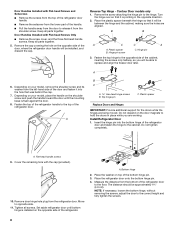
..., making sure the holes are aligned. Keep all parts together. Door Handles Installed with the cap (provided). 10. Remove the cap covering the hole on the opposite side of the cabinet, inserting the screws only halfway, so you are being moved. Hinge pin screw C. Fasten the top hinge to the opposite side of the refrigerator. Depending on your model, place the handle...
..., making sure the holes are aligned. Keep all parts together. Door Handles Installed with the cap (provided). 10. Remove the cap covering the hole on the opposite side of the cabinet, inserting the screws only halfway, so you are being moved. Hinge pin screw C. Fasten the top hinge to the opposite side of the refrigerator. Depending on your model, place the handle...
Use & Care Guide
Page 9
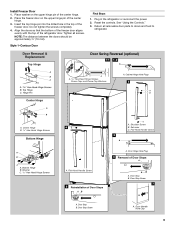
... power. 2. Tighten all removable door parts to doors and food to refrigerator. Cabinet Hinge Hole Plugs B A C A. 5/16" Hex-Head Hinge Screws, Dome Caps and Dome Cap Washers 2 B. Shoulder Screw B. Flat-Head Handle Screw 5 Reinstallation of the refrigerator door. Door Stop B. Align the doors so that the bottom of the freezer door aligns evenly with the top of Door Stops AB A. Door Removal & Replacement Top Hinge Door Swing Reversal (optional) 1-1 1-2 A A A. Top Hinge C. Reset the controls. See "Using the Controls." 3. Flat-Head Handle...
... power. 2. Tighten all removable door parts to doors and food to refrigerator. Cabinet Hinge Hole Plugs B A C A. 5/16" Hex-Head Hinge Screws, Dome Caps and Dome Cap Washers 2 B. Shoulder Screw B. Flat-Head Handle Screw 5 Reinstallation of the refrigerator door. Door Stop B. Align the doors so that the bottom of the freezer door aligns evenly with the top of Door Stops AB A. Door Removal & Replacement Top Hinge Door Swing Reversal (optional) 1-1 1-2 A A A. Top Hinge C. Reset the controls. See "Using the Controls." 3. Flat-Head Handle...

Use & Care Guide
Page 10
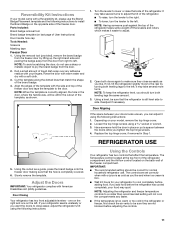
Door Handle Sealing Screws Front View Side View 5 6A 7 A. Center Hinge B. 5/16" Hex-Head Hinge Screws Bottom Hinge A B C A. Setscrew C. Screw Cover 3 A A. Door Handle Hole Cap A A. Screw Cover 10 Top Hinge Center Hinge A B A. Shoulder Screw B. Flat-Head Handle Screw D. Door Stop A B A. Top Hinge Cover B. 5/16" Hex-Head Hinge Screws C. Door Hinge Hole Plug 4 A A. Door Stop Screw A B B. Washer C. 5/16" Hex-Head Hinge Screws Door Swing Reversal (optional) 1-2 1-1 A A. Cabinet Hinge Hole Plugs 2 D A C B A A. 5/16" Hex-Head Hinge Screws, Dome Caps and Dome Cap ...
Door Handle Sealing Screws Front View Side View 5 6A 7 A. Center Hinge B. 5/16" Hex-Head Hinge Screws Bottom Hinge A B C A. Setscrew C. Screw Cover 3 A A. Door Handle Hole Cap A A. Screw Cover 10 Top Hinge Center Hinge A B A. Shoulder Screw B. Flat-Head Handle Screw D. Door Stop A B A. Top Hinge Cover B. 5/16" Hex-Head Hinge Screws C. Door Hinge Hole Plug 4 A A. Door Stop Screw A B B. Washer C. 5/16" Hex-Head Hinge Screws Door Swing Reversal (optional) 1-2 1-1 A A. Cabinet Hinge Hole Plugs 2 D A C B A A. 5/16" Hex-Head Hinge Screws, Dome Caps and Dome Cap ...
Use & Care Guide
Page 11
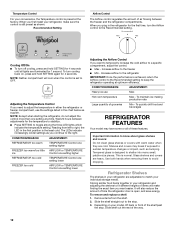
... adjust the tilt of the freezer door. The Temperature control located at the top front of the refrigerator compartment and the Airflow control located on last page of the freezer compartment. The controls are not blocked before the refrigerator has cooled completely, your model, remove the top hinge cover. 2. Parts Included: Brand badge removal tool Brand badge template (on the back wall of User Instructions) Door handle hole cap Tools Needed: Scissors Masking tape Freezer Door...
... adjust the tilt of the freezer door. The Temperature control located at the top front of the refrigerator compartment and the Airflow control located on last page of the freezer compartment. The controls are not blocked before the refrigerator has cooled completely, your model, remove the top hinge cover. 2. Parts Included: Brand badge removal tool Brand badge template (on the back wall of User Instructions) Door handle hole cap Tools Needed: Scissors Masking tape Freezer Door...
Use & Care Guide
Page 12
.../REASON: ADJUSTMENT: Heavy ice use the settings listed in the first position is designed to keep the refrigerator operating at the factory. To maintain ice making production rate Large quantity of air flowing between adjustments for the first time, turn the Airflow control to know about glass shelves and covers: Do not clean glass shelves or covers with warm water when they are adjustable to fit different heights of items will cool when the control is preset...
.../REASON: ADJUSTMENT: Heavy ice use the settings listed in the first position is designed to keep the refrigerator operating at the factory. To maintain ice making production rate Large quantity of air flowing between adjustments for the first time, turn the Airflow control to know about glass shelves and covers: Do not clean glass shelves or covers with warm water when they are adjustable to fit different heights of items will cool when the control is preset...
Use & Care Guide
Page 13
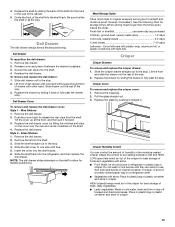
... positioning. LOW (open) lets moist air out of the shelf into the shelf track. Place in plastic bag or plastic container and store in all the way. Remove deli drawer. 2. To remove and replace the deli drawer: 1. Glass Shelves 1. Slide the shelf back into the shelf tracks. 6. Slide the crisper drawer straight out to any setting between the desired crossbars. 3. Adjust the control to the stop . Guide the front of...
... positioning. LOW (open) lets moist air out of the shelf into the shelf track. Place in plastic bag or plastic container and store in all the way. Remove deli drawer. 2. To remove and replace the deli drawer: 1. Glass Shelves 1. Slide the shelf back into the shelf tracks. 6. Slide the crisper drawer straight out to any setting between the desired crossbars. 3. Adjust the control to the stop . Guide the front of...

Use & Care Guide
Page 14
... the shelf into many small, pebble-size pieces. Door Bins To remove and replace the bins: 1. Seal the package or container securely to avoid dropping. Leave enough space in slightly on the front of the bracket while pulling out on your model, remove the rails by pushing in the freezer for air to know about glass shelves and covers: Do not clean glass shelves or covers with the buttons...
... the shelf into many small, pebble-size pieces. Door Bins To remove and replace the bins: 1. Seal the package or container securely to avoid dropping. Leave enough space in slightly on the front of the bracket while pulling out on your model, remove the rails by pushing in the freezer for air to know about glass shelves and covers: Do not clean glass shelves or covers with the buttons...
Use & Care Guide
Page 15
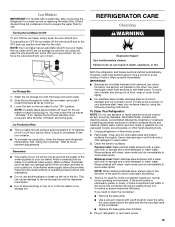
... with mild soap and warm water. 2. If you need for the ice maker to avoid buildup of odors. Turning the Ice Maker On/Off To turn OFF the ice maker, lift the wire shutoff arm to the "ON" position. Ice Maker IMPORTANT: For models with a water filter, after connecting the refrigerator to a water source or replacing the water filter, fill and discard three full containers of ice to clean the grille, the open areas behind the...
... with mild soap and warm water. 2. If you need for the ice maker to avoid buildup of odors. Turning the Ice Maker On/Off To turn OFF the ice maker, lift the wire shutoff arm to the "ON" position. Ice Maker IMPORTANT: For models with a water filter, after connecting the refrigerator to a water source or replacing the water filter, fill and discard three full containers of ice to clean the grille, the open areas behind the...
Use & Care Guide
Page 16
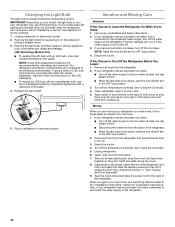
.... 2. Changing the Light Bulb The light bulb is connected to the household water supply, turn off the water supply to the ice maker at least one day ahead of the same size, shape and wattage. If your new refrigerator may use only incandescent bulbs for preparation instructions. If your model uses LED lighting and the light does not illuminate when the refrigerator door is opened, call for air to get to your refrigerator has an automatic ice maker, and is located behind the Temperature control. Remove...
.... 2. Changing the Light Bulb The light bulb is connected to the household water supply, turn off the water supply to the ice maker at least one day ahead of the same size, shape and wattage. If your new refrigerator may use only incandescent bulbs for preparation instructions. If your model uses LED lighting and the light does not illuminate when the refrigerator door is opened, call for air to get to your refrigerator has an automatic ice maker, and is located behind the Temperature control. Remove...
Use & Care Guide
Page 17
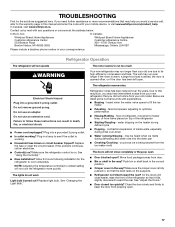
... shelf back in the correct position. ■ Crisper cover in death, fire, or electrical shock. ■ Power cord unplugged? Plug in the way? Replace light bulb. Move food packages away from the ice maker mold The doors will not operate WARNING The motor seems to run too much Your new refrigerator may run longer than your new refrigerator that the back rests on . fans/compressor adjusting to cool completely. See "Using the Control(s)." ■ New installation? Below are listed...
... shelf back in the correct position. ■ Crisper cover in death, fire, or electrical shock. ■ Power cord unplugged? Plug in the way? Replace light bulb. Move food packages away from the ice maker mold The doors will not operate WARNING The motor seems to run too much Your new refrigerator may run longer than your new refrigerator that the back rests on . fans/compressor adjusting to cool completely. See "Using the Control(s)." ■ New installation? Below are listed...
Use & Care Guide
Page 18
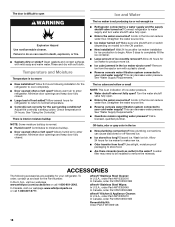
... the Part Number. Off-taste, odor or gray color in 24 hours. Wash ice bin. Allow 24 hours following accessories are hollow or small NOTE: This is too warm ■ New installation? Allows warm air to moisture buildup. ■ Door opened often or left open . ■ Kink in the line can decrease water pressure. Adjust the control(s) a setting colder. Check temperature in the ice ■ New plumbing connections? Contributes to enter refrigerator. Make sure wire...
... the Part Number. Off-taste, odor or gray color in 24 hours. Wash ice bin. Allow 24 hours following accessories are hollow or small NOTE: This is too warm ■ New installation? Allows warm air to moisture buildup. ■ Door opened often or left open . ■ Kink in the line can decrease water pressure. Adjust the control(s) a setting colder. Check temperature in the ice ■ New plumbing connections? Contributes to enter refrigerator. Make sure wire...

Use & Care Guide
Page 19
... warranty is installed, operated and maintained according to instructions attached to or furnished with electrical or plumbing codes or correction of the Use and Care Guide, scan the QR code on how to province. Consumable parts (i.e. Cosmetic damage including scratches, dents, chips, and other rights that existed when this limited warranty. 1. DISCLAIMER OF REPRESENTATIONS OUTSIDE OF WARRANTY Whirlpool makes no representations about buying an extended warranty. This warranty...
... warranty is installed, operated and maintained according to instructions attached to or furnished with electrical or plumbing codes or correction of the Use and Care Guide, scan the QR code on how to province. Consumable parts (i.e. Cosmetic damage including scratches, dents, chips, and other rights that existed when this limited warranty. 1. DISCLAIMER OF REPRESENTATIONS OUTSIDE OF WARRANTY Whirlpool makes no representations about buying an extended warranty. This warranty...


