
Dimension Guide
Page 1
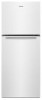
TOP Mount Refrigerator Model Size WRT112CZJB, WRT112CZJW, WRT112CZJZ WRT312CZJB, WRT312CZJV, WRT312CZJW, WRT312CZJZ, HEIGHT OVERALL "A" OVERALL CAB HEIGHT (INCLUDING ROLLERS) "B" OVERALL TOP DOOR FREEZER TO ROLLERS "C" FRIDGE DOOR HEIGHT "D" 1563 (61 9/16) 1540 (60 5/8) 1560 (61 7/16) 978 (38 1/2) FREEZER DOOR HEIGHT CABINET WIDTH MIDDLE OF THE FREEZER 527 610 (20 3/4) (24) 1270 (50) NOTE: MILLIMETER DIMENSIONS ARE ACTUAL. FRACTIONAL INCH DIMENSIONS ARE DERIVED FROM ACTUAL BY ROUNDING TO...
TOP Mount Refrigerator Model Size WRT112CZJB, WRT112CZJW, WRT112CZJZ WRT312CZJB, WRT312CZJV, WRT312CZJW, WRT312CZJZ, HEIGHT OVERALL "A" OVERALL CAB HEIGHT (INCLUDING ROLLERS) "B" OVERALL TOP DOOR FREEZER TO ROLLERS "C" FRIDGE DOOR HEIGHT "D" 1563 (61 9/16) 1540 (60 5/8) 1560 (61 7/16) 978 (38 1/2) FREEZER DOOR HEIGHT CABINET WIDTH MIDDLE OF THE FREEZER 527 610 (20 3/4) (24) 1270 (50) NOTE: MILLIMETER DIMENSIONS ARE ACTUAL. FRACTIONAL INCH DIMENSIONS ARE DERIVED FROM ACTUAL BY ROUNDING TO...
Dimension Guide
Page 2
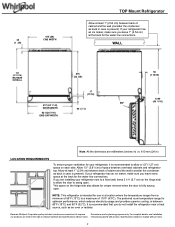
...: All the dimension are installing your refrigerator, it is recommended to allow a 1/2" (1.27 cm) space on the hinge side to allow the door to change materials and specifications without notice. 2 The preferred room temperature range for optimum performance, which reduces electricity usage and provides superior cooling, is recommended that you are millimeters (inches in) i.e. 610 mm (24 in) LOCATION REQUIREMENTS To...
...: All the dimension are installing your refrigerator, it is recommended to allow a 1/2" (1.27 cm) space on the hinge side to allow the door to change materials and specifications without notice. 2 The preferred room temperature range for optimum performance, which reduces electricity usage and provides superior cooling, is recommended that you are millimeters (inches in) i.e. 610 mm (24 in) LOCATION REQUIREMENTS To...
Dimension Guide
Page 3
... you are finished, reconnect the refrigerator to the electrical source and reset the control (Thermostat, Refrigerator or Freezer Control depending on the model) to operate ice maker and water dispenser. It is connected to your cold water supply, the water pressure to the reverse osmosis system needs to the desired setting. Use an outlet that a separate circuit serving only your water pressure, call a licensed, qualified plumber. Reverse Osmosis Water Supply: If a reverse osmosis water filtration system is recommended that...
... you are finished, reconnect the refrigerator to the electrical source and reset the control (Thermostat, Refrigerator or Freezer Control depending on the model) to operate ice maker and water dispenser. It is connected to your cold water supply, the water pressure to the reverse osmosis system needs to the desired setting. Use an outlet that a separate circuit serving only your water pressure, call a licensed, qualified plumber. Reverse Osmosis Water Supply: If a reverse osmosis water filtration system is recommended that...
Dimension Guide
Page 4
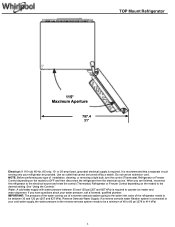
A B Models WRT312CZJB, WRT312CZJV, WRT312CZJW, WRT312CZJZ FREEZER Shelves Refrigerator Compartment Features Description FREEZER GLASS SHELF TM CHROME Width mm (in) A 462 (18 3/16) Depth mm (in) B 279.19 (11) Height mm (in) C N/A FRIDGE Shelves Refrigerator Compartment Features Description BOTTOM GLASS SHELF ASSY CHROME REFRIGERATOR GLASS SHELF STANDARD CHROME Width mm (in) A 514 (20 1/4) 514 (20 1/4) Depth mm (in) B 446.02 (17 9/16) 382.49 (15 1/16) Height mm (in) C N/A N/A 4
A B Models WRT312CZJB, WRT312CZJV, WRT312CZJW, WRT312CZJZ FREEZER Shelves Refrigerator Compartment Features Description FREEZER GLASS SHELF TM CHROME Width mm (in) A 462 (18 3/16) Depth mm (in) B 279.19 (11) Height mm (in) C N/A FRIDGE Shelves Refrigerator Compartment Features Description BOTTOM GLASS SHELF ASSY CHROME REFRIGERATOR GLASS SHELF STANDARD CHROME Width mm (in) A 514 (20 1/4) 514 (20 1/4) Depth mm (in) B 446.02 (17 9/16) 382.49 (15 1/16) Height mm (in) C N/A N/A 4

Dimension Guide
Page 5
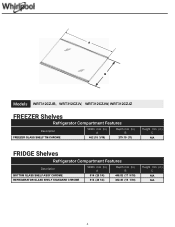
A B Models WRT112CZJB, WRT112CZJW, WRT112CZJZ, FREEZER Shelves Refrigerator Compartment Features Description FREEZER GLASS SHELF TM Width mm (in) A 462 (18 3/16) Depth mm (in) B 279.19 (11) Height mm (in) C N/A FRIDGE Shelves Refrigerator Compartment Features Description REFRIGERATOR GLASS SHELF STANDARD BOTTOM GLASS SHELF ASSY STANDARD Width mm (in) A 514 (20 1/4) 514 (20 1/4) Depth mm (in) B 382.49 (15 1/16) 446.02 (17 9/16) Height mm (in) C N/A N/A 5
A B Models WRT112CZJB, WRT112CZJW, WRT112CZJZ, FREEZER Shelves Refrigerator Compartment Features Description FREEZER GLASS SHELF TM Width mm (in) A 462 (18 3/16) Depth mm (in) B 279.19 (11) Height mm (in) C N/A FRIDGE Shelves Refrigerator Compartment Features Description REFRIGERATOR GLASS SHELF STANDARD BOTTOM GLASS SHELF ASSY STANDARD Width mm (in) A 514 (20 1/4) 514 (20 1/4) Depth mm (in) B 382.49 (15 1/16) 446.02 (17 9/16) Height mm (in) C N/A N/A 5
Dimension Guide
Page 7
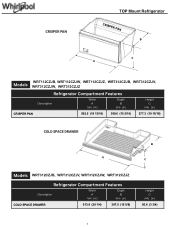
CRISPER PAN TOP Mount Refrigerator CRISPER PAN B C A WRT112CZJB, WRT112CZJW, WRT112CZJZ, WRT312CZJB, WRT312CZJV, Models WRT312CZJW, WRT312CZJZ Refrigerator Compartment Features Description Width A mm (in) Depth B mm (in) Height C mm (in) CRISPER PAN 502.5 (19 13/16) 389.6 (15 5/16) 277.3 (10 15/16) COLD SPACE DRAWER A B C Models WRT312CZJB, WRT312CZJV, WRT312CZJW, WRT312CZJZ Refrigerator Compartment Features Description Width A mm (in) Depth B mm (in) COLD SPACE DRAWER 513.9 (20 1/4) 397.5 (15 5/8) Height C mm (in) 95.8 (3 3/4) 7
CRISPER PAN TOP Mount Refrigerator CRISPER PAN B C A WRT112CZJB, WRT112CZJW, WRT112CZJZ, WRT312CZJB, WRT312CZJV, Models WRT312CZJW, WRT312CZJZ Refrigerator Compartment Features Description Width A mm (in) Depth B mm (in) Height C mm (in) CRISPER PAN 502.5 (19 13/16) 389.6 (15 5/16) 277.3 (10 15/16) COLD SPACE DRAWER A B C Models WRT312CZJB, WRT312CZJV, WRT312CZJW, WRT312CZJZ Refrigerator Compartment Features Description Width A mm (in) Depth B mm (in) COLD SPACE DRAWER 513.9 (20 1/4) 397.5 (15 5/8) Height C mm (in) 95.8 (3 3/4) 7
Owners Manual
Page 1
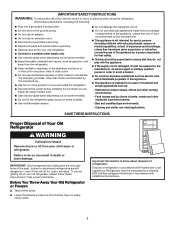
... safety messages will follow instructions. Para una version de estas instrucciones en español, visite www.whirlpool.com. The model number is the safety alert symbol. Always read and obey all safety messages. W11331641A A complete User Instructions manual can kill or hurt you to conserve natural resources, this manual and on the inside wall of the refrigerator compartment. This symbol...
... safety messages will follow instructions. Para una version de estas instrucciones en español, visite www.whirlpool.com. The model number is the safety alert symbol. Always read and obey all safety messages. W11331641A A complete User Instructions manual can kill or hurt you to conserve natural resources, this manual and on the inside wall of the refrigerator compartment. This symbol...
Owners Manual
Page 2
...; Do not damage the refrigerant circuit. Do not use electrical appliances inside the food storage compartments of the appliance, unless they have been given supervision or instruction concerning use an extension cord. Disconnect power before servicing. Replace all parts and panels before operating. Remove doors from your old refrigerator. Connect to a potable water supply only. Use a sturdy glass when dispensing ice (on some models). Keep flammable...
...; Do not damage the refrigerant circuit. Do not use electrical appliances inside the food storage compartments of the appliance, unless they have been given supervision or instruction concerning use an extension cord. Disconnect power before servicing. Replace all parts and panels before operating. Remove doors from your old refrigerator. Connect to a potable water supply only. Use a sturdy glass when dispensing ice (on some models). Keep flammable...
Owners Manual
Page 3
... do so can damage the surface of refrigerant tubing. Follow handling instructions carefully. Failure to remove tape or glue. When Moving Your Refrigerator: Your refrigerator is removed, ice may migrate down from the freezer and cause icicles to puncture of your fingers. Always pull the refrigerator straight out when moving the refrigerator for cleaning or service, be sure to cover the oor with a soft cloth. These...
... do so can damage the surface of refrigerant tubing. Follow handling instructions carefully. Failure to remove tape or glue. When Moving Your Refrigerator: Your refrigerator is removed, ice may migrate down from the freezer and cause icicles to puncture of your fingers. Always pull the refrigerator straight out when moving the refrigerator for cleaning or service, be sure to cover the oor with a soft cloth. These...
Owners Manual
Page 4
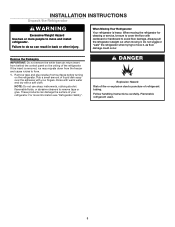
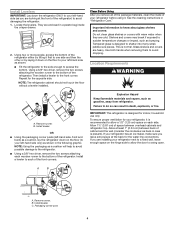
..., pebble-size pieces. If your refrigerator has an ice maker, make sure you remove all of the package materials, clean the inside the crisper drawer. 2. Packaging corner post. 4 NOTE: The refrigerator cabinet should not touch the floor without a leveler installed. Clean Before Using After you leave extra space at least 1" (2.54 cm) between overhead cabinets and refrigerator top. Important information to the front corner. Shelves and covers may...
..., pebble-size pieces. If your refrigerator has an ice maker, make sure you remove all of the package materials, clean the inside the crisper drawer. 2. Packaging corner post. 4 NOTE: The refrigerator cabinet should not touch the floor without a leveler installed. Clean Before Using After you leave extra space at least 1" (2.54 cm) between overhead cabinets and refrigerator top. Important information to the front corner. Shelves and covers may...
Owners Manual
Page 5
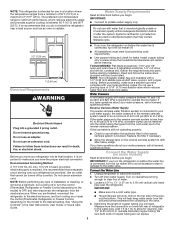
... desired setting. Unplug refrigerator or disconnect power. 2. Turn on nearest faucet long enough to operate the ice maker. Determine the length of copper tubing you turn the refrigerator on before the water line is connected, turn the control (Thermostat, Refrigerator or Freezer Control depending on before the water line is required to clear line of 110°F (43°C). NOTE: This refrigerator is intended for use an extension cord. Do not use in the User Instructions, User Guide, or Use & Care Guide...
... desired setting. Unplug refrigerator or disconnect power. 2. Turn on nearest faucet long enough to operate the ice maker. Determine the length of copper tubing you turn the refrigerator on before the water line is connected, turn the control (Thermostat, Refrigerator or Freezer Control depending on before the water line is required to clear line of 110°F (43°C). NOTE: This refrigerator is intended for use an extension cord. Do not use in the User Instructions, User Guide, or Use & Care Guide...
Owners Manual
Page 6
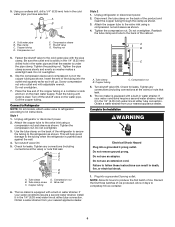
... kit instructions. Slip the compression sleeve and compression nut on the copper tubing as it in water strainer. A B C D E A. Valve inlet 6. Turn shutoff valve ON. Cold water pipe B. Shutoff valve G. Do not overtighten. Connect to Refrigerator NOTE: On kit models, attach water valve to refrigerator according to the cold water pipe with a built-in the 1/4" (6.35 mm) water line at either tube connection. Attach the copper tube to the tubing when the refrigerator is equipped with adjustable wrench. Use...
... kit instructions. Slip the compression sleeve and compression nut on the copper tubing as it in water strainer. A B C D E A. Valve inlet 6. Turn shutoff valve ON. Cold water pipe B. Shutoff valve G. Do not overtighten. Connect to Refrigerator NOTE: On kit models, attach water valve to refrigerator according to the cold water pipe with a built-in the 1/4" (6.35 mm) water line at either tube connection. Attach the copper tube to the tubing when the refrigerator is equipped with adjustable wrench. Use...

Owners Manual
Page 7
... "Replace Doors and Hinges." Unplug refrigerator or disconnect power. 2. Remove the parts for the center hinge as shown and tighten all removable door parts to doors and food to lift the refrigerator door. Lift the freezer door free from where you removed the hinge screws. Replace the freezer door. 3. Remove the four screws, (two on the bottom and two on the door magnets to reverse your doors so that hole plugs and screws are in the User Instructions, User Guide, or Use & Care Guide...
... "Replace Doors and Hinges." Unplug refrigerator or disconnect power. 2. Remove the parts for the center hinge as shown and tighten all removable door parts to doors and food to lift the refrigerator door. Lift the freezer door free from where you removed the hinge screws. Replace the freezer door. 3. Remove the four screws, (two on the bottom and two on the door magnets to reverse your doors so that hole plugs and screws are in the User Instructions, User Guide, or Use & Care Guide...
Owners Manual
Page 8
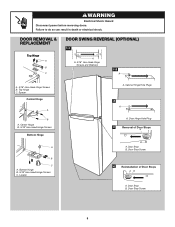
... DOOR SWINGWREAVRERNSIANL G(OPTIONAL) Electrical Shock Hazard Disconnect power before removing doors. Failure to do so can result in death or electrical shock. Door Stop B. DOOR REMOVAL & REPLACEMENT Top Hinge A B C DOOR SWING REVERSAL (OPTIONAL) 1-1 A A. 5/16" Hex-Head Hinge Screws and Washers 1-2 A A. 5/16" Hex-Head Hinge Screws B. Center Hinge B. 5/16" Hex-Head Hinge Screws Bottom Hinge A B C A. Door Hinge Hole Plug 3 Removal of Door Stops A B A. Cabinet Hinge Hole Plugs 2 A A. Door Stop B. Spacer Center Hinge A B A. Top Hinge C. Leveler A. Door Stop...
... DOOR SWINGWREAVRERNSIANL G(OPTIONAL) Electrical Shock Hazard Disconnect power before removing doors. Failure to do so can result in death or electrical shock. Door Stop B. DOOR REMOVAL & REPLACEMENT Top Hinge A B C DOOR SWING REVERSAL (OPTIONAL) 1-1 A A. 5/16" Hex-Head Hinge Screws and Washers 1-2 A A. 5/16" Hex-Head Hinge Screws B. Center Hinge B. 5/16" Hex-Head Hinge Screws Bottom Hinge A B C A. Door Hinge Hole Plug 3 Removal of Door Stops A B A. Cabinet Hinge Hole Plugs 2 A A. Door Stop B. Spacer Center Hinge A B A. Top Hinge C. Leveler A. Door Stop...
Owners Manual
Page 9
... hear water running into the drain pan during a defrost cycle may cause a sizzling sound. ■■ As each cycle. If the vents are new to eliminate odors. If your refrigerator to run more efficiently to fill the ice maker for each cycle ends, you open the doors or add warm food. ■■ Rattling noises may have either a Normal flow or Multiflow air system. This makes...
... hear water running into the drain pan during a defrost cycle may cause a sizzling sound. ■■ As each cycle. If the vents are new to eliminate odors. If your refrigerator to run more efficiently to fill the ice maker for each cycle ends, you open the doors or add warm food. ■■ Rattling noises may have either a Normal flow or Multiflow air system. This makes...
Owners Manual
Page 10
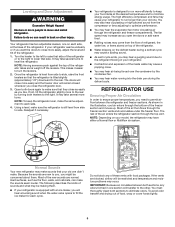
... refrigerator or freezer compartment, use the settings listed in crisper. OPERATING YOUR REFRIGERATOR Using the Controls panel Temperature Control Temperature Control For your Recommended Setting refrigerator, make sure the control is still preset as a guide. When you need to right, the LED in crisper. 10 Reading from left to adjust the temperature on the back wall of groceries ADJUSTMENT: Max Max - The LEDs indicate increasingly colder settings as you want to temporarily increase the cold airflow to use Hot room temperature...
... refrigerator or freezer compartment, use the settings listed in crisper. OPERATING YOUR REFRIGERATOR Using the Controls panel Temperature Control Temperature Control For your Recommended Setting refrigerator, make sure the control is still preset as a guide. When you need to right, the LED in crisper. 10 Reading from left to adjust the temperature on the back wall of groceries ADJUSTMENT: Max Max - The LEDs indicate increasingly colder settings as you want to temporarily increase the cold airflow to use Hot room temperature...
Owners Manual
Page 11
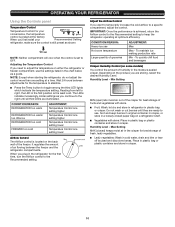
... removable parts and interior surfaces thoroughly. Plug in warm water. 3. REFRIGERATOR CARE Cleaning WARNING Explosion Hazard Use nonflammable cleaner. Do not use abrasive or harsh cleaners such as window sprays, scouring cleansers, flammable fluids, cleaning waxes, concentrated detergents, bleaches or cleansers containing petroleum products on plastic parts, interior and door liners or gaskets. Wipe up spills immediately. Unplug refrigerator or disconnect power. 2. Both the refrigerator and freezer sections defrost automatically. However, clean...
... removable parts and interior surfaces thoroughly. Plug in warm water. 3. REFRIGERATOR CARE Cleaning WARNING Explosion Hazard Use nonflammable cleaner. Do not use abrasive or harsh cleaners such as window sprays, scouring cleansers, flammable fluids, cleaning waxes, concentrated detergents, bleaches or cleansers containing petroleum products on plastic parts, interior and door liners or gaskets. Wipe up spills immediately. Unplug refrigerator or disconnect power. 2. Both the refrigerator and freezer sections defrost automatically. However, clean...
Owners Manual
Page 12
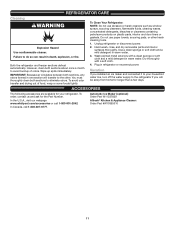
... not use mechanical devices to the warranty page in your mobile device, or visit www.whirlpool.com/product_help. Flammable refrigerant used . 12 Flammable refrigerant used . If you need further assistance or more recommendations that may help you avoid a service call, refer to defrost refrigerator. In Canada, visit http://www.whirlpool.ca. WARNING WARNING Electrical Shock Hazard Plug into a grounded 3 prong outlet. Do not puncture refrigerant tubing.
... not use mechanical devices to the warranty page in your mobile device, or visit www.whirlpool.com/product_help. Flammable refrigerant used . 12 Flammable refrigerant used . If you need further assistance or more recommendations that may help you avoid a service call, refer to defrost refrigerator. In Canada, visit http://www.whirlpool.ca. WARNING WARNING Electrical Shock Hazard Plug into a grounded 3 prong outlet. Do not puncture refrigerant tubing.
Owners Manual
Page 13
... the line can decrease water pressure - A water filter my need to our cold water supply can reduce water fl w - See "Using the Controls." ■■ New Installation - Temperature is noisy Refrigerator noise has been reduced over the years. moisture buildup NOTE: Some ■■ Door(s) opened often or not closed . Minimize door openings and keep doors fully closed completely - Make sure the ice maker wire shutoff arm or switch (depending on model) is in a lamp to make new ice, and...
... the line can decrease water pressure - A water filter my need to our cold water supply can reduce water fl w - See "Using the Controls." ■■ New Installation - Temperature is noisy Refrigerator noise has been reduced over the years. moisture buildup NOTE: Some ■■ Door(s) opened often or not closed . Minimize door openings and keep doors fully closed completely - Make sure the ice maker wire shutoff arm or switch (depending on model) is in a lamp to make new ice, and...

Owners Manual
Page 14
... appliance, you . In-home instruction on the duration of implied warranties of non-genuine Whirlpool parts or accessories. 6. This warranty gives you specific legal rights, and you call the Customer eXperience Center: ■ Name, address, and telephone number ■ Model number and serial number ■ A clear, detailed description of the problem ■ Proof of the Use and Care Guide or visit producthelp.whirlpool.com. 2. Please have the...
... appliance, you . In-home instruction on the duration of implied warranties of non-genuine Whirlpool parts or accessories. 6. This warranty gives you specific legal rights, and you call the Customer eXperience Center: ■ Name, address, and telephone number ■ Model number and serial number ■ A clear, detailed description of the problem ■ Proof of the Use and Care Guide or visit producthelp.whirlpool.com. 2. Please have the...


