
Dimension Guide
Page 1
... W11440351 1 FRACTIONAL INCH DIMENSIONS ARE DERIVED FROM ACTUAL BY ROUNDING TO THE NEAREST 1/16 INCH. TOP Mount Refrigerator Model Size WRT112CZJB, WRT112CZJW, WRT112CZJZ WRT312CZJB, WRT312CZJV, WRT312CZJW, WRT312CZJZ, HEIGHT OVERALL "A" OVERALL CAB HEIGHT (INCLUDING ROLLERS) "B" OVERALL TOP DOOR FREEZER TO ROLLERS "C" FRIDGE DOOR HEIGHT "D" 1563 (61 9/16) 1540 (60 5/8) 1560 (61 7/16) 978 (38 1/2) FREEZER DOOR HEIGHT CABINET WIDTH MIDDLE OF THE FREEZER 527 610 (20...
... W11440351 1 FRACTIONAL INCH DIMENSIONS ARE DERIVED FROM ACTUAL BY ROUNDING TO THE NEAREST 1/16 INCH. TOP Mount Refrigerator Model Size WRT112CZJB, WRT112CZJW, WRT112CZJZ WRT312CZJB, WRT312CZJV, WRT312CZJW, WRT312CZJZ, HEIGHT OVERALL "A" OVERALL CAB HEIGHT (INCLUDING ROLLERS) "B" OVERALL TOP DOOR FREEZER TO ROLLERS "C" FRIDGE DOOR HEIGHT "D" 1563 (61 9/16) 1540 (60 5/8) 1560 (61 7/16) 978 (38 1/2) FREEZER DOOR HEIGHT CABINET WIDTH MIDDLE OF THE FREEZER 527 610 (20...
Dimension Guide
Page 2
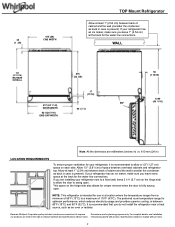
... 2 1/4 (5.7 cm) on the hinge side to improve Dimensions are installing your refrigerator has an ice maker, make sure you leave 1" (2.54 cm) at the back for the water line connections. If you are for crisper removal when the door is recommended that you leave extra space at the back for the water line connections. This space on each side. It is fully swung open . Specifications subject to a maximum...
... 2 1/4 (5.7 cm) on the hinge side to improve Dimensions are installing your refrigerator has an ice maker, make sure you leave 1" (2.54 cm) at the back for the water line connections. If you are for crisper removal when the door is recommended that you leave extra space at the back for the water line connections. This space on each side. It is fully swung open . Specifications subject to a maximum...
Dimension Guide
Page 3
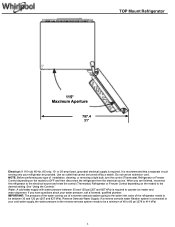
... provided. If you are finished, reconnect the refrigerator to the electrical source and reset the control (Thermostat, Refrigerator or Freezer Control depending on the model) to the desired setting. Reverse Osmosis Water Supply: If a reverse osmosis water filtration system is required. or 20-amp fused, grounded electrical supply is connected to operate ice maker and water dispenser. See "Using the Controls." TOP Mount Refrigerator 115° Maximum Aperture 787.4 31" Electrical: A 115-volt, 60-Hz, AC-only, 15...
... provided. If you are finished, reconnect the refrigerator to the electrical source and reset the control (Thermostat, Refrigerator or Freezer Control depending on the model) to the desired setting. Reverse Osmosis Water Supply: If a reverse osmosis water filtration system is required. or 20-amp fused, grounded electrical supply is connected to operate ice maker and water dispenser. See "Using the Controls." TOP Mount Refrigerator 115° Maximum Aperture 787.4 31" Electrical: A 115-volt, 60-Hz, AC-only, 15...
Dimension Guide
Page 4
A B Models WRT312CZJB, WRT312CZJV, WRT312CZJW, WRT312CZJZ FREEZER Shelves Refrigerator Compartment Features Description FREEZER GLASS SHELF TM CHROME Width mm (in) A 462 (18 3/16) Depth mm (in) B 279.19 (11) Height mm (in) C N/A FRIDGE Shelves Refrigerator Compartment Features Description BOTTOM GLASS SHELF ASSY CHROME REFRIGERATOR GLASS SHELF STANDARD CHROME Width mm (in) A 514 (20 1/4) 514 (20 1/4) Depth mm (in) B 446.02 (17 9/16) 382.49 (15 1/16) Height mm (in) C N/A N/A 4
A B Models WRT312CZJB, WRT312CZJV, WRT312CZJW, WRT312CZJZ FREEZER Shelves Refrigerator Compartment Features Description FREEZER GLASS SHELF TM CHROME Width mm (in) A 462 (18 3/16) Depth mm (in) B 279.19 (11) Height mm (in) C N/A FRIDGE Shelves Refrigerator Compartment Features Description BOTTOM GLASS SHELF ASSY CHROME REFRIGERATOR GLASS SHELF STANDARD CHROME Width mm (in) A 514 (20 1/4) 514 (20 1/4) Depth mm (in) B 446.02 (17 9/16) 382.49 (15 1/16) Height mm (in) C N/A N/A 4

Dimension Guide
Page 5
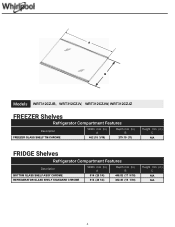
A B Models WRT112CZJB, WRT112CZJW, WRT112CZJZ, FREEZER Shelves Refrigerator Compartment Features Description FREEZER GLASS SHELF TM Width mm (in) A 462 (18 3/16) Depth mm (in) B 279.19 (11) Height mm (in) C N/A FRIDGE Shelves Refrigerator Compartment Features Description REFRIGERATOR GLASS SHELF STANDARD BOTTOM GLASS SHELF ASSY STANDARD Width mm (in) A 514 (20 1/4) 514 (20 1/4) Depth mm (in) B 382.49 (15 1/16) 446.02 (17 9/16) Height mm (in) C N/A N/A 5
A B Models WRT112CZJB, WRT112CZJW, WRT112CZJZ, FREEZER Shelves Refrigerator Compartment Features Description FREEZER GLASS SHELF TM Width mm (in) A 462 (18 3/16) Depth mm (in) B 279.19 (11) Height mm (in) C N/A FRIDGE Shelves Refrigerator Compartment Features Description REFRIGERATOR GLASS SHELF STANDARD BOTTOM GLASS SHELF ASSY STANDARD Width mm (in) A 514 (20 1/4) 514 (20 1/4) Depth mm (in) B 382.49 (15 1/16) 446.02 (17 9/16) Height mm (in) C N/A N/A 5
Dimension Guide
Page 7
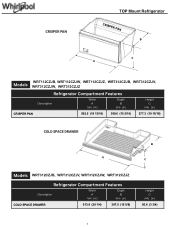
CRISPER PAN TOP Mount Refrigerator CRISPER PAN B C A WRT112CZJB, WRT112CZJW, WRT112CZJZ, WRT312CZJB, WRT312CZJV, Models WRT312CZJW, WRT312CZJZ Refrigerator Compartment Features Description Width A mm (in) Depth B mm (in) Height C mm (in) CRISPER PAN 502.5 (19 13/16) 389.6 (15 5/16) 277.3 (10 15/16) COLD SPACE DRAWER A B C Models WRT312CZJB, WRT312CZJV, WRT312CZJW, WRT312CZJZ Refrigerator Compartment Features Description Width A mm (in) Depth B mm (in) COLD SPACE DRAWER 513.9 (20 1/4) 397.5 (15 5/8) Height C mm (in) 95.8 (3 3/4) 7
CRISPER PAN TOP Mount Refrigerator CRISPER PAN B C A WRT112CZJB, WRT112CZJW, WRT112CZJZ, WRT312CZJB, WRT312CZJV, Models WRT312CZJW, WRT312CZJZ Refrigerator Compartment Features Description Width A mm (in) Depth B mm (in) Height C mm (in) CRISPER PAN 502.5 (19 13/16) 389.6 (15 5/16) 277.3 (10 15/16) COLD SPACE DRAWER A B C Models WRT312CZJB, WRT312CZJV, WRT312CZJW, WRT312CZJZ Refrigerator Compartment Features Description Width A mm (in) Depth B mm (in) COLD SPACE DRAWER 513.9 (20 1/4) 397.5 (15 5/8) Height C mm (in) 95.8 (3 3/4) 7
Owners Manual
Page 1
... User Guide. W11331641B In Canada: For assistance or service, call 1-800-253-1301. This is located on your appliance. Register your refrigerator at : www.whirlpool.com/manuals. Your safety and the safety of injury, and tell you don't follow the safety alert symbol and either the word "DANGER" or "WARNING." All safety messages will follow instructions. The model number is...
... User Guide. W11331641B In Canada: For assistance or service, call 1-800-253-1301. This is located on your appliance. Register your refrigerator at : www.whirlpool.com/manuals. Your safety and the safety of injury, and tell you don't follow the safety alert symbol and either the word "DANGER" or "WARNING." All safety messages will follow instructions. The model number is...
Owners Manual
Page 2
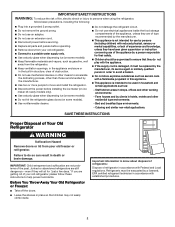
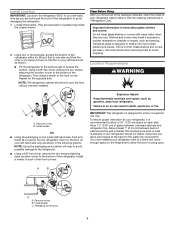
..., well away from your old freezer or refrigerator. Important information to move and install the refrigerator. Disconnect the power before installing the ice maker (on ice maker kit-ready models only). Use a sturdy glass when dispensing ice (on some models). Do not hit the refrigerator glass doors (on some models). Use nonflammable cleaner. Do not damage the refrigerant circuit. Do not use electrical appliances inside . IMPORTANT: Child entrapment and suffocation...
..., well away from your old freezer or refrigerator. Important information to move and install the refrigerator. Disconnect the power before installing the ice maker (on ice maker kit-ready models only). Use a sturdy glass when dispensing ice (on some models). Do not hit the refrigerator glass doors (on some models). Use nonflammable cleaner. Do not damage the refrigerant circuit. Do not use electrical appliances inside . IMPORTANT: Child entrapment and suffocation...
Owners Manual
Page 3
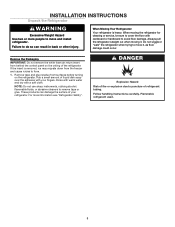
... the ceiling of refrigerant tubing. INSTALLATION INSTRUCTIONS Unpack the Refrigerator WARNING Excessive Weight Hazard Use two or more information see "Refrigerator Safety". Do not wiggle or "walk" the refrigerator when trying to cover the oor with a soft cloth. Always pull the refrigerator straight out when moving the refrigerator for cleaning or service, be sure to move and install refrigerator. Rinse with warm water and dry with cardboard...
... the ceiling of refrigerant tubing. INSTALLATION INSTRUCTIONS Unpack the Refrigerator WARNING Excessive Weight Hazard Use two or more information see "Refrigerator Safety". Do not wiggle or "walk" the refrigerator when trying to cover the oor with a soft cloth. Always pull the refrigerator straight out when moving the refrigerator for cleaning or service, be sure to move and install refrigerator. Rinse with warm water and dry with cardboard...
Owners Manual
Page 4
Then install a leveler to sudden temperature changes or impact, such as bumping. NOTE: The refrigerator cabinet should not touch the floor without a leveler installed. Shelves and covers may break if exposed to the front corner. This is designed to avoid dropping. If you remove all of the package materials, clean the inside the crisper drawer. 2. Install leveler. Repeat for indoor, household use only. Clean Before Using After you are cold. Install leveler. Packaging...
Then install a leveler to sudden temperature changes or impact, such as bumping. NOTE: The refrigerator cabinet should not touch the floor without a leveler installed. Shelves and covers may break if exposed to the front corner. This is designed to avoid dropping. If you remove all of the package materials, clean the inside the crisper drawer. 2. Install leveler. Repeat for indoor, household use only. Clean Before Using After you are cold. Install leveler. Packaging...

Owners Manual
Page 5
... the electrical source, and turn cooling on or reset the control (Thermostat, Refrigerator or Freezer Control, depending on lower left rear of refrigerator to clear line of copper tubing you turn the ice maker off main water supply. Do not use an adapter. See "Using the Controls" in the User Instructions, User Guide, or Use & Care Guide. ■■ If you will work. Connect the Water Line 1. Locate a 1/2" to 1¹⁄4" (1.27 cm to be turned off . ■■ All installations must meet local plumbing code...
... the electrical source, and turn cooling on or reset the control (Thermostat, Refrigerator or Freezer Control, depending on lower left rear of refrigerator to clear line of copper tubing you turn the ice maker off main water supply. Do not use an adapter. See "Using the Controls" in the User Instructions, User Guide, or Use & Care Guide. ■■ If you will work. Connect the Water Line 1. Locate a 1/2" to 1¹⁄4" (1.27 cm to be turned off . ■■ All installations must meet local plumbing code...

Owners Manual
Page 6
... ice container. 6 Style 1 1. Check for leaks. Copper tubing C. Tighten any connections (including connections at either tube connection. NOTE: Allow 24 hours to kit instructions. Discard the first three batches of the tubing into the outlet end squarely as far as shown. 4. Shutoff valve G. Connect to Refrigerator NOTE: On kit models, attach water valve to refrigerator according to produce the first batch of the cabinet. Copper tubing D. Unplug refrigerator or disconnect power...
... ice container. 6 Style 1 1. Check for leaks. Copper tubing C. Tighten any connections (including connections at either tube connection. NOTE: Allow 24 hours to kit instructions. Discard the first three batches of the tubing into the outlet end squarely as far as shown. 4. Shutoff valve G. Connect to Refrigerator NOTE: On kit models, attach water valve to refrigerator according to produce the first batch of the cabinet. Copper tubing D. Unplug refrigerator or disconnect power...
Owners Manual
Page 7
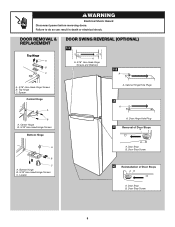
.... Remove the parts for the top hinge as shown in Top Hinge graphic. Replace the refrigerator door. 2. Final Steps 1. NOTE: Provide support between the freezer and refrigerator doors while the hinges are in the User Instructions, User Guide, or Use & Care Guide. 4. Reverse Doors (optional) IMPORTANT: If you are being moved. Move the parts of both doors closed until you begin, turn off the refrigerator control. Unplug refrigerator or disconnect power. 2. Replace the parts for the top hinge as shown. Assemble the parts...
.... Remove the parts for the top hinge as shown in Top Hinge graphic. Replace the refrigerator door. 2. Final Steps 1. NOTE: Provide support between the freezer and refrigerator doors while the hinges are in the User Instructions, User Guide, or Use & Care Guide. 4. Reverse Doors (optional) IMPORTANT: If you are being moved. Move the parts of both doors closed until you begin, turn off the refrigerator control. Unplug refrigerator or disconnect power. 2. Replace the parts for the top hinge as shown. Assemble the parts...
Owners Manual
Page 8
... G(OPTIONAL) Electrical Shock Hazard Disconnect power before removing doors. DOOR REMOVAL & REPLACEMENT Top Hinge A B C DOOR SWING REVERSAL (OPTIONAL) 1-1 A A. 5/16" Hex-Head Hinge Screws and Washers 1-2 A A. 5/16" Hex-Head Hinge Screws B. Spacer Center Hinge A B A. Top Hinge C. Door Stop Screw 4 Reinstallation of Door Stops A B A. Leveler A. Center Hinge B. 5/16" Hex-Head Hinge Screws Bottom Hinge A B C A. Bottom Hinge B. 5/16" Hex-Head Hinge Screws C. Door Stop B. Door Hinge Hole Plug 3 Removal of Door Stops A B A. Door Stop B. Door Stop Screw 8
... G(OPTIONAL) Electrical Shock Hazard Disconnect power before removing doors. DOOR REMOVAL & REPLACEMENT Top Hinge A B C DOOR SWING REVERSAL (OPTIONAL) 1-1 A A. 5/16" Hex-Head Hinge Screws and Washers 1-2 A A. 5/16" Hex-Head Hinge Screws B. Spacer Center Hinge A B A. Top Hinge C. Door Stop Screw 4 Reinstallation of Door Stops A B A. Leveler A. Center Hinge B. 5/16" Hex-Head Hinge Screws Bottom Hinge A B C A. Bottom Hinge B. 5/16" Hex-Head Hinge Screws C. Door Stop B. Door Hinge Hole Plug 3 Removal of Door Stops A B A. Door Stop B. Door Stop Screw 8

Owners Manual
Page 9
... the refrigerator is level from the flow of refrigerant, the water line, or items stored on top of the refrigerator. 1. The high efficiency compressor and fans may take several more turns. REFRIGERATOR USE Ensuring Proper Air Circulation In order to ensure proper temperatures, you need to eliminate odors. Most of these vents with an ice maker, you want the doors to keep the refrigerator level, make . You must thoroughly clean both...
... the refrigerator is level from the flow of refrigerant, the water line, or items stored on top of the refrigerator. 1. The high efficiency compressor and fans may take several more turns. REFRIGERATOR USE Ensuring Proper Air Circulation In order to ensure proper temperatures, you need to eliminate odors. Most of these vents with an ice maker, you want the doors to keep the refrigerator level, make . You must thoroughly clean both...

Owners Manual
Page 10
... settings listed in cold water, drain and trim or tear off bruised and discolored areas. Adjust the Airflow Control If you need to adjust the temperature on a refrigerator shelf. ■■ Vegetables with skins. ■■ Fruit: Wash, let dry and store in refrigerator in crisper. 10 Max Setting MAX (closed paper bag on either the refrigerator or freezer compartment, use . OPERATING YOUR REFRIGERATOR Using the Controls panel Temperature Control Temperature Control For your Recommended Setting refrigerator, make sure the control...
... settings listed in cold water, drain and trim or tear off bruised and discolored areas. Adjust the Airflow Control If you need to adjust the temperature on a refrigerator shelf. ■■ Vegetables with skins. ■■ Fruit: Wash, let dry and store in refrigerator in crisper. 10 Max Setting MAX (closed paper bag on either the refrigerator or freezer compartment, use . OPERATING YOUR REFRIGERATOR Using the Controls panel Temperature Control Temperature Control For your Recommended Setting refrigerator, make sure the control...
Owners Manual
Page 11
... containing petroleum products on plastic parts, interior and door liners or gaskets. Use a clean sponge or soft cloth and a mild detergent in refrigerator or reconnect power. Plug in warm water. 3. Vacation If you installed an ice maker and connected it to the other harsh cleaning tools. 1. this includes the accessory bag for the Part Number. Wire Shelf Affresh® Kitchen & Appliance Cleaner: Order Part #W10355010 11 IMPORTANT: Because air circulates between both sections...
... containing petroleum products on plastic parts, interior and door liners or gaskets. Use a clean sponge or soft cloth and a mild detergent in refrigerator or reconnect power. Plug in warm water. 3. Vacation If you installed an ice maker and connected it to the other harsh cleaning tools. 1. this includes the accessory bag for the Part Number. Wire Shelf Affresh® Kitchen & Appliance Cleaner: Order Part #W10355010 11 IMPORTANT: Because air circulates between both sections...
Owners Manual
Page 12
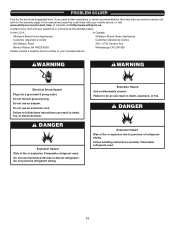
... not use mechanical devices to follow these instructions can result in death, fire, or electrical shock. Failure to defrost refrigerator. If you need further assistance or more recommendations that may help you avoid a service call, refer to puncture of fire or explosion. In Canada, visit http://www.whirlpool.ca. Contact us by mail with your correspondence. Follow handling instructions carefully. Benton...
... not use mechanical devices to follow these instructions can result in death, fire, or electrical shock. Failure to defrost refrigerator. If you need further assistance or more recommendations that may help you avoid a service call, refer to puncture of fire or explosion. In Canada, visit http://www.whirlpool.ca. Contact us by mail with your correspondence. Follow handling instructions carefully. Benton...

Owners Manual
Page 13
... setting will not cool the refrigerator more energy efficient speeds. The refrigerator is too warm ■■ New Installation - may be installed to begin. Move food packages away from the ice maker mold. Make sure the crisper cover is being ejected from door. Temperature is noisy Refrigerator noise has been reduced over the years. Adjust the controls to our cold water supply can cause discolored or off -taste - moisture build- Straighten the water source line...
... setting will not cool the refrigerator more energy efficient speeds. The refrigerator is too warm ■■ New Installation - may be installed to begin. Move food packages away from the ice maker mold. Make sure the crisper cover is being ejected from door. Temperature is noisy Refrigerator noise has been reduced over the years. Adjust the controls to our cold water supply can cause discolored or off -taste - moisture build- Straighten the water source line...
Owners Manual
Page 14
... province to : Whirlpool Customer eXperience Center In the U.S.A., call 1-800-807-6777. Consumable parts (e.g., light bulbs, batteries, air or water filters, preservation solutions). 5. Discoloration, rust, or oxidation of merchantability or fitness, so this limited warranty. 1. This warranty gives you specific legal rights, and you also may not apply to review the Troubleshooting section of household electrical or plumbing (e.g., house wiring, fuses, or water inlet hoses). 4. Please...
... province to : Whirlpool Customer eXperience Center In the U.S.A., call 1-800-807-6777. Consumable parts (e.g., light bulbs, batteries, air or water filters, preservation solutions). 5. Discoloration, rust, or oxidation of merchantability or fitness, so this limited warranty. 1. This warranty gives you specific legal rights, and you also may not apply to review the Troubleshooting section of household electrical or plumbing (e.g., house wiring, fuses, or water inlet hoses). 4. Please...


