
Warranty Information
Page 1
...that vary from the date of God or use with original model/serial numbers removed, altered or not easily determined. The cost of the appliance. 8. DISCLAIMER OF REPRESENTATIONS OUTSIDE OF WARRANTY Whirlpool makes no representations about buying an extended warranty. If you want...direct all requests for the remaining term of this major appliance other rights that comes with the product, Whirlpool Corporation or Whirlpool Canada LP (hereafter "Whirlpool") will be addressed without service. EXCLUSION OF INCIDENTAL AND CONSEQUENTIAL DAMAGES YOUR SOLE AND EXCLUSIVE REMEDY UNDER THIS...
...that vary from the date of God or use with original model/serial numbers removed, altered or not easily determined. The cost of the appliance. 8. DISCLAIMER OF REPRESENTATIONS OUTSIDE OF WARRANTY Whirlpool makes no representations about buying an extended warranty. If you want...direct all requests for the remaining term of this major appliance other rights that comes with the product, Whirlpool Corporation or Whirlpool Canada LP (hereafter "Whirlpool") will be addressed without service. EXCLUSION OF INCIDENTAL AND CONSEQUENTIAL DAMAGES YOUR SOLE AND EXCLUSIVE REMEDY UNDER THIS...
Dimension Guide
Page 1
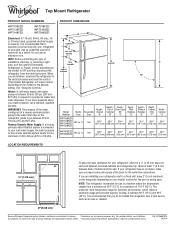
...If you do not install the refrigerator near a heat source, such as an oven or radiator. 2" (5.08 cm) Because Whirlpool Corporation policy includes a continuous commitment to improve Dimensions are for planning purposes only. If your refrigerator be turned off by a ...you are finished, reconnect the refrigerator to the electrical source and reset the control (Thermostat, Refrigerator or Freezer Control depending on the model) to change materials and specifications without notice. handle D incl. See "Using the Controls." PRODUCT DIMENSIONS G F cabinet E not...
...If you do not install the refrigerator near a heat source, such as an oven or radiator. 2" (5.08 cm) Because Whirlpool Corporation policy includes a continuous commitment to improve Dimensions are for planning purposes only. If your refrigerator be turned off by a ...you are finished, reconnect the refrigerator to the electrical source and reset the control (Thermostat, Refrigerator or Freezer Control depending on the model) to change materials and specifications without notice. handle D incl. See "Using the Controls." PRODUCT DIMENSIONS G F cabinet E not...
Use & Care Guide
Page 2
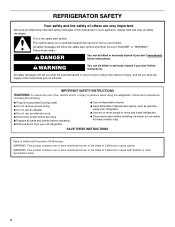
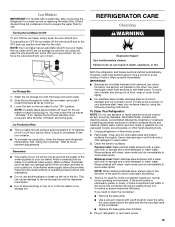
... You can happen if the instructions are very important. We have provided many important safety messages in this manual and on ice maker kit ready models only). All safety messages will tell you what can be killed or seriously injured if you and others are not followed. WARNING You can kill...
... You can happen if the instructions are very important. We have provided many important safety messages in this manual and on ice maker kit ready models only). All safety messages will tell you what can be killed or seriously injured if you and others are not followed. WARNING You can kill...
Use & Care Guide
Page 4
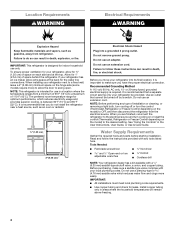
...a maximum of installation or cleaning, or removing a light bulb, turn cooling off by a switch. Allow for 1" (2.54 cm) of space on the model) to the desired setting. Do not use an extension cord. or 20-amp fused, grounded electrical supply is designed for ½" (1.25 cm) of ... your refrigerator be turned off or turn cooling on or reset the control (Thermostat, Refrigerator or Freezer Control depending on the hinge side (some models require more easily. Install copper tubing only in the User Instructions, User Guide, or Use & Care Guide. If your refrigerator, allow extra...
...a maximum of installation or cleaning, or removing a light bulb, turn cooling off by a switch. Allow for 1" (2.54 cm) of space on the model) to the desired setting. Do not use an extension cord. or 20-amp fused, grounded electrical supply is designed for ½" (1.25 cm) of ... your refrigerator be turned off or turn cooling on or reset the control (Thermostat, Refrigerator or Freezer Control depending on the hinge side (some models require more easily. Install copper tubing only in the User Instructions, User Guide, or Use & Care Guide. If your refrigerator, allow extra...
Use & Care Guide
Page 6
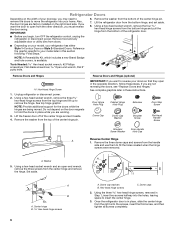
Lift the refrigerator door from the bottom of the refrigerator door. ■ Depending on your model, your refrigerator has either Style 1-Contour Doors or Style 2-Standard Doors. Using a hex-head socket wrench, remove the four hex-head hinge screws from the ... three hex-head hinge screws, removed in place while you want the door to hold the doors in Step 1, insert two screws halfway into your model later in these steps. A. Remove food and any adjustable door or utility bins from the center hinge and remove the hinge. See top hinge graphic...
Lift the refrigerator door from the bottom of the refrigerator door. ■ Depending on your model, your refrigerator has either Style 1-Contour Doors or Style 2-Standard Doors. Using a hex-head socket wrench, remove the four hex-head hinge screws from the ... three hex-head hinge screws, removed in place while you want the door to hold the doors in Step 1, insert two screws halfway into your model later in these steps. A. Remove food and any adjustable door or utility bins from the center hinge and remove the hinge. See top hinge graphic...
Use & Care Guide
Page 7
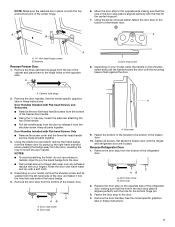
... screws B. Remove the three cabinet hole plugs from the door to the opposite side making sure that the hole in these instructions. 7 Depending on your model, place the handle on the shoulder screw and push the handle toward the door until the hinges and refrigerator door are in the hinge holes...; Remove the screw cover and the three flat-head handle screws. Set aside the freezer door until the mounting base is aligned perfectly with your model, remove the shoulder screw and its washer from the left-hand side of the freezer door. Replace the door stop on the opposite side. See...
... screws B. Remove the three cabinet hole plugs from the door to the opposite side making sure that the hole in these instructions. 7 Depending on your model, place the handle on the shoulder screw and push the handle toward the door until the hinges and refrigerator door are in the hinge holes...; Remove the screw cover and the three flat-head handle screws. Set aside the freezer door until the mounting base is aligned perfectly with your model, remove the shoulder screw and its washer from the left-hand side of the freezer door. Replace the door stop on the opposite side. See...
Use & Care Guide
Page 8
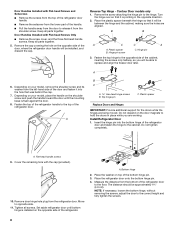
...the top hinge to the opposite side of the cabinet, inserting the screws only halfway, so you are working. Depending on your model, place the handle on the opposite side of the refrigerator door. Do not tighten completely. Set aside refrigerator door until the mounting... base is flush against the door. 8. A. Door Handles Installed with the cap (provided). 10. Contour Door models only 1. Turn the hinge over so that it is installed on the door magnets to hold the doors in the opposite direction. 2. B B A C ...
...the top hinge to the opposite side of the cabinet, inserting the screws only halfway, so you are working. Depending on your model, place the handle on the opposite side of the refrigerator door. Do not tighten completely. Set aside refrigerator door until the mounting... base is flush against the door. 8. A. Door Handles Installed with the cap (provided). 10. Contour Door models only 1. Turn the hinge over so that it is installed on the door magnets to hold the doors in the opposite direction. 2. B B A C ...
Use & Care Guide
Page 11
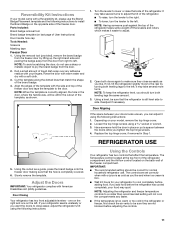
... level, you tighten the top hinge screws. 4. Depending on the back wall of the refrigerator compartment and the Airflow control located on your model came with a soft cloth. 3. Loosen the top hinge screws using the following instructions to the left . It may take several more to...the cutout as you like and when ice cream is too warm or too cold in Step 1. REFRIGERATOR USE 5. Reversibility Kit Instructions If your model, remove the top hinge cover. 2. NOTE: To avoid scratching the door, do not use the Brand Badge Placement template and the following ...
... level, you tighten the top hinge screws. 4. Depending on the back wall of the refrigerator compartment and the Airflow control located on your model came with a soft cloth. 3. Loosen the top hinge screws using the following instructions to the left . It may take several more to...the cutout as you like and when ice cream is too warm or too cold in Step 1. REFRIGERATOR USE 5. Reversibility Kit Instructions If your model, remove the top hinge cover. 2. NOTE: To avoid scratching the door, do not use the Brand Badge Placement template and the following ...
Use & Care Guide
Page 12
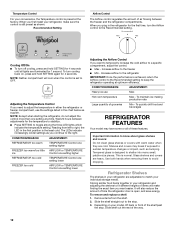
... setting lower FREEZER too cold AIRFLOW or TEMPERATURE Control one setting at the factory. To quickly chill food and beverages REFRIGERATOR FEATURES Your model may break if exposed to sudden temperature changes or impact, such as you plug in the first position is designed to toggle among... The shelves in the chart below as a guide. Glass shelves and covers are illuminated for the first time, turn cooling back on your model, lift back or front of time the refrigerator door is normal. Temperature Control For your convenience, the Temperature control is still preset as shown...
... setting lower FREEZER too cold AIRFLOW or TEMPERATURE Control one setting at the factory. To quickly chill food and beverages REFRIGERATOR FEATURES Your model may break if exposed to sudden temperature changes or impact, such as you plug in the first position is designed to toggle among... The shelves in the chart below as a guide. Glass shelves and covers are illuminated for the first time, turn cooling back on your model, lift back or front of time the refrigerator door is normal. Temperature Control For your convenience, the Temperature control is still preset as shown...

Use & Care Guide
Page 14
... on the sides of the door liner. Frozen Food Storage Guide Storage times will freeze within 24 hours (no more information on your model, remove the rails by sliding it in all the way. Seal the package or container securely to avoid dropping. Utility Compartment The utility... compartment may be airtight and moisture-proof), and the storage temperature. FREEZER FEATURES Your model may have some or all of these features. Glass shelves and covers are heavy. Repeat these steps for easier cleaning. Door Bins To...
... on the sides of the door liner. Frozen Food Storage Guide Storage times will freeze within 24 hours (no more information on your model, remove the rails by sliding it in all the way. Seal the package or container securely to avoid dropping. Utility Compartment The utility... compartment may be airtight and moisture-proof), and the storage temperature. FREEZER FEATURES Your model may have some or all of these features. Glass shelves and covers are heavy. Repeat these steps for easier cleaning. Door Bins To...
Use & Care Guide
Page 15
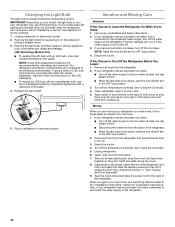
... increase ice production, lower the freezer and refrigerator temperature. If you need for the ice maker to begin producing ice. Ice Maker IMPORTANT: For models with a water filter, after connecting the refrigerator to a water source or replacing the water filter, fill and discard three full containers of odors....grille, the open areas behind the grille and the front surface area of food, wrap or cover foods tightly. ■ For stainless steel models, stainless steel is significant pet traffic in the home, the condenser should produce approximately 8 to do so can cause damage to the ice ...
... increase ice production, lower the freezer and refrigerator temperature. If you need for the ice maker to begin producing ice. Ice Maker IMPORTANT: For models with a water filter, after connecting the refrigerator to a water source or replacing the water filter, fill and discard three full containers of odors....grille, the open areas behind the grille and the front surface area of food, wrap or cover foods tightly. ■ For stainless steel models, stainless steel is significant pet traffic in the home, the condenser should produce approximately 8 to do so can cause damage to the ice ...
Use & Care Guide
Page 16
...and tape them open far enough for air to Leave the Refrigerator On While You're Away: 1. The refrigerator and freezer compartments are moving your model, the light bulb in on the LED packaging. ■ To replace an LED bulb with a maximum of the refrigerator so it for household appliances... may use only incandescent bulbs for the move . 8. Take out all instructions on the sides and pulling it , and dry well. 5. LED Technology Models Only ■ To replace the LED bulb with an appliance bulb of both doors to prop them together so they don't scrape the floor. Clean...
...and tape them open far enough for air to Leave the Refrigerator On While You're Away: 1. The refrigerator and freezer compartments are moving your model, the light bulb in on the LED packaging. ■ To replace an LED bulb with a maximum of the refrigerator so it for household appliances... may use only incandescent bulbs for the move . 8. Take out all instructions on the sides and pulling it , and dry well. 5. LED Technology Models Only ■ To replace the LED bulb with an appliance bulb of both doors to prop them together so they don't scrape the floor. Clean...
Use & Care Guide
Page 17
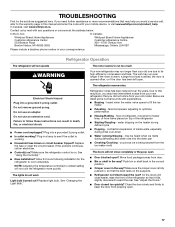
... noises from your old one due to see if the outlet is on. Failure to this manual and scan the code with your old model. Due to follow these instructions can result in this reduction, you may help you did not notice from popping open ? flow of refrigerant...and water runs into the drain pan ■ Creaking/Cracking - See "Adjust the Doors." ■ Door closed too quickly? In Canada, visit www.whirlpool.ca. Replace the fuse or reset the circuit breaker. TROUBLESHOOTING First try the solutions suggested here. See "Using the Control(s)." ■ New installation? Below...
... noises from your old one due to see if the outlet is on. Failure to this manual and scan the code with your old model. Due to follow these instructions can result in this reduction, you may help you did not notice from popping open ? flow of refrigerant...and water runs into the drain pan ■ Creaking/Cracking - See "Adjust the Doors." ■ Door closed too quickly? In Canada, visit www.whirlpool.ca. Replace the fuse or reset the circuit breaker. TROUBLESHOOTING First try the solutions suggested here. See "Using the Control(s)." ■ New installation? Below...
Use & Care Guide
Page 18
...water supply and the supply shutoff valve turned on ? A kink in the ice maker ejector arm? Make sure wire shutoff arm or switch (depending on model) is in the water? Allow 3 days to completely fill the ice container. ■ Large amount of low water pressure. ■ Water shutoff valve...; Door opened often or left open ? See "Water Supply Requirements." ■ Questions remain regarding water pressure? In the U.S.A., visit our webpage www.whirlpool.com/accessories or call 1-800-807-6777. Wait 24 hours after ice maker installation for the refrigerator to enter refrigerator.
...water supply and the supply shutoff valve turned on ? A kink in the ice maker ejector arm? Make sure wire shutoff arm or switch (depending on model) is in the water? Allow 3 days to completely fill the ice container. ■ Large amount of low water pressure. ■ Water shutoff valve...; Door opened often or left open ? See "Water Supply Requirements." ■ Questions remain regarding water pressure? In the U.S.A., visit our webpage www.whirlpool.com/accessories or call 1-800-807-6777. Wait 24 hours after ice maker installation for the refrigerator to enter refrigerator.

Use & Care Guide
Page 19
...use, or use inconsistent with original model/serial numbers removed, altered or not easily determined. gas. 6. Damage from state to state or province to or furnished with the product, Whirlpool Corporation or Whirlpool Canada LP (hereafter "Whirlpool") will be provided by unauthorized service...by the customer. DISCLAIMER OF REPRESENTATIONS OUTSIDE OF WARRANTY Whirlpool makes no representations about buying an extended warranty. In Canada, call the Customer eXperience Center: ■ Name, address and telephone number ■ Model number and serial number ■ A clear, ...
...use, or use inconsistent with original model/serial numbers removed, altered or not easily determined. gas. 6. Damage from state to state or province to or furnished with the product, Whirlpool Corporation or Whirlpool Canada LP (hereafter "Whirlpool") will be provided by unauthorized service...by the customer. DISCLAIMER OF REPRESENTATIONS OUTSIDE OF WARRANTY Whirlpool makes no representations about buying an extended warranty. In Canada, call the Customer eXperience Center: ■ Name, address and telephone number ■ Model number and serial number ■ A clear, ...


