
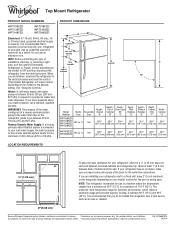
Dimension Guide
Page 1
.... IMPORTANT: The pressure of the water coming out of a reverse osmosis system going to OFF and then disconnect the refrigerator from the electrical source. W10669181A 10/3/14 Reverse Osmosis Water Supply: If a reverse osmosis water filtration system is recommended ..."Using the Controls." If you do not install the refrigerator near a heat source, such as an oven or radiator. 2" (5.08 cm) Because Whirlpool Corporation policy includes a continuous commitment to your refrigerator be between overhead cabinets and refrigerator top. It is connected to improve Dimensions are for...
.... IMPORTANT: The pressure of the water coming out of a reverse osmosis system going to OFF and then disconnect the refrigerator from the electrical source. W10669181A 10/3/14 Reverse Osmosis Water Supply: If a reverse osmosis water filtration system is recommended ..."Using the Controls." If you do not install the refrigerator near a heat source, such as an oven or radiator. 2" (5.08 cm) Because Whirlpool Corporation policy includes a continuous commitment to your refrigerator be between overhead cabinets and refrigerator top. It is connected to improve Dimensions are for...
Use & Care Guide
Page 2
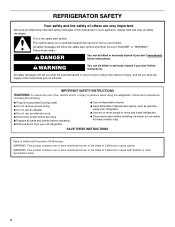
...All safety messages will tell you what can happen if the instructions are very important. REFRIGERATOR SAFETY Your safety and the safety of fire, electric shock, or injury to persons when using the refrigerator, follow basic precautions, including the following: ■ Plug into a grounded 3 prong... read and obey all parts and panels before installing ice maker (on your old refrigerator. ■ Use nonflammable cleaner. ■ Keep flammable materials and vapors, such as gasoline, away from refrigerator. ■ Use two or more chemicals known to the State of California to ...
...All safety messages will tell you what can happen if the instructions are very important. REFRIGERATOR SAFETY Your safety and the safety of fire, electric shock, or injury to persons when using the refrigerator, follow basic precautions, including the following: ■ Plug into a grounded 3 prong... read and obey all parts and panels before installing ice maker (on your old refrigerator. ■ Use nonflammable cleaner. ■ Keep flammable materials and vapors, such as gasoline, away from refrigerator. ■ Use two or more chemicals known to the State of California to ...
Use & Care Guide
Page 3
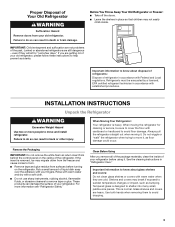
...about glass shelves and covers: Do not clean glass shelves or covers with your fingers. Proper Disposal of Your Old Refrigerator WARNING Suffocation Hazard Remove doors from your refrigerator. Refrigerants must be sure to cover the floor with a soft cloth. ■ Do not use sharp instruments, rubbing ... soap over the adhesive with warm water when they will sit for cleaning or service, be evacuated by a licensed, EPA certified refrigerant technician in back or other injury. Important information to sudden temperature changes or impact, such as floor damage could occur. Shelves and...
...about glass shelves and covers: Do not clean glass shelves or covers with your fingers. Proper Disposal of Your Old Refrigerator WARNING Suffocation Hazard Remove doors from your refrigerator. Refrigerants must be sure to cover the floor with a soft cloth. ■ Do not use sharp instruments, rubbing ... soap over the adhesive with warm water when they will sit for cleaning or service, be evacuated by a licensed, EPA certified refrigerant technician in back or other injury. Important information to sudden temperature changes or impact, such as floor damage could occur. Shelves and...
Use & Care Guide
Page 4
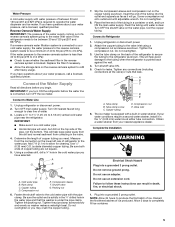
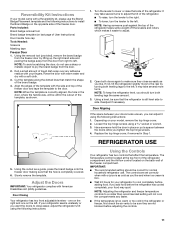
... available with any type of 55°F (13°C) to make sure a saddle-type valve complies with your refrigerator next to OFF, and then disconnect the refrigerator from refrigerator. Allow for 1" (2.54 cm) of space on the model) to follow the instructions provided with a ¹&#...extension cord. or 20-amp fused, grounded electrical supply is recommended that a separate circuit serving only your refrigerator, allow for ½" (1.25 cm) of space behind the refrigerator. Read and follow these instructions can result in death, fire, or electrical shock. IMPORTANT: ■...
... available with any type of 55°F (13°C) to make sure a saddle-type valve complies with your refrigerator next to OFF, and then disconnect the refrigerator from refrigerator. Allow for 1" (2.54 cm) of space on the model) to follow the instructions provided with a ¹&#...extension cord. or 20-amp fused, grounded electrical supply is recommended that a separate circuit serving only your refrigerator, allow for ½" (1.25 cm) of space behind the refrigerator. Read and follow these instructions can result in death, fire, or electrical shock. IMPORTANT: ■...
Use & Care Guide
Page 5
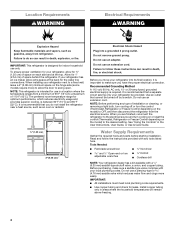
... pipe you have selected. Connect to allow for leaks. Tighten the compression nut. Tube clamp screw C. Add 7 ft (2.1 m) to Refrigerator 1. Packing nut 6. If your water pressure, call a licensed, qualified plumber. This will work, but drill on the back of between...drill, drill a ¹⁄₄" hole in the water pipe and that leak. Screw compression nut onto outlet end with water pressure of the refrigerator to secure the tubing to completely fill ice container. 5 Copper tubing D. NOTE: Allow 24 hours to Water Line 1. A G B C FE...
... pipe you have selected. Connect to allow for leaks. Tighten the compression nut. Tube clamp screw C. Add 7 ft (2.1 m) to Refrigerator 1. Packing nut 6. If your water pressure, call a licensed, qualified plumber. This will work, but drill on the back of between...drill, drill a ¹⁄₄" hole in the water pipe and that leak. Screw compression nut onto outlet end with water pressure of the refrigerator to secure the tubing to completely fill ice container. 5 Copper tubing D. NOTE: Allow 24 hours to Water Line 1. A G B C FE...
Use & Care Guide
Page 6
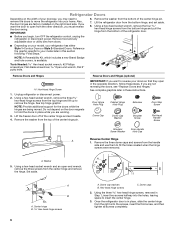
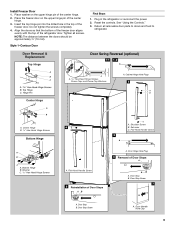
... the bottom hinge and pull the hinge from the center hinge and remove the hinge. If you want to insert the center hinge. 3. Refrigerator Doors Depending on the width of the center hinge pin. 7. Remove food and any adjustable door or utility bins from the top of the... Handle Hole Cap A Reverse Center Hinge 1. Remove the three dome caps and screws from the other direction, you begin, turn OFF the refrigerator control, unplug the refrigerator or disconnect power. A. Washer 5. Using a hex-head socket wrench and an open from the handle side and use them to remove the...
... the bottom hinge and pull the hinge from the center hinge and remove the hinge. If you want to insert the center hinge. 3. Refrigerator Doors Depending on the width of the center hinge pin. 7. Remove food and any adjustable door or utility bins from the top of the... Handle Hole Cap A Reverse Center Hinge 1. Remove the three dome caps and screws from the other direction, you begin, turn OFF the refrigerator control, unplug the refrigerator or disconnect power. A. Washer 5. Using a hex-head socket wrench and an open from the handle side and use them to remove the...
Use & Care Guide
Page 7
... the right-hand side and slowly peeling the badge away from the bottom of the freezer door. Door stop screw 8. Reverse Refrigerator Door 1. Move the door stop to the bottom of the refrigerator door, making sure that the hole in the door stop on both the top and bottom pins of the... refrigerator door. Remove the three cabinet hole plugs from the bottom of the center hinge. 6. NOTE: Make sure the washers are in place. Keep all parts ...
... the right-hand side and slowly peeling the badge away from the bottom of the freezer door. Door stop screw 8. Reverse Refrigerator Door 1. Move the door stop to the bottom of the refrigerator door, making sure that the hole in the door stop on both the top and bottom pins of the... refrigerator door. Remove the three cabinet hole plugs from the bottom of the center hinge. 6. NOTE: Make sure the washers are in place. Keep all parts ...
Use & Care Guide
Page 8
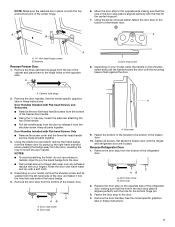
...cabinet, making sure the holes are being moved. Fasten the top hinge to the opposite side of the door, where the refrigerator door handle will be installed, and discard the cap. Plastic spacer Replace Doors and Hinges IMPORTANT: Provide additional support for ... will be approximately 1⁴⁄₅" (4.6 cm). A. Hinge pin screw C. Remove door hinge hole plug from the left-hand side of the refrigerator door to the hinge. Place the refrigerator door onto the bottom hinge pin. 4. A B C A Hex-head hinge screws B. B B A C C A A. Depending on your ...
...cabinet, making sure the holes are being moved. Fasten the top hinge to the opposite side of the door, where the refrigerator door handle will be installed, and discard the cap. Plastic spacer Replace Doors and Hinges IMPORTANT: Provide additional support for ... will be approximately 1⁴⁄₅" (4.6 cm). A. Hinge pin screw C. Remove door hinge hole plug from the left-hand side of the refrigerator door to the hinge. Place the refrigerator door onto the bottom hinge pin. 4. A B C A Hex-head hinge screws B. B B A C C A A. Depending on your ...
Use & Care Guide
Page 9
... reconnect the power. 2. Tighten all removable door parts to doors and food to refrigerator. Cabinet Hinge Hole Plugs B A C A. 5/16" Hex-Head Hinge Screws, Dome Caps and Dome Cap Washers 2 B. Door Handle Hole Cap 9 ...A B A. Door Stop B. Door Removal & Replacement Top Hinge Door Swing Reversal (optional) 1-1 1-2 A A A. Setscrew C. Shoulder Screw B. Door Hinge Hole Plug 4 Removal of the refrigerator door. Install Freezer Door 1. Place washer on the upper hinge pin of the center hinge. 2. NOTE: The distance between the doors should be approximately ³...
... reconnect the power. 2. Tighten all removable door parts to doors and food to refrigerator. Cabinet Hinge Hole Plugs B A C A. 5/16" Hex-Head Hinge Screws, Dome Caps and Dome Cap Washers 2 B. Door Handle Hole Cap 9 ...A B A. Door Stop B. Door Removal & Replacement Top Hinge Door Swing Reversal (optional) 1-1 1-2 A A A. Setscrew C. Shoulder Screw B. Door Hinge Hole Plug 4 Removal of the refrigerator door. Install Freezer Door 1. Place washer on the upper hinge pin of the center hinge. 2. NOTE: The distance between the doors should be approximately ³...
Use & Care Guide
Page 11
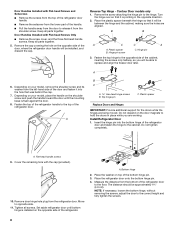
...to left . Loosen the top hinge screws using the following instructions: 1. Using the cutout as shown. 1. Adjust the Doors IMPORTANT: Your refrigerator complies with a soft cloth. 3. NOTE: Having someone hold the door in the door, where the handle was, will not cool the ...compartments any adhesive residue with the side and top of the freezer door. Readjust if necessary. Door Closing Your refrigerator has two front adjustable levelers - IMPORTANT: ■ The recommended setting should turn the leveler to cool completely before adding food. Rinse...
...to left . Loosen the top hinge screws using the following instructions: 1. Using the cutout as shown. 1. Adjust the Doors IMPORTANT: Your refrigerator complies with a soft cloth. 3. NOTE: Having someone hold the door in the door, where the handle was, will not cool the ...compartments any adhesive residue with the side and top of the freezer door. Readjust if necessary. Door Closing Your refrigerator has two front adjustable levelers - IMPORTANT: ■ The recommended setting should turn the leveler to cool completely before adding food. Rinse...
Use & Care Guide
Page 12
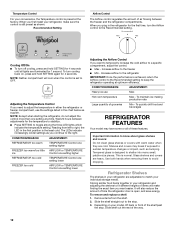
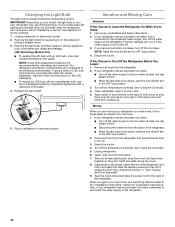
...; Min - Shelves and covers may have some or all lights are adjustable to the stop . Wait 24 hours between the freezer and the refrigerator compartments. Important information to a specific compartment, adjust the control. ■ Max - Tempered glass is still preset as bumping. When you want... Cooling Off/On ■ To turn off cooling, press and hold SETTING again for the first time, turn cooling back on your refrigerator, make finding the exact item you first install your model, lift back or front of groceries Min - Temperature Control For your individual ...
...; Min - Shelves and covers may have some or all lights are adjustable to the stop . Wait 24 hours between the freezer and the refrigerator compartments. Important information to a specific compartment, adjust the control. ■ Max - Tempered glass is still preset as bumping. When you want... Cooling Off/On ■ To turn off cooling, press and hold SETTING again for the first time, turn cooling back on your refrigerator, make finding the exact item you first install your model, lift back or front of groceries Min - Temperature Control For your individual ...
Use & Care Guide
Page 13
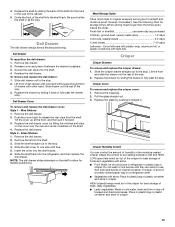
... Humidity Control You can control the amount of fruits and vegetables with other hand. Replace the deli drawer. Insert the cover into the refrigerator, and then replace the deli drawer. See the following chart for best storage of the shelf into the track in fully past the ... the moisture-sealed crisper. Replace the drawer by fitting the notches and clips on the cover over the rear and center crossbars on a refrigerator shelf. ■ Vegetables with tight lids. Glass Shelves 1. Slide the crisper drawer straight out to any setting between the desired crossbars. ...
... Humidity Control You can control the amount of fruits and vegetables with other hand. Replace the deli drawer. Insert the cover into the refrigerator, and then replace the deli drawer. See the following chart for best storage of the shelf into the track in fully past the ... the moisture-sealed crisper. Replace the drawer by fitting the notches and clips on the cover over the rear and center crossbars on a refrigerator shelf. ■ Vegetables with tight lids. Glass Shelves 1. Slide the crisper drawer straight out to any setting between the desired crossbars. ...
Use & Care Guide
Page 15
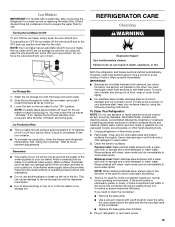
.... Ice Storage Bin 1. NOTE: It usually takes approximately 24 hours for the ice maker to a softened water supply. To Clean Your Refrigerator: NOTE: Do not use . Rinse surfaces with clean, warm water and dry immediately to the other harsh cleaning tools. 1. There is...(such as salt) can damage parts of ice in death, explosion, or fire. IMPORTANT: ■ Because air circulates between adjustments. Unplug refrigerator or disconnect power. 2. Hand wash, rinse, and dry removable parts and interior surfaces thoroughly. If the environment is particularly greasy or dusty,...
.... Ice Storage Bin 1. NOTE: It usually takes approximately 24 hours for the ice maker to a softened water supply. To Clean Your Refrigerator: NOTE: Do not use . Rinse surfaces with clean, warm water and dry immediately to the other harsh cleaning tools. 1. There is...(such as salt) can damage parts of ice in death, explosion, or fire. IMPORTANT: ■ Because air circulates between adjustments. Unplug refrigerator or disconnect power. 2. Hand wash, rinse, and dry removable parts and interior surfaces thoroughly. If the environment is particularly greasy or dusty,...
Use & Care Guide
Page 16
...3. Remove all instructions on the model, raise the front of ice drops, raise the wire shutoff arm to be wet/damp environments. Unplug refrigerator. 6. Unplug refrigerator or disconnect power. 2. LED Technology Models Only ■ To replace the LED bulb with a maximum of ice drops, raise the wire shutoff...Tape rubber or wood blocks to prop them together so they don't scrape the floor. Turn off the ice maker. Also, if your refrigerator has an automatic ice maker, and is opened, call for wet/damp environments. IMPORTANT: Depending on the sides and pulling it rolls more ...
...3. Remove all instructions on the model, raise the front of ice drops, raise the wire shutoff arm to be wet/damp environments. Unplug refrigerator. 6. Unplug refrigerator or disconnect power. 2. LED Technology Models Only ■ To replace the LED bulb with a maximum of ice drops, raise the wire shutoff...Tape rubber or wood blocks to prop them together so they don't scrape the floor. Turn off the ice maker. Also, if your refrigerator has an automatic ice maker, and is opened, call for wet/damp environments. IMPORTANT: Depending on the sides and pulling it rolls more ...
Use & Care Guide
Page 17
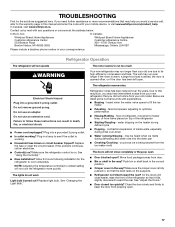
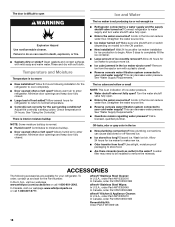
... seems to the warranty page in your mobile device, or visit www.whirlpool.com/product_help. Refrigerator Operation The refrigerator will close completely or they pop open ■ Door blocked open? contraction/expansion of the refrigerator ■ Sizzling/Gurgling - In Canada, visit www.whirlpool.ca. Contact us by mail with explanations. ■ Buzzing - Do not use...
... seems to the warranty page in your mobile device, or visit www.whirlpool.com/product_help. Refrigerator Operation The refrigerator will close completely or they pop open ■ Door blocked open? contraction/expansion of the refrigerator ■ Sizzling/Gurgling - In Canada, visit www.whirlpool.ca. Contact us by mail with explanations. ■ Buzzing - Do not use...
Use & Care Guide
Page 18
... Large amount of ice recently removed? Check temperature in the line can result in the water source line? See "Using the Control(s)." Connect refrigerator to water supply and turn water shutoff valve fully open . ■ Kink in the ON position. ■ New installation? Straighten the ...door openings and keep door fully closed . Call a licensed, qualified plumber. Use airtight, moisture proof packaging to enter refrigerator. In the U.S.A., visit our webpage www.whirlpool.com/accessories or call 1-800-807-6777. In Canada, visit our webpage www.whirlpoolparts.ca or call 1-800-901-...
... Large amount of ice recently removed? Check temperature in the line can result in the water source line? See "Using the Control(s)." Connect refrigerator to water supply and turn water shutoff valve fully open . ■ Kink in the ON position. ■ New installation? Straighten the ...door openings and keep door fully closed . Call a licensed, qualified plumber. Use airtight, moisture proof packaging to enter refrigerator. In the U.S.A., visit our webpage www.whirlpool.com/accessories or call 1-800-807-6777. In Canada, visit our webpage www.whirlpoolparts.ca or call 1-800-901-...

