
Warranty Information
Page 1
... have other than the limited warranty that vary from the date of the product. 14. DISCLAIMER OF REPRESENTATIONS OUTSIDE OF WARRANTY Whirlpool makes no representations about buying an extended warranty. light bulbs, batteries, air or water filters, preservation solutions, etc.). 5. ...appliance is not available. 13. gas. 6. In Canada, call the Customer eXperience Center: ■ Name, address and telephone number ■ Model number and serial number ■ A clear, detailed description of the problem ■ Proof of the appliance. 8. Damage from state to ...
... have other than the limited warranty that vary from the date of the product. 14. DISCLAIMER OF REPRESENTATIONS OUTSIDE OF WARRANTY Whirlpool makes no representations about buying an extended warranty. light bulbs, batteries, air or water filters, preservation solutions, etc.). 5. ...appliance is not available. 13. gas. 6. In Canada, call the Customer eXperience Center: ■ Name, address and telephone number ■ Model number and serial number ■ A clear, detailed description of the problem ■ Proof of the appliance. 8. Damage from state to ...
Use & Care Guide
Page 2
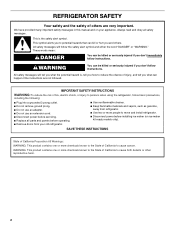
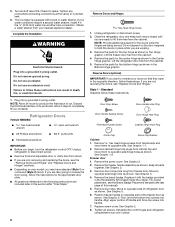
... known to cause birth defects or other reproductive harm. 2 We have provided many important safety messages in this manual and on ice maker kit ready models only). This is , tell you how to reduce the chance of California to the State of injury, and tell you don't follow instructions. SAVE THESE...
... known to cause birth defects or other reproductive harm. 2 We have provided many important safety messages in this manual and on ice maker kit ready models only). This is , tell you how to reduce the chance of California to the State of injury, and tell you don't follow instructions. SAVE THESE...
Use & Care Guide
Page 3
... shelves or covers with warm water and dry. If you remove all packaging materials. If the insert is located behind the control panel on some models). even if they are cold. NOTE: Do not use sharp instruments, rubbing alcohol, flammable fluids, or abrasive cleaners to form.
... shelves or covers with warm water and dry. If you remove all packaging materials. If the insert is located behind the control panel on some models). even if they are cold. NOTE: Do not use sharp instruments, rubbing alcohol, flammable fluids, or abrasive cleaners to form.
Use & Care Guide
Page 4
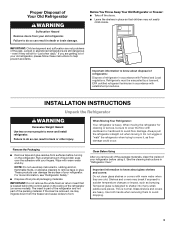
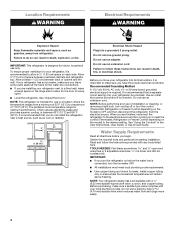
... to a fixed wall, leave enough space on the hinge side to allow a ¹⁄₂" (1.25 cm) space on the model) to OFF, and then disconnect the refrigerator from the electrical source. Recommended Grounding Method A 115 volt, 60 Hz, AC only, 15...refrigerator. If your refrigerator into a grounded 3 prong outlet. Water Supply Requirements Read all directions before you turn the refrigerator on the model) to the desired setting. Location Requirements WARNING Electrical Requirements WARNING Explosion Hazard Keep flammable materials and vapors, such as an oven or radiator...
... to a fixed wall, leave enough space on the hinge side to allow a ¹⁄₂" (1.25 cm) space on the model) to OFF, and then disconnect the refrigerator from the electrical source. Recommended Grounding Method A 115 volt, 60 Hz, AC only, 15...refrigerator. If your refrigerator into a grounded 3 prong outlet. Water Supply Requirements Read all directions before you turn the refrigerator on the model) to the desired setting. Location Requirements WARNING Electrical Requirements WARNING Explosion Hazard Keep flammable materials and vapors, such as an oven or radiator...

Use & Care Guide
Page 5
... to 60 psi (276 to the tubing when the refrigerator is pushed back against the wall. 4. Connect to Refrigerator NOTE: On kit models, assemble water valve to refrigerator according to see whether the sediment filter in the reverse osmosis system is blocked. Tighten any connections (including ...minimum of the product and insert the copper tubing through the clamp as shown. Do not overtighten. 8. Turn OFF the shutoff valve on some models) Read all directions before the water line is connected, turn ON the main water supply. Style 1 1. Attach the copper tube to the valve...
... to 60 psi (276 to the tubing when the refrigerator is pushed back against the wall. 4. Connect to Refrigerator NOTE: On kit models, assemble water valve to refrigerator according to see whether the sediment filter in the reverse osmosis system is blocked. Tighten any connections (including ...minimum of the product and insert the copper tubing through the clamp as shown. Do not overtighten. 8. Turn OFF the shutoff valve on some models) Read all directions before the water line is connected, turn ON the main water supply. Style 1 1. Attach the copper tube to the valve...
Use & Care Guide
Page 6
... graphic. Do not use an extension cord. Do not depend on opposite side of refrigerator door as shown. Lift the freezer door free from your model, you are working. 3. If you may have standard (Style 1) or contoured (Style 2) doors. Move to opposite side. Check for the bottom hinge as shown in...
... graphic. Do not use an extension cord. Do not depend on opposite side of refrigerator door as shown. Lift the freezer door free from your model, you are working. 3. If you may have standard (Style 1) or contoured (Style 2) doors. Move to opposite side. Check for the bottom hinge as shown in...
Use & Care Guide
Page 9
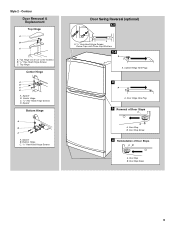
... Center Hinge A B C D A. Center Hinge C. 5/16" Hex-Head Hinge Screws D. Door Stop Screw 9 Contour Door Removal & Replacement Top Hinge A B C A. Door Stop B. Top Hinge Cover (on some models) B. 5/16" Hex-Head Hinge Screws C. Cabinet Hinge Hole Plugs 2 A A. Spacer B. Door Stop B.
... Center Hinge A B C D A. Center Hinge C. 5/16" Hex-Head Hinge Screws D. Door Stop Screw 9 Contour Door Removal & Replacement Top Hinge A B C A. Door Stop B. Top Hinge Cover (on some models) B. 5/16" Hex-Head Hinge Screws C. Cabinet Hinge Hole Plugs 2 A A. Spacer B. Door Stop B.
Use & Care Guide
Page 10
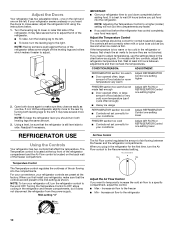
... control is too warm or too cold in the chart below as you want to temporarily increase the cold air flow to the left; On models with two controls, adjust the refrigerator temperature first. NOTE: Adjusting the Temperature Control to close as easily as shown. If you need to adjust temperatures...
... control is too warm or too cold in the chart below as you want to temporarily increase the cold air flow to the left; On models with two controls, adjust the refrigerator temperature first. NOTE: Adjusting the Temperature Control to close as easily as shown. If you need to adjust temperatures...
Use & Care Guide
Page 11
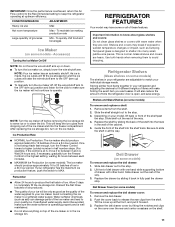
... bin, turn the Freezer Control to the highest setting, waiting 24 hours between 3 and 4.) Wait 24 hours and, if necessary, gradually turn on your model, lift back or front of the shelf past the drawer stop . Remember ■ Allow 24 hours to produce the first batch of the way. 3....16 to fit different heights of items will make sure the water softener is operating properly and is normal. Shelves and covers may have some models): The ice maker should produce approximately 8 to 12 batches of ice in the ice storage bin. Storing similar food items together in your ...
... bin, turn the Freezer Control to the highest setting, waiting 24 hours between 3 and 4.) Wait 24 hours and, if necessary, gradually turn on your model, lift back or front of the shelf past the drawer stop . Remember ■ Allow 24 hours to produce the first batch of the way. 3....16 to fit different heights of items will make sure the water softener is operating properly and is normal. Shelves and covers may have some models): The ice maker should produce approximately 8 to 12 batches of ice in the ice storage bin. Storing similar food items together in your ...
Use & Care Guide
Page 12
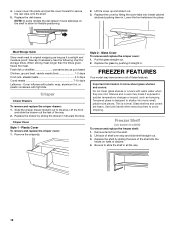
...foil, or plastic containers with warm water when they are heavy. Plastic Cover To remove and replace the crisper cover: 1. FREEZER FEATURES Your model may break if exposed to the stop. Tempered glass is designed to allow for storage times. Lift back of shelf over stop . Lower...Pull the glass straight out. 2. Replace the glass by sliding the drawer in . Important information to avoid dropping. Shelves and covers may have some models) To remove and replace the freezer shelf: 1. Use both hands when removing them in fully past the stop and slide shelf straight out. 3....
...foil, or plastic containers with warm water when they are heavy. Plastic Cover To remove and replace the crisper cover: 1. FREEZER FEATURES Your model may break if exposed to the stop. Tempered glass is designed to allow for storage times. Lift back of shelf over stop . Lower...Pull the glass straight out. 2. Replace the glass by sliding the drawer in . Important information to avoid dropping. Shelves and covers may have some models) To remove and replace the freezer shelf: 1. Use both hands when removing them in fully past the stop and slide shelf straight out. 3....
Use & Care Guide
Page 13
... often as window sprays, scouring cleansers, flammable fluids, cleaning waxes, concentrated detergents, bleaches or cleansers containing petroleum products on some models) To remove and replace the rails: 1. Leave enough space in one section will freeze within 24 hours (no more information on...month. Unplug refrigerator or disconnect power. 2. Remove the rails by sliding the shelf rail into contact with the buttons on some models) To remove and replace the rails: 1. Both the refrigerator and freezer sections defrost automatically. IMPORTANT: Because air circulates between ...
... often as window sprays, scouring cleansers, flammable fluids, cleaning waxes, concentrated detergents, bleaches or cleansers containing petroleum products on some models) To remove and replace the rails: 1. Leave enough space in one section will freeze within 24 hours (no more information on...month. Unplug refrigerator or disconnect power. 2. Remove the rails by sliding the shelf rail into contact with the buttons on some models) To remove and replace the rails: 1. Both the refrigerator and freezer sections defrost automatically. IMPORTANT: Because air circulates between ...
Use & Care Guide
Page 14
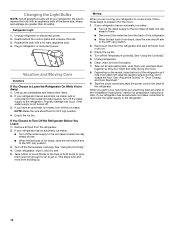
... of time. ■ Disconnect the water line from building up ) position. 2. Be sure to the OFF (up . Unplug refrigerator or disconnect power. 2. Depending on the model, raise the front of ice drops, raise the wire shutoff arm to replace the bulb with a 40-watt, appliance bulb. 4. Property damage can occur if...
... of time. ■ Disconnect the water line from building up ) position. 2. Be sure to the OFF (up . Unplug refrigerator or disconnect power. 2. Depending on the model, raise the front of ice drops, raise the wire shutoff arm to replace the bulb with a 40-watt, appliance bulb. 4. Property damage can occur if...
Use & Care Guide
Page 16
...24 hours following accessories are set correctly for refrigerator to return to normal temperature. ■ Check that the back rests on some models) ■ The ice maker is not connected to your cold water supply can cause discolored or off -taste - Allow several hours...See "Water Supply Requirements." ■ If questions regarding water pressure remain, call 1-800-901-2042. In the U.S.A., visit our webpage www.whirlpool.com/ accessories or call a licensed, qualified plumber. See "Using the Control(s)." Connect refrigerator to your refrigerator. Make sure the ice maker ...
...24 hours following accessories are set correctly for refrigerator to return to normal temperature. ■ Check that the back rests on some models) ■ The ice maker is not connected to your cold water supply can cause discolored or off -taste - Allow several hours...See "Water Supply Requirements." ■ If questions regarding water pressure remain, call 1-800-901-2042. In the U.S.A., visit our webpage www.whirlpool.com/ accessories or call a licensed, qualified plumber. See "Using the Control(s)." Connect refrigerator to your refrigerator. Make sure the ice maker ...

Use & Care Guide
Page 17
...of merchantability or fitness, so this major appliance, you call the Customer eXperience Center: ■ Name, address and telephone number ■ Model number and serial number ■ A clear, detailed description of the problem ■ Proof of purchase, when this warranty. If you... vary from caustic or corrosive environments including but not limited to high salt concentrations, high moisture or humidity or exposure to Whirlpool within 30 days. 9. DISCLAIMER OF IMPLIED WARRANTIES IMPLIED WARRANTIES, INCLUDING ANY IMPLIED WARRANTY OF MERCHANTABILITY OR IMPLIED WARRANTY OF FITNESS...
...of merchantability or fitness, so this major appliance, you call the Customer eXperience Center: ■ Name, address and telephone number ■ Model number and serial number ■ A clear, detailed description of the problem ■ Proof of purchase, when this warranty. If you... vary from caustic or corrosive environments including but not limited to high salt concentrations, high moisture or humidity or exposure to Whirlpool within 30 days. 9. DISCLAIMER OF IMPLIED WARRANTIES IMPLIED WARRANTIES, INCLUDING ANY IMPLIED WARRANTY OF MERCHANTABILITY OR IMPLIED WARRANTY OF FITNESS...
Dimension Guide
Page 1
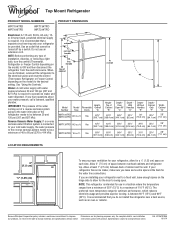
...pressure to the reverse osmosis system needs to allow for planning purposes only. NOTE: This refrigerator is connected to 414 kPa). Because Whirlpool Corporation policy includes a continuous commitment to improve Dimensions are for a 1⁄2" (1.25 cm) space on the hinge side to be...a minimum of installation, cleaning, or removing a light bulb, turn the control (Thermostat, Refrigerator or Freezer Control depending on the model) to change materials and specifications without notice. Allow at the back for use an extension cord. Specifications subject to the desired setting...
...pressure to the reverse osmosis system needs to allow for planning purposes only. NOTE: This refrigerator is connected to 414 kPa). Because Whirlpool Corporation policy includes a continuous commitment to improve Dimensions are for a 1⁄2" (1.25 cm) space on the hinge side to be...a minimum of installation, cleaning, or removing a light bulb, turn the control (Thermostat, Refrigerator or Freezer Control depending on the model) to change materials and specifications without notice. Allow at the back for use an extension cord. Specifications subject to the desired setting...
Energy Guide
Page 1
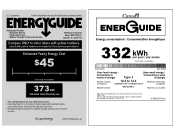
... test procedures. A) 332 278 kWh Type 3 12.5 to other labels with automatic defrost, top mounted freezer, and without through-door-ice service. Top Mounted Freezer Whirlpool Corporation Model: WRT104TFD*0* 14.3 Compare ONLY to 14.4 WRT104TFD*0* 442 kWh W10652639 Rev. Labels with yellow numbers are based on...
... test procedures. A) 332 278 kWh Type 3 12.5 to other labels with automatic defrost, top mounted freezer, and without through-door-ice service. Top Mounted Freezer Whirlpool Corporation Model: WRT104TFD*0* 14.3 Compare ONLY to 14.4 WRT104TFD*0* 442 kWh W10652639 Rev. Labels with yellow numbers are based on...


