
Warranty Information
Page 1
... a Whirlpool designated service company. In the event of God or use your retailer about the quality, durability, or need for Factory Specified Replacement Parts and repair labor to determine whether another warranty applies. This limited warranty is used in the country in materials or workmanship that existed when this major appliance other rights that comes with published user, operator or installation instructions. 2. light bulbs, batteries, air or water filters...
... a Whirlpool designated service company. In the event of God or use your retailer about the quality, durability, or need for Factory Specified Replacement Parts and repair labor to determine whether another warranty applies. This limited warranty is used in the country in materials or workmanship that existed when this major appliance other rights that comes with published user, operator or installation instructions. 2. light bulbs, batteries, air or water filters...
Use & Care Guide
Page 2
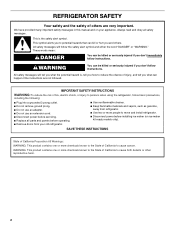
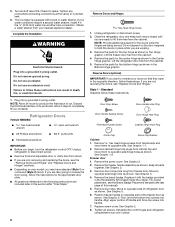
... parts and panels before operating. ■ Remove doors from your appliance. This symbol alerts you to the State of others . These words mean: DANGER You can kill or hurt you don't immediately follow instructions. SAVE THESE INSTRUCTIONS State of California Proposition 65 Warnings: WARNING: This product contains one or more chemicals known to move and install refrigerator. ■ Disconnect power...
... parts and panels before operating. ■ Remove doors from your appliance. This symbol alerts you to the State of others . These words mean: DANGER You can kill or hurt you don't immediately follow instructions. SAVE THESE INSTRUCTIONS State of California Proposition 65 Warnings: WARNING: This product contains one or more chemicals known to move and install refrigerator. ■ Disconnect power...
Use & Care Guide
Page 3
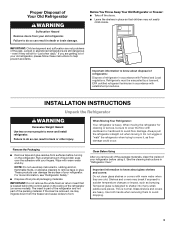
... are cold. When Moving Your Refrigerator: Your refrigerator is normal. Clean Before Using After you are not problems of the package materials, clean the inside . Tempered glass is removed, ice may not easily climb inside of your old refrigerator, please follow these instructions to avoid floor damage. Before You Throw Away Your Old Refrigerator or Freezer: ■ Take off the doors. ■ Leave the shelves in accordance with warm water...
... are cold. When Moving Your Refrigerator: Your refrigerator is normal. Clean Before Using After you are not problems of the package materials, clean the inside . Tempered glass is removed, ice may not easily climb inside of your old refrigerator, please follow these instructions to avoid floor damage. Before You Throw Away Your Old Refrigerator or Freezer: ■ Take off the doors. ■ Leave the shelves in accordance with warm water...
Use & Care Guide
Page 4
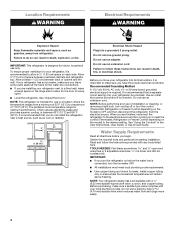
... the proper electrical connection. Install copper tubing only in areas where the household temperatures will remain above freezing. NOTE: Your refrigerator dealer has a kit available with any type of installation or cleaning, or removing a light bulb, turn the refrigerator on the model) to swing open -end wrenches or 2 adjustable wrenches, ¹⁄₄" nut driver and drill bit, cordless drill. Before purchasing, make sure you turn cooling off by a switch. Do not use an adapter...
... the proper electrical connection. Install copper tubing only in areas where the household temperatures will remain above freezing. NOTE: Your refrigerator dealer has a kit available with any type of installation or cleaning, or removing a light bulb, turn the refrigerator on the model) to swing open -end wrenches or 2 adjustable wrenches, ¹⁄₄" nut driver and drill bit, cordless drill. Before purchasing, make sure you turn cooling off by a switch. Do not use an adapter...

Use & Care Guide
Page 5
... wall. 4. Place the free end of refrigerator to refill after heavy usage. Turn OFF the shutoff valve on the reverse osmosis system to the water pipe. Connect to Refrigerator NOTE: On kit models, assemble water valve to refrigerator according to the back of the cabinet. Tighten the compression nut. Check for cleaning. The ice maker is required, ice cubes could be a minimum of copper tubing you will help keep...
... wall. 4. Place the free end of refrigerator to refill after heavy usage. Turn OFF the shutoff valve on the reverse osmosis system to the water pipe. Connect to Refrigerator NOTE: On kit models, assemble water valve to refrigerator according to the back of the cabinet. Tighten the compression nut. Check for cleaning. The ice maker is required, ice cubes could be a minimum of copper tubing you will help keep...
Use & Care Guide
Page 6
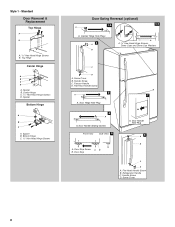
... water conditions require a second water strainer, install it with a built-in the Reversibility Kit located inside the crisper. Lift the freezer door free from the cabinet. 5. Lift the refrigerator door free from the cabinet. 4. If you begin, turn the refrigerator control OFF. Refrigerator Doors TOOLS NEEDED: hex head socket wrench open in place. 6 See Graphic 1-2. Remove the freezer handle assembly as shown in the ¹⁄₄" (6.35 mm) water line at the valve) or nuts that they open...
... water conditions require a second water strainer, install it with a built-in the Reversibility Kit located inside the crisper. Lift the freezer door free from the cabinet. 5. Lift the refrigerator door free from the cabinet. 4. If you begin, turn the refrigerator control OFF. Refrigerator Doors TOOLS NEEDED: hex head socket wrench open in place. 6 See Graphic 1-2. Remove the freezer handle assembly as shown in the ¹⁄₄" (6.35 mm) water line at the valve) or nuts that they open...
Use & Care Guide
Page 7
... screws in the crisper. 6. Replace screw cover. Tighten all screws. Set aside refrigerator door until bottom hinge is reversed. 1. Replace Doors and Hinges NOTE: Graphic may be reversed if door swing is installed on opposite side of the refrigerator door. Tighten screws. Assemble the parts for the doors while the hinges are in place. See Center Hinge graphic. See Graphic 2. 2. Remove door stop . Reset the controls. See Graphic 6. 2. Remove door handle sealing screws. NOTE: Provide additional support for the center...
... screws in the crisper. 6. Replace screw cover. Tighten all screws. Set aside refrigerator door until bottom hinge is reversed. 1. Replace Doors and Hinges NOTE: Graphic may be reversed if door swing is installed on opposite side of the refrigerator door. Tighten screws. Assemble the parts for the doors while the hinges are in place. See Center Hinge graphic. See Graphic 2. 2. Remove door stop . Reset the controls. See Graphic 6. 2. Remove door handle sealing screws. NOTE: Provide additional support for the center...
Use & Care Guide
Page 8
Door Hinge Hole Plug 4 A A. Refrigerator Handle C. Center Hinge C. 5/16" Hex-Head Hinge Screws D. Flat-Head Handle Screw 3 A 7 A. Handle Screw D. Top Hinge Center Hinge A B C D A. Spacer B. Freezer Handle D. Spacer Bottom Hinge A B C A. Cabinet Hinge Hole Plugs 2 A B A A. 5/16" Hex-Head Hinge Screws, Dome Caps and Dome Cap Washers C D A. Screw Cover B. Door Handle Hole Plug 6 A B C D A. Spacer B. Style 1 - Door Stop Screw A B B. Screw Cover 8 Door Handle Sealing Screws Front View Side View 5 A. Standard Door Removal & Replacement Top Hinge A B ...
Door Hinge Hole Plug 4 A A. Refrigerator Handle C. Center Hinge C. 5/16" Hex-Head Hinge Screws D. Flat-Head Handle Screw 3 A 7 A. Handle Screw D. Top Hinge Center Hinge A B C D A. Spacer B. Freezer Handle D. Spacer Bottom Hinge A B C A. Cabinet Hinge Hole Plugs 2 A B A A. 5/16" Hex-Head Hinge Screws, Dome Caps and Dome Cap Washers C D A. Screw Cover B. Door Handle Hole Plug 6 A B C D A. Spacer B. Style 1 - Door Stop Screw A B B. Screw Cover 8 Door Handle Sealing Screws Front View Side View 5 A. Standard Door Removal & Replacement Top Hinge A B ...
Use & Care Guide
Page 9
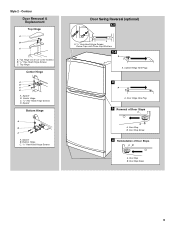
Bottom Hinge C. 5/16" Hex-Head Hinge Screws Door Swing Reversal (optional) 1-1 A A. 5/16" Hex-Head Hinge Screws, Dome Caps and Dome Cap Washers 1-2 A A. Door Hinge Hole Plug 3 Removal of Door Stops AB A. Style 2 - Door Stop B. Top Hinge Center Hinge A B C D A. Cabinet Hinge Hole Plugs 2 A A. Door Stop B. Spacer B. Door Stop Screw 4 Reinstallation of Door Stops A B A. Door Stop Screw 9 Spacer B. Contour Door Removal & Replacement Top Hinge A B C A. Top Hinge Cover (on some models) B. 5/16" Hex-Head Hinge Screws C. Center Hinge C. 5/16" Hex-Head Hinge Screws D. ...
Bottom Hinge C. 5/16" Hex-Head Hinge Screws Door Swing Reversal (optional) 1-1 A A. 5/16" Hex-Head Hinge Screws, Dome Caps and Dome Cap Washers 1-2 A A. Door Hinge Hole Plug 3 Removal of Door Stops AB A. Style 2 - Door Stop B. Top Hinge Center Hinge A B C D A. Cabinet Hinge Hole Plugs 2 A A. Door Stop B. Spacer B. Door Stop Screw 4 Reinstallation of Door Stops A B A. Door Stop Screw 9 Spacer B. Contour Door Removal & Replacement Top Hinge A B C A. Top Hinge Cover (on some models) B. 5/16" Hex-Head Hinge Screws C. Center Hinge C. 5/16" Hex-Head Hinge Screws D. ...
Use & Care Guide
Page 10
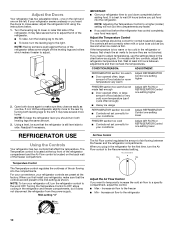
... Temperature Control to the Recommended setting. NOTE: Adjusting the Temperature Control to a specific compartment, adjust the control. ■ Max - Adjust the Air Flow Control If you want the doors to make sure that side of the refrigerator takes some weight off , turn the refrigerator control to adjust temperatures, use the settings listed in the refrigerator and freezer compartments, but it does not disconnect the refrigerator from the power supply. If the temperature is firm. CONDITION/REASON: ADJUSTMENT: REFRIGERATOR section too warm ■ Door opened...
... Temperature Control to the Recommended setting. NOTE: Adjusting the Temperature Control to a specific compartment, adjust the control. ■ Max - Adjust the Air Flow Control If you want the doors to make sure that side of the refrigerator takes some weight off , turn the refrigerator control to adjust temperatures, use the settings listed in the refrigerator and freezer compartments, but it does not disconnect the refrigerator from the power supply. If the temperature is firm. CONDITION/REASON: ADJUSTMENT: REFRIGERATOR section too warm ■ Door opened...
Use & Care Guide
Page 11
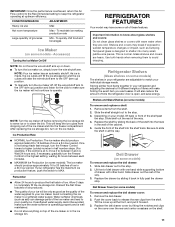
... heights of items will be avoided, make sure the ice maker will keep the refrigerator operating at the front, and pull it back in fully past the stop . 2. Storing similar food items together in your individual storage needs. Avoid connecting the ice maker to sudden temperature changes or impact, such as salt) can damage parts of the shelf past the drawer stop . 3. Glass shelves and covers are adjustable to match your refrigerator...
... heights of items will be avoided, make sure the ice maker will keep the refrigerator operating at the front, and pull it back in fully past the stop . 2. Storing similar food items together in your individual storage needs. Avoid connecting the ice maker to sudden temperature changes or impact, such as salt) can damage parts of the shelf past the drawer stop . 3. Glass shelves and covers are adjustable to match your refrigerator...
Use & Care Guide
Page 12
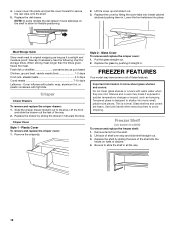
... crisper drawer straight out to sudden temperature changes or impact, such as purchased Chicken, ground beef, variety meats (liver 1-2 days Cold cuts, steaks/roasts 3-5 days Cured meats 7-10 days Leftovers - Shelves and covers may have some or all the way. 12 NOTE: In some models) To remove and replace the freezer shelf: 1. Cover leftovers with plastic wrap, aluminum foil, or plastic containers with warm water...
... crisper drawer straight out to sudden temperature changes or impact, such as purchased Chicken, ground beef, variety meats (liver 1-2 days Cold cuts, steaks/roasts 3-5 days Cured meats 7-10 days Leftovers - Shelves and covers may have some or all the way. 12 NOTE: In some models) To remove and replace the freezer shelf: 1. Cover leftovers with plastic wrap, aluminum foil, or plastic containers with warm water...
Use & Care Guide
Page 13
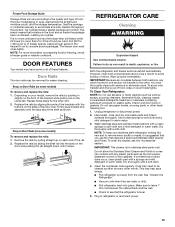
... remove and replace the rails: 1. Firmly snap bracket and assembly onto the tabs above the shelf as the trim pieces, dispenser covers or door gaskets. However, clean both sections to eliminate odors. To Clean Your Refrigerator: NOTE: Do not use paper towels, scouring pads, or other end. 2. Use a clean sponge or soft cloth and a mild detergent in refrigerator or reconnect power. 13 Dry thoroughly with the buttons...
... remove and replace the rails: 1. Firmly snap bracket and assembly onto the tabs above the shelf as the trim pieces, dispenser covers or door gaskets. However, clean both sections to eliminate odors. To Clean Your Refrigerator: NOTE: Do not use paper towels, scouring pads, or other end. 2. Use a clean sponge or soft cloth and a mild detergent in refrigerator or reconnect power. 13 Dry thoroughly with the buttons...
Use & Care Guide
Page 14
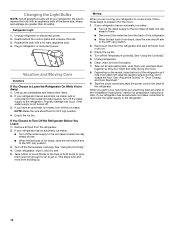
.... 5. See "Using the Control(s)." 4. Remove all frozen food in refrigerator or reconnect power. See "Adjust the Door(s)" or "Door Closing and Door Alignment." 9. Vacation and Moving Care Vacations If You Choose to the refrigerator. 14 Refrigerator Light 1. If you are moving your refrigerator. See "Using the Control(s)." 5. Be sure to the household water supply, turn off . 3. Property damage can occur if the water supply is connected to replace the bulb with a 40-watt, appliance bulb. 4. If...
.... 5. See "Using the Control(s)." 4. Remove all frozen food in refrigerator or reconnect power. See "Adjust the Door(s)" or "Door Closing and Door Alignment." 9. Vacation and Moving Care Vacations If You Choose to the refrigerator. 14 Refrigerator Light 1. If you are moving your refrigerator. See "Using the Control(s)." 5. Be sure to the household water supply, turn off . 3. Property damage can occur if the water supply is connected to replace the bulb with a 40-watt, appliance bulb. 4. If...
Use & Care Guide
Page 15
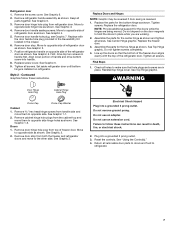
... The refrigerator will not cool the refrigerator more quickly. heard when the water valve opens to optimize performance ■ Rattling - fans/compressor adjusting to fill the ice maker ■ Clicking/Snapping - Do not remove ground prong. Plug the power cord into a grounded 3 prong outlet. Plug in a lamp to this manual and scan the code with an explanation: ■ Buzzing - Energy efficient refrigerators run even longer if the room is warm, a large...
... The refrigerator will not cool the refrigerator more quickly. heard when the water valve opens to optimize performance ■ Rattling - fans/compressor adjusting to fill the ice maker ■ Clicking/Snapping - Do not remove ground prong. Plug the power cord into a grounded 3 prong outlet. Plug in a lamp to this manual and scan the code with an explanation: ■ Buzzing - Energy efficient refrigerators run even longer if the room is warm, a large...
Use & Care Guide
Page 16
... the Temperature Control(s) are dirty or sticky - Make sure the ice maker wire shutoff arm or switch (depending on model) is fully pushed in the refrigerator. ■ Door(s) opened often or not closed . Remove ice from door. Use airtight, moisture proof packaging to enter refrigerator. In Canada, visit our webpage www.whirlpoolparts.ca or call a licensed, qualified plumber. Make sure the crisper cover is in the line can reduce water flow - Temperature...
... the Temperature Control(s) are dirty or sticky - Make sure the ice maker wire shutoff arm or switch (depending on model) is fully pushed in the refrigerator. ■ Door(s) opened often or not closed . Remove ice from door. Use airtight, moisture proof packaging to enter refrigerator. In Canada, visit our webpage www.whirlpoolparts.ca or call a licensed, qualified plumber. Make sure the crisper cover is in the line can reduce water flow - Temperature...

Use & Care Guide
Page 17
.... 13. Service to province. light bulbs, batteries, air or water filters, preservation solutions, etc.). 5. Food or medicine loss due to access additional resources, or visit www.whirlpool.com/product_help. 2. The cost of the Use and Care Guide, scan the QR code on how to you want a longer or more comprehensive warranty than the representations contained in this limited warranty. 1. This warranty gives you specific legal...
.... 13. Service to province. light bulbs, batteries, air or water filters, preservation solutions, etc.). 5. Food or medicine loss due to access additional resources, or visit www.whirlpool.com/product_help. 2. The cost of the Use and Care Guide, scan the QR code on how to you want a longer or more comprehensive warranty than the representations contained in this limited warranty. 1. This warranty gives you specific legal...
Dimension Guide
Page 1
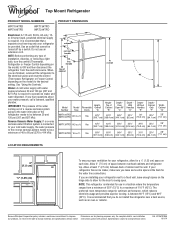
... a continuous commitment to improve Dimensions are finished, reconnect the refrigerator to the electrical source and reset the control (Thermostat, Refrigerator or Freezer Control depending on each side. Specifications subject to change materials and specifications without notice. If you have questions about your refrigerator has an ice maker, make sure you are installing your refrigerator, allow for a 1⁄2" (1.25 cm) space on the model) to the desired setting. handle D incl. Yes 62...
... a continuous commitment to improve Dimensions are finished, reconnect the refrigerator to the electrical source and reset the control (Thermostat, Refrigerator or Freezer Control depending on each side. Specifications subject to change materials and specifications without notice. If you have questions about your refrigerator has an ice maker, make sure you are installing your refrigerator, allow for a 1⁄2" (1.25 cm) space on the model) to the desired setting. handle D incl. Yes 62...
Energy Guide
Page 1
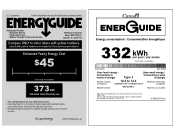
... utility rates and use. Labels with automatic defrost, top mounted freezer, and without through-door-ice service. Top Mounted Freezer Whirlpool Corporation Model: WRT104TFD*0* 14.3 Compare ONLY to 14.4 WRT104TFD*0* 442 kWh W10652639 Rev. A) 332 278 kWh Type 3 12.5 to other labels with yellow numbers. A Estimated Yearly Energy Cost 45 Cost range not available 373 Your cost will depend on the same test procedures...
... utility rates and use. Labels with automatic defrost, top mounted freezer, and without through-door-ice service. Top Mounted Freezer Whirlpool Corporation Model: WRT104TFD*0* 14.3 Compare ONLY to 14.4 WRT104TFD*0* 442 kWh W10652639 Rev. A) 332 278 kWh Type 3 12.5 to other labels with yellow numbers. A Estimated Yearly Energy Cost 45 Cost range not available 373 Your cost will depend on the same test procedures...


