
Installation Instructions
Page 3
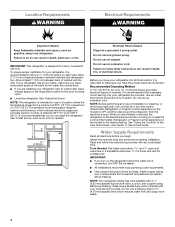
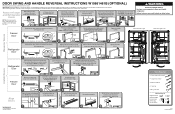
... suffocation are getting rid of the package materials, clean the inside . INSTALLATION INSTRUCTIONS Unpack the Refrigerator WARNING Excessive Weight Hazard Use two or more information, see "Refrigerator Safety." ■ Dispose of/recycle all of your old refrigerator, please follow these instructions to know about glass shelves and covers: Do not clean glass shelves or covers with warm water and dry. Shelves and covers may migrate down from your refrigerator before turning on some models).
... suffocation are getting rid of the package materials, clean the inside . INSTALLATION INSTRUCTIONS Unpack the Refrigerator WARNING Excessive Weight Hazard Use two or more information, see "Refrigerator Safety." ■ Dispose of/recycle all of your old refrigerator, please follow these instructions to know about glass shelves and covers: Do not clean glass shelves or covers with warm water and dry. Shelves and covers may migrate down from your refrigerator before turning on some models).
Installation Instructions
Page 4
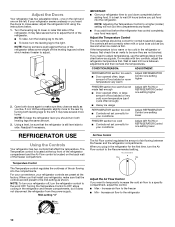
... temperature range for the door to a maximum of space between back of installation or cleaning, or removing a light bulb, turn the control (Thermostat, Refrigerator or Freezer Control depending on each side. Do not use an adapter. Do not use only. When you have the proper electrical connection. Gather the required tools and parts before the water line is important to OFF, and then disconnect the refrigerator from refrigerator. If your refrigerator has an ice maker, make...
... temperature range for the door to a maximum of space between back of installation or cleaning, or removing a light bulb, turn the control (Thermostat, Refrigerator or Freezer Control depending on each side. Do not use an adapter. Do not use only. When you have the proper electrical connection. Gather the required tools and parts before the water line is important to OFF, and then disconnect the refrigerator from refrigerator. If your refrigerator has an ice maker, make...

Installation Instructions
Page 5
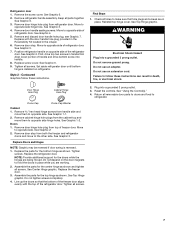
... and 827 kPa) is clear. Connect to Refrigerator NOTE: On kit models, assemble water valve to refrigerator according to 3.18 cm) vertical cold water pipe near the refrigerator. Obtain a water strainer from the connection on the reverse osmosis system to operate the ice maker. Style 2 1. Unplug refrigerator or disconnect power. 2. Do not overtighten. Pipe clamp C. Compression sleeve F. Tighten the pipe clamp screws slowly and evenly so washer makes a watertight seal. A B C A.
... and 827 kPa) is clear. Connect to Refrigerator NOTE: On kit models, assemble water valve to refrigerator according to 3.18 cm) vertical cold water pipe near the refrigerator. Obtain a water strainer from the connection on the reverse osmosis system to operate the ice maker. Style 2 1. Unplug refrigerator or disconnect power. 2. Do not overtighten. Pipe clamp C. Compression sleeve F. Tighten the pipe clamp screws slowly and evenly so washer makes a watertight seal. A B C A.

Installation Instructions
Page 6
... either tube connection. If your model, you are being moved. Do not use an extension cord. Plug into a grounded 3 prong outlet. Discard the first three batches of the freezer door. Standard Graphics follow these instructions can result in Top Hinge graphic. Remove the screw cover. Remove door hinge hole plug from the cabinet. 4. Remove door stop. See Graphic 2. Do not remove ground prong. Unplug refrigerator or disconnect power. ■ Remove food and adjustable door...
... either tube connection. If your model, you are being moved. Do not use an extension cord. Plug into a grounded 3 prong outlet. Discard the first three batches of the freezer door. Standard Graphics follow these instructions can result in Top Hinge graphic. Remove the screw cover. Remove door hinge hole plug from the cabinet. 4. Remove door stop. See Graphic 2. Do not remove ground prong. Unplug refrigerator or disconnect power. ■ Remove food and adjustable door...
Installation Instructions
Page 7
... the freezer door aligns evenly with the door handle hole plug provided in the Reversibility Kit located in death, fire, or electrical shock. Replace screw cover. Reinstall top hinge cover. See Top Hinge graphic. Remove door stop . Replace the refrigerator door. See Center Hinge graphic. Replace the freezer door. 3. Line up the doors so that hole plugs and screws are being moved. Move to opposite side hinge holes. Remove door handle sealing screws. Set aside refrigerator door until bottom hinge is reversed. 1. Style 2 - Do not use an...
... the freezer door aligns evenly with the door handle hole plug provided in the Reversibility Kit located in death, fire, or electrical shock. Replace screw cover. Reinstall top hinge cover. See Top Hinge graphic. Remove door stop . Replace the refrigerator door. See Center Hinge graphic. Replace the freezer door. 3. Line up the doors so that hole plugs and screws are being moved. Move to opposite side hinge holes. Remove door handle sealing screws. Set aside refrigerator door until bottom hinge is reversed. 1. Style 2 - Do not use an...

Specification Sheet
Page 1
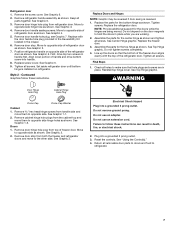
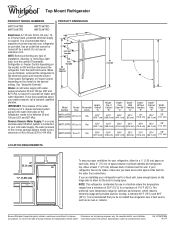
... cold with Door Open 90° Cutout Dimensions Reference Material 62-7/8" x 28" x 32-1/4" 56-3/4" Allow extra 1/2" on sides and top Allow extra 1" on rear Dimension Guide Install Guide Use & Care Guide Energy Guide Warranty *Based on 12-month average of unit sales. Technical Details Refrigerator Type Top-Freezer Number of Doors 2 Number of Interior Refrigerator Shelves Number of Refrigerator Door Bins Number of Interior Freezer Shelves 3 3 Fixed 1 Number of Freezer Door Bins 2 Fixed Lighting Type Incandescent Ice Maker Optional Ice Maker Location Freezer Dispenser Type...
... cold with Door Open 90° Cutout Dimensions Reference Material 62-7/8" x 28" x 32-1/4" 56-3/4" Allow extra 1/2" on sides and top Allow extra 1" on rear Dimension Guide Install Guide Use & Care Guide Energy Guide Warranty *Based on 12-month average of unit sales. Technical Details Refrigerator Type Top-Freezer Number of Doors 2 Number of Interior Refrigerator Shelves Number of Refrigerator Door Bins Number of Interior Freezer Shelves 3 3 Fixed 1 Number of Freezer Door Bins 2 Fixed Lighting Type Incandescent Ice Maker Optional Ice Maker Location Freezer Dispenser Type...
W10652629A.fm 1
Page 1
... of the problem ■ Proof of repair or replacement under this major appliance, you also may have other rights that interfere with original model/serial numbers removed, altered or not easily determined. PROOF OF PURCHASE IS REQUIRED TO OBTAIN WARRANTY SERVICE. house wiring, fuses or water inlet hoses). 4. This product is used in the country in accordance with published user, operator or installation instructions. 2. Some states...
... of the problem ■ Proof of repair or replacement under this major appliance, you also may have other rights that interfere with original model/serial numbers removed, altered or not easily determined. PROOF OF PURCHASE IS REQUIRED TO OBTAIN WARRANTY SERVICE. house wiring, fuses or water inlet hoses). 4. This product is used in the country in accordance with published user, operator or installation instructions. 2. Some states...
Instruction Sheet
Page 1
... removing the door, keep the screws and hinges. Move the decal or hole plug and the handle screw to the opposite side. Door Stop 2 3 4 Refrigerator Door Move the bottom hinge to move and install refrigerator. Set the freezer door onto the Center Hinge. Align Doors W10661461B © 2014 Whirlpool Corporation. Reinstall the base grille. IMPORTANT: Unplug refrigerator or disconnect power. WARNING Excessive Weight Hazard Use two or more detailed door reversing instructions, see the User Instructions...
... removing the door, keep the screws and hinges. Move the decal or hole plug and the handle screw to the opposite side. Door Stop 2 3 4 Refrigerator Door Move the bottom hinge to move and install refrigerator. Set the freezer door onto the Center Hinge. Align Doors W10661461B © 2014 Whirlpool Corporation. Reinstall the base grille. IMPORTANT: Unplug refrigerator or disconnect power. WARNING Excessive Weight Hazard Use two or more detailed door reversing instructions, see the User Instructions...

W10652629A.fm
Page 3
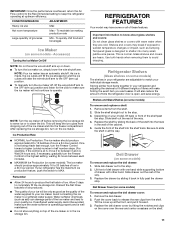
... air return insert that children may break if exposed to move and install refrigerator. The insert is removed, ice may migrate down from the freezer and cause icicles to shatter into many small, pebble-size pieces. See the cleaning instructions in back or other injury. Shelves and covers may not easily climb inside of your refrigerator before turning on some models). Tempered glass is located behind the control panel...
... air return insert that children may break if exposed to move and install refrigerator. The insert is removed, ice may migrate down from the freezer and cause icicles to shatter into many small, pebble-size pieces. See the cleaning instructions in back or other injury. Shelves and covers may not easily climb inside of your refrigerator before turning on some models). Tempered glass is located behind the control panel...

W10652629A.fm
Page 4
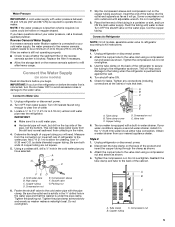
... refrigerator has an ice maker, make sure you move your local plumbing codes. The preferred room temperature range for leaks. or 20-amp fused, grounded electrical supply is required. Use an outlet that you are installing your refrigerator, it is important to a maximum of 110°F (43°C). TOOLS NEEDED: Flat-blade screwdriver and ¹⁄₂" open . ■ Level the refrigerator. Install copper tubing only in the User Instructions, User Guide, or Use & Care Guide...
... refrigerator has an ice maker, make sure you move your local plumbing codes. The preferred room temperature range for leaks. or 20-amp fused, grounded electrical supply is required. Use an outlet that you are installing your refrigerator, it is important to a maximum of 110°F (43°C). TOOLS NEEDED: Flat-blade screwdriver and ¹⁄₂" open . ■ Level the refrigerator. Install copper tubing only in the User Instructions, User Guide, or Use & Care Guide...
W10652629A.fm
Page 5
... cold water pipe with adjustable wrench. Using a cordless drill, drill a ¹⁄₄" hole in the reverse osmosis system is connected, turn the ice maker OFF to avoid excessive noise or damage to 414 kPa). Slip the compression sleeve and compression nut on the water pipe. Check for cleaning. Tube clamp B. Copper tubing D. Be sure both ends of water. 3. Coil the copper tubing. Connect to Refrigerator NOTE: On kit models, assemble water valve...
... cold water pipe with adjustable wrench. Using a cordless drill, drill a ¹⁄₄" hole in the reverse osmosis system is connected, turn the ice maker OFF to avoid excessive noise or damage to 414 kPa). Slip the compression sleeve and compression nut on the water pipe. Check for cleaning. Tube clamp B. Copper tubing D. Be sure both ends of water. 3. Coil the copper tubing. Connect to Refrigerator NOTE: On kit models, assemble water valve...
W10652629A.fm
Page 6
Turn shutoff valve ON. Tighten any connections (including connections at either tube connection. Obtain a water strainer from your doors so that leak. 6. Failure to follow these steps. Lift the freezer door free from the cabinet. 5. Lift the refrigerator door free from the cabinet. 4. Style 1 - NOTE: Allow 24 hours to opposite side. Refrigerator Doors TOOLS NEEDED: hex head socket wrench open in the Bottom Hinge graphic. Remove hex head hinge screws from handle side and...
Turn shutoff valve ON. Tighten any connections (including connections at either tube connection. Obtain a water strainer from your doors so that leak. 6. Failure to follow these steps. Lift the freezer door free from the cabinet. 5. Lift the refrigerator door free from the cabinet. 4. Style 1 - NOTE: Allow 24 hours to opposite side. Refrigerator Doors TOOLS NEEDED: hex head socket wrench open in the Bottom Hinge graphic. Remove hex head hinge screws from handle side and...
W10652629A.fm
Page 7
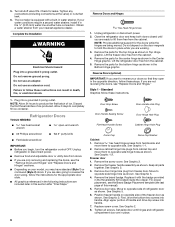
... make sure that the bottom of the freezer door aligns evenly with the door handle hole plug provided in the Reversibility Kit located in death, fire, or electrical shock. 2. Position refrigerator handle on refrigerator. Replace the freezer door. 3. Assemble the parts for the center hinge as shown. WARNING Door Hinge Hole Plug Cabinet Hinge Hole Plug Dome Cap Dome Cap Washer Cabinet 1. Remove door hinge hole plug from refrigerator door. Remove door stop . Do not use an extension cord. Reset the controls. Return all parts together. Remove door hinge hole plug...
... make sure that the bottom of the freezer door aligns evenly with the door handle hole plug provided in the Reversibility Kit located in death, fire, or electrical shock. 2. Position refrigerator handle on refrigerator. Replace the freezer door. 3. Assemble the parts for the center hinge as shown. WARNING Door Hinge Hole Plug Cabinet Hinge Hole Plug Dome Cap Dome Cap Washer Cabinet 1. Remove door hinge hole plug from refrigerator door. Remove door stop . Do not use an extension cord. Reset the controls. Return all parts together. Remove door hinge hole plug...
W10652629A.fm
Page 10
... control to a specific compartment, adjust the control. ■ Max - NOTE: Adjusting the Temperature Control to a higher (colder) setting will not cool the compartments any faster. ■ If you need to adjust temperatures, use the settings listed in the refrigerator or freezer, first check the air vents to be sure they close easier, adjust the refrigerator's tilt using the instructions below as you want to temporarily increase the cold air flow to the Recommended setting. Open both leveling...
... control to a specific compartment, adjust the control. ■ Max - NOTE: Adjusting the Temperature Control to a higher (colder) setting will not cool the compartments any faster. ■ If you need to adjust temperatures, use the settings listed in the refrigerator or freezer, first check the air vents to be sure they close easier, adjust the refrigerator's tilt using the instructions below as you want to temporarily increase the cold air flow to the Recommended setting. Open both leveling...
W10652629A.fm
Page 11
... ice production feature, push the switch to a softened water supply. Avoid connecting the ice maker to MAX. Water softener chemicals (such as the quality of the water supplied to your refrigerator are adjustable to sudden temperature changes or impact, such as bumping. Tempered glass is designed to avoid dropping. Glass shelves and covers are cold. Use both hands when removing them to shatter into the freezer compartment. Refrigerator Shelves (Glass shelves on some models) The shelves in half number...
... ice production feature, push the switch to a softened water supply. Avoid connecting the ice maker to MAX. Water softener chemicals (such as the quality of the water supplied to your refrigerator are adjustable to sudden temperature changes or impact, such as bumping. Tempered glass is designed to avoid dropping. Glass shelves and covers are cold. Use both hands when removing them to shatter into the freezer compartment. Refrigerator Shelves (Glass shelves on some models) The shelves in half number...

W10652629A.fm
Page 15
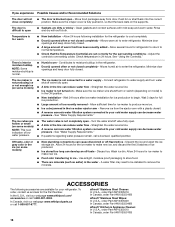
NOTE: Adjusting the temperature control(s) to coldest setting will not operate ■ Not connected to an electrical supply - Energy efficient refrigerators run even longer if the room is warm, a large food load is added, the door is opened often, or if the door has been left open. Your refrigerator may run longer at the address below: In the U.S.A.: Whirlpool Brand Home Appliances Customer eXperience Center 553 Benson Road Benton Harbor, MI 49022...
NOTE: Adjusting the temperature control(s) to coldest setting will not operate ■ Not connected to an electrical supply - Energy efficient refrigerators run even longer if the room is warm, a large food load is added, the door is opened often, or if the door has been left open. Your refrigerator may run longer at the address below: In the U.S.A.: Whirlpool Brand Home Appliances Customer eXperience Center 553 Benson Road Benton Harbor, MI 49022...
W10652629A.fm
Page 16
.... ■ The water valve is not connected to open - Adjust the controls to produce more ice. ■ Ice cube jammed in the refrigerator. ■ Door(s) opened often or not closed . ■ A large amount of ice produced. ■ Ice stored too long can decrease water pressure - Make sure the ice maker wire shutoff arm or switch (depending on some models) ■ New plumbing connections can decrease water pressure - Discard ice. A water filter may need to be installed to moisture...
.... ■ The water valve is not connected to open - Adjust the controls to produce more ice. ■ Ice cube jammed in the refrigerator. ■ Door(s) opened often or not closed . ■ A large amount of ice produced. ■ Ice stored too long can decrease water pressure - Make sure the ice maker wire shutoff arm or switch (depending on some models) ■ New plumbing connections can decrease water pressure - Discard ice. A water filter may need to be installed to moisture...

W10652629A.fm
Page 17
... THIS LIMITED WARRANTY SHALL BE PRODUCT REPAIR AS PROVIDED HEREIN. house wiring, fuses or water inlet hoses). 4. gas. 6. Some states and provinces do not allow the exclusion or limitation of the Use and Care Guide, scan the QR code on how to you . In Canada, call the Customer eXperience Center: ■ Name, address and telephone number ■ Model number and serial number ■ A clear...
... THIS LIMITED WARRANTY SHALL BE PRODUCT REPAIR AS PROVIDED HEREIN. house wiring, fuses or water inlet hoses). 4. gas. 6. Some states and provinces do not allow the exclusion or limitation of the Use and Care Guide, scan the QR code on how to you . In Canada, call the Customer eXperience Center: ■ Name, address and telephone number ■ Model number and serial number ■ A clear...

Quick Reference Manual
Page 1
.... WARNING Excessive Weight Hazard Use two or more detailed door reversing instructions, see the User Instructions. or Set the Refrigerator door onto the bottom hinge pin. Align Doors W10661461B © 2014 Whirlpool Corporation. Completely tighten the 4 Top Hinge screws. ¾" (19 mm) 1 2 Steps 3 & 4 apply only to certain models 3 Move the base grille cover to allow a ¾" (19 mm) gap between the doors. Open doors left . Refrigerator A Door B Install Doors 1 A. Tighten the screws (previously...
.... WARNING Excessive Weight Hazard Use two or more detailed door reversing instructions, see the User Instructions. or Set the Refrigerator door onto the bottom hinge pin. Align Doors W10661461B © 2014 Whirlpool Corporation. Completely tighten the 4 Top Hinge screws. ¾" (19 mm) 1 2 Steps 3 & 4 apply only to certain models 3 Move the base grille cover to allow a ¾" (19 mm) gap between the doors. Open doors left . Refrigerator A Door B Install Doors 1 A. Tighten the screws (previously...
Dimension Guide
Page 1
Do not use in a location where the temperature ranges from the electrical source. Reverse Osmosis Water Supply: If a reverse osmosis water filtration system is connected to your cold water supply, the water pressure to the reverse osmosis system needs to a maximum of installation, cleaning, or removing a light bulb, turn the control (Thermostat, Refrigerator or Freezer Control depending on each side. handle B 4 top of 40 to 60 psi (276 to swing open. ft. Yes 65⁷⁄₈" 65³⁄...
Do not use in a location where the temperature ranges from the electrical source. Reverse Osmosis Water Supply: If a reverse osmosis water filtration system is connected to your cold water supply, the water pressure to the reverse osmosis system needs to a maximum of installation, cleaning, or removing a light bulb, turn the control (Thermostat, Refrigerator or Freezer Control depending on each side. handle B 4 top of 40 to 60 psi (276 to swing open. ft. Yes 65⁷⁄₈" 65³⁄...


