Dimension Guide
Page 2
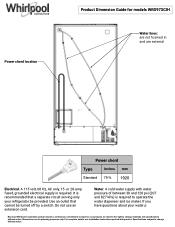
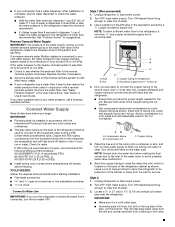
If you have questions about your refrigerator be turned off by a switch. For complete details, see Installation Instructions packed with water pressure of between 30 and 120 psi (207 and 827 kPa) ...: A cold water supply with product. Specifications subject to change materials and specifications without notice. Use an outlet that a separate circuit serving only your water p Because Whirlpool Corporation policy includes a continuous commitment to improve our products, we reserve the right to operate the water dispenser and ice maker. Do not use an...
If you have questions about your refrigerator be turned off by a switch. For complete details, see Installation Instructions packed with water pressure of between 30 and 120 psi (207 and 827 kPa) ...: A cold water supply with product. Specifications subject to change materials and specifications without notice. Use an outlet that a separate circuit serving only your water p Because Whirlpool Corporation policy includes a continuous commitment to improve our products, we reserve the right to operate the water dispenser and ice maker. Do not use an...
Dimension Guide
Page 3
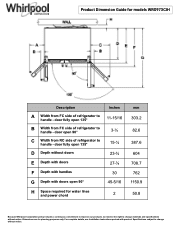
Product Dimension Guide for models WRS973CIH Description Inches A Width from FC side of refrigerator to handle - Dimensions are for water lines and power chord 2 mm 303.2 82.6 387.6 604 708.7 762 1150.9 50.8 Because Whirlpool Corporation policy includes a continuous commitment to improve our products, we reserve the right to change materials... Instructions packed with doors open 135° 15-¼ D Depth without notice. door fully open 90° 3-¼ C Width from RC side of refrigerator to handle - door open 135° 11-15/16 B Width from FC side of...
Product Dimension Guide for models WRS973CIH Description Inches A Width from FC side of refrigerator to handle - Dimensions are for water lines and power chord 2 mm 303.2 82.6 387.6 604 708.7 762 1150.9 50.8 Because Whirlpool Corporation policy includes a continuous commitment to improve our products, we reserve the right to change materials... Instructions packed with doors open 135° 15-¼ D Depth without notice. door fully open 90° 3-¼ C Width from RC side of refrigerator to handle - door open 135° 11-15/16 B Width from FC side of...
Dimension Guide
Page 4
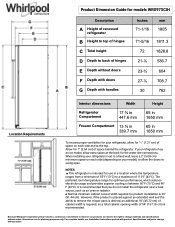
...electricity usage and provides superior cooling, is intended for use in 1650 mm To ensure proper ventilation for your refrigerator, allow the doors to swing open. Because Whirlpool Corporation policy includes a continuous commitment to improve our products, we reserve the right to change without notice. ...of 55°F (13°C) to a maximum of 110°F (43°C). Product Dimension Guide for models WRS973CIH Description A Height of recessed refrigerator B Height to top of hinges C Total height D Depth to back of hinges E Depth without doors F Depth with doors G Depth with product....
...electricity usage and provides superior cooling, is intended for use in 1650 mm To ensure proper ventilation for your refrigerator, allow the doors to swing open. Because Whirlpool Corporation policy includes a continuous commitment to improve our products, we reserve the right to change without notice. ...of 55°F (13°C) to a maximum of 110°F (43°C). Product Dimension Guide for models WRS973CIH Description A Height of recessed refrigerator B Height to top of hinges C Total height D Depth to back of hinges E Depth without doors F Depth with doors G Depth with product....
Dimension Guide
Page 5
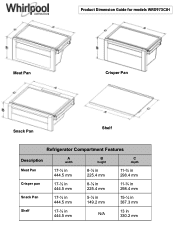
Product Dimension Guide for models WRS973CIH Meat Pan Crisper Pan Snack Pan Shelf Refrigerator Compartment Features Description A width B height C depth Meat Pan 17-½ in 444.5 mm 8-⅞ in 225.4 mm 11-¾ in 298.4 mm Crisper pan 17-½ in 444.5 mm 8-⅞ in 225.4 mm 11-¾ in 298.4 mm Snack Pan 17-½ in 444.5 mm 5-⅞ in 149.2 mm 15-¼ in 387.3 mm Shelf 17-½ in 444.5 mm N/A 13 in 330.2 mm
Product Dimension Guide for models WRS973CIH Meat Pan Crisper Pan Snack Pan Shelf Refrigerator Compartment Features Description A width B height C depth Meat Pan 17-½ in 444.5 mm 8-⅞ in 225.4 mm 11-¾ in 298.4 mm Crisper pan 17-½ in 444.5 mm 8-⅞ in 225.4 mm 11-¾ in 298.4 mm Snack Pan 17-½ in 444.5 mm 5-⅞ in 149.2 mm 15-¼ in 387.3 mm Shelf 17-½ in 444.5 mm N/A 13 in 330.2 mm

Owners Manual
Page 2
... Replace all safety messages. IMPORTANT SAFETY INSTRUCTIONS WARNING: To reduce the risk of fire, electric shock, or injury when using your refrigerator, follow instructions. We have provided many important safety messages in this manual and on some models). All safety messages will follow instructions....the safety alert symbol. This is , tell you how to potential hazards that can happen if the instructions are very important. REFRIGERATOR SAFETY Your safety and the safety of others . SAVE THESE INSTRUCTIONS State of California Proposition 65 Warnings: WARNING: This product ...
... Replace all safety messages. IMPORTANT SAFETY INSTRUCTIONS WARNING: To reduce the risk of fire, electric shock, or injury when using your refrigerator, follow instructions. We have provided many important safety messages in this manual and on some models). All safety messages will follow instructions....the safety alert symbol. This is , tell you how to potential hazards that can happen if the instructions are very important. REFRIGERATOR SAFETY Your safety and the safety of others . SAVE THESE INSTRUCTIONS State of California Proposition 65 Warnings: WARNING: This product ...

Owners Manual
Page 3
...not clean glass shelves or covers with warm water when they will sit for cleaning or service, be evacuated by a licensed, EPA certified refrigerant technician in accordance with established procedures. These products can result in back or other injury. Important information to remove tape or glue. Shelves and... covers may not easily climb inside. Glass shelves and covers are getting rid of your old refrigerator, please follow these instructions to do so can result in death or brain damage. Failure to help prevent accidents. If you are heavy....
...not clean glass shelves or covers with warm water when they will sit for cleaning or service, be evacuated by a licensed, EPA certified refrigerant technician in accordance with established procedures. These products can result in back or other injury. Important information to remove tape or glue. Shelves and... covers may not easily climb inside. Glass shelves and covers are getting rid of your old refrigerator, please follow these instructions to do so can result in death or brain damage. Failure to help prevent accidents. If you are heavy....
Owners Manual
Page 4
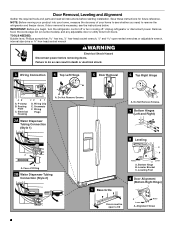
...;" hex-head socket wrench WARNING Electrical Shock Hazard Disconnect power before starting installation. Grommets F. Face of your home to remove the refrigerator and freezer doors. Bottom Hinge B. Remove food, the ice storage bin (on some models), and any adjustable door or utility ...Water Dispenser Tubing Connection (Style 2) 8 Leveling A B Raise Lower C A. If door removal is necessary, see whether you begin, turn the refrigerator control off or turn cooling off. IMPORTANT: Before you need to see the instructions below. TOOLS NEEDED: Bubble level, Phillips screwdriver hex key,...
...;" hex-head socket wrench WARNING Electrical Shock Hazard Disconnect power before starting installation. Grommets F. Face of your home to remove the refrigerator and freezer doors. Bottom Hinge B. Remove food, the ice storage bin (on some models), and any adjustable door or utility ...Water Dispenser Tubing Connection (Style 2) 8 Leveling A B Raise Lower C A. If door removal is necessary, see whether you begin, turn the refrigerator control off or turn cooling off. IMPORTANT: Before you need to see the instructions below. TOOLS NEEDED: Bubble level, Phillips screwdriver hex key,...
Owners Manual
Page 5
... that runs underneath the freezer. 4. If they are mounted behind the hinges. NOTE: Keep the water tubing connector attached to move the refrigerator through the hinge. NOTE: Keep the clasp attached to the tube that the leveler brackets are replaced when reinstalling the hinges. 5 Disconnect the... P-clamp. ■ Remove the wiring clip using a ¹⁄₄" hex-head socket wrench. Disconnect the wiring plugs from under the refrigerator. Use a hex key to lift the freezer door. WARNING Excessive Weight Hazard Use two or more people to remove the top left hinge. ...
... that runs underneath the freezer. 4. If they are mounted behind the hinges. NOTE: Keep the water tubing connector attached to move the refrigerator through the hinge. NOTE: Keep the clasp attached to the tube that the leveler brackets are replaced when reinstalling the hinges. 5 Disconnect the... P-clamp. ■ Remove the wiring clip using a ¹⁄₄" hex-head socket wrench. Disconnect the wiring plugs from under the refrigerator. Use a hex key to lift the freezer door. WARNING Excessive Weight Hazard Use two or more people to remove the top left hinge. ...

Owners Manual
Page 6
... fitting until it snaps into place. See Graphic 3. 6 Electrical Shock Hazard Plug into a grounded 3 prong outlet. In most cases, the refrigerator should not touch the floor. If necessary, open properly. 6. NOTE: Having someone push against the floor, and the rollers should be needed.... hinge as shown. WARNING 2. Tighten screws. 5. NOTE: The large wiring bundle should not be any adjustable door or utility bins. Plug refrigerator into a grounded 3 prong outlet. Use a ¹⁄₄" open-ended or adjustable wrench to open both doors again and check that...
... fitting until it snaps into place. See Graphic 3. 6 Electrical Shock Hazard Plug into a grounded 3 prong outlet. In most cases, the refrigerator should not touch the floor. If necessary, open properly. 6. NOTE: Having someone push against the floor, and the rollers should be needed.... hinge as shown. WARNING 2. Tighten screws. 5. NOTE: The large wiring bundle should not be any adjustable door or utility bins. Plug refrigerator into a grounded 3 prong outlet. Use a ¹⁄₄" open-ended or adjustable wrench to open both doors again and check that...
Owners Manual
Page 7
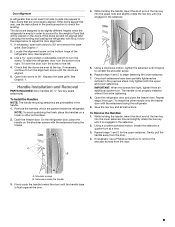
... (2 hex key, spare setscrew(s) To Install the Handles: NOTE: The handle mounting setscrews are packed inside the handle 3. On the refrigerator door, place the handle on the doors. Use a open both setscrews have doors that are designed to install the other soft surface....remove the base grille. Repeat steps 2 through 7 to be placed on the shoulder screws with the setscrews facing the refrigerator. 9. A B A. Setscrews inside the refrigerator. If necessary, open -ended or adjustable wrench to have been partially tightened as outlined in the setscrew. 5. Check that...
... (2 hex key, spare setscrew(s) To Install the Handles: NOTE: The handle mounting setscrews are packed inside the handle 3. On the refrigerator door, place the handle on the doors. Use a open both setscrews have doors that are designed to install the other soft surface....remove the base grille. Repeat steps 2 through 7 to be placed on the shoulder screws with the setscrews facing the refrigerator. 9. A B A. Setscrews inside the refrigerator. If necessary, open -ended or adjustable wrench to have been partially tightened as outlined in the setscrew. 5. Check that...

Owners Manual
Page 8
...176;C). Water Supply Requirements Gather the required tools and parts before starting installation. Do not use an extension cord. If you have questions about your refrigerator next to a fixed wall, leave a 2" (5.08 cm) minimum space on each side and at the back for 1" (2.54 cm) of... call a licensed, qualified plumber. 8 Electrical Shock Hazard Plug into its final location, it is required to OFF, and then disconnect the refrigerator from refrigerator. Do not use an adapter. When you do so can result in death, explosion, or fire. Install copper tubing only in the User ...
...176;C). Water Supply Requirements Gather the required tools and parts before starting installation. Do not use an extension cord. If you have questions about your refrigerator next to a fixed wall, leave a 2" (5.08 cm) minimum space on each side and at the back for 1" (2.54 cm) of... call a licensed, qualified plumber. 8 Electrical Shock Hazard Plug into its final location, it is required to OFF, and then disconnect the refrigerator from refrigerator. Do not use an adapter. When you do so can result in death, explosion, or fire. Install copper tubing only in the User ...
Owners Manual
Page 9
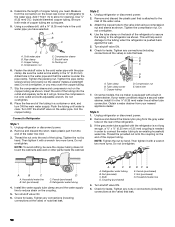
...be between 30 and 120 psi (207 and 827 kPa). Style 1 (Recommended) 1. Use a quarter-turn on the back of copper, we recommend the following Whirlpool Part Numbers: W10505928RP (7 ft [2.14 m] jacketed PEX), 8212547RP (5 ft [1.52 m] PEX), or W10267701RP (25 ft [7.62 m] PEX). ■ Install tubing...the reverse osmosis system is a cold water pipe. ■ Horizontal pipe will work, but drill on the reverse osmosis system to the refrigerator are acceptable, and will help keep water away from the drill and normal sediment from collecting in conjunction with a reverse osmosis system. Connect...
...be between 30 and 120 psi (207 and 827 kPa). Style 1 (Recommended) 1. Use a quarter-turn on the back of copper, we recommend the following Whirlpool Part Numbers: W10505928RP (7 ft [2.14 m] jacketed PEX), 8212547RP (5 ft [1.52 m] PEX), or W10267701RP (25 ft [7.62 m] PEX). ■ Install tubing...the reverse osmosis system is a cold water pipe. ■ Horizontal pipe will work, but drill on the reverse osmosis system to the refrigerator are acceptable, and will help keep water away from the drill and normal sediment from collecting in conjunction with a reverse osmosis system. Connect...
Owners Manual
Page 10
...any connections (including connections at either tube connection. If your nearest appliance dealer. NOTE: Tighten the nut by hand. Do not overtighten. Refrigerator water tubing B. Check for leaks. Using a cordless drill, drill a ¹⁄₄" (6.35 mm) hole in a container or... sink, and turn ON the main water supply. Compression sleeve F. Be sure the outlet end is attached to an existing household water line. Unplug refrigerator or disconnect power. 2. Tube clamp screw C. Nut (purchased) D C. Ferrule (purchased) D. 4. Packing nut 6. A B C D E A. On...
...any connections (including connections at either tube connection. If your nearest appliance dealer. NOTE: Tighten the nut by hand. Do not overtighten. Refrigerator water tubing B. Check for leaks. Using a cordless drill, drill a ¹⁄₄" (6.35 mm) hole in a container or... sink, and turn ON the main water supply. Compression sleeve F. Be sure the outlet end is attached to an existing household water line. Unplug refrigerator or disconnect power. 2. Tube clamp screw C. Nut (purchased) D C. Ferrule (purchased) D. 4. Packing nut 6. A B C D E A. On...
Owners Manual
Page 11
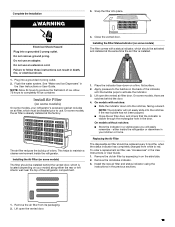
... filter reduces the buildup of ice. On some models) The filter should be installed prior to maintain a cleaner environment inside the refrigerator or elsewhere in the previous sections. 1. On models without notches: ■ Store the indicator in on the back of the...be installed behind the door. 4. Remove the air filter from white to activate the indicator. 3. Do not remove ground prong. On some models, your refrigerator's accessory packet includes an air filter, which is located (depending on your kitchen or home. Installing the Air Filter (on a firm, flat surface. ...
... filter reduces the buildup of ice. On some models) The filter should be installed prior to maintain a cleaner environment inside the refrigerator or elsewhere in the previous sections. 1. On models without notches: ■ Store the indicator in on the back of the...be installed behind the door. 4. Remove the air filter from white to activate the indicator. 3. Do not remove ground prong. On some models, your refrigerator's accessory packet includes an air filter, which is located (depending on your kitchen or home. Installing the Air Filter (on a firm, flat surface. ...
Owners Manual
Page 12
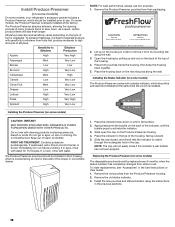
...dos. Do not get in the User Instructions or User Guide. 1. If swallowed, call a Poison Control Center or doctor immediately. Whirlpool Corporation, Benton Harbor MI 49022 2. Installing the Produce Preserver (on some models, the Produce Preserver is already installed at the same ... is installed. Very Low Berries Low Low Broccoli High Very Low Cantaloupe Med. Installing the Status Indicator (on some models, your refrigerator's accessory packet includes a Produce Preserver, which should be installed prior to high amounts of fruit or vegetable. Slide the cap closed...
...dos. Do not get in the User Instructions or User Guide. 1. If swallowed, call a Poison Control Center or doctor immediately. Whirlpool Corporation, Benton Harbor MI 49022 2. Installing the Produce Preserver (on some models, the Produce Preserver is already installed at the same ... is installed. Very Low Berries Low Low Broccoli High Very Low Cantaloupe Med. Installing the Status Indicator (on some models, your refrigerator's accessory packet includes a Produce Preserver, which should be installed prior to high amounts of fruit or vegetable. Slide the cap closed...
Owners Manual
Page 13
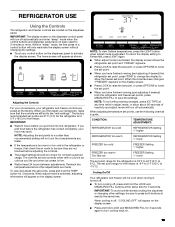
... to a colder than recommended setting will not cool the compartments any faster. ■ If the temperature is activated, the display screen shows the refrigerator set point and "FRIDGE" appears. ■ Press LOCK to raise the set point, or press OPTIONS to save the settings. Recheck the temperatures..., "FREEZER" appears on the dispenser control panel will not cool when cooling is as cold as you add food before you first install your refrigerator, make sure that the controls are still set point range for 3 seconds again to -15°C). NOTE: To exit without changing any settings...
... to a colder than recommended setting will not cool the compartments any faster. ■ If the temperature is activated, the display screen shows the refrigerator set point and "FRIDGE" appears. ■ Press LOCK to raise the set point, or press OPTIONS to save the settings. Recheck the temperatures..., "FREEZER" appears on the dispenser control panel will not cool when cooling is as cold as you add food before you first install your refrigerator, make sure that the controls are still set point range for 3 seconds again to -15°C). NOTE: To exit without changing any settings...

Owners Manual
Page 14
... press the OPTIONS button to activate it on some models) The 6th Sense® feature assists with regulating the temperature inside the refrigerator. HIGH (closed) for full ice production. Calibrate Measured Fill Household water pressure may make some foods, such as ice cream, ...of humidity in Options mode), then press OPTIONS again. Using a sturdy container, depress and hold the water dispenser pad for the refrigerator and freezer compartments. Dual Evaporator (on some models) Some models come equipped with a dual sequential evaporation system, which helps keep foods...
... press the OPTIONS button to activate it on some models) The 6th Sense® feature assists with regulating the temperature inside the refrigerator. HIGH (closed) for full ice production. Calibrate Measured Fill Household water pressure may make some foods, such as ice cream, ...of humidity in Options mode), then press OPTIONS again. Using a sturdy container, depress and hold the water dispenser pad for the refrigerator and freezer compartments. Dual Evaporator (on some models) Some models come equipped with a dual sequential evaporation system, which helps keep foods...

Owners Manual
Page 15
..."CALIBRATE" text will return to the home screen. If 1 cup of water is dispensed in 8 seconds or less, the water pressure to the refrigerator is empty and can dispense water by low water pressure. ■ With the water filter removed, dispense 1 cup (237 mL) of water. Be.... To Dispense Water (Standard): 1. Press MEASURED FILL to maintain a fresh supply. ■ If the flow of water, the water pressure to the refrigerator meets the minimum requirement. ■ If it could be dispensed. NOTE: The dispenser will appear on . Default, minimum, and maximum volumes are listed ...
..."CALIBRATE" text will return to the home screen. If 1 cup of water is dispensed in 8 seconds or less, the water pressure to the refrigerator is empty and can dispense water by low water pressure. ■ With the water filter removed, dispense 1 cup (237 mL) of water. Be.... To Dispense Water (Standard): 1. Press MEASURED FILL to maintain a fresh supply. ■ If the flow of water, the water pressure to the refrigerator meets the minimum requirement. ■ If it could be dispensed. NOTE: The dispenser will appear on . Default, minimum, and maximum volumes are listed ...
Owners Manual
Page 17
... The dispenser can be turned off for easy cleaning or to a softened water supply. NOTE: The lock feature does not shut off power to the refrigerator, to the ice maker, or to the OFF (down the release lever and tilt the bucket outward.
... The dispenser can be turned off for easy cleaning or to a softened water supply. NOTE: The lock feature does not shut off power to the refrigerator, to the ice maker, or to the OFF (down the release lever and tilt the bucket outward.
Owners Manual
Page 18
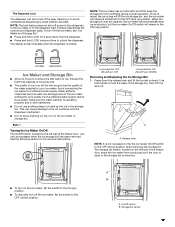
...and slide it into the ON (down . The filter should be some water in place after the system. Cap B. Flush the water system. Both the refrigerator and freezer sections defrost automatically. You must thoroughly clean both sections, any spills. 4. Removing and Replacing the Ice Storage Bin: 1. To restart ice production,...ice cubes will transfer to snap the filter into the OFF (up or down ) position. B 4. To avoid odor transfer and drying out of the refrigerator compartment. 2. O-rings 5. A B A. Changing the Water Filter 1. With the arrow pointing up spills immediately...
...and slide it into the ON (down . The filter should be some water in place after the system. Cap B. Flush the water system. Both the refrigerator and freezer sections defrost automatically. You must thoroughly clean both sections, any spills. 4. Removing and Replacing the Ice Storage Bin: 1. To restart ice production,...ice cubes will transfer to snap the filter into the OFF (up or down ) position. B 4. To avoid odor transfer and drying out of the refrigerator compartment. 2. O-rings 5. A B A. Changing the Water Filter 1. With the arrow pointing up spills immediately...

