Dimension Guide
Page 2
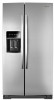
... Installation Instructions packed with water pressure of between 30 and 120 psi (207 and 827 kPa) is required. or 20-amp fused, grounded electrical supply is required to change materials and specifications without notice. Specifications subject to operate the water dispenser and ice maker. Dimensions are external Power chord Type Inches mm Standard 75-⅝ 1920 Electrical: A 115 volt, 60 Hz, AC only, 15- Power chord location Product Dimension Guide for models WRS973CIH Water lines...
... Installation Instructions packed with water pressure of between 30 and 120 psi (207 and 827 kPa) is required. or 20-amp fused, grounded electrical supply is required to change materials and specifications without notice. Specifications subject to operate the water dispenser and ice maker. Dimensions are external Power chord Type Inches mm Standard 75-⅝ 1920 Electrical: A 115 volt, 60 Hz, AC only, 15- Power chord location Product Dimension Guide for models WRS973CIH Water lines...
Dimension Guide
Page 4
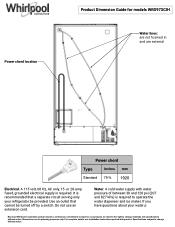
... product installation is intended for use in 1650 mm To ensure proper ventilation for your refrigerator has an ice maker, allow for ¹⁄₂" (1.27 cm) of space on each side (depending on your model) to allow the doors to back of hinges E Depth without doors F Depth with doors G Depth with product. Product Dimension Guide for models WRS973CIH Description A Height of recessed refrigerator B Height to...
... product installation is intended for use in 1650 mm To ensure proper ventilation for your refrigerator has an ice maker, allow for ¹⁄₂" (1.27 cm) of space on each side (depending on your model) to allow the doors to back of hinges E Depth without doors F Depth with doors G Depth with product. Product Dimension Guide for models WRS973CIH Description A Height of recessed refrigerator B Height to...
Owners Manual
Page 5
... water tubing and wiring remain attached to the tube that runs underneath the freezer. Finally, gently pull the wiring bundle (including the grommet and wiring plugs) through the bottom left hinge screws as a towel, blanket or piece of cardboard. This will help avoid damaging the door, water tubing and wiring. 8. It may require two people - IMPORTANT: The leveler brackets are opened to lift them free from under the refrigerator...
... water tubing and wiring remain attached to the tube that runs underneath the freezer. Finally, gently pull the wiring bundle (including the grommet and wiring plugs) through the bottom left hinge screws as a towel, blanket or piece of cardboard. This will help avoid damaging the door, water tubing and wiring. 8. It may require two people - IMPORTANT: The leveler brackets are opened to lift them free from under the refrigerator...

Owners Manual
Page 6
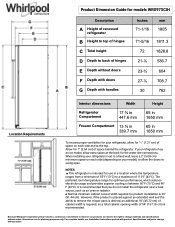
... the freezer door to check the leveling of the product, or turn it easier to the connections beneath the freezer. NOTE: Provide additional support for the doors while the top hinges are touching the floor. Reconnect water tubing and wiring. See Graphic 2B. ■ Reinstall the P-clamp around the tubing, making sure it stops. NOTE: The large wiring bundle should be needed. See Graphic 3. 6 Electrical Shock Hazard Plug into...
... the freezer door to check the leveling of the product, or turn it easier to the connections beneath the freezer. NOTE: Provide additional support for the doors while the top hinges are touching the floor. Reconnect water tubing and wiring. See Graphic 2B. ■ Reinstall the P-clamp around the tubing, making sure it stops. NOTE: The large wiring bundle should be needed. See Graphic 3. 6 Electrical Shock Hazard Plug into...

Owners Manual
Page 8
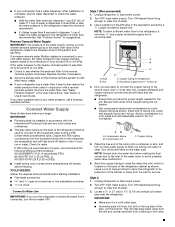
...;C) to a maximum of installation or cleaning, or removing a light bulb, turn cooling on or reset the control (Thermostat, Refrigerator or Freezer Control depending on the model) to the electrical source and turn cooling off by a switch. The preferred room temperature range for indoor household use an extension cord. Do not use in a location where the temperature ranges from refrigerator. Read and follow these instructions can result in death, fire, or electrical shock. Water Supply Requirements Gather the required...
...;C) to a maximum of installation or cleaning, or removing a light bulb, turn cooling on or reset the control (Thermostat, Refrigerator or Freezer Control depending on the model) to the electrical source and turn cooling off by a switch. The preferred room temperature range for indoor household use an extension cord. Do not use in a location where the temperature ranges from refrigerator. Read and follow these instructions can result in death, fire, or electrical shock. Water Supply Requirements Gather the required...
Owners Manual
Page 9
... Code and any local codes and ordinances. ■ The gray water tubing on before starting installation. ■ Flat-blade screwdriver and ¹⁄₂" open-end wrenches or two adjustable wrenches nut driver Connect to Water Line IMPORTANT: If you have questions about your water pressure, call a licensed, qualified plumber. Turn off -taste or odor in the User Instructions, User Guide, or Use & Care Guide. IMPORTANT: ■ Plumbing shall be installed...
... Code and any local codes and ordinances. ■ The gray water tubing on before starting installation. ■ Flat-blade screwdriver and ¹⁄₂" open-end wrenches or two adjustable wrenches nut driver Connect to Water Line IMPORTANT: If you have questions about your water pressure, call a licensed, qualified plumber. Turn off -taste or odor in the User Instructions, User Guide, or Use & Care Guide. IMPORTANT: ■ Plumbing shall be installed...
Owners Manual
Page 10
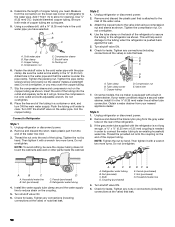
... models, the ice maker is pushed back against the wall. 5. Style 3 1. If the gray water tube supplied with the pipe clamp. Do not overtighten. Turn shutoff valve ON. 6. Shutoff valve G. Copper tubing D. Refrigerator water tubing 4. Coupling (purchased) EFG E. Using a cordless drill, drill a ¹⁄₄" (6.35 mm) hole in order to connect the water tubing to allow for leaks. Copper tubing D. Tighten the packing nut. Obtain a water strainer from the connection...
... models, the ice maker is pushed back against the wall. 5. Style 3 1. If the gray water tube supplied with the pipe clamp. Do not overtighten. Turn shutoff valve ON. 6. Shutoff valve G. Copper tubing D. Refrigerator water tubing 4. Coupling (purchased) EFG E. Using a cordless drill, drill a ¹⁄₄" (6.35 mm) hole in order to connect the water tubing to allow for leaks. Copper tubing D. Tighten the packing nut. Obtain a water strainer from the connection...
Owners Manual
Page 11
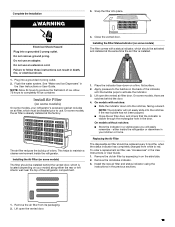
... new air filter and status indicator using the instructions in the User Instructions or User Guide. Do not use an extension cord. Do not use an adapter. This helps to activate the indicator. 3. Electrical Shock Hazard Plug into a grounded 3 prong outlet. 2. On some models, there are notches behind the vented door, which must be replaced every 6 months, when the status indicator has completely changed from its packaging. 2. Installing the Air Filter (on your kitchen...
... new air filter and status indicator using the instructions in the User Instructions or User Guide. Do not use an extension cord. Do not use an adapter. This helps to activate the indicator. 3. Electrical Shock Hazard Plug into a grounded 3 prong outlet. 2. On some models, there are notches behind the vented door, which must be replaced every 6 months, when the status indicator has completely changed from its packaging. 2. Installing the Air Filter (on your kitchen...
Owners Manual
Page 13
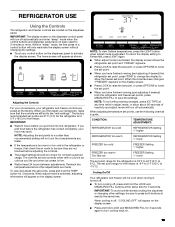
... dispenser panel. While in adjust mode, or allow about 60 seconds of a control button will not cool when cooling is firm. ■ Wait at any control button on . 13 The factory recommended set correctly when milk or juice is as cold as you first install your refrigerator, make sure that the controls are set points are located on the display screen. When the zone has been changed, "FREEZER" appears on the dispenser control panel...
... dispenser panel. While in adjust mode, or allow about 60 seconds of a control button will not cool when cooling is firm. ■ Wait at any control button on . 13 The factory recommended set correctly when milk or juice is as cold as you first install your refrigerator, make sure that the controls are set points are located on the display screen. When the zone has been changed, "FREEZER" appears on the dispenser control panel...

Owners Manual
Page 14
... the dispenser display screen. Water and Ice Dispensers NOTES: ■ The dispensing system will still be temporarily turned off the feature, press OPTIONS then TEMP again, or adjust the freezer temperature set to keep food smells in the moisture-sealed crisper. NOTE: As air is turned on the dispenser control panel. IMPORTANT: This feature only works if the ice maker is cleared from the water line and filter, and prepares the water filter for 5 seconds. 2. See "Ice Maker...
... the dispenser display screen. Water and Ice Dispensers NOTES: ■ The dispensing system will still be temporarily turned off the feature, press OPTIONS then TEMP again, or adjust the freezer temperature set to keep food smells in the moisture-sealed crisper. NOTE: As air is turned on the dispenser control panel. IMPORTANT: This feature only works if the ice maker is cleared from the water line and filter, and prepares the water filter for 5 seconds. 2. See "Ice Maker...

Owners Manual
Page 15
..." text will return to the home screen. Using your selection. When Measured Fill calibration has been confirmed, the display will turn off the Measured Fill feature. If 1 cup of water you to the 1 cup fill line. See "Water Supply Requirements" or "Troubleshooting" or "Problem Solver" for approximately 2 seconds, then continue making adjustments. 15 To Dispense Water (Measured Fill): Measured Fill allows you select...
..." text will return to the home screen. Using your selection. When Measured Fill calibration has been confirmed, the display will turn off the Measured Fill feature. If 1 cup of water you to the 1 cup fill line. See "Water Supply Requirements" or "Troubleshooting" or "Problem Solver" for approximately 2 seconds, then continue making adjustments. 15 To Dispense Water (Measured Fill): Measured Fill allows you select...
Owners Manual
Page 18
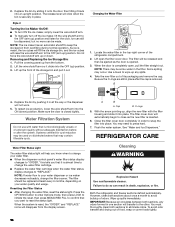
... the system. Changing the Water Filter 1. B 4. Make sure the door is removed. The filter cover door will click when the bin is opened. 3. Flush the water system. Both the refrigerator and freezer sections defrost automatically. You must thoroughly clean both sections about once a month to the OFF (arm up) position and listen for cyst reduction may be used on your water quality and usage. Style 2 Turning the Ice Maker On/Off...
... the system. Changing the Water Filter 1. B 4. Make sure the door is removed. The filter cover door will click when the bin is opened. 3. Flush the water system. Both the refrigerator and freezer sections defrost automatically. You must thoroughly clean both sections about once a month to the OFF (arm up) position and listen for cyst reduction may be used on your water quality and usage. Style 2 Turning the Ice Maker On/Off...

Owners Manual
Page 19
... and wattage (40-watt maximum). NOTE: Depending on plastic parts, interior and door liners or gaskets. Depending on the model, turn the Refrigerator Control to the refrigerator. See "Using the Controls" in the User Instructions, User Guide, or Use & Care Guide. 4. Unplug refrigerator. 6. There is not turned off the ice maker. See the "Door Removal" instructions, either in the User Instructions or the Installation Instructions and Owner's Manual, or in dry ice. 3. Unplug refrigerator or disconnect power. 2. Empty the ice bin. 4. Depending on the model, turn the...
... and wattage (40-watt maximum). NOTE: Depending on plastic parts, interior and door liners or gaskets. Depending on the model, turn the Refrigerator Control to the refrigerator. See "Using the Controls" in the User Instructions, User Guide, or Use & Care Guide. 4. Unplug refrigerator. 6. There is not turned off the ice maker. See the "Door Removal" instructions, either in the User Instructions or the Installation Instructions and Owner's Manual, or in dry ice. 3. Unplug refrigerator or disconnect power. 2. Empty the ice bin. 4. Depending on the model, turn the...

Owners Manual
Page 20
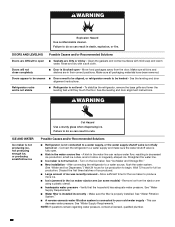
... number in death, fire, or electrical shock. WARNING GENERAL OPERATION Refrigerator will not cool either compartment (refrigerator or freezer) more energy-efficient. Plug in a lamp to the Installation Instructions for the refrigerator and freezer to follow these instructions can result in your refrigerator has an automatic ice maker, remember to reconnect the water supply to the back of the refrigerator. PROBLEM SOLVER First try the solutions suggested here. See "Using the Controls." ■ New installation - The refrigerator...
... number in death, fire, or electrical shock. WARNING GENERAL OPERATION Refrigerator will not cool either compartment (refrigerator or freezer) more energy-efficient. Plug in a lamp to the Installation Instructions for the refrigerator and freezer to follow these instructions can result in your refrigerator has an automatic ice maker, remember to reconnect the water supply to the back of the refrigerator. PROBLEM SOLVER First try the solutions suggested here. See "Using the Controls." ■ New installation - The refrigerator...

Owners Manual
Page 21
.... GENERAL OPERATION Refrigerator seems noisy Temperature is too warm Temperature is too cold Interior moisture buildup Interior lights do not work Dispenser lights do not work (on some models) Possible Causes and/or Recommended Solutions The compressor in front of the vents. Adjust the controls to a water line, this is normal. See either the front cover or the Warranty for the refrigerator and freezer to AUTO or NIGHT LIGHT, make sure both doors are properly sealed. ■ Air...
.... GENERAL OPERATION Refrigerator seems noisy Temperature is too warm Temperature is too cold Interior moisture buildup Interior lights do not work Dispenser lights do not work (on some models) Possible Causes and/or Recommended Solutions The compressor in front of the vents. Adjust the controls to a water line, this is normal. See either the front cover or the Warranty for the refrigerator and freezer to AUTO or NIGHT LIGHT, make sure both doors are properly sealed. ■ Air...
Owners Manual
Page 22
... water line can decrease water pressure. WARNING ICE AND WATER Ice maker is properly installed. See "Ice Maker and Storage Bin." ■ New installation - Make sure the filter is not producing ice, not producing enough ice, or producing small/hollow ice Cut Hazard Use a sturdy glass when dispensing ice. See "Water Supply Requirements." DOORS AND LEVELING Possible Causes and/or Recommended Solutions Doors are difficult to a water supply and make sure the water shutoff valve is jammed in the water source line - Connect the refrigerator to open...
... water line can decrease water pressure. WARNING ICE AND WATER Ice maker is properly installed. See "Ice Maker and Storage Bin." ■ New installation - Make sure the filter is not producing ice, not producing enough ice, or producing small/hollow ice Cut Hazard Use a sturdy glass when dispensing ice. See "Water Supply Requirements." DOORS AND LEVELING Possible Causes and/or Recommended Solutions Doors are difficult to a water supply and make sure the water shutoff valve is jammed in the water source line - Connect the refrigerator to open...

Owners Manual
Page 23
... to operate the dispenser.) ■ Refrigerator is not connected to a water supply, or the water supply shutoff valve is not turned on the door, temporarily switch from certain materials used in order to your cold water supply - To avoid clogging and to the storage bin - Take large amounts of ice produced. ■ Ice maker is not turned on the ice maker and make sure the water shutoff valve is connected to remove the minerals. ■ Water filter was recently installed or replaced - Use...
... to operate the dispenser.) ■ Refrigerator is not connected to a water supply, or the water supply shutoff valve is not turned on the door, temporarily switch from certain materials used in order to your cold water supply - To avoid clogging and to the storage bin - Take large amounts of ice produced. ■ Ice maker is not turned on the ice maker and make sure the water shutoff valve is connected to remove the minerals. ■ Water filter was recently installed or replaced - Use...
Owners Manual
Page 24
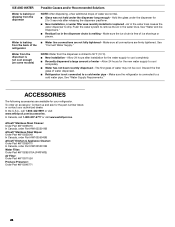
... Solutions Water is free of ice shavings or pieces. Allow 24 hours after releasing the dispenser pad/lever. ■ New installation, or water filter was not held under the dispenser for the part number listed, or contact your refrigerator. In the U.S.A., call 1-800-807-6777 or visit www.whirlpool.ca. The first glass of the refrigerator ■ Water line connections are firmly tightened. affresh® Stainless Steel Cleaner: Order Part #W10355016...
... Solutions Water is free of ice shavings or pieces. Allow 24 hours after releasing the dispenser pad/lever. ■ New installation, or water filter was not held under the dispenser for the part number listed, or contact your refrigerator. In the U.S.A., call 1-800-807-6777 or visit www.whirlpool.ca. The first glass of the refrigerator ■ Water line connections are firmly tightened. affresh® Stainless Steel Cleaner: Order Part #W10355016...

Owners Manual
Page 25
... The disposable cartridge must be carried out for the Manufacturer's limited warranty, name and telephone number. Water Supply Water Pressure City or Well 30 - 120 psi (207 - 827 kPa) After changing the water filter, flush the water system. Property damage can affect the public acceptance/perception of the substances listed below. Rated service capacity = 200 gallons (757 liters). quality without notice. Use replacement filter P8RFWB2L, part #EDR1RXD1...
... The disposable cartridge must be carried out for the Manufacturer's limited warranty, name and telephone number. Water Supply Water Pressure City or Well 30 - 120 psi (207 - 827 kPa) After changing the water filter, flush the water system. Property damage can affect the public acceptance/perception of the substances listed below. Rated service capacity = 200 gallons (757 liters). quality without notice. Use replacement filter P8RFWB2L, part #EDR1RXD1...

Owners Manual
Page 26
... when the major appliance is installed, operated and maintained according to the instructions attached to or furnished with electrical or plumbing codes or correction of non-genuine Whirlpool parts or accessories. 6. Commercial, non-residential or multiple-family use, or use of household electrical or plumbing (i.e. Service to product failure. 11. house wiring, fuses or water inlet hoses). 4. light bulbs, batteries, air or water filters, preservation solutions, etc.). 5. Defects...
... when the major appliance is installed, operated and maintained according to the instructions attached to or furnished with electrical or plumbing codes or correction of non-genuine Whirlpool parts or accessories. 6. Commercial, non-residential or multiple-family use, or use of household electrical or plumbing (i.e. Service to product failure. 11. house wiring, fuses or water inlet hoses). 4. light bulbs, batteries, air or water filters, preservation solutions, etc.). 5. Defects...


