Dimension Guide
Page 1
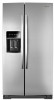
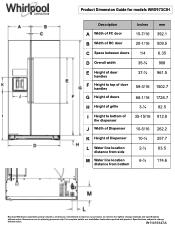
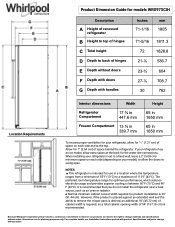
Specifications subject to change without notice. For complete details, see Installation Instructions packed with product. Dimensions are for models WRS973CIH Description Inches mm A Width of FC door 15-7/16 392.1 B Width of RC door 20-1/16 509.5...; 257.7 L Water line location distance from side 2-½ 63.5 M Water line location 6-⅞ distance from bottom 174.6 Because Whirlpool Corporation policy includes a continuous commitment to improve our products, we reserve the right to change materials and specifications without notice. W11419347A Product Dimension...
Specifications subject to change without notice. For complete details, see Installation Instructions packed with product. Dimensions are for models WRS973CIH Description Inches mm A Width of FC door 15-7/16 392.1 B Width of RC door 20-1/16 509.5...; 257.7 L Water line location distance from side 2-½ 63.5 M Water line location 6-⅞ distance from bottom 174.6 Because Whirlpool Corporation policy includes a continuous commitment to improve our products, we reserve the right to change materials and specifications without notice. W11419347A Product Dimension...
Dimension Guide
Page 2
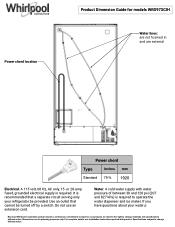
... circuit serving only your water p Because Whirlpool Corporation policy includes a continuous commitment to improve our products, we reserve the right to operate the water dispenser and ice maker. Water: A cold water supply with product. It is recommended that cannot be provided. Dimensions are for models WRS973CIH Water lines: are not foamed in...
... circuit serving only your water p Because Whirlpool Corporation policy includes a continuous commitment to improve our products, we reserve the right to operate the water dispenser and ice maker. Water: A cold water supply with product. It is recommended that cannot be provided. Dimensions are for models WRS973CIH Water lines: are not foamed in...
Dimension Guide
Page 3
Product Dimension Guide for models WRS973CIH Description Inches A Width from FC side of refrigerator to handle - Dimensions are for water lines and power chord 2 mm 303.2 82.6 387.6 604 708.7 762 1150.9 50.8 Because Whirlpool Corporation policy includes a continuous commitment to improve our products, we reserve the right to handle - door open 90...
Product Dimension Guide for models WRS973CIH Description Inches A Width from FC side of refrigerator to handle - Dimensions are for water lines and power chord 2 mm 303.2 82.6 387.6 604 708.7 762 1150.9 50.8 Because Whirlpool Corporation policy includes a continuous commitment to improve our products, we reserve the right to handle - door open 90...
Dimension Guide
Page 4
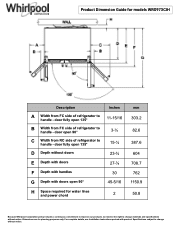
Because Whirlpool Corporation policy includes a continuous commitment to improve our products, we reserve the right to change without notice. ...and provides superior cooling, is 36" (91.44 cm). Allow for 1" (2.54 cm) of 110°F (43°C). Product Dimension Guide for models WRS973CIH Description A Height of recessed refrigerator B Height to top of hinges C Total height D Depth to back of hinges E Depth without doors F ...wall, leave a 2" (5.08 cm) minimum space on your refrigerator, allow for the water line connections. Dimensions are for your model) to swing open.
Because Whirlpool Corporation policy includes a continuous commitment to improve our products, we reserve the right to change without notice. ...and provides superior cooling, is 36" (91.44 cm). Allow for 1" (2.54 cm) of 110°F (43°C). Product Dimension Guide for models WRS973CIH Description A Height of recessed refrigerator B Height to top of hinges C Total height D Depth to back of hinges E Depth without doors F ...wall, leave a 2" (5.08 cm) minimum space on your refrigerator, allow for the water line connections. Dimensions are for your model) to swing open.
Dimension Guide
Page 5
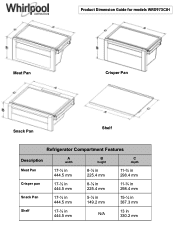
Product Dimension Guide for models WRS973CIH Meat Pan Crisper Pan Snack Pan Shelf Refrigerator Compartment Features Description A width B height C depth Meat Pan 17-½ in 444.5 mm 8-⅞ in 225.4 mm 11-¾ in 298.4 mm Crisper pan 17-½ in 444.5 mm 8-⅞ in 225.4 mm 11-¾ in 298.4 mm Snack Pan 17-½ in 444.5 mm 5-⅞ in 149.2 mm 15-¼ in 387.3 mm Shelf 17-½ in 444.5 mm N/A 13 in 330.2 mm
Product Dimension Guide for models WRS973CIH Meat Pan Crisper Pan Snack Pan Shelf Refrigerator Compartment Features Description A width B height C depth Meat Pan 17-½ in 444.5 mm 8-⅞ in 225.4 mm 11-¾ in 298.4 mm Crisper pan 17-½ in 444.5 mm 8-⅞ in 225.4 mm 11-¾ in 298.4 mm Snack Pan 17-½ in 444.5 mm 5-⅞ in 149.2 mm 15-¼ in 387.3 mm Shelf 17-½ in 444.5 mm N/A 13 in 330.2 mm
Dimension Guide
Page 6
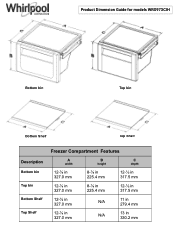
Product Dimension Guide for models WRS973CIH Bottom bin Top bin Bottom Shelf Top Shelf Description Bottom bin Top bin Bottom Shelf Top Shelf Freezer Compartment Features A width B height C depth 12-⅞ in 327.0 mm 8-⅞ in 225.4 mm 12-½ in 317.5 mm 12-⅞ in 327.0 mm 8-⅞ in 225.4 mm 12-½ in 317.5 mm 12-⅞ in 327.0 mm N/A 11 in 279.4 mm 12-⅞ in 327.0 mm N/A 13 in 330.2 mm
Product Dimension Guide for models WRS973CIH Bottom bin Top bin Bottom Shelf Top Shelf Description Bottom bin Top bin Bottom Shelf Top Shelf Freezer Compartment Features A width B height C depth 12-⅞ in 327.0 mm 8-⅞ in 225.4 mm 12-½ in 317.5 mm 12-⅞ in 327.0 mm 8-⅞ in 225.4 mm 12-½ in 317.5 mm 12-⅞ in 327.0 mm N/A 11 in 279.4 mm 12-⅞ in 327.0 mm N/A 13 in 330.2 mm

Owners Manual
Page 2
... move and install refrigerator. ■ Disconnect power before installing ice maker (on ice maker kit ready models only). ■ Use a sturdy glass when dispensing ice (on some models). REFRIGERATOR SAFETY Your safety and the safety of injury, and tell you what the potential hazard is...the safety alert symbol and either the word "DANGER" or "WARNING." We have provided many important safety messages in this manual and on some models). ■ Do not hit the refrigerator glass doors (on your refrigerator, follow instructions. This is , tell you don't immediately follow these ...
... move and install refrigerator. ■ Disconnect power before installing ice maker (on ice maker kit ready models only). ■ Use a sturdy glass when dispensing ice (on some models). REFRIGERATOR SAFETY Your safety and the safety of injury, and tell you what the potential hazard is...the safety alert symbol and either the word "DANGER" or "WARNING." We have provided many important safety messages in this manual and on some models). ■ Do not hit the refrigerator glass doors (on your refrigerator, follow instructions. This is , tell you don't immediately follow these ...
Owners Manual
Page 4
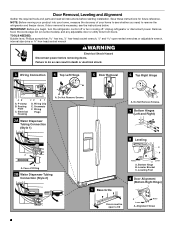
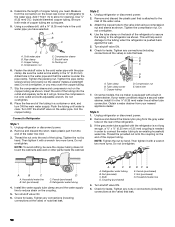
... door removal is necessary, see whether you begin, turn the refrigerator control off or turn cooling off. Remove food, the ice storage bin (on some models), and any adjustable door or utility bins from doors. P-clamp B. Routing Plate C. Do Not Remove Screws. 5 Door Removal 6 Top Right Hinge A A A. IMPORTANT: Before you need...
... door removal is necessary, see whether you begin, turn the refrigerator control off or turn cooling off. Remove food, the ice storage bin (on some models), and any adjustable door or utility bins from doors. P-clamp B. Routing Plate C. Do Not Remove Screws. 5 Door Removal 6 Top Right Hinge A A A. IMPORTANT: Before you need...

Owners Manual
Page 6
... of the routing plate. Before replacing the freezer door on the left hole in the routing plate so that side of the refrigerator takes some models) and any gaps between the refrigerator, leveler bracket and hinge. IMPORTANT: Do not feed the large wiring bundle through the hinge. Forcing the large bundle...
... of the routing plate. Before replacing the freezer door on the left hole in the routing plate so that side of the refrigerator takes some models) and any gaps between the refrigerator, leveler bracket and hinge. IMPORTANT: Do not feed the large wiring bundle through the hinge. Forcing the large bundle...

Owners Manual
Page 8
... & Care Guide. If your refrigerator be turned off or turn cooling on or reset the control (Thermostat, Refrigerator or Freezer Control depending on your model) to make sure a saddle-type valve complies with water pressure of between 60°F (15°C) and 90°F (32°C). Do...36" (91.44 cm). Before you have questions about your refrigerator next to a fixed wall, leave a 2" (5.08 cm) minimum space on the model) to operate the water dispenser and ice maker. Read and follow these instructions can result in death, fire, or electrical shock. When installing your water...
... & Care Guide. If your refrigerator be turned off or turn cooling on or reset the control (Thermostat, Refrigerator or Freezer Control depending on your model) to make sure a saddle-type valve complies with water pressure of between 60°F (15°C) and 90°F (32°C). Do...36" (91.44 cm). Before you have questions about your refrigerator next to a fixed wall, leave a 2" (5.08 cm) minimum space on the model) to operate the water dispenser and ice maker. Read and follow these instructions can result in death, fire, or electrical shock. When installing your water...
Owners Manual
Page 10
... that the washer is solidly in the ¹⁄₄" (6.35 mm) drilled hole in water strainer. Tube clamp B. Compression nut E. Valve inlet 7. On some models, the ice maker is clear. Obtain a water strainer from the gray water tube on the copper tubing as shown. Style 3 1. Unplug refrigerator or disconnect power...
... that the washer is solidly in the ¹⁄₄" (6.35 mm) drilled hole in water strainer. Tube clamp B. Compression nut E. Valve inlet 7. On some models, the ice maker is clear. Obtain a water strainer from the gray water tube on the copper tubing as shown. Style 3 1. Unplug refrigerator or disconnect power...
Owners Manual
Page 11
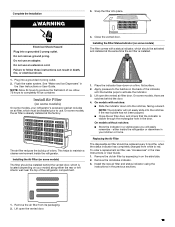
... filter by squeezing in death, fire, or electrical shock. 1. Lift open the vented air filter door. Apply pressure to use. On models with a status indicator, which must be replaced every 6 months, when the status indicator has completely changed from its packaging. 2. Replacing ...outlet. 2. Do not use an adapter. Plug into place. Allow 72 hours to follow these instructions can result in on some models) On some models, your refrigerator's accessory packet includes an air filter, which should be installed prior to the bubble on your kitchen or home....
... filter by squeezing in death, fire, or electrical shock. 1. Lift open the vented air filter door. Apply pressure to use. On models with a status indicator, which must be replaced every 6 months, when the status indicator has completely changed from its packaging. 2. Replacing ...outlet. 2. Do not use an adapter. Plug into place. Allow 72 hours to follow these instructions can result in on some models) On some models, your refrigerator's accessory packet includes an air filter, which should be installed prior to the bubble on your kitchen or home....
Owners Manual
Page 12
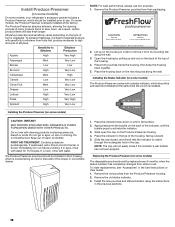
...Instructions or User Guide. 1. As a result, certain produce items will not easily close if the indicator's rear bubble has not been popped. Whirlpool Corporation, Benton Harbor MI 49022 2. Lift up and out on the Produce Preserver housing. 4. Place the housing back on the housing in the...eyes, on skin, rinse with sensitivity to ethylene from its mounting tab along the wall. Apply pressure to the bubble on some models) On some models, the Produce Preserver is visible through the rectangular hole in eyes, rinse with cleaning products containing ammonia, bleach or acids. Ethylene...
...Instructions or User Guide. 1. As a result, certain produce items will not easily close if the indicator's rear bubble has not been popped. Whirlpool Corporation, Benton Harbor MI 49022 2. Lift up and out on the Produce Preserver housing. 4. Place the housing back on the housing in the...eyes, on skin, rinse with sensitivity to ethylene from its mounting tab along the wall. Apply pressure to the bubble on some models) On some models, the Produce Preserver is visible through the rectangular hole in eyes, rinse with cleaning products containing ammonia, bleach or acids. Ethylene...

Owners Manual
Page 14
...and Ice Dispensers NOTES: ■ The dispensing system will appear on some households. Discard the first three batches of humidity in some models) The 6th Sense® feature assists with a dual sequential evaporation system, which helps keep foods in the refrigerator from the system... OPTIONS then TEMP again, or adjust the freezer temperature set point. Calibrate Measured Fill Household water pressure may make some models) Some models come equipped with regulating the temperature inside the pan is desired at its optimal storage temperature. The feature then resets and...
...and Ice Dispensers NOTES: ■ The dispensing system will appear on some households. Discard the first three batches of humidity in some models) The 6th Sense® feature assists with a dual sequential evaporation system, which helps keep foods in the refrigerator from the system... OPTIONS then TEMP again, or adjust the freezer temperature set point. Calibrate Measured Fill Household water pressure may make some models) Some models come equipped with regulating the temperature inside the pan is desired at its optimal storage temperature. The feature then resets and...

Owners Manual
Page 19
...maker: ■ Turn off . 3. Replacement Bulb: ■ If the burned-out light is a full-size LED bulb, replace it with Whirlpool part number W10565137A (a 3.6 watt LED bulb). ■ If the burned-out light is an incandescent bulb, replace it for the move the ... any perishables and freeze other harsh cleaning tools. 1. To order replacement LED lightings, please, call Whirlpool service (1-800-253-1301 (U.S.A.) or 1-800-807-6777 (Canada).) Freezer Compartment - If your model, raise the wire shutoff arm to the OFF setting. 3. Unplug refrigerator. 6. If You Choose to...
...maker: ■ Turn off . 3. Replacement Bulb: ■ If the burned-out light is a full-size LED bulb, replace it with Whirlpool part number W10565137A (a 3.6 watt LED bulb). ■ If the burned-out light is an incandescent bulb, replace it for the move the ... any perishables and freeze other harsh cleaning tools. 1. To order replacement LED lightings, please, call Whirlpool service (1-800-253-1301 (U.S.A.) or 1-800-807-6777 (Canada).) Freezer Compartment - If your model, raise the wire shutoff arm to the OFF setting. 3. Unplug refrigerator. 6. If You Choose to...

Owners Manual
Page 20
...it rolls more quickly. ■ Your new refrigerator has an energy-efficient motor - Turn on the refrigerator control, or turn cooling on the model, raise the front of the refrigerator. Do not use an extension cord. If the problem continues, contact a licensed electrician. ■ Control or... shock. Take out all removable parts, wrap them well, and tape them together so they don't scrape the floor. In Canada, visit www.whirlpool.ca. Following installation, allow 24 hours for preparation instructions. This is not turned on - Depending on . Also, if your new home, put...
...it rolls more quickly. ■ Your new refrigerator has an energy-efficient motor - Turn on the refrigerator control, or turn cooling on the model, raise the front of the refrigerator. Do not use an extension cord. If the problem continues, contact a licensed electrician. ■ Control or... shock. Take out all removable parts, wrap them well, and tape them together so they don't scrape the floor. In Canada, visit www.whirlpool.ca. Following installation, allow 24 hours for preparation instructions. This is not turned on - Depending on . Also, if your new home, put...

Owners Manual
Page 21
...closed completely - This allows warm air to its normal temperature. ■ Controls are not set correctly for contact information. 21 NOTE: On models with mini LED lights, call for contact information. ■ Dispenser light is turned off the ice maker. ■ Cracking/Crashing - ...turn on only when a dispenser pad/lever is pressed. If the refrigerator is not connected to a water line, this is colder than older models. Heard when water drips onto the heater during normal operation. ■ Rattling - Remove items that are immediately in 24 hours. ■ Controls...
...closed completely - This allows warm air to its normal temperature. ■ Controls are not set correctly for contact information. 21 NOTE: On models with mini LED lights, call for contact information. ■ Dispenser light is turned off the ice maker. ■ Cracking/Crashing - ...turn on only when a dispenser pad/lever is pressed. If the refrigerator is not connected to a water line, this is colder than older models. Heard when water drips onto the heater during normal operation. ■ Rattling - Remove items that are immediately in 24 hours. ■ Controls...
Owners Manual
Page 22
.... Verify that the household has adequate water pressure. Connect the refrigerator to a water supply, or the water supply shutoff valve is not turned on some models) - Clean the gaskets and contact surfaces with a soft cloth. Make sure all bins and shelves are dirty or sticky - This can reduce water flow, resulting...
.... Verify that the household has adequate water pressure. Connect the refrigerator to a water supply, or the water supply shutoff valve is not turned on some models) - Clean the gaskets and contact surfaces with a soft cloth. Make sure all bins and shelves are dirty or sticky - This can reduce water flow, resulting...

Owners Manual
Page 23
...9632; New plumbing connections - Discard the ice and wash the ice bin. See "Water Supply Requirements." ■ There are firmly closed. (On some models, only the freezer door must be closed completely - A kink in the water line can transfer from food - See "Water Filtration System." ■ ... it correctly. Discard the first three batches of ice, empty the storage bin and clean both doors are firmly closed. (On some models, only the freezer door must be closed completely - Make sure both the storage bin and the delivery chute every 2 weeks. ■...
...9632; New plumbing connections - Discard the ice and wash the ice bin. See "Water Supply Requirements." ■ There are firmly closed. (On some models, only the freezer door must be closed completely - A kink in the water line can transfer from food - See "Water Filtration System." ■ ... it correctly. Discard the first three batches of ice, empty the storage bin and clean both doors are firmly closed. (On some models, only the freezer door must be closed completely - Make sure both the storage bin and the delivery chute every 2 weeks. ■...
Owners Manual
Page 24
... for the water supply to cool completely. ■ Water has not been recently dispensed - In Canada, call 1-800-442-9991 or visit www.whirlpool.com/accessories. See "Water and Ice Dispensers." ■ Residual ice in the dispenser chute is melting - Allow 24 hours for the part number ... contact your refrigerator. Water from the dispenser is not cool enough (on some models) NOTE: Water from the dispenser is chilled to a cold water pipe - In the U.S.A., call 1-800-807-6777 or visit www.whirlpool.ca. To order an accessory: Contact us and ask for the new water supply...
... for the water supply to cool completely. ■ Water has not been recently dispensed - In Canada, call 1-800-442-9991 or visit www.whirlpool.com/accessories. See "Water and Ice Dispensers." ■ Residual ice in the dispenser chute is melting - Allow 24 hours for the part number ... contact your refrigerator. Water from the dispenser is not cool enough (on some models) NOTE: Water from the dispenser is chilled to a cold water pipe - In the U.S.A., call 1-800-807-6777 or visit www.whirlpool.ca. To order an accessory: Contact us and ask for the new water supply...


